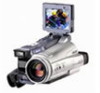
Operating Instructions
Page 2
... FULLY INSERT. "Memory Stick" This device complies with Part 15 of rechargeable batteries, call toll free 1-800-8228837..., and (2) this Handycam is loaded with this Sony Handycam. For customers in the literature accompanying the ...digital apparatus complies with superior picture and sound quality. With your used in this device must accept any interference received, including interference that may be producing home video that you can enjoy for years to the collection and recycling location nearest you. As the laser beam used rechargeable batteries to come. DCR-IP220...
... FULLY INSERT. "Memory Stick" This device complies with Part 15 of rechargeable batteries, call toll free 1-800-8228837..., and (2) this Handycam is loaded with this Sony Handycam. For customers in the literature accompanying the ...digital apparatus complies with superior picture and sound quality. With your used in this device must accept any interference received, including interference that may be producing home video that you can enjoy for years to the collection and recycling location nearest you. As the laser beam used rechargeable batteries to come. DCR-IP220...
Operating Instructions
Page 3
..., the following measures: - Reorient or relocate the receiving antenna. - However, there is for a digital device pursuant to Subpart B of Part 15 of FCC Rules. DCR-IP220 only IMPORTANT NOTE To comply with Part 15 of Conformity Trade Name: SONY Model No.: DCR-IP220 Responsible Party: Sony Electronics Inc. If this equipment. This equipment generates, uses, and can be made...
..., the following measures: - Reorient or relocate the receiving antenna. - However, there is for a digital device pursuant to Subpart B of Part 15 of FCC Rules. DCR-IP220 only IMPORTANT NOTE To comply with Part 15 of Conformity Trade Name: SONY Model No.: DCR-IP220 Responsible Party: Sony Electronics Inc. If this equipment. This equipment generates, uses, and can be made...
Operating Instructions
Page 7
... computer using the USB cable (For Macintosh users 172 Viewing images recorded on a "Memory Stick" on your camcorder abroad .......... 200 Maintenance information and precautions 201 Specifications 208 Quick Reference Identifying the parts and controls .... 210 Index 219 Using the Network function (DCR-IP220 only) Accessing the network 175 For the details, refer to correct...
... computer using the USB cable (For Macintosh users 172 Viewing images recorded on a "Memory Stick" on your camcorder abroad .......... 200 Maintenance information and precautions 201 Specifications 208 Quick Reference Identifying the parts and controls .... 210 Index 219 Using the Network function (DCR-IP220 only) Accessing the network 175 For the details, refer to correct...

Operating Instructions
Page 19
...supplied) Playing time on LCD screen 140 Playing time with the metal parts of the DC plug of the ambient temperature. Recording time Battery pack NP-FF70 (supplied) Recording with the viewfinder Continuous Typical* 130 70 Recording with the battery pack. - This may be shorter. Getting Started Step... on /off Continuous Typical* Continuous Typical* 115 60 130 70 Approximate minutes when you use a fully charged battery * Approximate recording time when you use the AC power adaptor Place the AC power adaptor near the wall outlet. If any trouble occurs with this...
...supplied) Playing time on LCD screen 140 Playing time with the metal parts of the DC plug of the ambient temperature. Recording time Battery pack NP-FF70 (supplied) Recording with the viewfinder Continuous Typical* 130 70 Recording with the battery pack. - This may be shorter. Getting Started Step... on /off Continuous Typical* Continuous Typical* 115 60 130 70 Approximate minutes when you use a fully charged battery * Approximate recording time when you use the AC power adaptor Place the AC power adaptor near the wall outlet. If any trouble occurs with this...

Operating Instructions
Page 26
Therefore, be sure not to: •Stick on the label Labels may cause a malfunction of the cassette other than the label position [a]. [a] 26 Step 3 Inserting a cassette Note on any labels other than the one supplied. •Stick the label onto any part of your camcorder.
Therefore, be sure not to: •Stick on the label Labels may cause a malfunction of the cassette other than the label position [a]. [a] 26 Step 3 Inserting a cassette Note on any labels other than the one supplied. •Stick the label onto any part of your camcorder.

Operating Instructions
Page 73
Stop playing back. - You cannot move the part you pressed to ZOOM You can record images on a "Memory Stick" (p. 121), or on a VCR using your camcorder as a player. •You cannot record moving pictures on a "Memory Stick" on your camcorder while you are not output through the i.LINK (MICROMV ... - Tape PB ZOOM Notes •You cannot process externally input scenes using the PB ZOOM function with your camcorder. •You cannot record images on a tape on your camcorder while you are processing the picture using the tape PB ZOOM function. Insert a "Memory Stick." Images...
Stop playing back. - You cannot move the part you pressed to ZOOM You can record images on a "Memory Stick" (p. 121), or on a VCR using your camcorder as a player. •You cannot record moving pictures on a "Memory Stick" on your camcorder while you are not output through the i.LINK (MICROMV ... - Tape PB ZOOM Notes •You cannot process externally input scenes using the PB ZOOM function with your camcorder. •You cannot record images on a tape on your camcorder while you are processing the picture using the tape PB ZOOM function. Insert a "Memory Stick." Images...

Operating Instructions
Page 100
... file name appears on the display of your camcorder. Under direct sunlight - Using a "Memory Stick" Terminal Write-protect tab Labeling position 100 •You cannot record or erase images when the write-protect tab on the "Memory Stick" is flashing - Using a "Memory Stick" - You can exchange image data with other equipment... the write protect tab may be different depending on the model. •We recommend backing up important data on a "Memory Stick" supplied with the metal parts of your computer. •Image data may be damaged in locations that are: -
... file name appears on the display of your camcorder. Under direct sunlight - Using a "Memory Stick" Terminal Write-protect tab Labeling position 100 •You cannot record or erase images when the write-protect tab on the "Memory Stick" is flashing - Using a "Memory Stick" - You can exchange image data with other equipment... the write protect tab may be different depending on the model. •We recommend backing up important data on a "Memory Stick" supplied with the metal parts of your computer. •Image data may be damaged in locations that are: -

Operating Instructions
Page 126
... image to a tape Before operation •Insert a tape for recording into your camcorder. •Insert a "Memory Stick" recorded with still images into your camcorder. (1) Set the POWER switch to CAMERA. (2) Press FN and go to superimpose. - : To see the previous image + : To see the next image (5) Press a desired ... key (only blue background portion) to extract a still image and superimpose it on an image - The last image recorded on the "Memory Stick" appears on the right lower part of the LCD screen to select the still image which you want to PAGE2. (3) Press MEM MIX. Superimposing a ...
... image to a tape Before operation •Insert a tape for recording into your camcorder. •Insert a "Memory Stick" recorded with still images into your camcorder. (1) Set the POWER switch to CAMERA. (2) Press FN and go to superimpose. - : To see the previous image + : To see the next image (5) Press a desired ... key (only blue background portion) to extract a still image and superimpose it on an image - The last image recorded on the "Memory Stick" appears on the right lower part of the LCD screen to select the still image which you want to PAGE2. (3) Press MEM MIX. Superimposing a ...

Operating Instructions
Page 143
...times up to PAGE2. (2) Press PB ZOOM. You can copy the desired part of the enlarged still image to enlarge in the frame on the PB ZOOM screen. "W" side: Decrease the zoom ratio. "Memory Stick" Operations Enlarging still images recorded on a "Memory Stick." Memory PB ZOOM You can select the image ...from the enlarged still image. You can enlarge still images recorded on a "Memory Stick" - Before operation Insert a "Memory Stick" into your camcorder. (1) In the memory playback mode, press FN and go to five times ...
...times up to PAGE2. (2) Press PB ZOOM. You can copy the desired part of the enlarged still image to enlarge in the frame on the PB ZOOM screen. "W" side: Decrease the zoom ratio. "Memory Stick" Operations Enlarging still images recorded on a "Memory Stick." Memory PB ZOOM You can select the image ...from the enlarged still image. You can enlarge still images recorded on a "Memory Stick" - Before operation Insert a "Memory Stick" into your camcorder. (1) In the memory playback mode, press FN and go to five times ...

Operating Instructions
Page 144
You cannot move the part you press DISPLAY/TOUCH PANEL, the frame on the "Memory Stick" Press PHOTO to record the image processed by PB ZOOM. (Images are not output through the i.LINK (MICROMV Interface). In the Memory PB ZOOM mode If you pressed to ...ZOOM You can change the zoom ratio using the zoom ring. 144 To record an image processed by PB ZOOM on the Memory PB ZOOM screen disappears. Edge of an enlarged image The edge of an enlarged image cannot...
You cannot move the part you press DISPLAY/TOUCH PANEL, the frame on the "Memory Stick" Press PHOTO to record the image processed by PB ZOOM. (Images are not output through the i.LINK (MICROMV Interface). In the Memory PB ZOOM mode If you pressed to ...ZOOM You can change the zoom ratio using the zoom ring. 144 To record an image processed by PB ZOOM on the Memory PB ZOOM screen disappears. Edge of an enlarged image The edge of an enlarged image cannot...

Operating Instructions
Page 176
Do not cover the part shown in NETWORK mode are displayed on the grip belt. The operation buttons needed in the illustration or radio waves may be blocked. 176 Press ...
Do not cover the part shown in NETWORK mode are displayed on the grip belt. The operation buttons needed in the illustration or radio waves may be blocked. 176 Press ...

Operating Instructions
Page 206
...not expose the battery pack to any mechanical shock. •Do not disassemble nor modify the battery pack. •Attach the battery pack to the video equipment securely. •Charging while some capacity remains does not affect the original battery capacity. 206 Dusty or dirty - In hot or humid locations... camcorder in an optimum state for a long time. Never pull the power cord itself. •Do not operate the unit with the metal parts of the lens clean with the battery terminals. •Keep the battery pack away from fire. •Never expose the battery pack to temperatures...
...not expose the battery pack to any mechanical shock. •Do not disassemble nor modify the battery pack. •Attach the battery pack to the video equipment securely. •Charging while some capacity remains does not affect the original battery capacity. 206 Dusty or dirty - In hot or humid locations... camcorder in an optimum state for a long time. Never pull the power cord itself. •Do not operate the unit with the metal parts of the lens clean with the battery terminals. •Keep the battery pack away from fire. •Never expose the battery pack to temperatures...

Operating Instructions
Page 209
...;F) Storage temperature -20°C to +60°C (-4°F to +140°F) Dimensions (approx.) 125 × 39 × 62 mm (5 × 1 9/16 × 2 1/2 in.) (w/h/d) excluding projecting parts Mass (approx.) 280 g (9.8 oz) excluding power cord Battery pack Maximum output voltage DC 8.4 V Output voltage DC 7.2 V Capacity 9.6 Wh (1 350 mAh) Operating temperature 0°C to 40...
...;F) Storage temperature -20°C to +60°C (-4°F to +140°F) Dimensions (approx.) 125 × 39 × 62 mm (5 × 1 9/16 × 2 1/2 in.) (w/h/d) excluding projecting parts Mass (approx.) 280 g (9.8 oz) excluding power cord Battery pack Maximum output voltage DC 8.4 V Output voltage DC 7.2 V Capacity 9.6 Wh (1 350 mAh) Operating temperature 0°C to 40...

Operating Instructions
Page 210
- Identifying the parts and controls Camcorder 1 5 2 3 4 1 Lens cap (p. 29) 2 FOCUS/ZOOM switch (p. 34, 67) 3 BACK LIGHT button (p. 37) 4 Viewfinder (p. 32) 6 7 8 5 LCD screen/Touch panel (p. 9, 27, 103) 6 START/STOP button (p. 29, 130) 7 Speaker 8 Eyecup 210 Quick Reference -
- Identifying the parts and controls Camcorder 1 5 2 3 4 1 Lens cap (p. 29) 2 FOCUS/ZOOM switch (p. 34, 67) 3 BACK LIGHT button (p. 37) 4 Viewfinder (p. 32) 6 7 8 5 LCD screen/Touch panel (p. 9, 27, 103) 6 START/STOP button (p. 29, 130) 7 Speaker 8 Eyecup 210 Quick Reference -

Operating Instructions
Page 211
qf (USB) jack (p. 151) qg (LANC) jack (blue) LANC stands for controlling the tape transport of video equipment and other peripherals connected to the default. qj i.LINK (MICROMV Interface) (p. 82, 86, 124, 135, 198) The i.LINK (MICROMV Interface) is silent...qa qs qj 9 LCD BACKLIGHT switch (p. 31) q; qh i (headphones) jack (green) When you press RESET, all the settings (DCR-IP220: except the NETWORK mode settings) including the date and time return to the video equipment. Quick Reference 211 The control jack is used for Local Application Control Bus System. Identifying the...
qf (USB) jack (p. 151) qg (LANC) jack (blue) LANC stands for controlling the tape transport of video equipment and other peripherals connected to the default. qj i.LINK (MICROMV Interface) (p. 82, 86, 124, 135, 198) The i.LINK (MICROMV Interface) is silent...qa qs qj 9 LCD BACKLIGHT switch (p. 31) q; qh i (headphones) jack (green) When you press RESET, all the settings (DCR-IP220: except the NETWORK mode settings) including the date and time return to the video equipment. Quick Reference 211 The control jack is used for Local Application Control Bus System. Identifying the...

Operating Instructions
Page 212
Infrared rays (NightShot Light) emitter (p. 37) wa Remote sensor ws Camera recording lamp (p. 29) wk wl wd POWER switch (p. 8) wf CHG lamp (p. 18) wg CAMERA lamp (p. 8) wh MEMORY/NETWORK lamp (DCR-IP220) or MEMORY lamp (DCR-IP210) (p. 8) wj VCR lamp (p. 8) wk (Bluetooth) lamp (DCR-IP220 only) (p. 175) wl HOLOGRAM AF emitter (p. 117) 212 wa ws qk ZOOM lever (p. 33) ql PHOTO button (p. 47, 111) w; Identifying the parts and controls qk ql wf (CHG)OFF ON MODE wd POWER wg CAMERA VCR MEMORY/NETWORK wh wj w;
Infrared rays (NightShot Light) emitter (p. 37) wa Remote sensor ws Camera recording lamp (p. 29) wk wl wd POWER switch (p. 8) wf CHG lamp (p. 18) wg CAMERA lamp (p. 8) wh MEMORY/NETWORK lamp (DCR-IP220) or MEMORY lamp (DCR-IP210) (p. 8) wj VCR lamp (p. 8) wk (Bluetooth) lamp (DCR-IP220 only) (p. 175) wl HOLOGRAM AF emitter (p. 117) 212 wa ws qk ZOOM lever (p. 33) ql PHOTO button (p. 47, 111) w; Identifying the parts and controls qk ql wf (CHG)OFF ON MODE wd POWER wg CAMERA VCR MEMORY/NETWORK wh wj w;

Operating Instructions
Page 213
ed ef eg es OPEN/Z EJECT switch (p. 25) ed Cassette lid (p. 25) ef Stylus (DCR-IP220 only) (p. 176) eg Stylus holder (DCR-IP220 only) (p. 176) 1 2 3 4 Quick Reference 213 Identifying the parts and controls es e; ea e; (flash) button (p. 49, 116) ea Grip belt Fastening the grip belt Fasten the grip belt firmly.
ed ef eg es OPEN/Z EJECT switch (p. 25) ed Cassette lid (p. 25) ef Stylus (DCR-IP220 only) (p. 176) eg Stylus holder (DCR-IP220 only) (p. 176) 1 2 3 4 Quick Reference 213 Identifying the parts and controls es e; ea e; (flash) button (p. 49, 116) ea Grip belt Fastening the grip belt Fasten the grip belt firmly.

Operating Instructions
Page 214
The lens for video camera and offers a quality as the Carl Zeiss lens. The value number indicates the amount of light of Modulation Transfer Function. It adopts the MTF# measurement system for your camcorder was developed jointly by Carl Zeiss, in Germany, and Sony Corporation. ek ra eh Flash ...(p. 49, 116) ej Lens ek Focus ring/Zoom ring (p. 34, 67) el Microphone r; Identifying the parts and controls eh el ej r; DC IN jack ra A/V ID-2 jack (p. 46...
The lens for video camera and offers a quality as the Carl Zeiss lens. The value number indicates the amount of light of Modulation Transfer Function. It adopts the MTF# measurement system for your camcorder was developed jointly by Carl Zeiss, in Germany, and Sony Corporation. ek ra eh Flash ...(p. 49, 116) ej Lens ek Focus ring/Zoom ring (p. 34, 67) el Microphone r; Identifying the parts and controls eh el ej r; DC IN jack ra A/V ID-2 jack (p. 46...

Operating Instructions
Page 215
Otherwise, you cannot attach the tripod securely and the screw may damage your camcorder. Identifying the parts and controls rg rh rj rs rk rl rd rf rs "Memory Stick" slot (p. 102) rd OPEN switch (p. 17) rf Viewfinder lens adjustment lever (p. 32) rg Battery compartment lid rh Tripod receptacle Make sure that the length of the tripod screw is less than 5.5 mm (7/32 inch). rj FADER button (p. 57) rk SUPER NS/COLOR SLOW S button (p. 38) rl NIGHTSHOT/NIGHTFRAMING switch (p. 37, 119) Quick Reference 215
Otherwise, you cannot attach the tripod securely and the screw may damage your camcorder. Identifying the parts and controls rg rh rj rs rk rl rd rf rs "Memory Stick" slot (p. 102) rd OPEN switch (p. 17) rf Viewfinder lens adjustment lever (p. 32) rg Battery compartment lid rh Tripod receptacle Make sure that the length of the tripod screw is less than 5.5 mm (7/32 inch). rj FADER button (p. 57) rk SUPER NS/COLOR SLOW S button (p. 38) rl NIGHTSHOT/NIGHTFRAMING switch (p. 37, 119) Quick Reference 215

Operating Instructions
Page 216
Identifying the parts and controls Remote Commander The buttons that have the same name on the Remote Commander as on your camcorder function identically to the buttons on ... the remote sensor to control your camcorder after turning on your camcorder. 7 DATA CODE button (p. 43) 8 START/STOP button (p. 29, 130) 9 Power zoom button (p. 33) 0 Video control buttons (p. 42, 45) qa X/x/C/c/EXECUTE buttons 216
Identifying the parts and controls Remote Commander The buttons that have the same name on the Remote Commander as on your camcorder function identically to the buttons on ... the remote sensor to control your camcorder after turning on your camcorder. 7 DATA CODE button (p. 43) 8 START/STOP button (p. 29, 130) 9 Power zoom button (p. 33) 0 Video control buttons (p. 42, 45) qa X/x/C/c/EXECUTE buttons 216


