Operating Instructions
Page 6
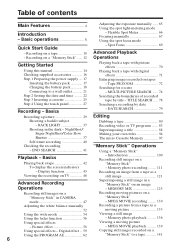
... - Introduction 100 Recording still images on tapes - Digital effect ... 59 Copying still images recorded on a "Memory Stick" in CAMERA "Memory Stick" mode 47 - NightShot/ Superimposing a title 88 Super NightShot/Color Slow Making your own titles 94 Shutter 37 The micro Cassette Memory 97 Self-timer recording 40 Checking the recording "Memory Stick" Operations - BACK LIGHT 37 Recording video or TV...
... - Introduction 100 Recording still images on tapes - Digital effect ... 59 Copying still images recorded on a "Memory Stick" in CAMERA "Memory Stick" mode 47 - NightShot/ Superimposing a title 88 Super NightShot/Color Slow Making your own titles 94 Shutter 37 The micro Cassette Memory 97 Self-timer recording 40 Checking the recording "Memory Stick" Operations - BACK LIGHT 37 Recording video or TV...
Operating Instructions
Page 7
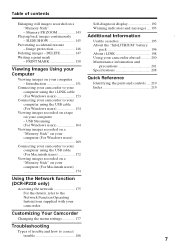
... (For Windows users 164 Viewing images recorded on a "Memory Stick" on your computer (For Windows users 169 Connecting your camcorder to your computer using the USB cable (For Windows users 154 Viewing images recorded on a tape on your camcorder. Customizing Your Camcorder... Usable cassettes 195 About the "InfoLITHIUM" battery pack 196 About i.LINK 198 Using your camcorder abroad .......... 200 Maintenance information and precautions 201 Specifications 208 Quick Reference Identifying the parts and controls .... 210 Index 219 Using the Network function (DCR-IP220 only)...
... (For Windows users 164 Viewing images recorded on a "Memory Stick" on your computer (For Windows users 169 Connecting your camcorder to your computer using the USB cable (For Windows users 154 Viewing images recorded on a tape on your camcorder. Customizing Your Camcorder... Usable cassettes 195 About the "InfoLITHIUM" battery pack 196 About i.LINK 198 Using your camcorder abroad .......... 200 Maintenance information and precautions 201 Specifications 208 Quick Reference Identifying the parts and controls .... 210 Index 219 Using the Network function (DCR-IP220 only)...
Operating Instructions
Page 10
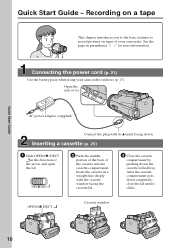
... record pictures on tapes of your camcorder outdoors (p. 17). OPEN/ Z EJECT 2 Push the middle portion of the back of the arrow and open the lid. Quick Start Guide Quick Start Guide - Connecting the power cord (p. 21) Use the battery pack when using your camcorder. See the page in the direction of the cassette...
... record pictures on tapes of your camcorder outdoors (p. 17). OPEN/ Z EJECT 2 Push the middle portion of the back of the arrow and open the lid. Quick Start Guide Quick Start Guide - Connecting the power cord (p. 21) Use the battery pack when using your camcorder. See the page in the direction of the cassette...
Operating Instructions
Page 14
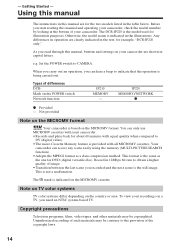
...). Unauthorized recording of such materials may be contrary to DV (digital video). •The micro Cassette Memory feature is being carried out. The DCR-IP220 is the still image. Your camcorder can only use MICROMV cassettes with equal quality when compared to the provision of your camcorder are shown in capital letters. Copyright precautions Television programs, films, video tapes...
...). Unauthorized recording of such materials may be contrary to DV (digital video). •The micro Cassette Memory feature is being carried out. The DCR-IP220 is the still image. Your camcorder can only use MICROMV cassettes with equal quality when compared to the provision of your camcorder are shown in capital letters. Copyright precautions Television programs, films, video tapes...

Operating Instructions
Page 30
...LCD screen facing inwards. (3) Eject the cassette. (4) Remove the power source. However, they are not displayed during recording. Recording data The recording data (date/time or various settings when recorded) are recorded automatically onto the tape. If you leave your camcorder. This ...is not inserted. However, your camcorder does not turn off your camcorder in microphone during recording. Notes...
...LCD screen facing inwards. (3) Eject the cassette. (4) Remove the power source. However, they are not displayed during recording. Recording data The recording data (date/time or various settings when recorded) are recorded automatically onto the tape. If you leave your camcorder. This ...is not inserted. However, your camcorder does not turn off your camcorder in microphone during recording. Notes...

Operating Instructions
Page 36
.../time or various settings when recorded) are recorded automatically onto the tape. Recording a picture Indicators displayed in the recording mode The indicators are not recorded on the conditions in which you are recording. FN button Press this operation (p. 43). 36 Date The date is displayed about five seconds after you insert a cassette and record or play back for the...
.../time or various settings when recorded) are recorded automatically onto the tape. Recording a picture Indicators displayed in the recording mode The indicators are not recorded on the conditions in which you are recording. FN button Press this operation (p. 43). 36 Date The date is displayed about five seconds after you insert a cassette and record or play back for the...

Operating Instructions
Page 76
...correctly. However, this has no effect on the Remote Commander The MULTI SCH screen appears. If the tape has a blank portion in the beginning of the tape or between recorded portions The multi-picture search function may not work . 76 To end the multi-picture search function Press...When you press MULTI SRCH on the recorded images. This is not a malfunction. •Noise may not be displayed depending on the Remote Commander. Searching for in one scanning A maximum of the tape. The number of thumbnails stored in one cassette About 400 thumbnails can be stored. While...
...correctly. However, this has no effect on the Remote Commander The MULTI SCH screen appears. If the tape has a blank portion in the beginning of the tape or between recorded portions The multi-picture search function may not work . 76 To end the multi-picture search function Press...When you press MULTI SRCH on the recorded images. This is not a malfunction. •Noise may not be displayed depending on the Remote Commander. Searching for in one scanning A maximum of the tape. The number of thumbnails stored in one cassette About 400 thumbnails can be stored. While...

Operating Instructions
Page 77
... images. When you have erased all the micro Cassette Memory of the tape (p. 99) To select the thumbnail with the Remote Commander Press X/x/C/c on the searched portion of the 11 thumbnails may not be scanned. Digital effect Some of the tape. • When scanning a tape recorded midway over previous recordings • When you select < or , during scanning...
... images. When you have erased all the micro Cassette Memory of the tape (p. 99) To select the thumbnail with the Remote Commander Press X/x/C/c on the searched portion of the 11 thumbnails may not be scanned. Digital effect Some of the tape. • When scanning a tape recorded midway over previous recordings • When you select < or , during scanning...

Operating Instructions
Page 79
.... Searching the boundaries starts, and playback automatically starts at each recording date. micro Cassette Memory The tape cassette memory can hold 20 recording date data. 79 Even if you do not press EXECUTE, searching the boundaries starts automatically in the beginning of the tape or between recorded portions The date search function may not work correctly. If...
.... Searching the boundaries starts, and playback automatically starts at each recording date. micro Cassette Memory The tape cassette memory can hold 20 recording date data. 79 Even if you do not press EXECUTE, searching the boundaries starts automatically in the beginning of the tape or between recorded portions The date search function may not work correctly. If...

Operating Instructions
Page 82
... in digital form for high-quality editing. (You cannot connect your camcorder to a DV product.) You cannot dub the titles, displayed indicators, the contents of micro Cassette Memory, or letters on the "Memory Stick" index screen. (1) Insert a blank tape (or a tape you have finished dubbing a tape Stop recording on the VCR, and stop playback on other video...
... in digital form for high-quality editing. (You cannot connect your camcorder to a DV product.) You cannot dub the titles, displayed indicators, the contents of micro Cassette Memory, or letters on the "Memory Stick" index screen. (1) Insert a blank tape (or a tape you have finished dubbing a tape Stop recording on the VCR, and stop playback on other video...

Operating Instructions
Page 95
... To return to FN Press EXIT. We recommend setting the POWER switch to enter characters in "Superimposing a title on starting a recording" on tape Follow the procedure in the standby mode while a cassette is erased. If you are entering title characters. The last character is in your camcorder The power automatically goes off while...
... To return to FN Press EXIT. We recommend setting the POWER switch to enter characters in "Superimposing a title on starting a recording" on tape Follow the procedure in the standby mode while a cassette is erased. If you are entering title characters. The last character is in your camcorder The power automatically goes off while...

Operating Instructions
Page 97
... " " is indicated by TAPE TITLE in the menu settings (Cassette label). [c] The first-recorded date in this cassette. [e] The recorded area is flashing Eject the cassette and insert it again. Recorded areas A blank portion between recorded area is still displayed, the micro Cassette Memory may be corrupted. Replace the cassette with the POWER switch set to CAMERA, or when you set...
... " " is indicated by TAPE TITLE in the menu settings (Cassette label). [c] The first-recorded date in this cassette. [e] The recorded area is flashing Eject the cassette and insert it again. Recorded areas A blank portion between recorded area is still displayed, the micro Cassette Memory may be corrupted. Replace the cassette with the POWER switch set to CAMERA, or when you set...

Operating Instructions
Page 98
...procedure as steps 5 and 6 to move the cursor for the next character. TAPE TITLE EXIT [ GRADUATION ABC DEF T t GH I JKL MNO 123 678 45 90 PQR TUV WXY ' . , SET S Z /- The micro Cassette Memory Labeling a cassette The label can consist of up to 16 characters and is stored in the... Press t to complete the label. (7) Press SET. The label is stored in cassette memory. (1) Insert the cassette you want to label. (2) Set the POWER switch to CAMERA or VCR. (3) Press FN to display PAGE1. (4) Press MENU, then select TAPE TITLE in in memory. 3 FN 4 MENU CM SET EXIT TITLEERASE TITLE DSPL...
...procedure as steps 5 and 6 to move the cursor for the next character. TAPE TITLE EXIT [ GRADUATION ABC DEF T t GH I JKL MNO 123 678 45 90 PQR TUV WXY ' . , SET S Z /- The micro Cassette Memory Labeling a cassette The label can consist of up to 16 characters and is stored in the... Press t to complete the label. (7) Press SET. The label is stored in cassette memory. (1) Insert the cassette you want to label. (2) Set the POWER switch to CAMERA or VCR. (3) Press FN to display PAGE1. (4) Press MENU, then select TAPE TITLE in in memory. 3 FN 4 MENU CM SET EXIT TITLEERASE TITLE DSPL...

Operating Instructions
Page 99
... off if you enter characters in the menu settings, then press EXEC (p. 183). (4) Press r/R to lock You cannot label the tape. If you set the write-protect tab of the tape to select OK, then press EXEC. After that, repeat the procedure from step 3. The power does not go off . To erase... number This item cannot be deleted. 99 To erase the label you have made Insert the cassette to change the label you delete all the data in micro Cassette Memory at once. (1) Set the POWER switch to CAMERA or VCR. (2) Press FN to display PAGE1. (3) Press MENU, then select ERASE ALL in in...
... off if you enter characters in the menu settings, then press EXEC (p. 183). (4) Press r/R to lock You cannot label the tape. If you set the write-protect tab of the tape to select OK, then press EXEC. After that, repeat the procedure from step 3. The power does not go off . To erase... number This item cannot be deleted. 99 To erase the label you have made Insert the cassette to change the label you delete all the data in micro Cassette Memory at once. (1) Set the POWER switch to CAMERA or VCR. (2) Press FN to display PAGE1. (3) Press MENU, then select ERASE ALL in in...

Operating Instructions
Page 131
... settings cannot be recorded. During recording on a "Memory Stick" Do not eject the cassette from the i.LINK (MICROMV Interface). Digital zoom - Fader - Super NightShot - Otherwise, the charging sound of view is set to MEMORY The following functions do not work: - While ejecting the tape, sound is recorded in CAMERA mode. 131 MPEG MOVIE recorded with the angle of...
... settings cannot be recorded. During recording on a "Memory Stick" Do not eject the cassette from the i.LINK (MICROMV Interface). Digital zoom - Fader - Super NightShot - Otherwise, the charging sound of view is set to MEMORY The following functions do not work: - While ejecting the tape, sound is recorded in CAMERA mode. 131 MPEG MOVIE recorded with the angle of...

Operating Instructions
Page 164
... to load. (2) Connect the AC power adaptor, and insert a cassette into your camcorder. (3) Set the POWER switch to view images recorded on a tape on the screen. 164 The "PIXELA ImageMixer Ver.1.0 for Sony". USB Streaming (For Windows users) Capturing images with "PIXELA ImageMixer Ver.1.0 for Sony" You need to install the USB driver and PIXELA...
... to load. (2) Connect the AC power adaptor, and insert a cassette into your camcorder. (3) Set the POWER switch to view images recorded on a tape on the screen. 164 The "PIXELA ImageMixer Ver.1.0 for Sony". USB Streaming (For Windows users) Capturing images with "PIXELA ImageMixer Ver.1.0 for Sony" You need to install the USB driver and PIXELA...

Operating Instructions
Page 167
...USB connection The USB driver has been registered incorrectly as your computer was completed. Digital effect - This is in the standby mode with the USB connection, the following... up and down. - Some images are not displayed correctly. •When your computer with a cassette inserted, it turns off automatically after quitting the application: - When operating the following the procedure on...installation of your camcorder. Viewing Images Using your Computer Viewing images recorded on a tape on your computer. USB Streaming (For Windows users) Notes •When you capture a...
...USB connection The USB driver has been registered incorrectly as your computer was completed. Digital effect - This is in the standby mode with the USB connection, the following... up and down. - Some images are not displayed correctly. •When your computer with a cassette inserted, it turns off automatically after quitting the application: - When operating the following the procedure on...installation of your camcorder. Viewing Images Using your Computer Viewing images recorded on a tape on your computer. USB Streaming (For Windows users) Notes •When you capture a...

Operating Instructions
Page 183
ERASE ALL -- CAMERA VCR VCR CAMERA VCR CAMERA VCR CAMERA VCR To display the remaining tape bar: •For about eight seconds after a cassette is inserted and your camcorder calculates the remaining amount of tape • For about eight seconds after the playback button is pressed in VCR mode •...in CAMERA mode • When setting the POWER switch to VCR To not display the cassette information of the tape This is pressed to display the title To label a cassette (p. 98) To erase all the data in cassette memory (p. 99) To display the cassette information of the tape. ...
ERASE ALL -- CAMERA VCR VCR CAMERA VCR CAMERA VCR CAMERA VCR To display the remaining tape bar: •For about eight seconds after a cassette is inserted and your camcorder calculates the remaining amount of tape • For about eight seconds after the playback button is pressed in VCR mode •...in CAMERA mode • When setting the POWER switch to VCR To not display the cassette information of the tape This is pressed to display the title To label a cassette (p. 98) To erase all the data in cassette memory (p. 99) To display the cassette information of the tape. ...
Operating Instructions
Page 186
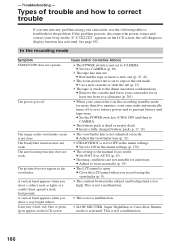
... Close the LCD panel when you run out. The picture does not appear in the recording standby mode for more than five minutes, your camcorder is not adjusted correctly. c Set ...problem. c Adjust the viewfinder lens (p. 32). • STEADYSHOT is set to CAMERA (p. 29). • The tape has run into any problem using the viewfinder (p. 9). • The contrast between...battery pack (p. 17, 18). • The viewfinder lens is in the viewfinder. c Remove the cassette and leave your Sony dealer. c Set FOCUS to AUTO (p. 67). • Shooting conditions are not suitable for at ...
... Close the LCD panel when you run out. The picture does not appear in the recording standby mode for more than five minutes, your camcorder is not adjusted correctly. c Set ...problem. c Adjust the viewfinder lens (p. 32). • STEADYSHOT is set to CAMERA (p. 29). • The tape has run into any problem using the viewfinder (p. 9). • The contrast between...battery pack (p. 17, 18). • The viewfinder lens is in the viewfinder. c Remove the cassette and leave your Sony dealer. c Set FOCUS to AUTO (p. 67). • Shooting conditions are not suitable for at ...

Operating Instructions
Page 187
Types of the tape or between recorded portion. c Insert a cassette or press the LCD screen. unnatural colors. c Set it off (p. 37). A black band appears when recording a TV screen or computer ...switch to OFF in the menu settings (p. 179). The picture is set to CAMERA without a cassette inserted, your camcorder automatically starts the demonstration. In the playback mode Symptom Cause .... • BEEP is recorded in the menu settings. c Set it off (p. 37). • The backlight function is not clear or does not appear. • The video head may be dirty....
Types of the tape or between recorded portion. c Insert a cassette or press the LCD screen. unnatural colors. c Set it off (p. 37). A black band appears when recording a TV screen or computer ...switch to OFF in the menu settings (p. 179). The picture is set to CAMERA without a cassette inserted, your camcorder automatically starts the demonstration. In the playback mode Symptom Cause .... • BEEP is recorded in the menu settings. c Set it off (p. 37). • The backlight function is not clear or does not appear. • The video head may be dirty....


