
Camera Operations Guide
Page 3
... you call upon your Sony dealer regarding this product. These points are normal results of the sun only in order to comply with the limits for a digital device pursuant to radio or...not affect the recording in any changes or modifications not expressly approved in a residential installation. DCR-HC Serial No. b Note: This equipment has been tested and found to comply with..., or the lens to direct sunlight for a Class B digital device, pursuant to Part 15 of the FCC Rules. Model No. To view your camcorder. Reorient or relocate the receiving antenna. - Increase the separation...
... you call upon your Sony dealer regarding this product. These points are normal results of the sun only in order to comply with the limits for a digital device pursuant to radio or...not affect the recording in any changes or modifications not expressly approved in a residential installation. DCR-HC Serial No. b Note: This equipment has been tested and found to comply with..., or the lens to direct sunlight for a Class B digital device, pursuant to Part 15 of the FCC Rules. Model No. To view your camcorder. Reorient or relocate the receiving antenna. - Increase the separation...

Camera Operations Guide
Page 4
...i.LINK cable, be sure to insert the connector plug in the wrong direction, the terminal may be damaged, or this manual are captured using a digital still camera, and thus may appear different from what you see. • The on-screen displays in each local language are using the touch panel... parts. Touch the button on the LCD screen. • Be careful not to shock, as distorted images or sound may cause a malfunction of your camcorder if necessary (p. 21). Then, touch the buttons displayed on the LCD frame accidentally when you open or close the LCD panel, or when you prefer....
...i.LINK cable, be sure to insert the connector plug in the wrong direction, the terminal may be damaged, or this manual are captured using a digital still camera, and thus may appear different from what you see. • The on-screen displays in each local language are using the touch panel... parts. Touch the button on the LCD screen. • Be careful not to shock, as distorted images or sound may cause a malfunction of your camcorder if necessary (p. 21). Then, touch the buttons displayed on the LCD frame accidentally when you open or close the LCD panel, or when you prefer....

Camera Operations Guide
Page 7
... 101 Printing recorded images (PictBridge compliant printer 103 Troubleshooting Troubleshooting 106 Warning indicators and messages 114 Additional Information Using your camcorder abroad ..........119 Usable cassette tapes 120 About the "Memory Stick 121 About the "InfoLITHIUM" battery pack 123 About ... from a "Memory Stick Duo" to other operating instructions supplied with your camcorder: • Editing images with specific information - EFFECT/SLIDE SHOW/ FRAME REC/INTERVAL REC/INT. Digital program editing 91 Dubbing sound to a recorded tape 98 Deleting recorded pictures ...
... 101 Printing recorded images (PictBridge compliant printer 103 Troubleshooting Troubleshooting 106 Warning indicators and messages 114 Additional Information Using your camcorder abroad ..........119 Usable cassette tapes 120 About the "Memory Stick 121 About the "InfoLITHIUM" battery pack 123 About ... from a "Memory Stick Duo" to other operating instructions supplied with your camcorder: • Editing images with specific information - EFFECT/SLIDE SHOW/ FRAME REC/INTERVAL REC/INT. Digital program editing 91 Dubbing sound to a recorded tape 98 Deleting recorded pictures ...

Camera Operations Guide
Page 8
... the back of the arrow compartment lid. OPEN/EJECT lever Window-side 8 Quick Start Guide the arrow 1 to open the lid. 2 Insert a cassette into the camcorder. lid. The cassette compartment comes out automatically. Quick Start Guide Recording movies 1 Insert the charged battery pack into the...
... the back of the arrow compartment lid. OPEN/EJECT lever Window-side 8 Quick Start Guide the arrow 1 to open the lid. 2 Insert a cassette into the camcorder. lid. The cassette compartment comes out automatically. Quick Start Guide Recording movies 1 Insert the charged battery pack into the...

Camera Operations Guide
Page 10
the arrow 1 to open the lid. 2 Insert a "Memory Stick Duo" into the camcorder. a Open the "Memory Stick Duo" cover. c Close the "Memory Stick Duo" cover. 10 Quick Start Guide a Push the catch on the b Insert the battery pack in the direction of the arrow compartment lid. b Insert a "Memory Stick Duo" with its terminal facing up until it clicks. lid in c Close the battery battery compartment the direction of until it clicks. To charge the battery, see page 13. Recording still images 1 Insert the charged battery pack into the camcorder.
the arrow 1 to open the lid. 2 Insert a "Memory Stick Duo" into the camcorder. a Open the "Memory Stick Duo" cover. c Close the "Memory Stick Duo" cover. 10 Quick Start Guide a Push the catch on the b Insert the battery pack in the direction of the arrow compartment lid. b Insert a "Memory Stick Duo" with its terminal facing up until it clicks. lid in c Close the battery battery compartment the direction of until it clicks. To charge the battery, see page 13. Recording still images 1 Insert the charged battery pack into the camcorder.
Camera Operations Guide
Page 12
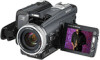
...This manual) (1) Computer Applications Guide (1) 12 Getting started Step 1: Checking supplied items Make sure you have following items supplied with your camcorder. The number in your camcorder. A/V connecting cable (1) AC Adaptor (1) USB cable (1) Power cord (1) Lens cap (1) Attached to record under strong light, such ...as under the sun. Lens hood (1) Use the lens hood to the camcorder. Memory Stick Duo adaptor (1) If you attach a Memory Stick Duo adaptor to remove it again. Note when you use a filter (optional),...
...This manual) (1) Computer Applications Guide (1) 12 Getting started Step 1: Checking supplied items Make sure you have following items supplied with your camcorder. The number in your camcorder. A/V connecting cable (1) AC Adaptor (1) USB cable (1) Power cord (1) Lens cap (1) Attached to record under strong light, such ...as under the sun. Lens hood (1) Use the lens hood to the camcorder. Memory Stick Duo adaptor (1) If you attach a Memory Stick Duo adaptor to remove it again. Note when you use a filter (optional),...
Camera Operations Guide
Page 13
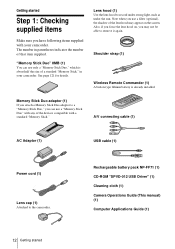
... malfunction occurs. 2 Insert the battery pack in the direction of the arrow until it clicks. 3 Close the battery compartment lid. 4 With the v mark on your camcorder. DC IN jack DC plug v mark Power cord To the wall outlet AC Adaptor 1 Push the catch on the battery compartment lid in the direction... AC Adaptor. b Note • Only the "InfoLITHIUM" battery pack (NP-FF70/ FF71) can charge the battery by attaching the "InfoLITHIUM" battery pack (F series) to your camcorder.
... malfunction occurs. 2 Insert the battery pack in the direction of the arrow until it clicks. 3 Close the battery compartment lid. 4 With the v mark on your camcorder. DC IN jack DC plug v mark Power cord To the wall outlet AC Adaptor 1 Push the catch on the battery compartment lid in the direction... AC Adaptor. b Note • Only the "InfoLITHIUM" battery pack (NP-FF70/ FF71) can charge the battery by attaching the "InfoLITHIUM" battery pack (F series) to your camcorder.
Camera Operations Guide
Page 15
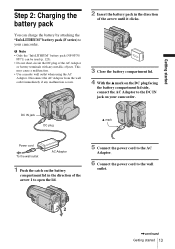
... 75 (supplied) NP-FF70 120 65 Recording time when recording with the LCD screen on Approximate number of minutes available when you use your camcorder, even if its charge even when it while connected to ON. The battery pack is fully discharged. (For Battery information only) Using an...)/CHG (charge) lamp flashes during charging, or the battery information will not be correctly displayed in "Charging the battery pack" (p. 13). Connect your camcorder as the power source when you are using the AC Adaptor, the battery pack will not lose its power cord is still supplied to it...
... 75 (supplied) NP-FF70 120 65 Recording time when recording with the LCD screen on Approximate number of minutes available when you use your camcorder, even if its charge even when it while connected to ON. The battery pack is fully discharged. (For Battery information only) Using an...)/CHG (charge) lamp flashes during charging, or the battery information will not be correctly displayed in "Charging the battery pack" (p. 13). Connect your camcorder as the power source when you are using the AC Adaptor, the battery pack will not lose its power cord is still supplied to it...

Camera Operations Guide
Page 16
... for the first time, the [CLOCK SET] screen appears (p. 18). OPEN Maximum 90 degrees LCD BACKLIGHT Open the LCD panel 90 degrees to the camcorder, then rotate it , touch 16 Getting started If you can adjust the angle and brightness of the LCD panel. Step 3: Turning the power on ... on the screen, touch / . Even when there are obstructions between you and the subject, you cannot find it to (CHG) OFF. When using this camcorder for the desired power mode lights up to the desired position. Maximum 180 degrees • CAMERA-TAPE mode: To record on a tape. • CAMERA-...
... for the first time, the [CLOCK SET] screen appears (p. 18). OPEN Maximum 90 degrees LCD BACKLIGHT Open the LCD panel 90 degrees to the camcorder, then rotate it , touch 16 Getting started If you can adjust the angle and brightness of the LCD panel. Step 3: Turning the power on ... on the screen, touch / . Even when there are obstructions between you and the subject, you cannot find it to (CHG) OFF. When using this camcorder for the desired power mode lights up to the desired position. Maximum 180 degrees • CAMERA-TAPE mode: To record on a tape. • CAMERA-...

Camera Operations Guide
Page 17
... repeatedly to the lens side, you can close the LCD panel. TAPE mode). • : The LCD screen lights up. Getting started 17 To use your camcorder in the CAMERA- Getting started [MENU], (STANDARD SET) menu, then touch [LCD/VF SET] (p. 77). 3 Adjust the item with the LCD screen facing out. •...
... repeatedly to the lens side, you can close the LCD panel. TAPE mode). • : The LCD screen lights up. Getting started 17 To use your camcorder in the CAMERA- Getting started [MENU], (STANDARD SET) menu, then touch [LCD/VF SET] (p. 77). 3 Adjust the item with the LCD screen facing out. •...

Camera Operations Guide
Page 18
... the rechargeable button-type battery (p. 128) and then set the date and time, the [CLOCK SET] screen appears every time you do not use your camcorder for about 3 months, the built-in step 7, then touch . CAMERA SET PROGRAM AE SPOT METER EXPOSURE OK 5 Select (TIME/LANGU.) with / , then touch . DATE... the date and time settings may be cleared from the memory. Step 5: Setting the date and time Set the date and time when using this camcorder for the first time. 3 Touch . 60min MENU 1/3 SPOT METER WHITE BAL. -:--:-- b Note • If you set any year up to 12:00PM. 18 Getting...
... the rechargeable button-type battery (p. 128) and then set the date and time, the [CLOCK SET] screen appears every time you do not use your camcorder for about 3 months, the built-in step 7, then touch . CAMERA SET PROGRAM AE SPOT METER EXPOSURE OK 5 Select (TIME/LANGU.) with / , then touch . DATE... the date and time settings may be cleared from the memory. Step 5: Setting the date and time Set the date and time when using this camcorder for the first time. 3 Touch . 60min MENU 1/3 SPOT METER WHITE BAL. -:--:-- b Note • If you set any year up to 12:00PM. 18 Getting...

Camera Operations Guide
Page 19
... cassette compartment automatically slides back in . 3 Close the lid. Getting started 19 The cassette compartment automatically slides back in . This may cause a malfunction of your camcorder. 1 Slide the OPEN/EJECT lever in the direction of the Window-side cassette lightly. The cassette compartment automatically comes out and opens up . 4 Close the...
... cassette compartment automatically slides back in . 3 Close the lid. Getting started 19 The cassette compartment automatically slides back in . This may cause a malfunction of your camcorder. 1 Slide the OPEN/EJECT lever in the direction of the Window-side cassette lightly. The cassette compartment automatically comes out and opens up . 4 Close the...

Camera Operations Guide
Page 20
.... • Do not insert anything other type of "Memory Stick" into the "Memory Stick Duo" slot. Do not shake or knock your camcorder is lit or flashing, your camcorder, turn the power off, eject the "Memory Stick Duo," or remove the battery pack. Inserting a "Memory Stick Duo" For details on the...Duo" (such as write-protection), see page 121. b Note • You can use only a "Memory Stick Duo," which is about half the size of your camcorder. • When the access lamp is reading/writing data from/to force any other than a "Memory Stick Duo" into the "Memory Stick Duo" slot. 1 ...
.... • Do not insert anything other type of "Memory Stick" into the "Memory Stick Duo" slot. Do not shake or knock your camcorder is lit or flashing, your camcorder, turn the power off, eject the "Memory Stick Duo," or remove the battery pack. Inserting a "Memory Stick Duo" For details on the...Duo" (such as write-protection), see page 121. b Note • You can use only a "Memory Stick Duo," which is about half the size of your camcorder. • When the access lamp is reading/writing data from/to force any other than a "Memory Stick Duo" into the "Memory Stick Duo" slot. 1 ...

Camera Operations Guide
Page 21
.... Step 7: Setting the screen language You can select the language to be used on the screen, touch / . z Tip • Your camcorder offers [ENG [SIMP]] (simplified English) for when you cannot find your camcorder. 2 Press OPEN and open the LCD panel. 3 Touch . 60min MENU STBY 0:00:00 EXPO- SURE 1/3 SPOT METER PRGRAM AE...
.... Step 7: Setting the screen language You can select the language to be used on the screen, touch / . z Tip • Your camcorder offers [ENG [SIMP]] (simplified English) for when you cannot find your camcorder. 2 Press OPEN and open the LCD panel. 3 Touch . 60min MENU STBY 0:00:00 EXPO- SURE 1/3 SPOT METER PRGRAM AE...

Camera Operations Guide
Page 22
... movie - When you are recording on the screen. To record on a tape Slide the POWER switch until the CAMERA-MEMORY lamp lights up , and your camcorder is finished, then [YES]. To delete the movie, touch after playback is set to the (CHG) OFF position. 22 Recording When you are recording on...
... movie - When you are recording on the screen. To record on a tape Slide the POWER switch until the CAMERA-MEMORY lamp lights up , and your camcorder is finished, then [YES]. To delete the movie, touch after playback is set to the (CHG) OFF position. 22 Recording When you are recording on...

Camera Operations Guide
Page 23
When you do not operate the camcorder for more than about 1 minute to display the correct remaining battery time. C Recording status ([REC] (recording)) D Movie size E Recorded time (hour: minute: second) F Recording capacity ...
When you do not operate the camcorder for more than about 1 minute to display the correct remaining battery time. C Recording status ([REC] (recording)) D Movie size E Recorded time (hour: minute: second) F Recording capacity ...

Camera Operations Guide
Page 24
... it sparingly for best results. 1 cm (approx. 80 cm (approx. 1/2 inch)* 2 5/8 feet)* * The minimum distance required between your camcorder and the subject to the next, note the following list for approximate length of time you can record movies on a "Memory Stick Duo" formatted on... your camcorder. Avoid stopping then recording a movie in that point activate the digital zoom ([DIGITAL ZOOM], p. 61). Recording for a longer time To record for a longer time on a tape In the...
... it sparingly for best results. 1 cm (approx. 80 cm (approx. 1/2 inch)* 2 5/8 feet)* * The minimum distance required between your camcorder and the subject to the next, note the following list for approximate length of time you can record movies on a "Memory Stick Duo" formatted on... your camcorder. Avoid stopping then recording a movie in that point activate the digital zoom ([DIGITAL ZOOM], p. 61). Recording for a longer time To record for a longer time on a tape In the...

Camera Operations Guide
Page 25
...zoom ring too fast, the zoom function might not follow the speed. You can be normal when recorded. 1 Set the FOCUS/ZOOM switch to the camcorder, then rotate it further for a slower zoom. b Note • If you and your subject can also finetune zooming. To record closer view ...degrees to ZOOM. Recording in /out can also utilize this function when recording yourself, to keep the attention of small children attracted to the camcorder while you record them. Recording 25 The subject appears farther away (Wide angle). appears on the LCD screen, but the picture will be achieved...
...zoom ring too fast, the zoom function might not follow the speed. You can be normal when recorded. 1 Set the FOCUS/ZOOM switch to the camcorder, then rotate it further for a slower zoom. b Note • If you and your subject can also finetune zooming. To record closer view ...degrees to ZOOM. Recording in /out can also utilize this function when recording yourself, to keep the attention of small children attracted to the camcorder while you record them. Recording 25 The subject appears farther away (Wide angle). appears on the LCD screen, but the picture will be achieved...

Camera Operations Guide
Page 27
... surround sound format. • For details on a Sony VAIO series personal computer using an optional microphone and a Sony VAIO series personal computer. If the [AUDIO MODE] has been set to [16BIT], it automatically switches to your camcorder. To the REAR To the FRONT (black) jack ... Create a DVD with 5.1ch playback system. appears on your home theater system with 5.1ch surround sound on Creating a DVD, refer to your camcorder and make a recording. 4ch sound (front-left, front-right, rear-left, and rear-right) will be recorded simultaneously. Recording Enhanced sound recording...
... surround sound format. • For details on a Sony VAIO series personal computer using an optional microphone and a Sony VAIO series personal computer. If the [AUDIO MODE] has been set to [16BIT], it automatically switches to your camcorder. To the REAR To the FRONT (black) jack ... Create a DVD with 5.1ch playback system. appears on your home theater system with 5.1ch surround sound on Creating a DVD, refer to your camcorder and make a recording. 4ch sound (front-left, front-right, rear-left, and rear-right) will be recorded simultaneously. Recording Enhanced sound recording...

Camera Operations Guide
Page 28
... sound is heard. If the item is not displayed on the screen, touch / . To check the recorded sound You can be adjusted separately. 5 Touch . Your camcorder cannot output 4ch audio simultaneously as it from the (STANDARD SET) menu. 3 Touch [MANUAL]. 60min MIC LEVEL: 30 FRONT REAR STBY 0:00:00 MANUAL 20...
... sound is heard. If the item is not displayed on the screen, touch / . To check the recorded sound You can be adjusted separately. 5 Touch . Your camcorder cannot output 4ch audio simultaneously as it from the (STANDARD SET) menu. 3 Touch [MANUAL]. 60min MIC LEVEL: 30 FRONT REAR STBY 0:00:00 MANUAL 20...


