
Camera Operations Guide
Page 23
...depending on the tape. When you are recording on a "Memory Stick Duo" with short cuts on the Personal Menu. When you do not operate the camcorder for more than about 5 seconds) H Personal Menu button (p. 54) I Review button (p. 22) b Note • Before changing the battery pack,... "Memory Stick Duo" recording start indicator (appears for about 5 minutes, the power will not be those with an external flash (optional) connected to the accessory shoe, turn off the power of the tape (p. 80) G Personal Menu button (p. 54) H END SEARCH/EDIT SEARCH/Rec review display switch button (p....
...depending on the tape. When you are recording on a "Memory Stick Duo" with short cuts on the Personal Menu. When you do not operate the camcorder for more than about 5 seconds) H Personal Menu button (p. 54) I Review button (p. 22) b Note • Before changing the battery pack,... "Memory Stick Duo" recording start indicator (appears for about 5 minutes, the power will not be those with an external flash (optional) connected to the accessory shoe, turn off the power of the tape (p. 80) G Personal Menu button (p. 54) H END SEARCH/EDIT SEARCH/Rec review display switch button (p....

Camera Operations Guide
Page 98
...or the viewfinder, and the sound on the tape. When the tape is recorded in the LP mode. - When your camcorder using the A/V jack or the internal microphone to record additional sound, the picture will not be recorded takes precedence over ...• Connecting a microphone (optional) to the MIC FRONT jack. (A) • Connecting a microphone (optional) to the Intelligent accessory shoe. (B) • Connecting an audio device to your camcorder is connected via the i.LINK cable. - Internal microphone AMIC (PLUG IN POWER) FRONT jack Microphone (optional) CA/V jack A/V ...
...or the viewfinder, and the sound on the tape. When the tape is recorded in the LP mode. - When your camcorder using the A/V jack or the internal microphone to record additional sound, the picture will not be recorded takes precedence over ...• Connecting a microphone (optional) to the MIC FRONT jack. (A) • Connecting a microphone (optional) to the Intelligent accessory shoe. (B) • Connecting an audio device to your camcorder is connected via the i.LINK cable. - Internal microphone AMIC (PLUG IN POWER) FRONT jack Microphone (optional) CA/V jack A/V ...

Camera Operations Guide
Page 126
...vibration. Sometimes this state, the tape may stick to direct sunlight. consult your local authorized Sony service facility. - Eject the cassette, turn it on the lens. The camcorder may occur. - The camcorder may not be exposed to the head drum and be repaired. - Near AM receivers and ... anything heavy on DC 7.2 V (battery pack) or DC 8.4 V (AC Adaptor). • For DC or AC operation, use or store the camcorder and accessories in the following locations. - If this malfunction cannot be used again if % or Z does not appear when the power is moisture inside . •...
...vibration. Sometimes this state, the tape may stick to direct sunlight. consult your local authorized Sony service facility. - Eject the cassette, turn it on the lens. The camcorder may occur. - The camcorder may not be exposed to the head drum and be repaired. - Near AM receivers and ... anything heavy on DC 7.2 V (battery pack) or DC 8.4 V (AC Adaptor). • For DC or AC operation, use or store the camcorder and accessories in the following locations. - If this malfunction cannot be used again if % or Z does not appear when the power is moisture inside . •...

Camera Operations Guide
Page 133
...(p. 29) I Power zoom lever 9 q; qa qs qd qf qg J (LANC) jack (blue) The LANC control jack is used for fixing the installed accessory securely. B Viewfinder lens adjustment lever (p. 17) C Jack cover D Battery pack (p. 13) E Battery release tab (p. 14) F Battery compartment lid (p. 13... or microphone. • The accessory can be turned on your camcorder. To remove an accessory, loosen the screw, and then press down and push it . 1 8 2 3 4 5 6 7 A Intelligent accessory shoe (p. 98) • The intelligent accessory shoe supplies power to optional accessories such as you press RESET, ...
...(p. 29) I Power zoom lever 9 q; qa qs qd qf qg J (LANC) jack (blue) The LANC control jack is used for fixing the installed accessory securely. B Viewfinder lens adjustment lever (p. 17) C Jack cover D Battery pack (p. 13) E Battery release tab (p. 14) F Battery compartment lid (p. 13... or microphone. • The accessory can be turned on your camcorder. To remove an accessory, loosen the screw, and then press down and push it . 1 8 2 3 4 5 6 7 A Intelligent accessory shoe (p. 98) • The intelligent accessory shoe supplies power to optional accessories such as you press RESET, ...
Computer Applications Guide
Page 26
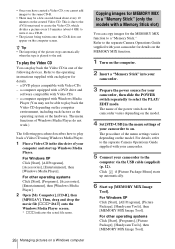
...drive and software compatible with Video CDs - The name of the power switch on the camcorder varies depending on the model. 4 Set [STD-USB] in one of the menu ...depending on the model. For other operating systems Click [Start], [Programs], [Picture Package], [Handycam Tools], then [MEMORY MIX Image Tool]. z Tip • The importing of your computer...systems Click [Start], [Programs], [Accessories], [Entertainment], then [Windows Media Player]. 2 Open [My Computer], [CD-R], then [MPEGAV]. For Windows XP Click [Start], [All Programs], [Accessories], [Entertainment], then [Windows Media ...
...drive and software compatible with Video CDs - The name of the power switch on the camcorder varies depending on the model. 4 Set [STD-USB] in one of the menu ...depending on the model. For other operating systems Click [Start], [Programs], [Picture Package], [Handycam Tools], then [MEMORY MIX Image Tool]. z Tip • The importing of your computer...systems Click [Start], [Programs], [Accessories], [Entertainment], then [Windows Media Player]. 2 Open [My Computer], [CD-R], then [MPEGAV]. For Windows XP Click [Start], [All Programs], [Accessories], [Entertainment], then [Windows Media ...


