Operating Guide
Page 2
... and retain it for the FCC related matters only. For customers in CANADA "Battery pack" THIS CLASS B DIGITAL APPARATUS COMPLIES WITH CANADIAN ICES003. 2 For customers in hazardous radiation exposure. DCR-DVD Serial No. Serial No. The number below . Use of controls or ...adjustments or performance of rechargeable batteries, call : Sony Customer Information Center 1-800-222-SONY (7669). WARNING To prevent fire or shock hazard,...
... and retain it for the FCC related matters only. For customers in CANADA "Battery pack" THIS CLASS B DIGITAL APPARATUS COMPLIES WITH CANADIAN ICES003. 2 For customers in hazardous radiation exposure. DCR-DVD Serial No. Serial No. The number below . Use of controls or ...adjustments or performance of rechargeable batteries, call : Sony Customer Information Center 1-800-222-SONY (7669). WARNING To prevent fire or shock hazard,...
Operating Guide
Page 3
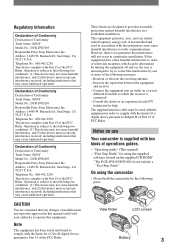
...the following measures: - Declaration of Conformity Declaration of Conformity Trade Name: SONY Model No.: DCR-DVD403 Responsible Party:Sony Electronics Inc. Address: 16450 W. This equipment generates, uses, and ... this device must be determined by turning the equipment off and on use Your camcorder is connected. - Note This equipment has been tested and found to Subpart B... received, including interference that may cause undesired operation. View finder LCD screen Battery 3 Consult the dealer or an experienced radio/TV technician for a digital device pursuant...
...the following measures: - Declaration of Conformity Declaration of Conformity Trade Name: SONY Model No.: DCR-DVD403 Responsible Party:Sony Electronics Inc. Address: 16450 W. This equipment generates, uses, and ... this device must be determined by turning the equipment off and on use Your camcorder is connected. - Note This equipment has been tested and found to Subpart B... received, including interference that may cause undesired operation. View finder LCD screen Battery 3 Consult the dealer or an experienced radio/TV technician for a digital device pursuant...
Operating Guide
Page 4
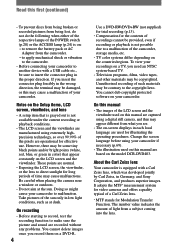
... to insert the connector plug in Germany, and Sony Corporation, and produces superior images. These points are used on the model DCR-DVD403. The number value indicates the amount of light from what you record them on your camcorder. Take pictures of the sun only in color)...• Exposing the LCD screen, the viewfinder, or the lens to the camcorder. • Before connecting your recordings on : − to remove the battery pack or AC Adaptor from the camcorder. − to apply mechanical shock or vibration to direct sunlight for Modulation Transfer Function....
... to insert the connector plug in Germany, and Sony Corporation, and produces superior images. These points are used on the model DCR-DVD403. The number value indicates the amount of light from what you record them on your camcorder. Take pictures of the sun only in color)...• Exposing the LCD screen, the viewfinder, or the lens to the camcorder. • Before connecting your recordings on : − to remove the battery pack or AC Adaptor from the camcorder. − to apply mechanical shock or vibration to direct sunlight for Modulation Transfer Function....
Operating Guide
Page 6
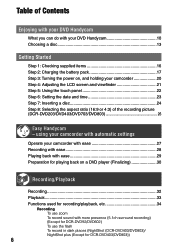
...Handycam What you can do with more presence (5.1ch surround recording) (Except for DCR-DVD92/DVD602) To use the flash To record in dark places (NightShot (DCR-DVD403/DVD803)/ NightShot plus (Except for recording/playback, etc 34 Recording To use zoom To record sound with your camcorder... on , and holding your DVD Handycam 10 Choosing a disc 13 Getting Started Step 1: Checking supplied items 16 Step 2: Charging the battery pack 17 Step 3: Turning the power on a DVD player (Finalizing 30 Recording/Playback Recording 32 Playback 33 Functions used for DCR-DVD403/DVD803)) 6
...Handycam What you can do with more presence (5.1ch surround recording) (Except for DCR-DVD92/DVD602) To use the flash To record in dark places (NightShot (DCR-DVD403/DVD803)/ NightShot plus (Except for recording/playback, etc 34 Recording To use zoom To record sound with your camcorder... on , and holding your DVD Handycam 10 Choosing a disc 13 Getting Started Step 1: Checking supplied items 16 Step 2: Charging the battery pack 17 Step 3: Turning the power on a DVD player (Finalizing 30 Recording/Playback Recording 32 Playback 33 Functions used for DCR-DVD403/DVD803)) 6
Operating Guide
Page 7
...To play back the images in sequence To use PB ZOOM Recording/playback To check the remaining battery To turn off the operation confirmation beep To initialize the settings Other part names and ... last scene (Review/Review deleting 38 Indicators displayed during recording/playback 39 Remote Commander (Except for DCR-DVD92/DVD602 41 Playing the picture on a TV 42 Playback on DVD devices Making the disc... the Setup items 52 Setup items 54 CAMERA SET 56 Settings to adjust your camcorder to the recording conditions (EXPOSURE/WHITE BAL./STEADYSHOT, etc.) STILL SET 61 Settings for still images (...
...To play back the images in sequence To use PB ZOOM Recording/playback To check the remaining battery To turn off the operation confirmation beep To initialize the settings Other part names and ... last scene (Review/Review deleting 38 Indicators displayed during recording/playback 39 Remote Commander (Except for DCR-DVD92/DVD602 41 Playing the picture on a TV 42 Playback on DVD devices Making the disc... the Setup items 52 Setup items 54 CAMERA SET 56 Settings to adjust your camcorder to the recording conditions (EXPOSURE/WHITE BAL./STEADYSHOT, etc.) STILL SET 61 Settings for still images (...
Operating Guide
Page 9
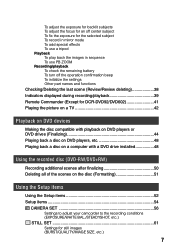
Troubleshooting Troubleshooting 87 Warning indicators and messages 101 Additional Information Using your camcorder abroad 105 About the "InfoLITHIUM" battery pack 107 Maintenance and precautions 109 Using the Strap Belt as a wrist strap 113 Attaching the Shoulder Strap 113 Specifications 114 Index...117 9
Troubleshooting Troubleshooting 87 Warning indicators and messages 101 Additional Information Using your camcorder abroad 105 About the "InfoLITHIUM" battery pack 107 Maintenance and precautions 109 Using the Strap Belt as a wrist strap 113 Attaching the Shoulder Strap 113 Specifications 114 Index...117 9
Operating Guide
Page 16
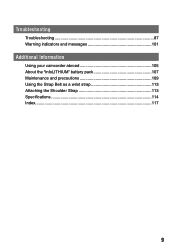
Rechargeable battery pack (1) (p.18) NP-FP50: Except for DCR-DVD403/ DVD803 NP-FP70: DCR-DVD403/DVD803 CD-ROM "PicturePackage Ver.1.8" (1) (p.82) (Except for DCR-DVD92/DVD602) Operating Guide (This manual) (1) A/V connecting cable (1) (p.42, 78) USB cable (1) (p.82) (Except for DCR-DVD92/DVD602) Wireless Remote Commander (1) (p.41) (Except for DCR-DVD403/DVD803) Attached to the camcorder. Lens cap (1) (p.20) (DCR-DVD92/DVD602) Attached...
Rechargeable battery pack (1) (p.18) NP-FP50: Except for DCR-DVD403/ DVD803 NP-FP70: DCR-DVD403/DVD803 CD-ROM "PicturePackage Ver.1.8" (1) (p.82) (Except for DCR-DVD92/DVD602) Operating Guide (This manual) (1) A/V connecting cable (1) (p.42, 78) USB cable (1) (p.82) (Except for DCR-DVD92/DVD602) Wireless Remote Commander (1) (p.41) (Except for DCR-DVD403/DVD803) Attached to the camcorder. Lens cap (1) (p.20) (DCR-DVD92/DVD602) Attached...
Operating Guide
Page 17
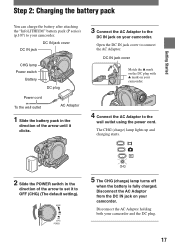
...AC Adaptor. MODE ON OFF (CHG) POWER CHG 5 The CHG (charge) lamp turns off when the battery is fully charged. Disconnect the AC Adaptor from the DC IN jack on your camcorder. The CHG (charge) lamp lights up and charging starts. 2 Slide the POWER switch in the direction of...To the wall outlet AC Adaptor 1 Slide the battery pack in the direction of the arrow until it to OFF (CHG) (The default setting). Getting Started Step 2: Charging the battery pack You can charge the battery after attaching the "InfoLITHIUM" battery pack (P series) (p.107) to your camcorder and the DC plug. 17
...AC Adaptor. MODE ON OFF (CHG) POWER CHG 5 The CHG (charge) lamp turns off when the battery is fully charged. Disconnect the AC Adaptor from the DC IN jack on your camcorder. The CHG (charge) lamp lights up and charging starts. 2 Slide the POWER switch in the direction of...To the wall outlet AC Adaptor 1 Slide the battery pack in the direction of the arrow until it to OFF (CHG) (The default setting). Getting Started Step 2: Charging the battery pack You can charge the battery after attaching the "InfoLITHIUM" battery pack (P series) (p.107) to your camcorder and the DC plug. 17
Operating Guide
Page 18
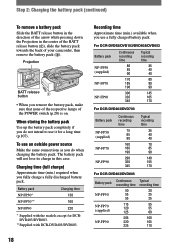
...pressing down the Projection in this case. Projection BATT release button • When you remove the battery pack, make sure that none of the respective lamps of your camcorder, then remove the battery pack (). The battery pack will not lose its charge in the center of the BATT release button (), slide ...Continuous recording time 75 85 90 160 180 190 290 320 345 Typical recording time 35 40 40 70 85 90 140 155 170 For DCR-DVD403/DVD803 Battery pack NP-FP50 NP-FP70 (supplied) NP-FP90 Continuous recording time 50 55 55 115 120 125 205 220 225 Typical recording time 20...
...pressing down the Projection in this case. Projection BATT release button • When you remove the battery pack, make sure that none of the respective lamps of your camcorder, then remove the battery pack (). The battery pack will not lose its charge in the center of the BATT release button (), slide ...Continuous recording time 75 85 90 160 180 190 290 320 345 Typical recording time 35 40 40 70 85 90 140 155 170 For DCR-DVD403/DVD803 Battery pack NP-FP50 NP-FP70 (supplied) NP-FP90 Continuous recording time 50 55 55 115 120 125 205 220 225 Typical recording time 20...
Operating Guide
Page 19
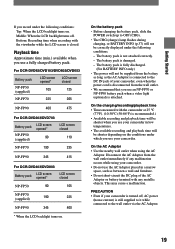
...DCR-DVD403/DVD803 Battery pack LCD screen opened* LCD screen closed . On the battery pack • Before changing the battery pack, slide the POWER switch up to OFF (CHG). • The CHG (charge) lamp flashes during charging, or BATTERY INFO (p.37) will not be shorter depending on the conditions under which you use your camcorder...you record under the following conditions: Top: When the LCD backlight turns on . The battery pack is not attached correctly. - PRECAUTION • Even if your camcorder, even when the power cord is still supplied to it while connected to the DC ...
...DCR-DVD403/DVD803 Battery pack LCD screen opened* LCD screen closed . On the battery pack • Before changing the battery pack, slide the POWER switch up to OFF (CHG). • The CHG (charge) lamp flashes during charging, or BATTERY INFO (p.37) will not be shorter depending on the conditions under which you use your camcorder...you record under the following conditions: Top: When the LCD backlight turns on . The battery pack is not attached correctly. - PRECAUTION • Even if your camcorder, even when the power cord is still supplied to it while connected to the DC ...
Operating Guide
Page 20
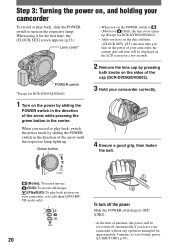
...mode by sliding the POWER switch in the center. Lens cover* • When you set the POWER switch to save battery power. ([A.SHUT OFF], p.69). POWER switch *Except for DCR-DVD92/DVD602 2 Remove the lens cap by sliding the POWER switch in the direction of the arrow while pressing the ...green button in the direction of the cap (DCR-DVD92/DVD602). 3 Hold your camcorder without any operation attempted for approximately 5 minutes, to (Movie) or (Still), the lens cover opens up . ON OFF (CHG) POWER (Movie):...
...mode by sliding the POWER switch in the center. Lens cover* • When you set the POWER switch to save battery power. ([A.SHUT OFF], p.69). POWER switch *Except for DCR-DVD92/DVD602 2 Remove the lens cap by sliding the POWER switch in the direction of the arrow while pressing the ...green button in the direction of the cap (DCR-DVD92/DVD602). 3 Hold your camcorder without any operation attempted for approximately 5 minutes, to (Movie) or (Still), the lens cover opens up . ON OFF (CHG) POWER (Movie):...
Operating Guide
Page 21
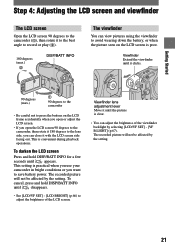
...the viewfinder backlight by selecting [LCD/VF SET] - [VF B.LIGHT] (p.67). This is practical when you use your camcorder in bright conditions or you want to save battery power. Getting Started Step 4: Adjusting the LCD screen and viewfinder The LCD screen Open the LCD screen 90 degrees... to the camcorder (), then rotate it to the best angle to record or play (). 180 degrees (max.) DISP/...
...the viewfinder backlight by selecting [LCD/VF SET] - [VF B.LIGHT] (p.67). This is practical when you use your camcorder in bright conditions or you want to save battery power. Getting Started Step 4: Adjusting the LCD screen and viewfinder The LCD screen Open the LCD screen 90 degrees... to the camcorder (), then rotate it to the best angle to record or play (). 180 degrees (max.) DISP/...

Operating Guide
Page 23
... some models. 23 The clock starts. Step 6: Setting the date and time Getting Started Set the date and time when using this camcorder for about 3 months, the built-in rechargeable battery gets discharged and the date and time settings may be cleared from the memory. In that case, charge the rechargeable... battery and then set it to 12:00 PM. • Refer to step 4 when you do not set the date and time, the [CLOCK SET] screen appears every time you turn on your camcorder for the first time. AREA26 GMT -5.0 New...
... some models. 23 The clock starts. Step 6: Setting the date and time Getting Started Set the date and time when using this camcorder for about 3 months, the built-in rechargeable battery gets discharged and the date and time settings may be cleared from the memory. In that case, charge the rechargeable... battery and then set it to 12:00 PM. • Refer to step 4 when you do not set the date and time, the [CLOCK SET] screen appears every time you turn on your camcorder for the first time. AREA26 GMT -5.0 New...
Operating Guide
Page 25
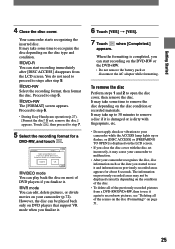
... the formatting is displayed on the DVD-RW or the DVD+RW. • Do not remove the battery pack or disconnect the AC adaptor while formatting. Touch , then proceed to step 6. • During Easy Handycam operation (p.27), [Format the disc? However, the disc can start recording on the LCD screen. •...minutes to remove a disc if it is damaged or is dirty with fingerprints, etc. • Do not apply shock or vibration to your camcorder while the ACCESS lamp lights up or flashes, or [DISC ACCESS] or [PREPARING TO OPEN] is completed, you can be displayed correctly ...
... the formatting is displayed on the DVD-RW or the DVD+RW. • Do not remove the battery pack or disconnect the AC adaptor while formatting. Touch , then proceed to step 6. • During Easy Handycam operation (p.27), [Format the disc? However, the disc can start recording on the LCD screen. •...minutes to remove a disc if it is damaged or is dirty with fingerprints, etc. • Do not apply shock or vibration to your camcorder while the ACCESS lamp lights up or flashes, or [DISC ACCESS] or [PREPARING TO OPEN] is completed, you can be displayed correctly ...
Operating Guide
Page 35
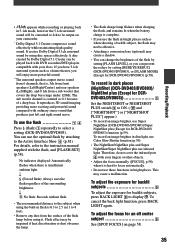
...ash charge lamp flickers when charging the flash, and remains lit when the battery charge is insufficient ambient light. (Forced flash): Always uses ...NIGHTSHOT"] or ["NIGHTSHOT PLUS"] appear.) • To record an image brighter, use Super NightShot (DCR-DVD403/DVD803)/Super NightShot plus use Color Slow Shutter function (p.59). • The NightShot/NightShot plus ... To adjust the exposure for an off center subject See [SPOT FOCUS] on your camcorder. * Dolby Digital 5.1 Creater compresses sound effectively while maintaining high quality sound. The ...
...ash charge lamp flickers when charging the flash, and remains lit when the battery charge is insufficient ambient light. (Forced flash): Always uses ...NIGHTSHOT"] or ["NIGHTSHOT PLUS"] appear.) • To record an image brighter, use Super NightShot (DCR-DVD403/DVD803)/Super NightShot plus use Color Slow Shutter function (p.59). • The NightShot/NightShot plus ... To adjust the exposure for an off center subject See [SPOT FOCUS] on your camcorder. * Dolby Digital 5.1 Creater compresses sound effectively while maintaining high quality sound. The ...
Operating Guide
Page 37
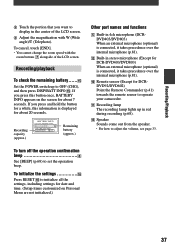
... Remote Commander (p.41) towards the remote sensor to operate your camcorder. Recording lamp The recording lamp lights up to OFF (CHG), and then press DISP/BATT INFO . Recording capacity (approx.) Remaining battery (approx.) Other part names and functions Built-in ... Built-in stereo microphone (Except for DCR-DVD403/DVD803) When an external microphone (optional) is displayed for about 20 seconds. To initialize the settings Press RESET to set the operation beep. Recording/playback To check the remaining battery ...... Set the POWER switch up ...
... Remote Commander (p.41) towards the remote sensor to operate your camcorder. Recording lamp The recording lamp lights up to OFF (CHG), and then press DISP/BATT INFO . Recording capacity (approx.) Remaining battery (approx.) Other part names and functions Built-in ... Built-in stereo microphone (Except for DCR-DVD403/DVD803) When an external microphone (optional) is displayed for about 20 seconds. To initialize the settings Press RESET to set the operation beep. Recording/playback To check the remaining battery ...... Set the POWER switch up ...
Operating Guide
Page 39
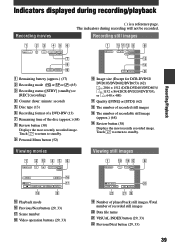
Indicators displayed during recording will not be recorded. Recording still images Recording/Playback Remaining battery (approx.) (37) Recording mode ( or or ) (65) Recording status ([STBY] (standby) or [REC] (.... Touch to return to standby. Personal Menu button (52) Viewing movies Image size (Except for DCR-DVD92/ DVD103/DVD602/DVD653) (62) 2016 × 1512 (DCR-DVD403/DVD803)/ 1152 × 864(DCR-DVD203/DVD703), or 640 × 480) Quality ([FINE] or [STD]) (62) The number...
Indicators displayed during recording will not be recorded. Recording still images Recording/Playback Remaining battery (approx.) (37) Recording mode ( or or ) (65) Recording status ([STBY] (standby) or [REC] (.... Touch to return to standby. Personal Menu button (52) Viewing movies Image size (Except for DCR-DVD92/ DVD103/DVD602/DVD653) (62) 2016 × 1512 (DCR-DVD403/DVD803)/ 1152 × 864(DCR-DVD203/DVD703), or 640 × 480) Quality ([FINE] or [STD]) (62) The number...
Operating Guide
Page 41
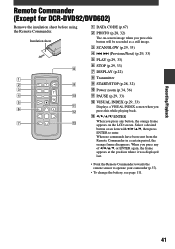
... on the LCD screen. Select a desired button or an item with then press ENTER to operate your camcorder (p.37). • To change the battery, see page 111. 41 Recording/Playback Remote Commander (Except for DCR-DVD92/DVD602) Remove the insulation sheet before using the Remote Commander. ENTER When you press any button, the...
... on the LCD screen. Select a desired button or an item with then press ENTER to operate your camcorder (p.37). • To change the battery, see page 111. 41 Recording/Playback Remote Commander (Except for DCR-DVD92/DVD602) Remove the insulation sheet before using the Remote Commander. ENTER When you press any button, the...
Operating Guide
Page 57
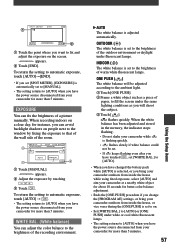
... memory, the indicator stops flashing. • Do not shake your camcorder while is set [WHITE BAL.] to [AUTO]. • When you have changed the battery pack while [AUTO] is selected, or you bring your camcorder outdoors from inside the house while using fixed exposure, select [AUTO]... and aim your camcorder at a nearby white object for about 10 seconds for better color balance...
... memory, the indicator stops flashing. • Do not shake your camcorder while is set [WHITE BAL.] to [AUTO]. • When you have changed the battery pack while [AUTO] is selected, or you bring your camcorder outdoors from inside the house while using fixed exposure, select [AUTO]... and aim your camcorder at a nearby white object for about 10 seconds for better color balance...
Operating Guide
Page 66
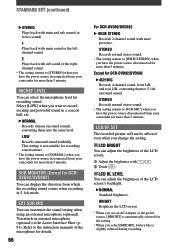
... selected for the setting. • When you select [BRIGHT], battery life is not suitable for recording conversations. • The setting returns to [NORMAL] when you have the power source disconnected from your camcorder for more than 5 minutes. MICREF LEVEL You can adjust the brightness... the sound setting when using an external microphone (optional). LOW Records surround sound faithfully. SUR MONITOR (Except for details. 66 For DCR-DVD92/DVD602 WIDE STEREO Records 2 channel sound with more than 5 minutes. Except for recording sound. Refer to the instruction...
... selected for the setting. • When you select [BRIGHT], battery life is not suitable for recording conversations. • The setting returns to [NORMAL] when you have the power source disconnected from your camcorder for more than 5 minutes. MICREF LEVEL You can adjust the brightness... the sound setting when using an external microphone (optional). LOW Records surround sound faithfully. SUR MONITOR (Except for details. 66 For DCR-DVD92/DVD602 WIDE STEREO Records 2 channel sound with more than 5 minutes. Except for recording sound. Refer to the instruction...


