
Operating Instructions
Page 4
... after another . You can find the desired scene quickly using a Visual Index display. You can play back still images, one after another on your DVD Handycam Your DVD Handycam uses DVD-R and DVD-RW as a recording media. Read the next few pages to find a scene quickly using ...images continuously on the disc in ways that are new and different from those of movies and still images recorded on a DVD player if you can find out how. You can do with your DVD Handycam. Read this convenient index. The Visual Index display shows thumbnails of a tape media-based camcorder...
... after another . You can find the desired scene quickly using a Visual Index display. You can play back still images, one after another on your DVD Handycam Your DVD Handycam uses DVD-R and DVD-RW as a recording media. Read the next few pages to find a scene quickly using ...images continuously on the disc in ways that are new and different from those of movies and still images recorded on a DVD player if you can find out how. You can do with your DVD Handycam. Read this convenient index. The Visual Index display shows thumbnails of a tape media-based camcorder...
Operating Instructions
Page 10
... players 66 Playing back movies on a computer with a DVD drive installed .... 68 Showing still images on a computer with your DVD Handycam 4 What is already connected to match your DVD Handycam 8 Getting Started Using this first What you can do with a DVD drive installed .... 68 ... 25 Step 6 Preparing a disc for recording . 26 Shooting movies/still images Shooting movies/still images 28 Before shooting 28 Shooting movies 29 Shooting still images 34 Shooting techniques to a VCR 62 If your camcorder ...... 55 Choosing and viewing a recording - PROGRAM AE 47 Adjusting the ...
... players 66 Playing back movies on a computer with a DVD drive installed .... 68 Showing still images on a computer with your DVD Handycam 4 What is already connected to match your DVD Handycam 8 Getting Started Using this first What you can do with a DVD drive installed .... 68 ... 25 Step 6 Preparing a disc for recording . 26 Shooting movies/still images Shooting movies/still images 28 Before shooting 28 Shooting movies 29 Shooting still images 34 Shooting techniques to a VCR 62 If your camcorder ...... 55 Choosing and viewing a recording - PROGRAM AE 47 Adjusting the ...

Operating Instructions
Page 11
... Editing the original data 85 Dividing a movie 85 Deleting movies/still images ....... 87 Viewing/dubbing discs/ editing the recordings on your computer Connecting your camcorder to the computer 92 Consulting the on-line help (operating instructions) of ImageMixer Ver.1.5 for Sony DVD Handycam 97 Viewing scenes recorded on your computer 98 Viewing scenes on...
... Editing the original data 85 Dividing a movie 85 Deleting movies/still images ....... 87 Viewing/dubbing discs/ editing the recordings on your computer Connecting your camcorder to the computer 92 Consulting the on-line help (operating instructions) of ImageMixer Ver.1.5 for Sony DVD Handycam 97 Viewing scenes recorded on your computer 98 Viewing scenes on...
Operating Instructions
Page 12
... and operating your camcorder. The DCR-DVD200 is the model used for example, "DCR-DVD200 only". Types of the camcorder, storage media, etc. 12 To view your recordings on your camcorder, check the model number by looking at the bottom of the recording cannot be contrary to a malfunction of differences Model DVD100 Image device 4.5mm (1/4 type...
... and operating your camcorder. The DCR-DVD200 is the model used for example, "DCR-DVD200 only". Types of the camcorder, storage media, etc. 12 To view your recordings on your camcorder, check the model number by looking at the bottom of the recording cannot be contrary to a malfunction of differences Model DVD100 Image device 4.5mm (1/4 type...

Operating Instructions
Page 19
... [BRT NORMAL]. 19 You can turn the LCD screen over and move it into the camcorder body. •When the LCD screen is moved back to the camcorder while recording or while in various angles, and reviewing recorded images. 2 180º OPEN button 90º 1 90º 1 Open the LCD screen while... •When closing the LCD screen, set it vertically until it clicks, then swing it back to the camcorder body with the LCD screen facing out as changing settings, shooting images in standby to the desired position. Rotate the LCD screen 180 degrees. When you adjust the angle of the LCD...
... [BRT NORMAL]. 19 You can turn the LCD screen over and move it into the camcorder body. •When the LCD screen is moved back to the camcorder while recording or while in various angles, and reviewing recorded images. 2 180º OPEN button 90º 1 90º 1 Open the LCD screen while... •When closing the LCD screen, set it vertically until it clicks, then swing it back to the camcorder body with the LCD screen facing out as changing settings, shooting images in standby to the desired position. Rotate the LCD screen 180 degrees. When you adjust the angle of the LCD...
Operating Instructions
Page 25
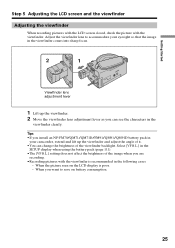
...Select [VF B.L.] in the SETUP display when using the battery pack (page 111). •The [VF B.L.] setting does not affect the brightness of the image when you are recording. •Recording pictures with the viewfinder. When the picture seen on battery consumption. 25 When you can change the brightness of ... can see the characters in the viewfinder clearly. Tips •If you install an NP-FM70/QM71/QM71D/FM91/QM91/QM91D battery pack in your camcorder, extend and lift up the viewfinder. 2 Move the viewfinder lens adjustment lever as you want to accommodate your eyesight so that the...
...Select [VF B.L.] in the SETUP display when using the battery pack (page 111). •The [VF B.L.] setting does not affect the brightness of the image when you are recording. •Recording pictures with the viewfinder. When the picture seen on battery consumption. 25 When you can change the brightness of ... can see the characters in the viewfinder clearly. Tips •If you install an NP-FM70/QM71/QM71D/FM91/QM91/QM91D battery pack in your camcorder, extend and lift up the viewfinder. 2 Move the viewfinder lens adjustment lever as you want to accommodate your eyesight so that the...
Operating Instructions
Page 27
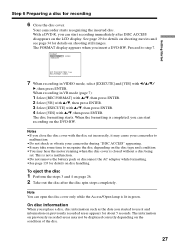
... the Access/Open lamp is completed, you can start recording on the DVD-RW. Getting Started Step 6 Preparing a disc for details on shooting still images. See page 29 for details on the LCD display. When recording in VR mode (page 7): 1 Select [REC FORMAT] with v/V, then press ENTER...you close the disc cover with the disc set . Notes •If you can start recording immediately after the disc spin stops completely. Your camcorder starts recognizing the inserted disc. PROCESS TIME : 7sec REC FORMAT : VIDEO 7 When recording in green. The disc formatting starts. On disc ...
... the Access/Open lamp is completed, you can start recording on the DVD-RW. Getting Started Step 6 Preparing a disc for details on shooting still images. See page 29 for details on the LCD display. When recording in VR mode (page 7): 1 Select [REC FORMAT] with v/V, then press ENTER...you close the disc cover with the disc set . Notes •If you can start recording immediately after the disc spin stops completely. Your camcorder starts recognizing the inserted disc. PROCESS TIME : 7sec REC FORMAT : VIDEO 7 When recording in green. The disc formatting starts. On disc ...
Operating Instructions
Page 28
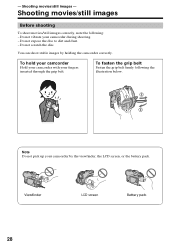
... following the illustration below. You can shoot stable images by the viewfinder, the LCD screen, or the battery pack. Viewfinder LCD screen Battery pack 28 To hold your camcorder Hold your camcorder with your camcorder during shooting. - Note Do not pick up your camcorder by holding the camcorder correctly. Do not scratch the disc. Do not...
... following the illustration below. You can shoot stable images by the viewfinder, the LCD screen, or the battery pack. Viewfinder LCD screen Battery pack 28 To hold your camcorder Hold your camcorder with your camcorder during shooting. - Note Do not pick up your camcorder by holding the camcorder correctly. Do not scratch the disc. Do not...
Operating Instructions
Page 29
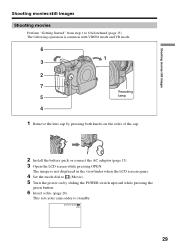
The image is common with VIDEO mode and VR mode. 6 1 3 2 7 Recording 5 lamp 4 1 Remove the lens cap by pressing both knobs on by sliding the POWER switch upward ... the battery pack or connect the AC adaptor (page 15). 3 Open the LCD screen while pressing OPEN. STBY0:00:00 -R VIDEO 29 Shooting movies/still images Shooting movies/still images Shooting movies Perform "Getting Started" from step 1 to standby. This sets your camcorder to 6 beforehand (page 15).
The image is common with VIDEO mode and VR mode. 6 1 3 2 7 Recording 5 lamp 4 1 Remove the lens cap by pressing both knobs on by sliding the POWER switch upward ... the battery pack or connect the AC adaptor (page 15). 3 Open the LCD screen while pressing OPEN. STBY0:00:00 -R VIDEO 29 Shooting movies/still images Shooting movies/still images Shooting movies Perform "Getting Started" from step 1 to standby. This sets your camcorder to 6 beforehand (page 15).
Operating Instructions
Page 30
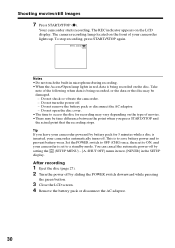
... switch to OFF (CHG) once, then set to access the disc for 5 minutes while a disc is set to a standby mode. Shooting movies/still images 7 Press START/STOP (z). Do not remove the battery pack or disconnect the AC adaptor. - You can cancel the automatic power-off by sliding the POWER...the power off by battery pack for recording may vary depending on the front of your camcorder is inserted, your camcorder automatically turns off . - Do not open the disc cover. •The time to ON, and your camcorder lights up. The REC indicator appears on the disc. REC 0:00:01 -R VIDEO ...
... switch to OFF (CHG) once, then set to access the disc for 5 minutes while a disc is set to a standby mode. Shooting movies/still images 7 Press START/STOP (z). Do not remove the battery pack or disconnect the AC adaptor. - You can cancel the automatic power-off by sliding the POWER...the power off by battery pack for recording may vary depending on the front of your camcorder is inserted, your camcorder automatically turns off . - Do not open the disc cover. •The time to ON, and your camcorder lights up. The REC indicator appears on the disc. REC 0:00:01 -R VIDEO ...
Operating Instructions
Page 33
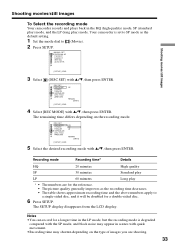
...: END 3 Select (DISC SET) with v/V, then press ENTER. The remaining time differs depending on the type of images you are for a double-sided disc. 6 Press SETUP. Your camcorder is degraded compared with the SP mode, and block noise may appear in scenes with v/V, then press ENTER. Recording mode...decreases. • The table shows approximate recording time and the above numbers apply to (Movie). 2 Press SETUP. Shooting movies/still images To Select the recording mode Your camcorder records and plays back in the HQ (high quality) mode, SP (standard play) mode, and the LP (long play * &#...
...: END 3 Select (DISC SET) with v/V, then press ENTER. The remaining time differs depending on the type of images you are for a double-sided disc. 6 Press SETUP. Your camcorder is degraded compared with the SP mode, and block noise may appear in scenes with v/V, then press ENTER. Recording mode...decreases. • The table shows approximate recording time and the above numbers apply to (Movie). 2 Press SETUP. Shooting movies/still images To Select the recording mode Your camcorder records and plays back in the HQ (high quality) mode, SP (standard play) mode, and the LP (long play * &#...
Operating Instructions
Page 34
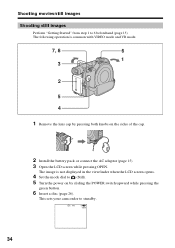
... the AC adaptor (page 15). 3 Open the LCD screen while pressing OPEN. This sets your camcorder to 6 beforehand (page 15). FINE 0 -R VIDEO 34 Shooting movies/still images Shooting still images Perform "Getting Started" from step 1 to standby. The image is common with VIDEO mode and VR mode. 7, 8 6 1 3 2 5 4 1 Remove the lens cap by sliding the...
... the AC adaptor (page 15). 3 Open the LCD screen while pressing OPEN. This sets your camcorder to 6 beforehand (page 15). FINE 0 -R VIDEO 34 Shooting movies/still images Shooting still images Perform "Getting Started" from step 1 to standby. The image is common with VIDEO mode and VR mode. 7, 8 6 1 3 2 5 4 1 Remove the lens cap by sliding the...
Operating Instructions
Page 35
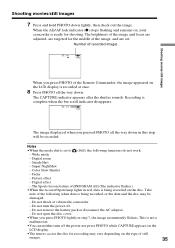
... - Color Slow Shutter - The Sports lesson feature of the Remote Commander, the image appeared on the type of recorded images FINE 0 -R VIDEO Shooting movies/still images When you press PHOTO lightly in step 7, the image momentarily flickers. Do not shock or vibrate the camcorder. - When the AE/AF lock indicator (z) stops flashing and remains on...
... - Color Slow Shutter - The Sports lesson feature of the Remote Commander, the image appeared on the type of recorded images FINE 0 -R VIDEO Shooting movies/still images When you press PHOTO lightly in step 7, the image momentarily flickers. Do not shock or vibrate the camcorder. - When the AE/AF lock indicator (z) stops flashing and remains on...
Operating Instructions
Page 36
... (CHG) once, then set to ON, and your camcorder is set to prevent battery wear. For details, see page 32. 36 To display the recording data, press DATA CODE on the settings for image quality and image size, and the type of the movie mode (DCR-DVD200/DVD300 only). •If you are shooting. •...
... (CHG) once, then set to ON, and your camcorder is set to prevent battery wear. For details, see page 32. 36 To display the recording data, press DATA CODE on the settings for image quality and image size, and the type of the movie mode (DCR-DVD200/DVD300 only). •If you are shooting. •...

Operating Instructions
Page 37
... recording data varies depending on the settings for your camcorder. LIGHT RETURN FINE STANDARD REMAIN [2000] [ SETUP ] : END 5 Select the desired image quality with v/V, then press ENTER. Image quality settings Setting Meaning FINE (FINE) Use this mode when you want to 2 Press SETUP. Standard images are compressed to about 1/4. LIGHT RETURN OFF [ SETUP ] : END...
... recording data varies depending on the settings for your camcorder. LIGHT RETURN FINE STANDARD REMAIN [2000] [ SETUP ] : END 5 Select the desired image quality with v/V, then press ENTER. Image quality settings Setting Meaning FINE (FINE) Use this mode when you want to 2 Press SETUP. Standard images are compressed to about 1/4. LIGHT RETURN OFF [ SETUP ] : END...

Operating Instructions
Page 39
... (Exposure bracketing) [b] Your camcorder automatically shoots 3 images at different exposures. ( ) [b] 1 Set the mode dial to record the continuous images on the disc. S. You cannot shoot still images while the camera is recording. LIGHT RETURN OFF [ SETUP ] : END 4 Select [BURST] with v/V, then press ENTER. Shooting movies/still images To shoot images continuously (BURST, DCR-DVD200/DVD300 only) You can...
... (Exposure bracketing) [b] Your camcorder automatically shoots 3 images at different exposures. ( ) [b] 1 Set the mode dial to record the continuous images on the disc. S. You cannot shoot still images while the camera is recording. LIGHT RETURN OFF [ SETUP ] : END 4 Select [BURST] with v/V, then press ENTER. Shooting movies/still images To shoot images continuously (BURST, DCR-DVD200/DVD300 only) You can...
Operating Instructions
Page 40
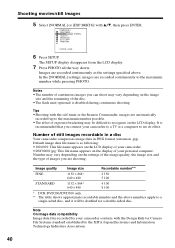
... the display of still images recordable in a disc Your camcorder compresses image data in JPEG format (extension .jpg). Default image data file name is disabled during continuous shooting. Image quality Image size Recordable number** FINE 1152 × 864* 640 × 480 2 150 5 100 STANDARD 1152 × 864* 640 × 480 4 100 8 100 * DCR-DVD200/DVD300 only. ** The table...
... the display of still images recordable in a disc Your camcorder compresses image data in JPEG format (extension .jpg). Default image data file name is disabled during continuous shooting. Image quality Image size Recordable number** FINE 1152 × 864* 640 × 480 2 150 5 100 STANDARD 1152 × 864* 640 × 480 4 100 8 100 * DCR-DVD200/DVD300 only. ** The table...
Operating Instructions
Page 41
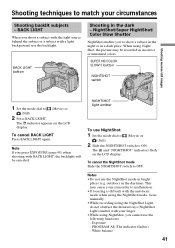
...AE (The indicator flashes) - Notes •Do not use the backlight. Exposure - SUPER NS/COLOR SLOW S button NIGHTSHOT switch Shooting movies/still images 1 Set the mode dial to ON. To cancel BACK LIGHT Press BACK LIGHT again. This may be canceled. BACK LIGHT button Shooting in incorrect ... display. To cancel the NightShot mode Slide the NIGHTSHOT switch to match your finger. •While using Night Shot, the picture may cause your camcorder to shoot a subject in the night or in a dark place. The . Note If you to malfunction. •If focusing is difficult with...
...AE (The indicator flashes) - Notes •Do not use the backlight. Exposure - SUPER NS/COLOR SLOW S button NIGHTSHOT switch Shooting movies/still images 1 Set the mode dial to ON. To cancel BACK LIGHT Press BACK LIGHT again. This may be canceled. BACK LIGHT button Shooting in incorrect ... display. To cancel the NightShot mode Slide the NIGHTSHOT switch to match your finger. •While using Night Shot, the picture may cause your camcorder to shoot a subject in the night or in a dark place. The . Note If you to malfunction. •If focusing is difficult with...
Operating Instructions
Page 45
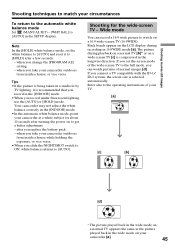
...you connect a TV compatible with the ID-1/ ID-2 system, the screen size is compressed in 16:9WIDE mode [a]. If you take your camcorder outdoors from inside a house while holding the exposure, or vice versa. •When you record under fluorescent lighting, use the [AUTO]... selected automatically. Refer also to [AUTO]. The picture during recording in the longwise direction. after a few seconds: - Shooting movies/still images Shooting techniques to match your circumstances To return to the automatic white balance mode Set (MANUAL SET) - [WHT BAL] to watch pictures...
...you connect a TV compatible with the ID-1/ ID-2 system, the screen size is compressed in 16:9WIDE mode [a]. If you take your camcorder outdoors from inside a house while holding the exposure, or vice versa. •When you record under fluorescent lighting, use the [AUTO]... selected automatically. Refer also to [AUTO]. The picture during recording in the longwise direction. after a few seconds: - Shooting movies/still images Shooting techniques to match your circumstances To return to the automatic white balance mode Set (MANUAL SET) - [WHT BAL] to watch pictures...
Operating Instructions
Page 47
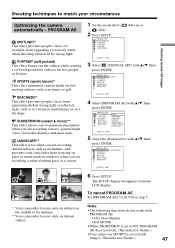
... (The indicator flashes.) •You cannot use SPORTS to record still images. (The indicator flashes.) 47 OLD MOVIE •When NIGHTSHOT is for subjects such as in the middle to far distance. ** Your camcorder focuses only on fastmoving subjects such as people or flowers. PORTRAIT (soft...windows when you are recording a subject behind glass or a screen. 1 Set the mode dial to (Still). 2 Press SETUP. Shooting techniques to match your camcorder from the LCD display. MANUAL SET PROGRAM AE P EFFECT D EFFECT WHT BAL AUTO SHTR RETURN AUTO [ SETUP ] : END 4 Select [PROGRAM AE] ...
... (The indicator flashes.) •You cannot use SPORTS to record still images. (The indicator flashes.) 47 OLD MOVIE •When NIGHTSHOT is for subjects such as in the middle to far distance. ** Your camcorder focuses only on fastmoving subjects such as people or flowers. PORTRAIT (soft...windows when you are recording a subject behind glass or a screen. 1 Set the mode dial to (Still). 2 Press SETUP. Shooting techniques to match your camcorder from the LCD display. MANUAL SET PROGRAM AE P EFFECT D EFFECT WHT BAL AUTO SHTR RETURN AUTO [ SETUP ] : END 4 Select [PROGRAM AE] ...


