Operating Instructions
Page 10
...NightShot/ Color Slow Shutter 41 Shooting with your circumstances 41 Shooting backlit subjects - Mirror mode ........ 43 Self-timer recording 43 Adjusting the white balance manually 44 Shooting for recording . 26 Shooting movies/still images Shooting movies/still images 28 Before shooting 28 Shooting movies 29 Shooting still images 34 Shooting techniques to prepare and use your camcorder ...... 55 Choosing and viewing a recording - Review 53 Deleting the last scene (DVD-RWs only 53 Changing the disc title 54 Viewing the recordings Playing a disc on a used disc - Display 58...
...NightShot/ Color Slow Shutter 41 Shooting with your circumstances 41 Shooting backlit subjects - Mirror mode ........ 43 Self-timer recording 43 Adjusting the white balance manually 44 Shooting for recording . 26 Shooting movies/still images Shooting movies/still images 28 Before shooting 28 Shooting movies 29 Shooting still images 34 Shooting techniques to prepare and use your camcorder ...... 55 Choosing and viewing a recording - Review 53 Deleting the last scene (DVD-RWs only 53 Changing the disc title 54 Viewing the recordings Playing a disc on a used disc - Display 58...

Operating Instructions
Page 11
... Playlist 82 Playing the Playlist 84 Editing the original data 85 Dividing a movie 85 Deleting movies/still images ....... 87 Viewing/dubbing discs/ editing the recordings on your computer Connecting your camcorder to the computer 92 Consulting the on-line help (operating instructions) of ImageMixer Ver.1.5 for Sony DVD Handycam 97 Viewing scenes recorded on your camcorder abroad .......... 129 Maintenance information and precautions 130 Specifications 134 Parts and controls/Index Identifying parts and controls 136 Index...
... Playlist 82 Playing the Playlist 84 Editing the original data 85 Dividing a movie 85 Deleting movies/still images ....... 87 Viewing/dubbing discs/ editing the recordings on your computer Connecting your camcorder to the computer 92 Consulting the on-line help (operating instructions) of ImageMixer Ver.1.5 for Sony DVD Handycam 97 Viewing scenes recorded on your camcorder abroad .......... 129 Maintenance information and precautions 130 Specifications 134 Parts and controls/Index Identifying parts and controls 136 Index...
Operating Instructions
Page 12
... recording of your recordings on a TV, you need an NTSC system-based TV. Contents of differences Model DVD100 Image device 4.5mm (1/4 type) CCD, gross approx. 680 000 pixels LCD screen 6.2 cm (2.5 type) DVD200 3.8 mm (1/4.7 type) CCD, gross approx. 1 070 000 pixels 6.2 cm (2.5 type) DVD300 3.8 mm (1/4.7 type) CCD, gross approx. 1 070 000 pixels 8.8 cm (3.5 type) Note on TV color systems TV color systems differ depending on your camcorder. You cannot dub copyright protected software...
... recording of your recordings on a TV, you need an NTSC system-based TV. Contents of differences Model DVD100 Image device 4.5mm (1/4 type) CCD, gross approx. 680 000 pixels LCD screen 6.2 cm (2.5 type) DVD200 3.8 mm (1/4.7 type) CCD, gross approx. 1 070 000 pixels 6.2 cm (2.5 type) DVD300 3.8 mm (1/4.7 type) CCD, gross approx. 1 070 000 pixels 8.8 cm (3.5 type) Note on TV color systems TV color systems differ depending on your camcorder. You cannot dub copyright protected software...
Operating Instructions
Page 33
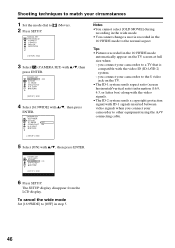
... 60 minutes Long play ) mode. DISC SET REC MODE FORMAT FINALIZE UNFINALIZE DISC TITLE RETURN HQ SP LP REMAIN [30min] [ SETUP ] : END 5 Select the desired recording mode with v/V, then press ENTER. MANUAL SET PROGRAM AE P EFFECT D EFFECT WHT BAL AUTO SHTR Shooting movies/still images [ SETUP ] : END 3 Select (DISC SET) with v/V, then press ENTER. DISC SET REC MODE FORMAT FINALIZE UNFINALIZE DISC TITLE RETURN SP REMAIN [30min] [ SETUP ] : END 4 Select [REC MODE] with quick movement. •Recording time may appear in scenes...
... 60 minutes Long play ) mode. DISC SET REC MODE FORMAT FINALIZE UNFINALIZE DISC TITLE RETURN HQ SP LP REMAIN [30min] [ SETUP ] : END 5 Select the desired recording mode with v/V, then press ENTER. MANUAL SET PROGRAM AE P EFFECT D EFFECT WHT BAL AUTO SHTR Shooting movies/still images [ SETUP ] : END 3 Select (DISC SET) with v/V, then press ENTER. DISC SET REC MODE FORMAT FINALIZE UNFINALIZE DISC TITLE RETURN SP REMAIN [30min] [ SETUP ] : END 4 Select [REC MODE] with quick movement. •Recording time may appear in scenes...
Operating Instructions
Page 35
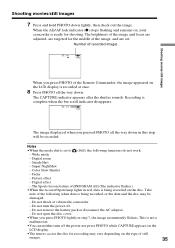
.... - Number of recorded images FINE 0 -R VIDEO Shooting movies/still images When you press PHOTO of the Remote Commander, the image appeared on the type of the image, and are set to access the disc for shooting. Digital zoom - Fader - This is being recorded on the LCD display. •The time to (Still), the following when data is not a malfunction. •You can neither turn the power off the power nor press PHOTO while CAPTURE appears on the disc. The...
.... - Number of recorded images FINE 0 -R VIDEO Shooting movies/still images When you press PHOTO of the Remote Commander, the image appeared on the type of the image, and are set to access the disc for shooting. Digital zoom - Fader - This is being recorded on the LCD display. •The time to (Still), the following when data is not a malfunction. •You can neither turn the power off the power nor press PHOTO while CAPTURE appears on the disc. The...
Operating Instructions
Page 41
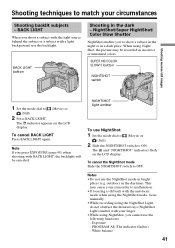
To cancel BACK LIGHT Press BACK LIGHT again. Notes •Do not use the backlight. Exposure - BACK LIGHT button Shooting in the daytime). NightShot/Super NightShot/ Color Slow Shutter NightShot enables you press EXPOSURE (page 48) when shooting with BACK LIGHT, the backlight will be recorded in incorrect or unnatural colors. indicator appears on the LCD display. White balance 41 SUPER NS/COLOR SLOW S button NIGHTSHOT switch Shooting movies/still images 1 Set the mode dial to shoot a subject...
To cancel BACK LIGHT Press BACK LIGHT again. Notes •Do not use the backlight. Exposure - BACK LIGHT button Shooting in the daytime). NightShot/Super NightShot/ Color Slow Shutter NightShot enables you press EXPOSURE (page 48) when shooting with BACK LIGHT, the backlight will be recorded in incorrect or unnatural colors. indicator appears on the LCD display. White balance 41 SUPER NS/COLOR SLOW S button NIGHTSHOT switch Shooting movies/still images 1 Set the mode dial to shoot a subject...
Operating Instructions
Page 46
...] in the 16:9WIDE mode to other equipment using the A/V connecting cable. 5 Select [ON] with v/V, then press ENTER. MANUAL SET PROGRAM AE P EFFECT D EFFECT WHT BAL AUTO SHTR (Movie). [ SETUP ] : END 3 Select (CAMERA SET) with the video ID (ID-1/ID-2) system. - Tips •Pictures recorded in the 16:9WIDE mode automatically appear on the TV. •The ID-1 system sends aspect ratio (screen horizontal/vertical ratio...
...] in the 16:9WIDE mode to other equipment using the A/V connecting cable. 5 Select [ON] with v/V, then press ENTER. MANUAL SET PROGRAM AE P EFFECT D EFFECT WHT BAL AUTO SHTR (Movie). [ SETUP ] : END 3 Select (CAMERA SET) with the video ID (ID-1/ID-2) system. - Tips •Pictures recorded in the 16:9WIDE mode automatically appear on the TV. •The ID-1 system sends aspect ratio (screen horizontal/vertical ratio...

Operating Instructions
Page 48
... functions do not work: - night scenes). if you adjust the exposure manually, the following cases: - when recording dark pictures (e.g. Notes •When you change the PROGRAM AE effect. - BACK LIGHT •Your camcorder automatically returns to the automatic exposure Press EXPOSURE again. 48 when you slide the NIGHTSHOT switch to ON, while adjusting the exposure manually. 2 3 1 Set the mode dial to (Still). 2 Press EXPOSURE. (Movie...
... functions do not work: - night scenes). if you adjust the exposure manually, the following cases: - when recording dark pictures (e.g. Notes •When you change the PROGRAM AE effect. - BACK LIGHT •Your camcorder automatically returns to the automatic exposure Press EXPOSURE again. 48 when you slide the NIGHTSHOT switch to ON, while adjusting the exposure manually. 2 3 1 Set the mode dial to (Still). 2 Press EXPOSURE. (Movie...
Operating Instructions
Page 62
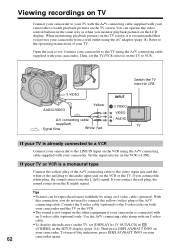
... screen, it is a monaural type Connect the yellow plug of your camcorder from the L (left) signal. Open the jack cover. Then press DISPLAY/BATT INFO on your camcorder to watch playback pictures on the TV screen. Connect your camcorder to the TV using the A/V connecting cable supplied with your camcorder. Tips • Pictures can operate the video control buttons in the SETUP display (page 114). Set the input selector on the TV to VCR. Viewing recordings on TV Connect your camcorder...
... screen, it is a monaural type Connect the yellow plug of your camcorder from the L (left) signal. Open the jack cover. Then press DISPLAY/BATT INFO on your camcorder to watch playback pictures on the TV screen. Connect your camcorder to the TV using the A/V connecting cable supplied with your camcorder. Tips • Pictures can operate the video control buttons in the SETUP display (page 114). Set the input selector on the TV to VCR. Viewing recordings on TV Connect your camcorder...
Operating Instructions
Page 66
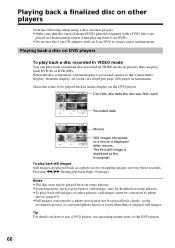
... vertical-shaped DVD player/computer with a DVD drive are placed in a horizontal position when playing back 8 cm DVDs. •Do not use a DVD player, see operating instructions of the DVD player. 66 In menu display, six scenes are played back as the thumbnail. Select the scene to a photo movie may cause malfunctions. Playing back a disc on DVD players To play back a disc recorded in VIDEO mode You can play back still images Still images are listed...
... vertical-shaped DVD player/computer with a DVD drive are placed in a horizontal position when playing back 8 cm DVDs. •Do not use a DVD player, see operating instructions of the DVD player. 66 In menu display, six scenes are played back as the thumbnail. Select the scene to a photo movie may cause malfunctions. Playing back a disc on DVD players To play back a disc recorded in VIDEO mode You can play back still images Still images are listed...
Operating Instructions
Page 89
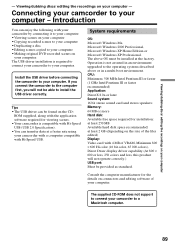
... later Sound system: 16 bit stereo sound card and stereo speakers Memory: 64 MB or more Hard disk: Available free space required for viewing scenes. •Your camcorder is compatible with Hi-Speed USB (USB 2.0 Specification). •You can enjoy the following with Hi-Speed USB. Viewing/dubbing discs/ editing the recordings on your computer - Install the USB driver before connecting the camcorder to your computer. Viewing/dubbing discs/ editing the recordings on your computer - The USB driver installation is...
... later Sound system: 16 bit stereo sound card and stereo speakers Memory: 64 MB or more Hard disk: Available free space required for viewing scenes. •Your camcorder is compatible with Hi-Speed USB (USB 2.0 Specification). •You can enjoy the following with Hi-Speed USB. Viewing/dubbing discs/ editing the recordings on your computer - Install the USB driver before connecting the camcorder to your computer. Viewing/dubbing discs/ editing the recordings on your computer - The USB driver installation is...
Operating Instructions
Page 91
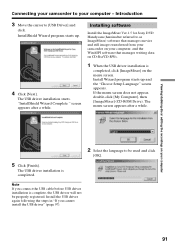
... Setup Language" screen appears. Installing software Install the ImageMixer Ver.1.5 for Sony DVD Handycam (hereinafter referred to as ImageMixer) software that manages movies and still images transferred from your camcorder on your computer, and the WinASPI software that manages writing data on CD-Rs/CD-RWs. 1 When the USB driver installation is completed, click [ImageMixer] on your computer 2 Select the language to be properly registered. The USB driver installation is complete, the USB driver will...
... Setup Language" screen appears. Installing software Install the ImageMixer Ver.1.5 for Sony DVD Handycam (hereinafter referred to as ImageMixer) software that manages movies and still images transferred from your camcorder on your computer, and the WinASPI software that manages writing data on CD-Rs/CD-RWs. 1 When the USB driver installation is completed, click [ImageMixer] on your computer 2 Select the language to be properly registered. The USB driver installation is complete, the USB driver will...
Operating Instructions
Page 92
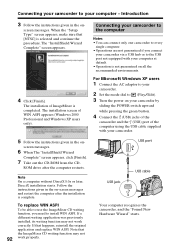
... environments. When the "Setup Type" screen appears, make sure that [NTSC] is complete. ROM drive after the installation is selected and continue the procedure. Connecting your camcorder to (Play/Edit). 3 Turn the power on your camcorder by sliding the POWER switch upward while pressing the green button. 4 Connect the (USB) jacks of the camcorder and the (USB) port of the computer using the USB cable supplied with your computer - screen messages. To replace WIN ASPI To...
... environments. When the "Setup Type" screen appears, make sure that [NTSC] is complete. ROM drive after the installation is selected and continue the procedure. Connecting your camcorder to (Play/Edit). 3 Turn the power on your camcorder by sliding the POWER switch upward while pressing the green button. 4 Connect the (USB) jacks of the camcorder and the (USB) port of the computer using the USB cable supplied with your computer - screen messages. To replace WIN ASPI To...

Operating Instructions
Page 95
... Serial Bus controllers respectively. screen messages and restart your computer - Introduction To confirm the USB driver installation 1 Click [Start] t [Settings] t [Control Panel]. 2 Click [System]. "Device Manager" screen appears. 5 Make sure that "SONY DDX-A1000 USB Device" appears in DVD/CD-ROM drives, "Generic volume" in Storage volumes, and "USB Mass Storage Device" in the on your computer Connecting your camcorder to (Play/Edit). 3 Turn the power on your camcorder by sliding the POWER switch upward while pressing the green button. 4 Connect...
... Serial Bus controllers respectively. screen messages and restart your computer - Introduction To confirm the USB driver installation 1 Click [Start] t [Settings] t [Control Panel]. 2 Click [System]. "Device Manager" screen appears. 5 Make sure that "SONY DDX-A1000 USB Device" appears in DVD/CD-ROM drives, "Generic volume" in Storage volumes, and "USB Mass Storage Device" in the on your computer Connecting your camcorder to (Play/Edit). 3 Turn the power on your camcorder by sliding the POWER switch upward while pressing the green button. 4 Connect...

Operating Instructions
Page 96
... USB Device" appears in CD-ROM, "Sony DVD Handycam" in Storage device, and "USB Mass Storage Device" in red. It may prevent from your camcorder. When all the devices appear, the USB driver is lit in Universal Serial Bus controllers respectively. If any of these devices are not shown, install the USB driver again following "If you cannot install the USB driver" (page 97). Turning off your computer. "System Properties" screen appears. 3 Click [Device Manager]. Connecting your camcorder...
... USB Device" appears in CD-ROM, "Sony DVD Handycam" in Storage device, and "USB Mass Storage Device" in red. It may prevent from your camcorder. When all the devices appear, the USB driver is lit in Universal Serial Bus controllers respectively. If any of these devices are not shown, install the USB driver again following "If you cannot install the USB driver" (page 97). Turning off your computer. "System Properties" screen appears. 3 Click [Device Manager]. Connecting your camcorder...
Operating Instructions
Page 98
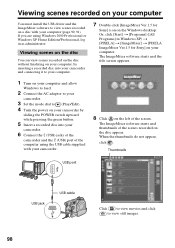
... using the USB cable supplied with your computer (page 90, 91). Viewing scenes on the disc You can view scenes recorded on the disc without finalizing on your computer, by sliding the POWER switch upward while pressing the green button. 5 Insert a recorded disc into your camcorder and connecting it to view still images. The ImageMixer software starts and the title screen appears. 1 Turn on your computer and allow Windows to load. 2 Connect...
... using the USB cable supplied with your computer (page 90, 91). Viewing scenes on the disc You can view scenes recorded on the disc without finalizing on your computer, by sliding the POWER switch upward while pressing the green button. 5 Insert a recorded disc into your camcorder and connecting it to view still images. The ImageMixer software starts and the title screen appears. 1 Turn on your computer and allow Windows to load. 2 Connect...
Operating Instructions
Page 116
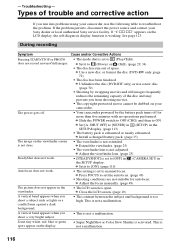
... open. c Set [A. c Adjust the viewfinder lens. (page 25) • [STEADYSHOT] is set to manual focus. c Use a new disc or format the disc (DVD-RW only, page 72) • The disc has been finalized. The image on your camcorder. - During recording Symptom Cause and/or Corrective Actions Pressing START/STOP or PHOTO does not record movies/still images. • The mode dial is exhausted or nearly exhausted. The picture does not appear in the SETUP display...
... open. c Set [A. c Adjust the viewfinder lens. (page 25) • [STEADYSHOT] is set to manual focus. c Use a new disc or format the disc (DVD-RW only, page 72) • The disc has been finalized. The image on your camcorder. - During recording Symptom Cause and/or Corrective Actions Pressing START/STOP or PHOTO does not record movies/still images. • The mode dial is exhausted or nearly exhausted. The picture does not appear in the SETUP display...
Operating Instructions
Page 121
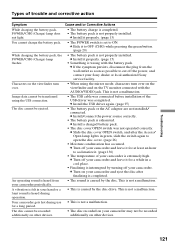
... plug from your camcorder and eject the disc after the Access/ Open lamp lights in green, slide the switch again to ON. This is caused by the disc. c Slide the disc cover OPEN switch, and after finalizing is completed. • The sound is not a malfunction. • The USB cable was connected before installation of trouble and corrective action Symptom While charging the battery pack, POWER/CHG (Charge) lamp does not light. c Turn on other devices...
... plug from your camcorder and eject the disc after the Access/ Open lamp lights in green, slide the switch again to ON. This is caused by the disc. c Slide the disc cover OPEN switch, and after finalizing is completed. • The sound is not a malfunction. • The USB cable was connected before installation of trouble and corrective action Symptom While charging the battery pack, POWER/CHG (Charge) lamp does not light. c Turn on other devices...
Operating Instructions
Page 134
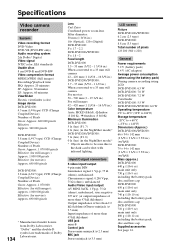
...camera recording using LCD DCR-DVD100: 6.5 W DCR-DVD200: 7.0 W DCR-DVD300: 7.2 W Viewfinder DCR-DVD100: 5.5 W DCR-DVD200/DVD300: 6.0 W Operating temperature 0°C to 40°C (32°F to 104°F) Storage temperature -20°C to + 60°C (-4°F to the dark can be shot with infrared lighting. Specifications Video camera recorder System Video recording format DVD-Video DVD-VR (DVD-RW only) Audio recording system 2ch Dolby* Digital Video signal NTSC color, EIA standards Usable discs 8 cm DVD-R and DVD-RW Video compression format MPEG2/JPEG (Still images) Recording/playback time...
...camera recording using LCD DCR-DVD100: 6.5 W DCR-DVD200: 7.0 W DCR-DVD300: 7.2 W Viewfinder DCR-DVD100: 5.5 W DCR-DVD200/DVD300: 6.0 W Operating temperature 0°C to 40°C (32°F to 104°F) Storage temperature -20°C to + 60°C (-4°F to the dark can be shot with infrared lighting. Specifications Video camera recorder System Video recording format DVD-Video DVD-VR (DVD-RW only) Audio recording system 2ch Dolby* Digital Video signal NTSC color, EIA standards Usable discs 8 cm DVD-R and DVD-RW Video compression format MPEG2/JPEG (Still images) Recording/playback time...
Operating Instructions
Page 144
... rechargeable battery .......... 132 Clock set 21 Color slow shutter 42 Continuous still images shooting 39 Counter 31 Data code 58 Date/time display 31, 58 Daylight saving time ...... 21, 114 DEMO 113 Digital effect 51 Digital zoom 32 Disc dubbing 100 Disc title 54 Disc type 6 DISPLAY 58 Divide 82, 85 DVD-R 6 DVD-RW 6 E EXP BRKTG 39 EXPOSURE 48 F, G, H FADER 50 Fade in/out 50 Finalize 63 FINE 37 Flash 109 Folder 69 FOCUS 49 Format 72 Full charge...
... rechargeable battery .......... 132 Clock set 21 Color slow shutter 42 Continuous still images shooting 39 Counter 31 Data code 58 Date/time display 31, 58 Daylight saving time ...... 21, 114 DEMO 113 Digital effect 51 Digital zoom 32 Disc dubbing 100 Disc title 54 Disc type 6 DISPLAY 58 Divide 82, 85 DVD-R 6 DVD-RW 6 E EXP BRKTG 39 EXPOSURE 48 F, G, H FADER 50 Fade in/out 50 Finalize 63 FINE 37 Flash 109 Folder 69 FOCUS 49 Format 72 Full charge...


