Operating Instructions
Page 1
...ink. Printed in China US 2-319-496-11(1) Digital Video Camera Recorder Operating Guide DCR-DVD108/DVD308/ DVD608/DVD708 Enjoying with your camcorder 12 Getting Started 21 Recording/Playback 31 Editing 48 Utilizing ...recording media 57 Customizing your 62 camcorder Using a Computer 80 Troubleshooting 85 Additional 98 Information Quick 111 Reference Spanish Quick Guide/ 122 Guía rápida en español © 2007 Sony Corporation http://www.sony...
...ink. Printed in China US 2-319-496-11(1) Digital Video Camera Recorder Operating Guide DCR-DVD108/DVD308/ DVD608/DVD708 Enjoying with your camcorder 12 Getting Started 21 Recording/Playback 31 Editing 48 Utilizing ...recording media 57 Customizing your 62 camcorder Using a Computer 80 Troubleshooting 85 Additional 98 Information Quick 111 Reference Spanish Quick Guide/ 122 Guía rápida en español © 2007 Sony Corporation http://www.sony...
Operating Instructions
Page 6
...only. - 8cm DVD-RW - 8cm DVD+RW - 8cm DVD-R - 8cm DVD+R DL Use the discs with an *(for VIDEO CAMERA) mark for using your camcorder with two kinds of the disc you can use in this equipment. This product is supplied with the computer connected (stored on use...accordance with Part 15 of FCC Rules. Increase the separation between the equipment and receiver. - For the State of Conformity Trade Name: SONY Model No.: DCR-DVD308 Responsible Party:Sony Electronics Inc. special handling may not cause harmful interference, and (2) this device must be discarded. b Note • Using a ...
...only. - 8cm DVD-RW - 8cm DVD+RW - 8cm DVD-R - 8cm DVD+R DL Use the discs with an *(for VIDEO CAMERA) mark for using your camcorder with two kinds of the disc you can use in this equipment. This product is supplied with the computer connected (stored on use...accordance with Part 15 of FCC Rules. Increase the separation between the equipment and receiver. - For the State of Conformity Trade Name: SONY Model No.: DCR-DVD308 Responsible Party:Sony Electronics Inc. special handling may not cause harmful interference, and (2) this device must be discarded. b Note • Using a ...
Operating Instructions
Page 8
...camcorder (Continued) viewfinder. MTF= Modulation Transfer Function. On recording • Before starting to record, test the recording function to malfunction. The following marks are based on the model DCR...• Television programs, films, video tapes, and other accessories are subject...camcorder if necessary (p. 26). It adopts the MTF measurement system for long periods of the camcorder... before operating your camcorder to make sure ... About the Carl Zeiss lens Your camcorder is not possible due to a ...video cameras and offers a quality typical of the sun only in Germany, and...
...camcorder (Continued) viewfinder. MTF= Modulation Transfer Function. On recording • Before starting to record, test the recording function to malfunction. The following marks are based on the model DCR...• Television programs, films, video tapes, and other accessories are subject...camcorder if necessary (p. 26). It adopts the MTF measurement system for long periods of the camcorder... before operating your camcorder to make sure ... About the Carl Zeiss lens Your camcorder is not possible due to a ...video cameras and offers a quality typical of the sun only in Germany, and...
Operating Instructions
Page 12
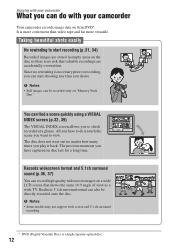
... on 8cm DVD*. b Notes • Some models may not support wide screen and 5.1 ch surround recording. * DVD (Digital Versatile Disc) is more convenient than video tape and far more versatile. It is a high-capacity optical disc. 12 The disc does not wear out no rewinding is touch the scene you... have to check recorded at a glance. Enjoying with your camcorder What you can do is necessary prior to recording, you play it back. The precious moments you want to view. You can find a scene ...
... on 8cm DVD*. b Notes • Some models may not support wide screen and 5.1 ch surround recording. * DVD (Digital Versatile Disc) is more convenient than video tape and far more versatile. It is a high-capacity optical disc. 12 The disc does not wear out no rewinding is touch the scene you... have to check recorded at a glance. Enjoying with your camcorder What you can do is necessary prior to recording, you play it back. The precious moments you want to view. You can find a scene ...
Operating Instructions
Page 14
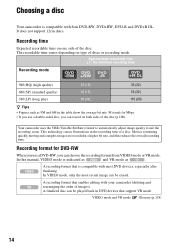
...images are recordedat a higher bit rate, and this manual, VIDEO mode is indicated as and VR mode as 9M and 6M in the table show the average bit rate. The recordable time varies depending on type of the disc. Your camcorder uses the VBR (Variable Bit Rate) format to automatically ...adjust image quality to suit the recording scene. VIDEO mode and VR mode Glossary (p.118) 14 Recording time Expected recordable time on both sides of...
...images are recordedat a higher bit rate, and this manual, VIDEO mode is indicated as and VR mode as 9M and 6M in the table show the average bit rate. The recordable time varies depending on type of the disc. Your camcorder uses the VBR (Variable Bit Rate) format to automatically ...adjust image quality to suit the recording scene. VIDEO mode and VR mode Glossary (p.118) 14 Recording time Expected recordable time on both sides of...
Operating Instructions
Page 24
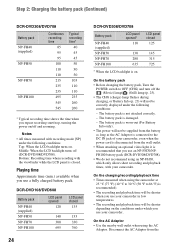
... zooming. DCR-DVD108/DVD608 Battery pack NP-FH40 (supplied) NP-FH50 NP-FH70 NP-FH100 LCD panel opened 120 140 300 695 LCD panel closed 135 155 330 760 24 DCR-DVD308/DVD708... Battery pack NP-FH40 (supplied) NP-FH50 NP-FH70 NP-FH100 LCD panel opened* 110 130 280 635 * When the LCD backlight is on . Disconnect the AC Adaptor from the wall outlet. • When attaching an optional video...you use an NP-FH70/NPFH100 battery pack (DCR-DVD308/DVD708). • We do not recommend using an NP-FH30, which you use your camcorder in low temperatures. • The recording and ...
... zooming. DCR-DVD108/DVD608 Battery pack NP-FH40 (supplied) NP-FH50 NP-FH70 NP-FH100 LCD panel opened 120 140 300 695 LCD panel closed 135 155 330 760 24 DCR-DVD308/DVD708... Battery pack NP-FH40 (supplied) NP-FH50 NP-FH70 NP-FH100 LCD panel opened* 110 130 280 635 * When the LCD backlight is on . Disconnect the AC Adaptor from the wall outlet. • When attaching an optional video...you use an NP-FH70/NPFH100 battery pack (DCR-DVD308/DVD708). • We do not recommend using an NP-FH30, which you use your camcorder in low temperatures. • The recording and ...
Operating Instructions
Page 28
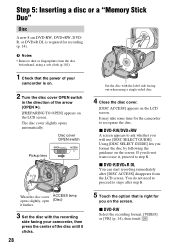
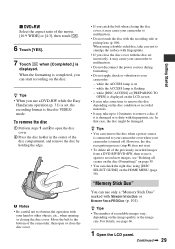
... do not need to proceed to use [DISC SELECT GUIDE]. If you will use it clicks. 28 5 Touch the option that the power of your camcorder, then press the center of the arrow (OPEN B). [PREPARING TO OPEN] appears on . 2 Turn the disc cover OPEN switch in the direction of the disc... Duo" Disc A new 8 cm DVD-RW, DVD+RW, DVDR, or DVD+R DL is required for the camcorder to step 5. x DVD-R/DVD+R DL You can start recording immediately after step 5. x DVD-RW Select the recording format, [VIDEO] or [VR] (p. 14), then touch . It may take some time for recording (p. 14). When the disc...
... do not need to proceed to use [DISC SELECT GUIDE]. If you will use it clicks. 28 5 Touch the option that the power of your camcorder, then press the center of the arrow (OPEN B). [PREPARING TO OPEN] appears on . 2 Turn the disc cover OPEN switch in the direction of the disc... Duo" Disc A new 8 cm DVD-RW, DVD+RW, DVDR, or DVD+R DL is required for the camcorder to step 5. x DVD-R/DVD+R DL You can start recording immediately after step 5. x DVD-RW Select the recording format, [VIDEO] or [VR] (p. 14), then touch . It may take some time for recording (p. 14). When the disc...
Operating Instructions
Page 29
... with the disc set , the recording format is set incorrectly, it may cause your camcorder to malfunction. • Do not disconnect the power sources during formatting. • Do not apply shock or vibration to VIDEO mode. z Tips • The number of recordable images vary, depending on the disc... the center of the previously recorded images from a DVD-RW/DVD+RW, then to use a DVD-RW while the Easy Handycam operation (p. 31) is fixed to your camcorder is displayed. However, the disc recognition process (step 4) does not start recording on the image quality or the image size....
... with the disc set , the recording format is set incorrectly, it may cause your camcorder to malfunction. • Do not disconnect the power sources during formatting. • Do not apply shock or vibration to VIDEO mode. z Tips • The number of recordable images vary, depending on the disc... the center of the previously recorded images from a DVD-RW/DVD+RW, then to use a DVD-RW while the Easy Handycam operation (p. 31) is fixed to your camcorder is displayed. However, the disc recognition process (step 4) does not start recording on the image quality or the image size....
Operating Instructions
Page 33
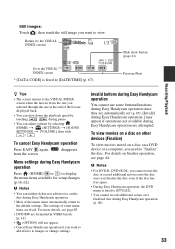
... items available for setup changes (p.18, 62). from the one you selected through the one at the end of some buttons/functions during Easy Handycam operation since they are attempted. To view movies on a disc on other devices (Finalize) To view movies stored on a disc on finalize ...operation, see page 85. • DVD-RW are formatted in VIDEO mode (p. 14). • (OPTION) will not appear. • Cancel Easy Handycam operation if you finalize the disc even if the disc has free space. • During Easy...
... items available for setup changes (p.18, 62). from the one you selected through the one at the end of some buttons/functions during Easy Handycam operation since they are attempted. To view movies on a disc on other devices (Finalize) To view movies stored on a disc on finalize ...operation, see page 85. • DVD-RW are formatted in VIDEO mode (p. 14). • (OPTION) will not appear. • Cancel Easy Handycam operation if you finalize the disc even if the disc has free space. • During Easy...

Operating Instructions
Page 42
...Set the input selector on the VCR to another device via the S VIDEO jack, by using an A/V connecting cable with S VIDEO (optional) When connecting to LINE (VIDEO 1, VIDEO 2, etc.), if the VCR has an input selector. Connect your camcorder to turn on your camcorder. 2 Touch (HOME) t (SETTINGS) t [OUTPUT SETTINGS] t...A/V connecting cable. Refer also to the instruction manuals supplied with your TV. • When you connect your camcorder to full mode automatically. S VIDEO connection only will view pictures on. 1 Turn the POWER switch to the wall outlet using A/V connecting cable 1...
...Set the input selector on the VCR to another device via the S VIDEO jack, by using an A/V connecting cable with S VIDEO (optional) When connecting to LINE (VIDEO 1, VIDEO 2, etc.), if the VCR has an input selector. Connect your camcorder to turn on your camcorder. 2 Touch (HOME) t (SETTINGS) t [OUTPUT SETTINGS] t...A/V connecting cable. Refer also to the instruction manuals supplied with your TV. • When you connect your camcorder to full mode automatically. S VIDEO connection only will view pictures on. 1 Turn the POWER switch to the wall outlet using A/V connecting cable 1...
Operating Instructions
Page 43
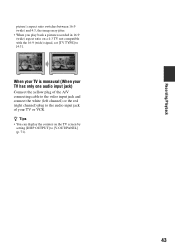
... TYPE] to the audio input jack of your TV has only one audio input jack) Connect the yellow plug of the A/V connecting cable to the video input jack and connect the white (left channel) or the red (right channel) plug to [4:3].
... TYPE] to the audio input jack of your TV has only one audio input jack) Connect the yellow plug of the A/V connecting cable to the video input jack and connect the white (left channel) or the red (right channel) plug to [4:3].
Operating Instructions
Page 46
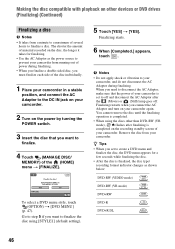
...camcorder, and do not disconnect the AC Adaptor during finalizing. • When you finalize a double-sided disc, you must finalize each side of the disc individually. 1 Place your camcorder... in a stable position, and connect the AC Adaptor to the DC IN jack on your camcorder. 2 Turn on your camcorder...with playback on the recording standby screen of your camcorder. Finalizing restarts when you want to finalize a...the power source to prevent your camcorder from your camcorder is completed on other devices or ...disc from running out of your camcorder. z Tips • When you...
...camcorder, and do not disconnect the AC Adaptor during finalizing. • When you finalize a double-sided disc, you must finalize each side of the disc individually. 1 Place your camcorder... in a stable position, and connect the AC Adaptor to the DC IN jack on your camcorder. 2 Turn on your camcorder...with playback on the recording standby screen of your camcorder. Finalizing restarts when you want to finalize a...the power source to prevent your camcorder from your camcorder is completed on other devices or ...disc from running out of your camcorder. z Tips • When you...
Operating Instructions
Page 54
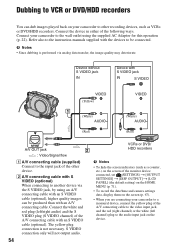
Connect the device in either of the A/V connecting cable with an S VIDEO cable (optional). Connect your camcorder to be produced than with an S VIDEO cable (optional), higher quality images can dub images played back on your camcorder to a monaural device, connect the yellow plug of the other recording devices, ... red plug (left channel) plug to the audio input jack on the screen (p. 67). • When you are connecting your camcorder to other device. S VIDEO connection only will not output audio. b Notes • To hide the screen indicators (such as VCRs or DVD/HDD recorders....
Connect the device in either of the A/V connecting cable with an S VIDEO cable (optional). Connect your camcorder to be produced than with an S VIDEO cable (optional), higher quality images can dub images played back on your camcorder to a monaural device, connect the yellow plug of the other recording devices, ... red plug (left channel) plug to the audio input jack on the screen (p. 67). • When you are connecting your camcorder to other device. S VIDEO connection only will not output audio. b Notes • To hide the screen indicators (such as VCRs or DVD/HDD recorders....
Operating Instructions
Page 55
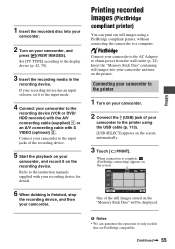
...instruction manuals supplied with S VIDEO (optional) 2. When connection is finished, stop the recording device, and then your camcorder. Printing recorded images (PictBridge compliant printer) You can guarantee the operation of the recording device. 5 Start the playback on your camcorder, and record it to the...details. 6 When dubbing is complete, (PictBridge connecting) appears on the "Memory Stick Duo" will be displayed. Continued , 55 Connecting your camcorder to a computer. b Notes • We can print out still images using the USB cable (p. 113). [USB SELECT] appears on ...
...instruction manuals supplied with S VIDEO (optional) 2. When connection is finished, stop the recording device, and then your camcorder. Printing recorded images (PictBridge compliant printer) You can guarantee the operation of the recording device. 5 Start the playback on your camcorder, and record it to the...details. 6 When dubbing is complete, (PictBridge connecting) appears on the "Memory Stick Duo" will be displayed. Continued , 55 Connecting your camcorder to a computer. b Notes • We can print out still images using the USB cable (p. 113). [USB SELECT] appears on ...
Operating Instructions
Page 56
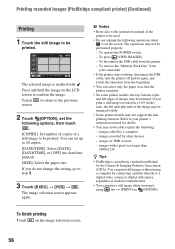
...pixel size larger than 2848×2136 z Tips • PictBridge is on again, and restart the operation from the printer. - Refer to your camcorder • If the printer stops working, disconnect the USB cable, turn the printer off and on the screen. images with . To finish printing ...only the paper sizes that the printer can print a still image when viewing it using a computer by connecting a printer directly to a digital video camera or digital still camera, regardless of 3MB or more - images edited by other devices - Press and hold the image on the image ...
...pixel size larger than 2848×2136 z Tips • PictBridge is on again, and restart the operation from the printer. - Refer to your camcorder • If the printer stops working, disconnect the USB cable, turn the printer off and on the screen. images with . To finish printing ...only the paper sizes that the printer can print a still image when viewing it using a computer by connecting a printer directly to a digital video camera or digital still camera, regardless of 3MB or more - images edited by other devices - Press and hold the image on the image ...
Operating Instructions
Page 59
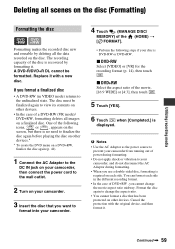
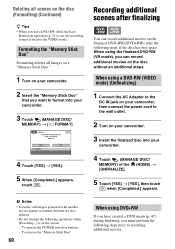
...during formatting. • When you want to format into your camcorder. 4 Touch (MANAGE DISC/ MEMORY) of the movie, [16:9 WIDE] or [4:3], then touch . 5 Touch [YES]. 6 Touch when [Completed.] is required on each side in VIDEO mode) returns to change the movie aspect ratio midway. Format ...ratio. • You cannot format a disc that you use a double-sided disc, formatting is displayed. One of the following steps if your camcorder. 3 Insert the disc that has been protected on your disc is recovered by deleting all images on a finalized disc. Cancel the protection with...
...during formatting. • When you want to format into your camcorder. 4 Touch (MANAGE DISC/ MEMORY) of the movie, [16:9 WIDE] or [4:3], then touch . 5 Touch [YES]. 6 Touch when [Completed.] is required on each side in VIDEO mode) returns to change the movie aspect ratio midway. Format ...ratio. • You cannot format a disc that you use a double-sided disc, formatting is displayed. One of the following steps if your camcorder. 3 Insert the disc that has been protected on your disc is recovered by deleting all images on a finalized disc. Cancel the protection with...
Operating Instructions
Page 60
...steps, if the disc has free space. When using a DVD-RW (VIDEO mode) (Unfinalizing) 1 Connect the AC Adaptor to the DC IN jack on your camcorder, then connect the power cord to the wall outlet. 2 Turn on your camcorder. 2 Insert the "Memory Stick Duo" that you want to format ... 47) during finalizing, you can record additional movies on the disc (Formatting) (Continued) z Tips • When you use a DVD-RW while the Easy Handycam operation (p. 31) is set, the recording format is on the disc without an additional steps. b Notes • Even the still images protected with another device...
...steps, if the disc has free space. When using a DVD-RW (VIDEO mode) (Unfinalizing) 1 Connect the AC Adaptor to the DC IN jack on your camcorder, then connect the power cord to the wall outlet. 2 Turn on your camcorder. 2 Insert the "Memory Stick Duo" that you want to format ... 47) during finalizing, you can record additional movies on the disc (Formatting) (Continued) z Tips • When you use a DVD-RW while the Easy Handycam operation (p. 31) is set, the recording format is on the disc without an additional steps. b Notes • Even the still images protected with another device...

Operating Instructions
Page 77
...take bright pictures of the ocean or a lake. Outdoors - Under video lamps in a studio, or under the same lighting conditions as people or flowers while creating a soft background. Continued , 77 Customizing your camcorder from appearing excessively white when subjects are lit by strong light. ...recording environment. B AUTO The white balance is adjusted to be adjusted according to take the vivid blue of a white landscape. * Your camcorder is set [SCENE SELECTION]. Sunrise or sunset - At party scenes or studios where the lighting conditions change quickly - PORTRAIT ( ) ...
...take bright pictures of the ocean or a lake. Outdoors - Under video lamps in a studio, or under the same lighting conditions as people or flowers while creating a soft background. Continued , 77 Customizing your camcorder from appearing excessively white when subjects are lit by strong light. ...recording environment. B AUTO The white balance is adjusted to be adjusted according to take the vivid blue of a white landscape. * Your camcorder is set [SCENE SELECTION]. Sunrise or sunset - At party scenes or studios where the lighting conditions change quickly - PORTRAIT ( ) ...
Operating Instructions
Page 80
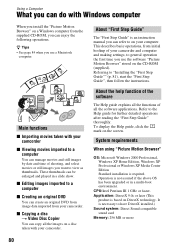
... instruction manual you can be enlarged and played in a multi-boot environment. This describes basic operations, from initial hookup of your camcorder. Referring to a computer x Creating an original DVD You can copy all the software applications. About the help function of the ...Guide"" (p. 81), start the "First Step Guide", then follow the instructions. x Copying a disc t Video Disc Copier You can create an original DVD from image data imported from your camcorder x Viewing movies imported to a computer You can enjoy the following operations. Main functions x Importing movies ...
... instruction manual you can be enlarged and played in a multi-boot environment. This describes basic operations, from initial hookup of your camcorder. Referring to a computer x Creating an original DVD You can copy all the software applications. About the help function of the ...Guide"" (p. 81), start the "First Step Guide", then follow the instructions. x Copying a disc t Video Disc Copier You can create an original DVD from image data imported from your camcorder x Viewing movies imported to a computer You can enjoy the following operations. Main functions x Importing movies ...
Operating Instructions
Page 81
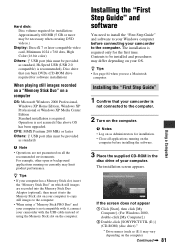
... Drive names (such as standard) b Note • Operations are recorded into the Memory Stick Duo Adaptor (optional), then insert it , connect your camcorder to the computer. 2 Turn on the computer. For example, other open or background applications running on the computer before connecting your...: DirectX 7 or later-compatible video card, Minimum 1024 × 768 dots, High Color (16 bit color) Others: USB port (this must be provided as standard, Hi-Speed USB (USB 2.0 compatible) is recommended), Disc drive that your camcorder is not assured if the above OS has been upgraded. ...
... Drive names (such as standard) b Note • Operations are recorded into the Memory Stick Duo Adaptor (optional), then insert it , connect your camcorder to the computer. 2 Turn on the computer. For example, other open or background applications running on the computer before connecting your...: DirectX 7 or later-compatible video card, Minimum 1024 × 768 dots, High Color (16 bit color) Others: USB port (this must be provided as standard, Hi-Speed USB (USB 2.0 compatible) is recommended), Disc drive that your camcorder is not assured if the above OS has been upgraded. ...


