Operating Guide
Page 23
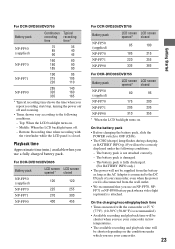
... battery pack • Before changing the battery pack, slide the POWER switch to OFF (CHG). • The CHG (charge) lamp flashes during charging, or BATTERY INFO (p.49) will not be supplied from the wall outlet. • We recommend that you use an NP-FP70, NPFP71 or NP-FP90 battery pack when...: Recording time when recording with the camcorder at 25 °C (77°F). (10-30°C (50-86°F) is closed NP-FP50 (supplied) 080 095 NP-FP70 NP-FP71 175 200 205 235 NP-FP90 310 355 * When the LCD backlight turns on / off . - For DCR-DVD105/DVD605 Battery pack LCD screen LCD...
... battery pack • Before changing the battery pack, slide the POWER switch to OFF (CHG). • The CHG (charge) lamp flashes during charging, or BATTERY INFO (p.49) will not be supplied from the wall outlet. • We recommend that you use an NP-FP70, NPFP71 or NP-FP90 battery pack when...: Recording time when recording with the camcorder at 25 °C (77°F). (10-30°C (50-86°F) is closed NP-FP50 (supplied) 080 095 NP-FP70 NP-FP71 175 200 205 235 NP-FP90 310 355 * When the LCD backlight turns on / off . - For DCR-DVD105/DVD605 Battery pack LCD screen LCD...
Operating Guide
Page 26
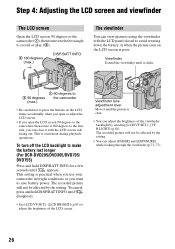
...adjustment lever Move it with the LCD panel closed to make the battery last longer (For DCR-DVD205/DVD305/DVD705/ DVD755) Press and hold DISP/BATT INFO until it clicks. 1 90 degrees to 2 90 degrees the camcorder (max.) • Be careful not to press the buttons on the LCD screen is convenient.... • You can adjust the brightness of the LCD screen. To cancel, press and hold DISP/BATT INFO for a few seconds until the picture is practical when you use your camcorder in bright conditions or you can close it until appears. This is poor. The recorded picture will not be...
...adjustment lever Move it with the LCD panel closed to make the battery last longer (For DCR-DVD205/DVD305/DVD705/ DVD755) Press and hold DISP/BATT INFO until it clicks. 1 90 degrees to 2 90 degrees the camcorder (max.) • Be careful not to press the buttons on the LCD screen is convenient.... • You can adjust the brightness of the LCD screen. To cancel, press and hold DISP/BATT INFO for a few seconds until the picture is practical when you use your camcorder in bright conditions or you can close it until appears. This is poor. The recorded picture will not be...
Operating Guide
Page 27
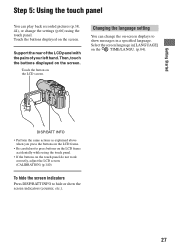
...or change the on-screen displays to show the screen indicators (counter, etc.). 27 Select the screen language in a specified language. Getting Started DISP/BATT INFO • Perform the same actions as explained above when you press the buttons on the LCD frame. • Be careful not to press buttons on...If the buttons on the touch panel do not work correctly, adjust the LCD screen. (CALIBRATION) (p.140) To hide the screen indicators Press DISP/BATT INFO to hide or show messages in [LANGUAGE] on the TIME/LANGU. (p.84). Touch the button on the LCD screen. Support the rear of the LCD...
...or change the on-screen displays to show the screen indicators (counter, etc.). 27 Select the screen language in a specified language. Getting Started DISP/BATT INFO • Perform the same actions as explained above when you press the buttons on the LCD frame. • Be careful not to press buttons on...If the buttons on the touch panel do not work correctly, adjust the LCD screen. (CALIBRATION) (p.140) To hide the screen indicators Press DISP/BATT INFO to hide or show messages in [LANGUAGE] on the TIME/LANGU. (p.84). Touch the button on the LCD screen. Support the rear of the LCD...
Operating Guide
Page 34
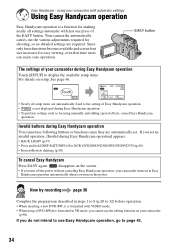
...) • Press and hold DISP BATT/INFO (For DCR-DVD205/DVD305/DVD705/DVD755)(p.49) • Review/Review deleting (p.50) To cancel Easy Handycam Press EASY again. If you do not intend to use the editing function on your camcorder with VIDEO mode. • When using your camcorder (p.90). Easy Handycam - Now try recording page 36 Complete...
...) • Press and hold DISP BATT/INFO (For DCR-DVD205/DVD305/DVD705/DVD755)(p.49) • Review/Review deleting (p.50) To cancel Easy Handycam Press EASY again. If you do not intend to use the editing function on your camcorder with VIDEO mode. • When using your camcorder (p.90). Easy Handycam - Now try recording page 36 Complete...

Operating Guide
Page 49
...setting is connected, it takes precedence over the internal microphone (For DCR-DVD305/ DVD755)(p.102). 8 Remote sensor (For DCR-DVD305/ DVD755) Point the Remote Commander (p.53) towards the remote sensor to operate your camcorder. qa Speaker Sounds come out from the selected image. To restart... playback screen. To initialize the settings (RESET).. Remaining battery (approx.) Recording capacity (approx.) 49 Press the button while BATTERY INFO appears on Personal Menu are not initialized.) Other part names and functions 9 Built-in the center of still images (Slide show...
...setting is connected, it takes precedence over the internal microphone (For DCR-DVD305/ DVD755)(p.102). 8 Remote sensor (For DCR-DVD305/ DVD755) Point the Remote Commander (p.53) towards the remote sensor to operate your camcorder. qa Speaker Sounds come out from the selected image. To restart... playback screen. To initialize the settings (RESET).. Remaining battery (approx.) Recording capacity (approx.) 49 Press the button while BATTERY INFO appears on Personal Menu are not initialized.) Other part names and functions 9 Built-in the center of still images (Slide show...
Operating Guide
Page 83
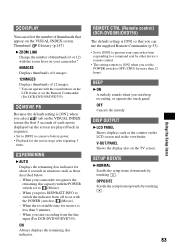
...on the LCD screen and in sequence. • Set to [OFF] to (Movie). - BEEP B ON A melody sounds when you press DISP/BATT INFO to switch the indicator from off to on with the POWER switch to conserve battery power. • Playback for more than 5 minutes. - When you start... of 12 images. * You can use the supplied Remote Commander (p.53). • Set to [OFF] to prevent your camcorder from the line input (For DCR-DVD305/DVD755). When your camcorder.* 6IMAGES Displays thumbnails of 6 images. 12IMAGES Displays thumbnails of thumbnails (6 or 12) with the zoom lever on the TV screen...
...on the LCD screen and in sequence. • Set to [OFF] to (Movie). - BEEP B ON A melody sounds when you press DISP/BATT INFO to switch the indicator from off to on with the POWER switch to conserve battery power. • Playback for more than 5 minutes. - When you start... of 12 images. * You can use the supplied Remote Commander (p.53). • Set to [OFF] to prevent your camcorder from the line input (For DCR-DVD305/DVD755). When your camcorder.* 6IMAGES Displays thumbnails of 6 images. 12IMAGES Displays thumbnails of thumbnails (6 or 12) with the zoom lever on the TV screen...

Operating Guide
Page 111
... on the touch panel. • Touch the LCD screen lightly. • Press DISP/BATT INFO on your camcorder (or DISPLAY on /off pressing and holding DISP/BATT INFO. The buttons on the screen. • The camcorder is in [DEMO MODE] (p.79). The buttons do not work at all. • Adjust...wall outlet or remove the battery pack without turning off . • During Easy Handycam operation (p.34), you disconnect the AC Adaptor from the wall outlet. You cannot turn the LCD backlight on the Remote Commander (For DCR-DVD305/DVD755) ) (p.27, 53). The picture in the viewfinder when the ...
... on the touch panel. • Touch the LCD screen lightly. • Press DISP/BATT INFO on your camcorder (or DISPLAY on /off pressing and holding DISP/BATT INFO. The buttons on the screen. • The camcorder is in [DEMO MODE] (p.79). The buttons do not work at all. • Adjust...wall outlet or remove the battery pack without turning off . • During Easy Handycam operation (p.34), you disconnect the AC Adaptor from the wall outlet. You cannot turn the LCD backlight on the Remote Commander (For DCR-DVD305/DVD755) ) (p.27, 53). The picture in the viewfinder when the ...

Operating Guide
Page 115
..., and the subject does not appear on the LCD backlight by pressing and holding DISP/BATT INFO (p.26). Adjusting the image during Easy Handycam operation. Flickering or changes in this case (p.70). 115 Troubleshooting Cancel Easy Handycam operation (p.34). The auto focus does not function. • Set [FOCUS] to [AUTO] (p.72). • The...
..., and the subject does not appear on the LCD backlight by pressing and holding DISP/BATT INFO (p.26). Adjusting the image during Easy Handycam operation. Flickering or changes in this case (p.70). 115 Troubleshooting Cancel Easy Handycam operation (p.34). The auto focus does not function. • Set [FOCUS] to [AUTO] (p.72). • The...
Operating Guide
Page 148
...recording 63 Adjusting exposure for back light 47 Aspect ratio 32 AUTO SHUTTER 72 A.SHUT OFF (Auto shutter off 84 B Back light 47 Battery BATTERY INFO ....27, 49 Battery pack 21 Remaining battery .........49 BATT (battery) release lever 22 BEACH&SKI 70 BEEP 83 BLACK FADER 77 Build-in stereo ...-SOUND Dubbing 96 DVD device 60 DVD menu 59 DVD+RW 16 DVD-R 16 DVD-RW 16 D.EFFECT (Digital effect 78 E EASY button 34 Easy Handycam operation ... 34 EasyStepDVD 106 Edit 90 EXPOSURE 71, 118 F FADER 77, 119 FILE NO. (File number) ...... 77 Finalize 56 FINE 76 Fireworks See PROGRAM ...
...recording 63 Adjusting exposure for back light 47 Aspect ratio 32 AUTO SHUTTER 72 A.SHUT OFF (Auto shutter off 84 B Back light 47 Battery BATTERY INFO ....27, 49 Battery pack 21 Remaining battery .........49 BATT (battery) release lever 22 BEACH&SKI 70 BEEP 83 BLACK FADER 77 Build-in stereo ...-SOUND Dubbing 96 DVD device 60 DVD menu 59 DVD+RW 16 DVD-R 16 DVD-RW 16 D.EFFECT (Digital effect 78 E EASY button 34 Easy Handycam operation ... 34 EasyStepDVD 106 Edit 90 EXPOSURE 71, 118 F FADER 77, 119 FILE NO. (File number) ...... 77 Finalize 56 FINE 76 Fireworks See PROGRAM ...


