
HDMI control guide
Page 2
...SYNC button on the remote while the HDMI CONTROL function is active. System Power Off: When you connect this system to a component which should be correspond with HDMI CONTROL) by HDMI CEC (Consumer Electronics Control) for DVD input mode automatically. - Refer to products featuring 'BRAVIA' Theatre Sync.... your TV so that this case, turn the TV off by SCART (EURO AV) cord. In this system is set for HDMI (high-definition multimedia interface). By connecting Sony components that are compatible with the HDMI CONTROL function with the component. • When [HDMI CONTROL] is...
...SYNC button on the remote while the HDMI CONTROL function is active. System Power Off: When you connect this system to a component which should be correspond with HDMI CONTROL) by HDMI CEC (Consumer Electronics Control) for DVD input mode automatically. - Refer to products featuring 'BRAVIA' Theatre Sync.... your TV so that this case, turn the TV off by SCART (EURO AV) cord. In this system is set for HDMI (high-definition multimedia interface). By connecting Sony components that are compatible with the HDMI CONTROL function with the component. • When [HDMI CONTROL] is...

HDMI control guide
Page 3
The options for [SETUP] appear. 1 2 ( 2 7 ) 1 8 ( 3 4 ) T 0:00:02 DVD VIDEO QUICK QUICK CUSTOM RESET BNR 4 Press X/x to on. 8 Press . 3US The Setup Display appears. The Setup item is in stop mode. The default setting ... DRC: AUDIO (HDMI): OFF AUTO OFF ON OFF OFF 6 Press X/x to select [HDMI CONTROL], then press . 7 Press X/x to select the setting. 2 Press DISPLAY when the system is selected.
The options for [SETUP] appear. 1 2 ( 2 7 ) 1 8 ( 3 4 ) T 0:00:02 DVD VIDEO QUICK QUICK CUSTOM RESET BNR 4 Press X/x to on. 8 Press . 3US The Setup Display appears. The Setup item is in stop mode. The default setting ... DRC: AUDIO (HDMI): OFF AUTO OFF ON OFF OFF 6 Press X/x to select [HDMI CONTROL], then press . 7 Press X/x to select the setting. 2 Press DISPLAY when the system is selected.
HDMI control guide
Page 4
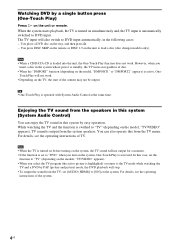
...sound will not work . However, when you select the TV program (the active picture is turned on the system. While watching the TV and the function is automatically switched to DVD input. For details, see the operating instructions of the content may not be output. The TV input will...return to the TV mode while watching the TV and a DVD by PAP (picture and picture) mode, the DVD playback will also switch to DVD input automatically, in the system whose power is standby, the TV turns on regardless of the system. 4US Watching DVD by a single button press (One-Touch Play) Press ...
...sound will not work . However, when you select the TV program (the active picture is turned on the system. While watching the TV and the function is automatically switched to DVD input. For details, see the operating instructions of the content may not be output. The TV input will...return to the TV mode while watching the TV and a DVD by PAP (picture and picture) mode, the DVD playback will also switch to DVD input automatically, in the system whose power is standby, the TV turns on regardless of the system. 4US Watching DVD by a single button press (One-Touch Play) Press ...

Operating Instructions
Page 1
2-895-967-13(1) DVD Home Theatre System Operating Instructions DAV-HDZ235 ©2007 Sony Corporation
2-895-967-13(1) DVD Home Theatre System Operating Instructions DAV-HDZ235 ©2007 Sony Corporation

Operating Instructions
Page 3
...cart/apparatus combination to avoid injury from tip-over. 13) Unplug this system so that the AC power cord (mains) can be connected to the grounding system of the building, as practical. Before operating this system, please read this manual thoroughly and retain it is not disconnected from...the NEC that the cable ground shall be unplugged from the AC power source (mains) as long as it for purchasing Sony DVD Home Theatre System. Note to CATV system installer: This reminder is damaged, liquid has been spilled or objects have fallen into the apparatus, the apparatus has been ...
...cart/apparatus combination to avoid injury from tip-over. 13) Unplug this system so that the AC power cord (mains) can be connected to the grounding system of the building, as practical. Before operating this system, please read this manual thoroughly and retain it is not disconnected from...the NEC that the cable ground shall be unplugged from the AC power source (mains) as long as it for purchasing Sony DVD Home Theatre System. Note to CATV system installer: This reminder is damaged, liquid has been spilled or objects have fallen into the apparatus, the apparatus has been ...

Operating Instructions
Page 4
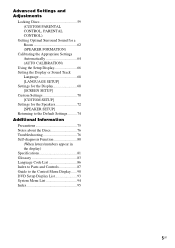
... the Delay Between the Picture and Sound 44 (A/V SYNC) About MP3 Audio Tracks and JPEG Image Files 45 Playing DATA CDs or DATA DVDs with MP3 Audio Tracks and JPEG Image Files 47 Playing Audio Tracks and Images as a Slide Show with Sound 49 Playing VIDEO CDs with... the THEATRE SYNC Function 55 Using the Sound Effect 56 Using the Sleep Timer 57 Changing the Brightness of Contents Welcome 3 About This Manual 6 This System Can Play the Following Discs 6 Getting Started - ADVANCED - Turning off the Demonstration 18 Installing the Speakers on a Wall.......... 19 Connecting the TV ...
... the Delay Between the Picture and Sound 44 (A/V SYNC) About MP3 Audio Tracks and JPEG Image Files 45 Playing DATA CDs or DATA DVDs with MP3 Audio Tracks and JPEG Image Files 47 Playing Audio Tracks and Images as a Slide Show with Sound 49 Playing VIDEO CDs with... the THEATRE SYNC Function 55 Using the Sound Effect 56 Using the Sleep Timer 57 Changing the Brightness of Contents Welcome 3 About This Manual 6 This System Can Play the Following Discs 6 Getting Started - ADVANCED - Turning off the Demonstration 18 Installing the Speakers on a Wall.......... 19 Connecting the TV ...
Operating Instructions
Page 5
... appear in the display) Specifications 81 Glossary 83 Language Code List 86 Index to Parts and Controls 87 Guide to the Control Menu Display...... 90 DVD Setup Display List 93 System Menu List 94 Index 95 5US
... appear in the display) Specifications 81 Glossary 83 Language Code List 86 Index to Parts and Controls 87 Guide to the Control Menu Display...... 90 DVD Setup Display List 93 System Menu List 94 Index 95 5US
Operating Instructions
Page 6
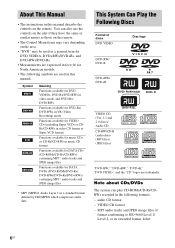
... The following formats: - This System Can Play the Following Discs Format of format conforming to ISO 9660 Level 1/ Level 2, or its extended format, Joliet 6US Symbol Meaning Functions available for DVD VIDEOs, DVD-Rs/DVD-RWs in video mode, and DVD+Rs/ DVD+RWs Functions available for DVD-Rs/ DVD-RWs in VR (Video Recording)... JPEG image files * MP3 (MPEG1 Audio Layer 3) is a standard format defined by ISO/MPEG which compresses audio data. Note about CDs/DVDs The system can also use the controls on the unit if they have the same or similar names as those on the remote. • The Control...
... The following formats: - This System Can Play the Following Discs Format of format conforming to ISO 9660 Level 1/ Level 2, or its extended format, Joliet 6US Symbol Meaning Functions available for DVD VIDEOs, DVD-Rs/DVD-RWs in video mode, and DVD+Rs/ DVD+RWs Functions available for DVD-Rs/ DVD-RWs in VR (Video Recording)... JPEG image files * MP3 (MPEG1 Audio Layer 3) is a standard format defined by ISO/MPEG which compresses audio data. Note about CDs/DVDs The system can also use the controls on the unit if they have the same or similar names as those on the remote. • The Control...

Operating Instructions
Page 7
...recorded in later sessions can also be played. continued 7US Note that do not contain MP3 audio tracks or JPEG image files • DVD-RAMs Also, the system cannot play the following formats: - Recently, various music discs encoded with some record companies. About Multi Session CD • This...that among those recorded in the formats listed on this case, view the disc by some DVD+RWs/DVD+Rs, even if they have been correctly finalized. The system can play DVD-ROMs/DVD+RWs/ DVD-RWs/DVD+Rs/DVD-Rs recorded in the first session. MP3 audio tracks and JPEG image files of format ...
...recorded in later sessions can also be played. continued 7US Note that do not contain MP3 audio tracks or JPEG image files • DVD-RAMs Also, the system cannot play the following formats: - Recently, various music discs encoded with some record companies. About Multi Session CD • This...that among those recorded in the formats listed on this case, view the disc by some DVD+RWs/DVD+Rs, even if they have been correctly finalized. The system can play DVD-ROMs/DVD+RWs/ DVD-RWs/DVD+Rs/DVD-Rs recorded in the first session. MP3 audio tracks and JPEG image files of format ...

Operating Instructions
Page 8
... set by software producers. Note about playback operations of DVDs and VIDEO CDs Some playback operations of the unit and will only play DVDs labeled with the same region code. Since this system plays DVDs and VIDEO CDs according to read the operating instructions supplied...by area limitations.] will also play any other intellectual property rights. patents and other DVD VIDEO, the message [Playback prohibited by U.S. Reverse engineering or disassembly is intended for home and other limited viewing uses only unless otherwise authorized by area restrictions. Be sure...
... set by software producers. Note about playback operations of DVDs and VIDEO CDs Some playback operations of the unit and will only play DVDs labeled with the same region code. Since this system plays DVDs and VIDEO CDs according to read the operating instructions supplied...by area limitations.] will also play any other intellectual property rights. patents and other DVD VIDEO, the message [Playback prohibited by U.S. Reverse engineering or disassembly is intended for home and other limited viewing uses only unless otherwise authorized by area restrictions. Be sure...
Operating Instructions
Page 10
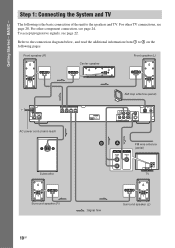
...following is the basic connection of the unit to the speakers and TV. For other component connection, see page 22. Step 1: Connecting the System and TV The following pages. To accept progressive signals, see page 24. Front speaker (R) Center speaker Front speaker (L) SPEAKER CENTER WOOFER ...SPEAKER FRONT R FRONT L SUR R SUR L AC power cord (mains lead) Subwoofer OUT (DVD ONLY) AM loop antenna (aerial) TV / VIDEO (DVD ONLY) R AUDIO IN L VIDEO Y PB/CB PR/CR COMPONENT VIDEO OUT S VIDEO (DVD ONLY) MONITOR OUT COAXIAL AM FM75 B A AUDIO OUT L VIDEO IN R FM wire ...
...following is the basic connection of the unit to the speakers and TV. For other component connection, see page 22. Step 1: Connecting the System and TV The following pages. To accept progressive signals, see page 24. Front speaker (R) Center speaker Front speaker (L) SPEAKER CENTER WOOFER ...SPEAKER FRONT R FRONT L SUR R SUR L AC power cord (mains lead) Subwoofer OUT (DVD ONLY) AM loop antenna (aerial) TV / VIDEO (DVD ONLY) R AUDIO IN L VIDEO Y PB/CB PR/CR COMPONENT VIDEO OUT S VIDEO (DVD ONLY) MONITOR OUT COAXIAL AM FM75 B A AUDIO OUT L VIDEO IN R FM wire ...
Operating Instructions
Page 15
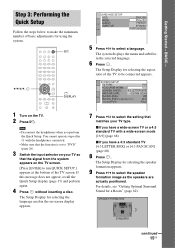
... Display for a Room" (page 62). For details, see "Getting Optimal Surround Sound for selecting the speaker formation appears. 9 Press C/c to "DVD" (page 26). 3 Switch the input selector on your TV so that matches your TV type. BASIC - Note • Disconnect the headphones when... you perform the Quick Setup. Step 3: Performing the Quick Setup Follow the steps below to select the setting that the signal from the system appears on the TV. 2 Press [/1. "/1 C/X/x/c, DISPLAY LANGUAGE SETUP OSD: MENU: AUDIO: SUBTITLE: ENGLISH ENGLISH FRENCH SPANISH PORTUGUESE 5 Press X/x to...
... Display for a Room" (page 62). For details, see "Getting Optimal Surround Sound for selecting the speaker formation appears. 9 Press C/c to "DVD" (page 26). 3 Switch the input selector on your TV so that matches your TV type. BASIC - Note • Disconnect the headphones when... you perform the Quick Setup. Step 3: Performing the Quick Setup Follow the steps below to select the setting that the signal from the system appears on the TV. 2 Press [/1. "/1 C/X/x/c, DISPLAY LANGUAGE SETUP OSD: MENU: AUDIO: SUBTITLE: ENGLISH ENGLISH FRENCH SPANISH PORTUGUESE 5 Press X/x to...

Operating Instructions
Page 17
The Quick Setup display appears. 17US The Control Menu display appears. 2 Press X/x to select press . [SETUP], then The options for [SETUP] appear. 1 2 ( 2 7 ) 1 8 ( 3 4 ) T 0:00:02 DVD VIDEO QUICK QUICK CUSTOM RESET BNR 3 Press X/x to select [QUICK], then press . BASIC - To recall the Quick Setup display 1 Press DISPLAY when the system is in stop mode. Getting Started -
The Quick Setup display appears. 17US The Control Menu display appears. 2 Press X/x to select press . [SETUP], then The options for [SETUP] appear. 1 2 ( 2 7 ) 1 8 ( 3 4 ) T 0:00:02 DVD VIDEO QUICK QUICK CUSTOM RESET BNR 3 Press X/x to select [QUICK], then press . BASIC - To recall the Quick Setup display 1 Press DISPLAY when the system is in stop mode. Getting Started -

Operating Instructions
Page 20
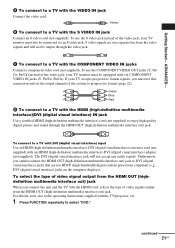
... TV with COMPONENT VIDEO IN jacks TV with S VIDEO IN jack TV with VIDEO IN jack :Signal flow * HDMI (high-definition multimedia interface) The system incorporates High-Definition Multimedia Interface (HDMITM) technology. Check the jacks of HDMI Licensing LLC. 20US Connecting the TV (Advanced) Sends the played back DVD image to D (HDMI).
... TV with COMPONENT VIDEO IN jacks TV with S VIDEO IN jack TV with VIDEO IN jack :Signal flow * HDMI (high-definition multimedia interface) The system incorporates High-Definition Multimedia Interface (HDMITM) technology. Check the jacks of HDMI Licensing LLC. 20US Connecting the TV (Advanced) Sends the played back DVD image to D (HDMI).
Operating Instructions
Page 21
... TV/projector, etc. 1 Press FUNCTION repeatedly to the operating instructions supplied with via an S video jack. For details, refer also to select "DVD." The DVI (digital visual interface) jack will not be connected via COMPONENT VIDEO IN jacks (Y, PB/CB, PR/CR). continued 21US S video ...multimedia interface out) jack to progressive format (page 22). A To connect to a TV with the HDMI cord, selects the type of the system to DVI (digital visual interface) jacks that are on the computer displays). Furthermore, you must also be output through the HDMI OUT (high-...
... TV/projector, etc. 1 Press FUNCTION repeatedly to the operating instructions supplied with via an S video jack. For details, refer also to select "DVD." The DVI (digital visual interface) jack will not be connected via COMPONENT VIDEO IN jacks (Y, PB/CB, PR/CR). continued 21US S video ...multimedia interface out) jack to progressive format (page 22). A To connect to a TV with the HDMI cord, selects the type of the system to DVI (digital visual interface) jacks that are on the computer displays). Furthermore, you must also be output through the HDMI OUT (high-...

Operating Instructions
Page 22
...] are stretched vertically. Does your TV screen. The current type of video signals appears in the front panel display when the system outputs progressive signals. 1 Press FUNCTION repeatedly to select "DVD." 22US When connecting to a TV that accepts progressive signals. 2 Press VIDEO FORMAT. Each time you need to connect to a standard 4:3 screen...
...] are stretched vertically. Does your TV screen. The current type of video signals appears in the front panel display when the system outputs progressive signals. 1 Press FUNCTION repeatedly to select "DVD." 22US When connecting to a TV that accepts progressive signals. 2 Press VIDEO FORMAT. Each time you need to connect to a standard 4:3 screen...

Operating Instructions
Page 23
... detects the software type, and selects the appropriate conversion method. your TV does not accept progressive signals, or, - In order for selecting the type of DVD software that the picture will not be clear or no picture will appear if you connect the unit and the TV with the HDMI cord... during the system is set to "NORMAL (INTERLACE)," the system is connected to the COMPONENT VIDEO OUT jacks. your TV accepts progressive signals, and, - the TV is derived from the HDMI OUT...
... detects the software type, and selects the appropriate conversion method. your TV does not accept progressive signals, or, - In order for selecting the type of DVD software that the picture will not be clear or no picture will appear if you connect the unit and the TV with the HDMI cord... during the system is set to "NORMAL (INTERLACE)," the system is connected to the COMPONENT VIDEO OUT jacks. your TV accepts progressive signals, and, - the TV is derived from the HDMI OUT...
Operating Instructions
Page 24
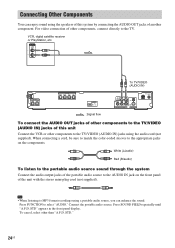
... R AUDIO IN L VIDEO Y PB/CB PR/CR COMPONENT VIDEO OUT S VIDEO (DVD ONLY) MONITOR OUT COAXIAL AM FM75 To connect the AUDIO OUT jacks of other components to the TV/VIDEO (AUDIO IN) jacks of this system by connecting the AUDIO OUT jacks of another component. White (L/audio) Red (R/audio) To... listen to the portable audio source sound through the system Connect the audio output jacks of the portable audio source to the AUDIO IN jack on the components. For video connection of other than "A.F.D....
... R AUDIO IN L VIDEO Y PB/CB PR/CR COMPONENT VIDEO OUT S VIDEO (DVD ONLY) MONITOR OUT COAXIAL AM FM75 To connect the AUDIO OUT jacks of other components to the TV/VIDEO (AUDIO IN) jacks of this system by connecting the AUDIO OUT jacks of another component. White (L/audio) Red (R/audio) To... listen to the portable audio source sound through the system Connect the audio output jacks of the portable audio source to the AUDIO IN jack on the components. For video connection of other than "A.F.D....

Operating Instructions
Page 26
... 5 Load a disc. For details, see the HDMI CONTROL Guide (supplied separately). Additional operations To Stop Pause Resume play ). Unless the system is connected to select "DVD." 4 Press A. 26US Note • When you can be synch-operated with the HDMI cord, you play an 8 cm disc, place...the TV screen and in the front panel display. Be careful that is set to "DVD," press FUNCTION to the system with the HDMI cord can operate them simply, using the HDMI CONTROL function. The system starts playback (continuous play after pause Press x X X or H Place one disc on...
... 5 Load a disc. For details, see the HDMI CONTROL Guide (supplied separately). Additional operations To Stop Pause Resume play ). Unless the system is connected to select "DVD." 4 Press A. 26US Note • When you can be synch-operated with the HDMI cord, you play an 8 cm disc, place...the TV screen and in the front panel display. Be careful that is set to "DVD," press FUNCTION to the system with the HDMI cord can operate them simply, using the HDMI CONTROL function. The system starts playback (continuous play after pause Press x X X or H Place one disc on...

Operating Instructions
Page 27
...the rear panel. Replay the previous scene* (instant replay) during playback. * DVD VIDEOs/DVD-RWs/DVD-Rs only. ** DVD VIDEOs/DVD-RWs/DVD-Rs/DVD+RWs/ DVD+Rs only. Enjoying the Radio or Other Components X/x/c, FUNCTION SYSTEM MENU Selecting the connected component You can use the instant replay or instant advance ...temporarily MUTING. continued 27US Refer to the TV/VIDEO jacks on the unit. Each time you press FUNCTION, the mode of the system changes in the front panel display. DVD t TUNER FM t TUNER AM t TV/VIDEO t AUDIO t ... To cancel, press it again or VOLUME + to ...
...the rear panel. Replay the previous scene* (instant replay) during playback. * DVD VIDEOs/DVD-RWs/DVD-Rs only. ** DVD VIDEOs/DVD-RWs/DVD-Rs/DVD+RWs/ DVD+Rs only. Enjoying the Radio or Other Components X/x/c, FUNCTION SYSTEM MENU Selecting the connected component You can use the instant replay or instant advance ...temporarily MUTING. continued 27US Refer to the TV/VIDEO jacks on the unit. Each time you press FUNCTION, the mode of the system changes in the front panel display. DVD t TUNER FM t TUNER AM t TV/VIDEO t AUDIO t ... To cancel, press it again or VOLUME + to ...


