
Operating Instructions
Page 16
... system is installed may interfere with measurement. 13 Unplug the calibration mic and press C/ c to select [YES]. Give consideration to change the position of each speaker should face the calibration mic, and there should be no obstruction between the speakers and the calibration mic... you change any Step. Getting Started - AUDIO IN / A.CAL MIC Calibration mic Note • Loud test sound is finished. AUTO CALIBRATION Connect calibration mic. Quick Setup is output when [AUTO CALIBRATION] starts. Auto Calibration starts. 16US The front of the speakers, reset the speaker settings...
... system is installed may interfere with measurement. 13 Unplug the calibration mic and press C/ c to select [YES]. Give consideration to change the position of each speaker should face the calibration mic, and there should be no obstruction between the speakers and the calibration mic... you change any Step. Getting Started - AUDIO IN / A.CAL MIC Calibration mic Note • Loud test sound is finished. AUTO CALIBRATION Connect calibration mic. Quick Setup is output when [AUTO CALIBRATION] starts. Auto Calibration starts. 16US The front of the speakers, reset the speaker settings...

Operating Instructions
Page 64
... X/x to children and neighbor. 1 Press FUNCTION repeatedly until "DVD" appears in the front panel display. 2 Press DISPLAY when the system is in [SPEAKER SETUP], the [SPEAKER FORMATION] setting returns to [STANDARD]. The options for [AUTO CALIBRATION] appear. AUTO CALIBRATION Connect calibration mic. C. SPEAKER FORMATION Continue with [AUTO CALIBRATION], see Step 4 of the speakers, it is output when...
... X/x to children and neighbor. 1 Press FUNCTION repeatedly until "DVD" appears in the front panel display. 2 Press DISPLAY when the system is in [SPEAKER SETUP], the [SPEAKER FORMATION] setting returns to [STANDARD]. The options for [AUTO CALIBRATION] appear. AUTO CALIBRATION Connect calibration mic. C. SPEAKER FORMATION Continue with [AUTO CALIBRATION], see Step 4 of the speakers, it is output when...

Operating Instructions
Page 65
... FRONT L : YES FRONT R : YES CENTER : NONE SUBWOOFER : YES SURROUND L : NONE SURROUND R : NONE If OK, unplug calibration mic and select "YES". Please wait a moment. The front of the room in the measurement area and making noise during the measurement. the headphones...not supplied). Advanced Settings and Adjustments Connect the calibration mic to select [YES] or [NO], then press . AUDIO IN / A.CAL MIC Calibration mic Note • Avoid being in which the system is not OK. x The measurement is excessive noise around the calibration mic. - YES NO 5 Press X/x to ...
... FRONT L : YES FRONT R : YES CENTER : NONE SUBWOOFER : YES SURROUND L : NONE SURROUND R : NONE If OK, unplug calibration mic and select "YES". Please wait a moment. The front of the room in the measurement area and making noise during the measurement. the headphones...not supplied). Advanced Settings and Adjustments Connect the calibration mic to select [YES] or [NO], then press . AUDIO IN / A.CAL MIC Calibration mic Note • Avoid being in which the system is not OK. x The measurement is excessive noise around the calibration mic. - YES NO 5 Press X/x to ...

Operating Instructions
Page 66
do not disconnect the calibration mic. • The measurement for [SETUP] appear. 1 2 ( 2 7 ) 1 8 ( 3 4 ) T 0:00:02 DVD VIDEO QUICK QUICK CUSTOM RESET BNR 4 Press X/x to select [CUSTOM],.... LANGUAGE SETUP OSD: MENU: AUDIO: SUBTITLE: ENGLISH ENGLISH ORIGINAL AUDIO FOLLOW 66US Note • While the Auto Calibration function works: - do not turn off the power. - Using the Setup Display By using the Setup Display,...[SUBWOOFER] is in the front panel display. 2 Press DISPLAY when the system is always [YES] since the system does not perform subwoofer calibration. The Setup Display appears.
do not disconnect the calibration mic. • The measurement for [SETUP] appear. 1 2 ( 2 7 ) 1 8 ( 3 4 ) T 0:00:02 DVD VIDEO QUICK QUICK CUSTOM RESET BNR 4 Press X/x to select [CUSTOM],.... LANGUAGE SETUP OSD: MENU: AUDIO: SUBTITLE: ENGLISH ENGLISH ORIGINAL AUDIO FOLLOW 66US Note • While the Auto Calibration function works: - do not turn off the power. - Using the Setup Display By using the Setup Display,...[SUBWOOFER] is in the front panel display. 2 Press DISPLAY when the system is always [YES] since the system does not perform subwoofer calibration. The Setup Display appears.

Operating Instructions
Page 82
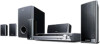
...ohms 93 × 162 × 75 mm (3 3/4 × 6 1/2 × 3 inches) (w/h/d) 0.6 kg (1 lb 6 oz) Subwoofer (SS-WS71) Speaker system Speaker unit Rated impedance Dimensions (approx.) Mass (approx.) Bass reflex 160 mm (6 3/8 inches) dia, cone type 3.0 ohms 197 × 322 × 345 mm ... red/white/green/gray/blue/purple) • Video Cord (1) • Remote Commander (remote) (1) • R6 (size AA) batteries (2) • Calibration mic (1) • Foot pads (1 set) 82US • Operating Instructions • HDMI CONTROL Guide • Speaker and TV connections (card) •Standby power...
...ohms 93 × 162 × 75 mm (3 3/4 × 6 1/2 × 3 inches) (w/h/d) 0.6 kg (1 lb 6 oz) Subwoofer (SS-WS71) Speaker system Speaker unit Rated impedance Dimensions (approx.) Mass (approx.) Bass reflex 160 mm (6 3/8 inches) dia, cone type 3.0 ohms 197 × 322 × 345 mm ... red/white/green/gray/blue/purple) • Video Cord (1) • Remote Commander (remote) (1) • R6 (size AA) batteries (2) • Calibration mic (1) • Foot pads (1 set) 82US • Operating Instructions • HDMI CONTROL Guide • Speaker and TV connections (card) •Standby power...


