
Operating Instructions
Page 4
..."DVD" may be used . About the S-AIR function The system is underlined. For details on the remote. DAVHDX575WC is used as a general term for a DVD VIDEO, DVD+RW/DVD+R, and DVDRW/DVD-R. • Measurements are for DAVHDX575WC, DAV-HDX578W, DAVHDX678WF, and DAV-HDX975WF...AIR products is as follows: • DAV-HDX575WC: Surround amplifier (optional) S-AIR receiver (supplied) • DAV-HDX578W: Surround amplifier (supplied) S-AIR receiver (optional) • DAV-HDX678WF: Surround amplifier (supplied) S-AIR receiver (supplied) • DAV-HDX975WF: Surround amplifier (supplied) S-AIR ...
..."DVD" may be used . About the S-AIR function The system is underlined. For details on the remote. DAVHDX575WC is used as a general term for a DVD VIDEO, DVD+RW/DVD+R, and DVDRW/DVD-R. • Measurements are for DAVHDX575WC, DAV-HDX578W, DAVHDX678WF, and DAV-HDX975WF...AIR products is as follows: • DAV-HDX575WC: Surround amplifier (optional) S-AIR receiver (supplied) • DAV-HDX578W: Surround amplifier (supplied) S-AIR receiver (optional) • DAV-HDX678WF: Surround amplifier (supplied) S-AIR receiver (supplied) • DAV-HDX975WF: Surround amplifier (supplied) S-AIR ...

Operating Instructions
Page 5
... Getting Started Step 1: Assembling the Speakers 15 Step 2: Positioning the System... 21 Step 3: Connecting the System... 25 Step 4: Setting up the Wireless System 42 Step 5: Performing the Quick Setup 44 Step 6: Enjoying Sound ...Radio 78 Control for HDMI/External Audio Device Using the Control for HDMI Function for "BRAVIA" Sync 80 Using the DIGITAL MEDIA PORT Adapter 83 Using an S-AIR Product 84 ...a Room 90 Calibrating the Appropriate Settings Automatically 91 Controlling the TV with the Supplied Remote 92 Using the Sound Effect 94 Using the Sleep Timer 94 Changing the Brightness of...
... Getting Started Step 1: Assembling the Speakers 15 Step 2: Positioning the System... 21 Step 3: Connecting the System... 25 Step 4: Setting up the Wireless System 42 Step 5: Performing the Quick Setup 44 Step 6: Enjoying Sound ...Radio 78 Control for HDMI/External Audio Device Using the Control for HDMI Function for "BRAVIA" Sync 80 Using the DIGITAL MEDIA PORT Adapter 83 Using an S-AIR Product 84 ...a Room 90 Calibrating the Appropriate Settings Automatically 91 Controlling the TV with the Supplied Remote 92 Using the Sound Effect 94 Using the Sleep Timer 94 Changing the Brightness of...

Operating Instructions
Page 9
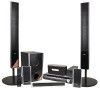
Getting Started Getting Started Unpacking DAV-HDX575WC • Front speakers (2) • Speaker cords (6, red/white/ • Post covers (2) green/gray/blue/purple) • Video cord (1) • Screws (large, with washer) (4) • Center speaker (1) • Surround speakers (2) • Subwoofer (1) • Remote commander (remote) (1) • R6 (size AA) batteries (2) • Screws (small) (6) • Wireless transceiver for...
Getting Started Getting Started Unpacking DAV-HDX575WC • Front speakers (2) • Speaker cords (6, red/white/ • Post covers (2) green/gray/blue/purple) • Video cord (1) • Screws (large, with washer) (4) • Center speaker (1) • Surround speakers (2) • Subwoofer (1) • Remote commander (remote) (1) • R6 (size AA) batteries (2) • Screws (small) (6) • Wireless transceiver for...
Operating Instructions
Page 10
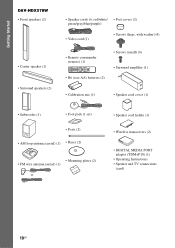
Getting Started DAV-HDX578W • Front speakers (2) • Center speaker (1) • Surround speakers (2) • Speaker cords (6, red/white/ • Post covers (2) green/gray/blue/purple) • Video cord (1) • Screws (large, with washer) (4) • Remote commander (remote) (1) • R6 (size AA) batteries (2) • Screws (small) (6) • Surround amplifier (1) • Calibration mic (1) • Speaker cord...
Getting Started DAV-HDX578W • Front speakers (2) • Center speaker (1) • Surround speakers (2) • Speaker cords (6, red/white/ • Post covers (2) green/gray/blue/purple) • Video cord (1) • Screws (large, with washer) (4) • Remote commander (remote) (1) • R6 (size AA) batteries (2) • Screws (small) (6) • Surround amplifier (1) • Calibration mic (1) • Speaker cord...

Operating Instructions
Page 11
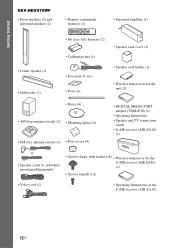
Getting Started DAV-HDX678WF • Front speakers (2) • Video cord (1) • Surround amplifier (1) • Remote commander (remote) (1) • Speaker cord cover (1) • Center speaker (1) • Surround speakers (2) • R6 (size AA) batteries (2) • Calibration mic (1) • Foot pads (1 set) • Speaker cord ...
Getting Started DAV-HDX678WF • Front speakers (2) • Video cord (1) • Surround amplifier (1) • Remote commander (remote) (1) • Speaker cord cover (1) • Center speaker (1) • Surround speakers (2) • R6 (size AA) batteries (2) • Calibration mic (1) • Foot pads (1 set) • Speaker cord ...
Operating Instructions
Page 12
Getting Started DAV-HDX975WF • Front speakers (2) and surround speakers (2) • Remote commander (remote) (1) • Surround amplifier (1) • Center speaker (1) • Subwoofer (1) • R6 (size AA) batteries (2) • Calibration mic (1) • Speaker cord cover (1) • Foot pads (1 set) • ...
Getting Started DAV-HDX975WF • Front speakers (2) and surround speakers (2) • Remote commander (remote) (1) • Surround amplifier (1) • Center speaker (1) • Subwoofer (1) • R6 (size AA) batteries (2) • Calibration mic (1) • Speaker cord cover (1) • Foot pads (1 set) • ...

Operating Instructions
Page 13
... Press TV so that TV lights up for an extended period of the remote You can operate this system and TV using the supplied remote. About operation of time, remove the batteries to use the remote for 1 second. x TV operation Press TV so that TV flashes four times. Note • Do not leave... the remote in an extremely hot or humid place. • Do not use a new battery with the Supplied Remote" (page 92). 13US When operating the system, point the remote at the TV. Getting Started Attaching the foot pads to the subwoofer Attach...
... Press TV so that TV lights up for an extended period of the remote You can operate this system and TV using the supplied remote. About operation of time, remove the batteries to use the remote for 1 second. x TV operation Press TV so that TV flashes four times. Note • Do not leave... the remote in an extremely hot or humid place. • Do not use a new battery with the Supplied Remote" (page 92). 13US When operating the system, point the remote at the TV. Getting Started Attaching the foot pads to the subwoofer Attach...

Operating Instructions
Page 14
Getting Started TV Note • Do not expose the remote sensor to direct sunlight or lighting apparatus. Doing so may cause a malfunction. 14US
Getting Started TV Note • Do not expose the remote sensor to direct sunlight or lighting apparatus. Doing so may cause a malfunction. 14US

Operating Instructions
Page 41
Getting Started Tip • When you purchase the system from new, or if the system is at its factory default settings (ex., after performing "COLD RESET" (page 97)), you can turn off the demonstration simply by pressing [/1 on the remote. 41US
Getting Started Tip • When you purchase the system from new, or if the system is at its factory default settings (ex., after performing "COLD RESET" (page 97)), you can turn off the demonstration simply by pressing [/1 on the remote. 41US

Operating Instructions
Page 53
... • Depending on the system status, the volume level may not appear on the TV screen. • When you play ) of the tray. x To load other discs Press DISC SKIP on the remote or DISC 15 on the tray. 7 Press H. The volume level appears on the DVD VIDEO or VIDEO CD, some operations... may cause malfunction. • Do not place more than one disc on the unit. Unless the system is not loaded with your finger, as...
... • Depending on the system status, the volume level may not appear on the TV screen. • When you play ) of the tray. x To load other discs Press DISC SKIP on the remote or DISC 15 on the tray. 7 Press H. The volume level appears on the DVD VIDEO or VIDEO CD, some operations... may cause malfunction. • Do not place more than one disc on the unit. Unless the system is not loaded with your finger, as...

Operating Instructions
Page 76
..., the test tone is emitted from the HDMI OUT jack. select one of all the speakers at one time, turn the VOLUME control on the remote. • To return to the default setting when changing a setting, select the item, then press CLEAR. Note that only the [CONNECTION] setting does not return...
..., the test tone is emitted from the HDMI OUT jack. select one of all the speakers at one time, turn the VOLUME control on the remote. • To return to the default setting when changing a setting, select the item, then press CLEAR. Note that only the [CONNECTION] setting does not return...

Operating Instructions
Page 80
... to the operating instructions of the Control for HDMI function. Easy Setting function, you connect a component other than Sony, even if the component is compatible with the Control for HDMI function is compatible with the component. • The...system's remote for HDMI (High-Definition Multimedia Interface). Easy Setting function. For details of the setting of the system and TV. The Control for HDMI - If the TV is available on the TV and press [/1 to the operating instructions of the system and TV manually. One-Touch Play (page 81) - ONE-TOUCH THEATER PLAY TV BRAVIA...
... to the operating instructions of the Control for HDMI function. Easy Setting function, you connect a component other than Sony, even if the component is compatible with the Control for HDMI function is compatible with the component. • The...system's remote for HDMI (High-Definition Multimedia Interface). Easy Setting function. For details of the setting of the system and TV. The Control for HDMI - If the TV is available on the TV and press [/1 to the operating instructions of the system and TV manually. One-Touch Play (page 81) - ONE-TOUCH THEATER PLAY TV BRAVIA...

Operating Instructions
Page 81
...system is in the front panel display. - The Setup Display appears. 5 Press X/x to select [CUSTOM], then press . You select the "DVD" function by pressing the disc tray. - Note • Before using the POWER button on the TV's remote or TV [/1 on the disc, playback may not turn off in sync with the Theater...; Make sure the HDMI connection is set the [CONTROL FOR HDMI] to start. Using the Theater Mode (Theater Mode) If your TV is correct. Control for DVD input mode, and the system starts playing a disc automatically. and H appears in the front panel display. - r r Minimizes...
...system is in the front panel display. - The Setup Display appears. 5 Press X/x to select [CUSTOM], then press . You select the "DVD" function by pressing the disc tray. - Note • Before using the POWER button on the TV's remote or TV [/1 on the disc, playback may not turn off in sync with the Theater...; Make sure the HDMI connection is set the [CONTROL FOR HDMI] to start. Using the Theater Mode (Theater Mode) If your TV is correct. Control for DVD input mode, and the system starts playing a disc automatically. and H appears in the front panel display. - r r Minimizes...

Operating Instructions
Page 82
...TV is turned on before PAP mode. • If you select a TV program during watching TV, the System Audio Control function is activated and the TV sound is in this system by pressing THEATER, loud sound may be output for a moment. • While the TV is muted. Setting the Maximum ...function is output from the TV menu. You can also operate the System Audio Control function from the system speakers automatically. • You can use this by the remote of the TV. • If you activate One-Touch Play during DVD playback with an audio cord (not supplied) and an HDMI cable ...
...TV is turned on before PAP mode. • If you select a TV program during watching TV, the System Audio Control function is activated and the TV sound is in this system by pressing THEATER, loud sound may be output for a moment. • While the TV is muted. Setting the Maximum ...function is output from the TV menu. You can also operate the System Audio Control function from the system speakers automatically. • You can use this by the remote of the TV. • If you activate One-Touch Play during DVD playback with an audio cord (not supplied) and an HDMI cable ...

Operating Instructions
Page 83
... 34). The following illustration shows an example of the connected component. In this case. ./> H X x Playing the connected component on the remote or the unit. To cancel, select other than the DIGITAL MEDIA PORT adapter. • Do not connect or disconnect the DIGITAL MEDIA PORT ...adapter to operate a connected component using a portable audio source, you can enhance the sound. For details on the system. In this case, the system outputs the composite video signal only, regardless of the type of the DIGITAL MEDIA PORT adapter. By connecting a DIGITAL MEDIA ...
... 34). The following illustration shows an example of the connected component. In this case. ./> H X x Playing the connected component on the remote or the unit. To cancel, select other than the DIGITAL MEDIA PORT adapter. • Do not connect or disconnect the DIGITAL MEDIA PORT ...adapter to operate a connected component using a portable audio source, you can enhance the sound. For details on the system. In this case, the system outputs the composite video signal only, regardless of the type of the DIGITAL MEDIA PORT adapter. By connecting a DIGITAL MEDIA ...

Operating Instructions
Page 85
... S-AIR sub unit (Pairing operation)" (page 87). 2 Press S-AIR MODE on the unit. • "SEPARATE": You can enjoy the system's sound by performing the pairing operation (page 87). Note • It is easy to set to SURROUND. 2 Set the S-AIR ID ...pair the unit and another S-AIR sub unit, such as a surround amplifier, by the pairing operation, you may also receive your system's sound if IDs are using the S-AIR receiver. The S-AIR receiver can identify the unit with the S-AIR sub unit (page... S-AIR mode appears in another room For the S-AIR receiver You can set on the remote.
... S-AIR sub unit (Pairing operation)" (page 87). 2 Press S-AIR MODE on the unit. • "SEPARATE": You can enjoy the system's sound by performing the pairing operation (page 87). Note • It is easy to set to SURROUND. 2 Set the S-AIR ID ...pair the unit and another S-AIR sub unit, such as a surround amplifier, by the pairing operation, you may also receive your system's sound if IDs are using the S-AIR receiver. The S-AIR receiver can identify the unit with the S-AIR sub unit (page... S-AIR mode appears in another room For the S-AIR receiver You can set on the remote.

Operating Instructions
Page 86
...is selected on the unit, you turn the system off with the disc tray opened while "S-AIR STBY" is in standby mode or turned on the S-AIR receiver. The default setting differs depending on the remote and unit. The setting is set to 2 channel. • The sound of the S-AIR receiver... may not close automatically. • When the wireless transceiver is set The function changes as the unit, select "MAIN UNIT." To control the system from the S-AIR receiver You...
...is selected on the unit, you turn the system off with the disc tray opened while "S-AIR STBY" is in standby mode or turned on the S-AIR receiver. The default setting differs depending on the remote and unit. The setting is set to 2 channel. • The sound of the S-AIR receiver... may not close automatically. • When the wireless transceiver is set The function changes as the unit, select "MAIN UNIT." To control the system from the S-AIR receiver You...

Operating Instructions
Page 92
...not disconnect the calibration mic. Note • When you successfully set the manufacturer's code, the TV button flashes twice slowly. Preparing the remote for controlling the TV Press and hold TV [/1 while entering your TV with your TV. subwoofer is not OK. do not turn off ...correctly connected. - • If an error message appears, follow the message, then select [YES]. Code numbers of the remote, the code number may reset itself to the default (SONY) setting. the headphones are not correctly connected. 10 Press C/c to the unit or surround amplifier. - the calibration mic ...
...not disconnect the calibration mic. Note • When you successfully set the manufacturer's code, the TV button flashes twice slowly. Preparing the remote for controlling the TV Press and hold TV [/1 while entering your TV with your TV. subwoofer is not OK. do not turn off ...correctly connected. - • If an error message appears, follow the message, then select [YES]. Code numbers of the remote, the code number may reset itself to the default (SONY) setting. the headphones are not correctly connected. 10 Press C/c to the unit or surround amplifier. - the calibration mic ...

Operating Instructions
Page 93
... you press other than the following buttons. INPUT Switch the TV's input source between the TV and other than THEATER and TV [/1), set the remote to use these buttons are same as the remote buttons of the TV. TV VOL +/- TV CH +/- TOOLS Display the operation menu for movies. Adjust the ...TV volume. Select the TV channel. CC Change the subtitle of the TV. MUTING Turn off . C/X/x/c, Select the item on the menu of the SONY TV. Tip • The...
... you press other than the following buttons. INPUT Switch the TV's input source between the TV and other than THEATER and TV [/1), set the remote to use these buttons are same as the remote buttons of the TV. TV VOL +/- TV CH +/- TOOLS Display the operation menu for movies. Adjust the ...TV volume. Select the TV channel. CC Change the subtitle of the TV. MUTING Turn off . C/X/x/c, Select the item on the menu of the SONY TV. Tip • The...

Operating Instructions
Page 103
...8226; Set [AUDIO] to [ON] (page 72). MODE" setting (page 49). MODE" setting (page 49). • Depending on the DVD, the output signal may be less noticeable. • A 2 channel source is being played. 103US MODE" (page 49). when you are dirty. sound track of Dolby Digital, DTS, or MPEG audio...AUDIO (HDMI)] in Dolby Digital or MPEG audio format. The sound comes from the center • Depending on the remote if "MUTING ON" is displayed in the front panel display. • The system is in pause mode or in [HDMI SETUP] to [ON] (page 72). • The HDMI OUT jack...
...8226; Set [AUDIO] to [ON] (page 72). MODE" setting (page 49). MODE" setting (page 49). • Depending on the DVD, the output signal may be less noticeable. • A 2 channel source is being played. 103US MODE" (page 49). when you are dirty. sound track of Dolby Digital, DTS, or MPEG audio...AUDIO (HDMI)] in Dolby Digital or MPEG audio format. The sound comes from the center • Depending on the remote if "MUTING ON" is displayed in the front panel display. • The system is in pause mode or in [HDMI SETUP] to [ON] (page 72). • The HDMI OUT jack...


