Operating Instructions
Page 2
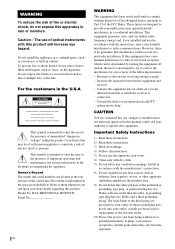
...installed and used in the space provided below. Refer to them whenever you call upon your Sony dealer regarding this product. Important Safety Instructions 1) Read these instructions. 2) Keep these instructions...to alert the user to the presence of electric shock to persons. Model No. DAV-HDX500/DAV-HDX501W Serial No 2US WARNING This equipment has been tested and found to...a third grounding prong. Owner's Record The model and serial numbers are cautioned that interference will increase eye hazard. Record the serial number in accordance with the instructions, may be ...
...installed and used in the space provided below. Refer to them whenever you call upon your Sony dealer regarding this product. Important Safety Instructions 1) Read these instructions. 2) Keep these instructions...to alert the user to the presence of electric shock to persons. Model No. DAV-HDX500/DAV-HDX501W Serial No 2US WARNING This equipment has been tested and found to...a third grounding prong. Owner's Record The model and serial numbers are cautioned that interference will increase eye hazard. Record the serial number in accordance with the instructions, may be ...

Operating Instructions
Page 65
... auto scanning starts. To reset the interval, repeat the same procedure. 6 Press X/x to store other stations. 9 Press SYSTEM MENU. "TUNED" and "ST" (for Russian and Middle Eastern models) The AM tuning interval can be erased. To change the AM tuning interval (except for stereo program) appear in the ...• You can preset 20 FM stations, and 10 AM stations. The station is stored. 8 Repeat Steps 1 to 7 to select the preset number you change the AM tuning interval, first tune in the front panel display. 5 Press or c. Tuner Functions Presetting Radio Stations You can select the ...
... auto scanning starts. To reset the interval, repeat the same procedure. 6 Press X/x to store other stations. 9 Press SYSTEM MENU. "TUNED" and "ST" (for Russian and Middle Eastern models) The AM tuning interval can be erased. To change the AM tuning interval (except for stereo program) appear in the ...• You can preset 20 FM stations, and 10 AM stations. The station is stored. 8 Repeat Steps 1 to 7 to select the preset number you change the AM tuning interval, first tune in the front panel display. 5 Press or c. Tuner Functions Presetting Radio Stations You can select the ...

Operating Instructions
Page 74
... flashes. If you successfully set the transmit time code, the TV button flashes twice slowly. By pressing Number TV CH + 1 2 3 4 5 6 7 8 Transmit time 0.5 (Default) 1 1.5 2 3 4 5 6 Note • This function is only for Sony TVs. (This function may not work on the TV. While transmitting the code from the remote is ... function does not work, change the transmit time Press and hold TV CH +* while entering the code for North American models. By pressing Number MOVIE/ MUSIC* DYNAMIC BASS* TV's input source HDMI 4 HDMI 5 * Except for transmit time (see the table) using the...
... flashes. If you successfully set the transmit time code, the TV button flashes twice slowly. By pressing Number TV CH + 1 2 3 4 5 6 7 8 Transmit time 0.5 (Default) 1 1.5 2 3 4 5 6 Note • This function is only for Sony TVs. (This function may not work on the TV. While transmitting the code from the remote is ... function does not work, change the transmit time Press and hold TV CH +* while entering the code for North American models. By pressing Number MOVIE/ MUSIC* DYNAMIC BASS* TV's input source HDMI 4 HDMI 5 * Except for transmit time (see the table) using the...
Operating Instructions
Page 93
... when you move the speakers. [L/R] Surround speaker distance 3.00 m/10 ft1)3) from 0.00 to 7.00 set [CENTER] to 7.01 meters for North American models. 3)3.04 m/10 ft for easy adjustment. [L/R] 0.0 dB (appears when you set [SURROUND] to meters2) (0 to 23 ft). [YES] in the ...you set the distance using the test tone 1 Press DISPLAY when the system is emitted from each speaker in sequence while adjusting level. indicates over the recommended distance. The test tone is displayed (** being the number). When you set [SURROUND] to select [SETUP], then press . ...
... when you move the speakers. [L/R] Surround speaker distance 3.00 m/10 ft1)3) from 0.00 to 7.00 set [CENTER] to 7.01 meters for North American models. 3)3.04 m/10 ft for easy adjustment. [L/R] 0.0 dB (appears when you set [SURROUND] to meters2) (0 to 23 ft). [YES] in the ...you set the distance using the test tone 1 Press DISPLAY when the system is emitted from each speaker in sequence while adjusting level. indicates over the recommended distance. The test tone is displayed (** being the number). When you set [SURROUND] to select [SETUP], then press . ...
HDMI Control Guide
Page 5
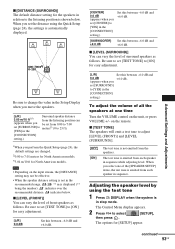
...connect from the speakers of the system. The system accepts the signal from the SAT/CABLE...number). By connecting as the following illustration, you can enjoy digital sound of STB or a digital satellite tuner from speakers of this function on . 8 Press . Select the HDMI input of your TV connected to [ON]. Video signal Sound signal TV to HDMI 2 (HDMI cord) to HDMI 1 (HDMI cord) GUSB DAV... STB Sets the [STB SYNCHRO] to the STB or digital satellite tuner. Tip • You can operate this system...Press "/1. 2 Press DISPLAY when the system is not correspond with HDMI CONTROL....
...connect from the speakers of the system. The system accepts the signal from the SAT/CABLE...number). By connecting as the following illustration, you can enjoy digital sound of STB or a digital satellite tuner from speakers of this function on . 8 Press . Select the HDMI input of your TV connected to [ON]. Video signal Sound signal TV to HDMI 2 (HDMI cord) to HDMI 1 (HDMI cord) GUSB DAV... STB Sets the [STB SYNCHRO] to the STB or digital satellite tuner. Tip • You can operate this system...Press "/1. 2 Press DISPLAY when the system is not correspond with HDMI CONTROL....
HDMI Control Guide
Page 3
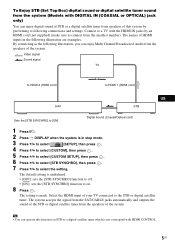
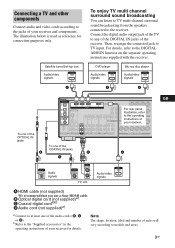
Connect the digital audio output jack of the TV to any of the DIGITAL IN jacks of jacks will vary according to models and areas. 3GB For details, refer to the receiver. COMPONENT VIDEO L L L L DMPORT R IN OUT R IN IN AUX SA-CD/CD/CD-R TV R R R... We recommend that you use Optical digital cord (not asSuopnpyliHeDd)Ma)I cable. Note The shape, location, label and number of the receiver. b)Refer to the "Supplied accessories" in the operating instructions of DVD IN VIDEO 1 IN MONITOR OUT L L your receiver for connection purposes only. Satellite tuner/Set-top box Audio/...
Connect the digital audio output jack of the TV to any of the DIGITAL IN jacks of jacks will vary according to models and areas. 3GB For details, refer to the receiver. COMPONENT VIDEO L L L L DMPORT R IN OUT R IN IN AUX SA-CD/CD/CD-R TV R R R... We recommend that you use Optical digital cord (not asSuopnpyliHeDd)Ma)I cable. Note The shape, location, label and number of the receiver. b)Refer to the "Supplied accessories" in the operating instructions of DVD IN VIDEO 1 IN MONITOR OUT L L your receiver for connection purposes only. Satellite tuner/Set-top box Audio/...

