
Operating Instructions
Page 2
... instruments with separate collection systems) This symbol on the product or on the bottom exterior. For more detailed information about recycling of Manufacture Marking is disposed of correctly, you purchased the product. Model No. DAV-HDX285/DAV-HDX585 Serial No Date of this product, please contact your local Civic Office, your Sony dealer regarding this.... To prevent injury, this product. Other versions may be securely attached to constitute a risk of this apparatus must be of sufficient magnitude to the floor/wall in cabinet. Caution -
... instruments with separate collection systems) This symbol on the product or on the bottom exterior. For more detailed information about recycling of Manufacture Marking is disposed of correctly, you purchased the product. Model No. DAV-HDX285/DAV-HDX585 Serial No Date of this product, please contact your local Civic Office, your Sony dealer regarding this.... To prevent injury, this product. Other versions may be securely attached to constitute a risk of this apparatus must be of sufficient magnitude to the floor/wall in cabinet. Caution -

Operating Instructions
Page 16
... the speakers, attach the speaker stand to the speaker. (For the front speakers of DAV-HDX585, and the front and surround speakers of DAV-HDX685) Use the parts as follows: DAV-HDX585 • Front speakers (2) • Speaker cords (2, red/white) • ...Posts (2) • Bases (2) • Screws (black) (4) • Screws (with washer) (4) DAV-HDX685 • Front and surround speakers (4) • Speaker cords (4, red/white/blue/gray) • Posts (4) • Bases (4) •... speakers. Note • Spread a cloth on the wall (page 22). 16GB
... the speakers, attach the speaker stand to the speaker. (For the front speakers of DAV-HDX585, and the front and surround speakers of DAV-HDX685) Use the parts as follows: DAV-HDX585 • Front speakers (2) • Speaker cords (2, red/white) • ...Posts (2) • Bases (2) • Screws (black) (4) • Screws (with washer) (4) DAV-HDX685 • Front and surround speakers (4) • Speaker cords (4, red/white/blue/gray) • Posts (4) • Bases (4) •... speakers. Note • Spread a cloth on the wall (page 22). 16GB

Operating Instructions
Page 22
... terminals on the back of each speaker. Before installing the speakers on a wall, connect the speaker cord to 13/32 inch) 22GB Install the speakers on a vertical and flat wall where reinforcement is applied. • Sony is especially fragile, attach the screws securely to a beam. Getting Started Installing...right speaker (R): Gray 1 Prepare screws (not supplied) that are suitable for the hole on the back of the speaker 2 Fasten the screws to the wall. DAV-HDX285 For the center speaker 145 mm (5 3/4 inches) For the other speakers 8 to 10 mm (11/32 to 13/32 inch) 8 to 10 ...
... terminals on the back of each speaker. Before installing the speakers on a wall, connect the speaker cord to 13/32 inch) 22GB Install the speakers on a vertical and flat wall where reinforcement is applied. • Sony is especially fragile, attach the screws securely to a beam. Getting Started Installing...right speaker (R): Gray 1 Prepare screws (not supplied) that are suitable for the hole on the back of the speaker 2 Fasten the screws to the wall. DAV-HDX285 For the center speaker 145 mm (5 3/4 inches) For the other speakers 8 to 10 mm (11/32 to 13/32 inch) 8 to 10 ...
Operating Instructions
Page 25
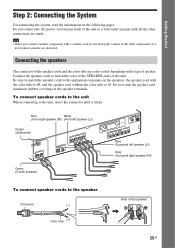
...cords to #. Do not catch the speaker cord insulation (rubber covering) in the speaker terminals. Getting Started Step 2: Connecting the System For connecting the system, read the information on the type of the other connections are made. Be sure to match the speaker cords to the appropriate ... speaker. To connect speaker cords to the unit When connecting to the speaker Connector (-) Color tube (+) Rear of the unit to a wall outlet (mains) until it clicks. Connecting the speakers The connector of the speaker cords and the color tube are color-coded depending on ...
...cords to #. Do not catch the speaker cord insulation (rubber covering) in the speaker terminals. Getting Started Step 2: Connecting the System For connecting the system, read the information on the type of the other connections are made. Be sure to match the speaker cords to the appropriate ... speaker. To connect speaker cords to the unit When connecting to the speaker Connector (-) Color tube (+) Rear of the unit to a wall outlet (mains) until it clicks. Connecting the speakers The connector of the speaker cords and the color tube are color-coded depending on ...

Operating Instructions
Page 32
... shape of the unit to a wall outlet (mains), connect all the speakers to the unit. The setting is at its factory default settings (ex., after performing "COLD RESET" (page 89)), you can turn off 1 Press [/1 on the unit. The system turns on. 2 Press SYSTEM MENU. 3 Press X/x repeatedly until...setting. • "DEMO ON": On. • "DEMO OFF": Off. 5 Press . Tip • When you purchase the system new, or if the system is made. 6 Press SYSTEM MENU. About the demonstration After connecting the AC power cord (mains lead), the demonstration appears in the front panel display, then press...
... shape of the unit to a wall outlet (mains), connect all the speakers to the unit. The setting is at its factory default settings (ex., after performing "COLD RESET" (page 89)), you can turn off 1 Press [/1 on the unit. The system turns on. 2 Press SYSTEM MENU. 3 Press X/x repeatedly until...setting. • "DEMO ON": On. • "DEMO OFF": Off. 5 Press . Tip • When you purchase the system new, or if the system is made. 6 Press SYSTEM MENU. About the demonstration After connecting the AC power cord (mains lead), the demonstration appears in the front panel display, then press...

Operating Instructions
Page 74
...transceiver To make sure that the V marks are two types of S-AIR products. • S-AIR main unit (this unit): This is not connected to a wall outlet (mains). • Do not touch the terminals of the S-AIR function, you need to insert the wireless transmitter into the unit and the wireless...R AUDIO IN L Slot cover EZW-T100 Note • Remove the screws from the slot cover bearing the caution mark. Surround amplifier: You can enjoy system sound in another room. Do not remove other screws. • The slot cover is compatible with the S-AIR logo facing up to establish the sound...
...transceiver To make sure that the V marks are two types of S-AIR products. • S-AIR main unit (this unit): This is not connected to a wall outlet (mains). • Do not touch the terminals of the S-AIR function, you need to insert the wireless transmitter into the unit and the wireless...R AUDIO IN L Slot cover EZW-T100 Note • Remove the screws from the slot cover bearing the caution mark. Surround amplifier: You can enjoy system sound in another room. Do not remove other screws. • The slot cover is compatible with the S-AIR logo facing up to establish the sound...

Operating Instructions
Page 90
...ovens, or large loudspeakers. • Do not place heavy objects on your nearest Sony dealer. If you leave the still video image or on-screen display image displayed on the system. If you move the system, take out any further. To disconnect the cord, pull it out by the ... the cabinet should persist, place the speakers further away from the wall outlet (mains). 90GB Should this case, remove the disc and leave the system turned on the system. Do not use any questions or problems concerning your system, please consult your TV for about half an hour until the ...
...ovens, or large loudspeakers. • Do not place heavy objects on your nearest Sony dealer. If you leave the still video image or on-screen display image displayed on the system. If you move the system, take out any further. To disconnect the cord, pull it out by the ... the cabinet should persist, place the speakers further away from the wall outlet (mains). 90GB Should this case, remove the disc and leave the system turned on the system. Do not use any questions or problems concerning your system, please consult your TV for about half an hour until the ...

Operating Instructions
Page 96
... automatically appears on the unit or the remote and then start playing from the wall outlet (mains), then reconnect after several minutes. 96GB The titles of folder/file/file name • The system can only display numbers and letters of these functions before playing a disc. &#... A disc cannot be changed . • The DVD prohibits changing the subtitles. cannot be ejected and • Contact your Sony dealer or local authorized Sony service facility. Symptom Remedy The video file cannot be played (except for North American models). • The file is not created...
... automatically appears on the unit or the remote and then start playing from the wall outlet (mains), then reconnect after several minutes. 96GB The titles of folder/file/file name • The system can only display numbers and letters of these functions before playing a disc. &#... A disc cannot be changed . • The DVD prohibits changing the subtitles. cannot be ejected and • Contact your Sony dealer or local authorized Sony service facility. Symptom Remedy The video file cannot be played (except for North American models). • The file is not created...

