Operating Instructions
Page 4
..." (page 83). 4US DAV-HDX277WC is underlined. Notes or instructions for North American models. • The default setting is the model used . About the S-AIR function The system is compatible with the system: • Surround amplifier: You can enjoy surround speaker sound wirelessly. • S-AIR receiver: You can enjoy system sound in feet (ft) for the surround amplifier or S-AIR...
..." (page 83). 4US DAV-HDX277WC is underlined. Notes or instructions for North American models. • The default setting is the model used . About the S-AIR function The system is compatible with the system: • Surround amplifier: You can enjoy surround speaker sound wirelessly. • S-AIR receiver: You can enjoy system sound in feet (ft) for the surround amplifier or S-AIR...
Operating Instructions
Page 5
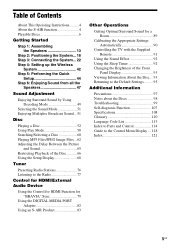
... the System... 18 Step 3: Connecting the System... 22 Step 4: Setting up the Wireless System 42 Step 5: Performing the Quick Setup 44 Step 6: Enjoying Sound from all the Speakers 47 Sound Adjustment Enjoying Surround Sound by Using Decoding Mode 49 Selecting the Sound Mode 51 Enjoying Multiplex Broadcast Sound... 51...External Audio Device Using the Control for HDMI Function for "BRAVIA" Sync 79 Using the DIGITAL MEDIA PORT Adapter 82 Using an S-AIR Product 83 Other Operations Getting Optimal Surround Sound for a Room 89 Calibrating the Appropriate Settings Automatically 90 Controlling...
... the System... 18 Step 3: Connecting the System... 22 Step 4: Setting up the Wireless System 42 Step 5: Performing the Quick Setup 44 Step 6: Enjoying Sound from all the Speakers 47 Sound Adjustment Enjoying Surround Sound by Using Decoding Mode 49 Selecting the Sound Mode 51 Enjoying Multiplex Broadcast Sound... 51...External Audio Device Using the Control for HDMI Function for "BRAVIA" Sync 79 Using the DIGITAL MEDIA PORT Adapter 82 Using an S-AIR Product 83 Other Operations Getting Optimal Surround Sound for a Room 89 Calibrating the Appropriate Settings Automatically 90 Controlling...
Operating Instructions
Page 18
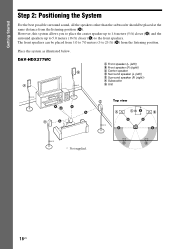
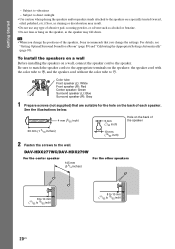
... listening position. D E 18US DAV-HDX277WC B A A Front speaker (L (left)) B Front speaker (R (right)) C Center speaker D Surround speaker (L (left)) E Surround speaker (R (right)) F Subwoofer G Unit CF G E Top view AA A A A CB B D A A C A C * Not supplied. The front speakers can be placed at the same distance from the listening position (A). Getting Started Step 2: Positioning the System For the best possible surround sound, all the speakers...
... listening position. D E 18US DAV-HDX277WC B A A Front speaker (L (left)) B Front speaker (R (right)) C Center speaker D Surround speaker (L (left)) E Surround speaker (R (right)) F Subwoofer G Unit CF G E Top view AA A A A CB B D A A C A C * Not supplied. The front speakers can be placed at the same distance from the listening position (A). Getting Started Step 2: Positioning the System For the best possible surround sound, all the speakers...
Operating Instructions
Page 20
...Fasten the screws to the appropriate terminals on the back of the speakers, Sony recommends that are suitable for a Room" (page 89) and "Calibrating the Appropriate Settings Automatically" (page 90). For details, see "Getting Optimal Surround Sound for the hole on the speakers: the speaker cord with the color ...speaker may result. • Do not use any type of abrasive pad, scouring powder, or solvent such as staining or discoloration may fall down. DAV-HDX277WC/DAV-HDX279W For the center speaker 145 mm (5 3/4 inches) For the other speakers 8 to 10 mm (11/32 to 13/32 inch) 8...
...Fasten the screws to the appropriate terminals on the back of the speakers, Sony recommends that are suitable for a Room" (page 89) and "Calibrating the Appropriate Settings Automatically" (page 90). For details, see "Getting Optimal Surround Sound for the hole on the speakers: the speaker cord with the color ...speaker may result. • Do not use any type of abrasive pad, scouring powder, or solvent such as staining or discoloration may fall down. DAV-HDX277WC/DAV-HDX279W For the center speaker 145 mm (5 3/4 inches) For the other speakers 8 to 10 mm (11/32 to 13/32 inch) 8...
Operating Instructions
Page 22
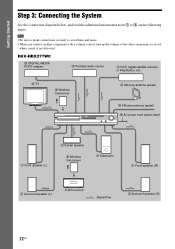
DAV-HDX277WC 3 DIGITAL MEDIA PORT adapter 3 Portable audio source 3 VCR, digital satellite receiver, or PlayStation, etc. 2 TV 5 Wireless transceiver 4 AM loop antenna (aerial) 4 FM wire antenna (aerial) 6 AC power cord (mains lead) 1 Front speaker (L) 1 Center speaker 5 Wireless transceiver 1 Subwoofer 1 Front speaker (R) 1 Surround speaker (L) S-AIR receiver :Signal flow 1 Surround speaker (R) 22US Getting Started Step 3: Connecting the...
DAV-HDX277WC 3 DIGITAL MEDIA PORT adapter 3 Portable audio source 3 VCR, digital satellite receiver, or PlayStation, etc. 2 TV 5 Wireless transceiver 4 AM loop antenna (aerial) 4 FM wire antenna (aerial) 6 AC power cord (mains lead) 1 Front speaker (L) 1 Center speaker 5 Wireless transceiver 1 Subwoofer 1 Front speaker (R) 1 Surround speaker (L) S-AIR receiver :Signal flow 1 Surround speaker (R) 22US Getting Started Step 3: Connecting the...
Operating Instructions
Page 38
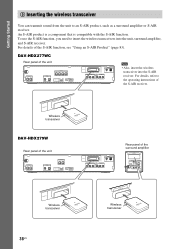
... function. For details of the surround amplifier EZW-RT10 S-AIR ID A B C PAIRING SPEAKER L SURROUND SELECTOR R SURROUND SURROUND BACK EZW-RT10 Wireless transceiver EZW-RT10 Wireless transceiver 38US Getting Started 5 Inserting the wireless transceiver You can transmit sound from the unit to insert the wireless transceivers into the S-AIR receiver. DAV-HDX277WC Rear panel of the S-AIR receiver...
... function. For details of the surround amplifier EZW-RT10 S-AIR ID A B C PAIRING SPEAKER L SURROUND SELECTOR R SURROUND SURROUND BACK EZW-RT10 Wireless transceiver EZW-RT10 Wireless transceiver 38US Getting Started 5 Inserting the wireless transceiver You can transmit sound from the unit to insert the wireless transceivers into the S-AIR receiver. DAV-HDX277WC Rear panel of the S-AIR receiver...
Operating Instructions
Page 42
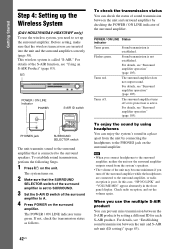
... sound by connecting the headphones to the surround speakers. Before setting, make sure that the SURROUND SELECTOR switch of the surround amplifier is poor. When you need to SURROUND. 3 Set the S-AIR ID switch of the surround amplifier. For details, see "Surround amplifier operation" (page 105). Check radio reception, and set to set up the Wireless System (DAV-HDX279W/DAV...
... sound by connecting the headphones to the surround speakers. Before setting, make sure that the SURROUND SELECTOR switch of the surround amplifier is poor. When you need to SURROUND. 3 Set the S-AIR ID switch of the surround amplifier. For details, see "Surround amplifier operation" (page 105). Check radio reception, and set to set up the Wireless System (DAV-HDX279W/DAV...
Operating Instructions
Page 44
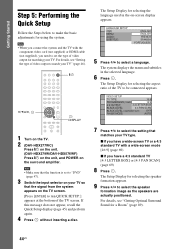
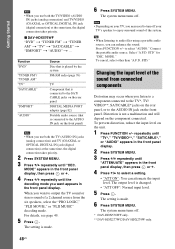
... the menu and subtitles in the on your TV so that matches your TV. For details, see "Getting Optimal Surround Sound for using the system. If this message does not appear, recall the Quick Setup display (page 45) and perform again. 4 Press without inserting a disc.... OUT): OFF PAUSE MODE: AUTO 7 Press X/x to select the setting that the signal from the system appears on the surround amplifier. "/1 C/X/x/c, DISPLAY 1 Turn on the TV. 2 (DAV-HDX277WC) Press [/1 on the unit. (DAV-HDX279W/DAV-HDX576WF) Press [/1 on the unit, and POWER on the TV screen. [Press [ENTER] to ...
... the menu and subtitles in the on your TV so that matches your TV. For details, see "Getting Optimal Surround Sound for using the system. If this message does not appear, recall the Quick Setup display (page 45) and perform again. 4 Press without inserting a disc.... OUT): OFF PAUSE MODE: AUTO 7 Press X/x to select the setting that the signal from the system appears on the surround amplifier. "/1 C/X/x/c, DISPLAY 1 Turn on the TV. 2 (DAV-HDX277WC) Press [/1 on the unit. (DAV-HDX279W/DAV-HDX576WF) Press [/1 on the unit, and POWER on the TV screen. [Press [ENTER] to ...
Operating Instructions
Page 45
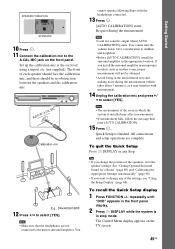
AUDIO IN / A.CAL MIC Calibration mic E.g., DAV-HDX576WF 12 Press C/c to children and neighbors. • Before [AUTO CALIBRATION], install the surround amplifier in the appropriate location. You cannot turn the volume down. Give consideration to select [YES]. Tip • If you change any... the ear level using a tripod, etc. (not supplied). Quick Setup is in the front panel display. 2 Press DISPLAY while the system is finished. See "Getting Optimal Surround Sound for a Room" (page 89) and "Calibrating the Appropriate Settings Automatically" (page 90). • If you install the...
AUDIO IN / A.CAL MIC Calibration mic E.g., DAV-HDX576WF 12 Press C/c to children and neighbors. • Before [AUTO CALIBRATION], install the surround amplifier in the appropriate location. You cannot turn the volume down. Give consideration to select [YES]. Tip • If you change any... the ear level using a tripod, etc. (not supplied). Quick Setup is in the front panel display. 2 Press DISPLAY while the system is finished. See "Getting Optimal Surround Sound for a Room" (page 89) and "Calibrating the Appropriate Settings Automatically" (page 90). • If you install the...
Operating Instructions
Page 48
The system menu turns off . * DAV-HDX576WF only. ** DAV-HDX277WC/DAV-HDX279W only. 48US STD." repeatedly until "TV*," "TV/VIDEO**," "SAT/CABLE*," or "AUDIO" appears in the front panel display. 2 Press SYSTEM MENU. 3 Press X/x repeatedly until the decoding mode you use both the TV (..."A.F.D. To cancel, select other than "A.F.D. The output level is made . 6 Press SYSTEM MENU. Tip • When listening to select a setting. • "ATT ON": You can enhance the sound. to enjoy surround sound of a 2 channel source from the six speakers, select the "PRO LOGIC," "PLII...
The system menu turns off . * DAV-HDX576WF only. ** DAV-HDX277WC/DAV-HDX279W only. 48US STD." repeatedly until "TV*," "TV/VIDEO**," "SAT/CABLE*," or "AUDIO" appears in the front panel display. 2 Press SYSTEM MENU. 3 Press X/x repeatedly until the decoding mode you use both the TV (..."A.F.D. To cancel, select other than "A.F.D. The output level is made . 6 Press SYSTEM MENU. Tip • When listening to select a setting. • "ATT ON": You can enhance the sound. to enjoy surround sound of a 2 channel source from the six speakers, select the "PRO LOGIC," "PLII...
Operating Instructions
Page 49
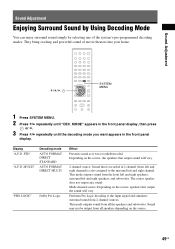
...) is also assigned to the input signal and simulates surround sound from the front left and right speakers, surround left and right channel. The center speaker does not output any sound. Sound Adjustment Enjoying Surround Sound by Using Decoding Mode You can enjoy surround sound simply by selecting one of movie theaters into your home. Performs Pro Logic decoding to...
...) is also assigned to the input signal and simulates surround sound from the front left and right speakers, surround left and right channel. The center speaker does not output any sound. Sound Adjustment Enjoying Surround Sound by Using Decoding Mode You can enjoy surround sound simply by selecting one of movie theaters into your home. Performs Pro Logic decoding to...
Operating Instructions
Page 50
... videos of overdubbed or old movies. This setting is made. 5 Press SYSTEM MENU. Outputs the sound as a CD. The system menu turns off Select "A.F.D. Effect Performs Pro Logic II movie mode decoding ...to the input signal and produces five full-bandwidth output channels from all the speakers and subwoofer. This setting is played. Multi channel surround formats are downmixed to 2 channels. Outputs the sound from 2 channel sources. Multi channel surround...
... videos of overdubbed or old movies. This setting is made. 5 Press SYSTEM MENU. Outputs the sound as a CD. The system menu turns off Select "A.F.D. Effect Performs Pro Logic II movie mode decoding ...to the input signal and produces five full-bandwidth output channels from all the speakers and subwoofer. This setting is played. Multi channel surround formats are downmixed to 2 channels. Outputs the sound from 2 channel sources. Multi channel surround...
Operating Instructions
Page 51
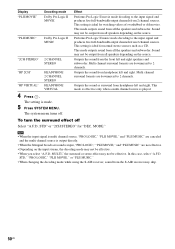
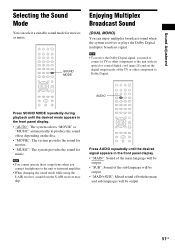
... setup items when you need to connect a TV or other component to the unit or surround amplifier. • When changing the sound mode while using the S-AIR receiver, sound from the S-AIR receiver may skip. Press AUDIO repeatedly until the desired mode appears in the... other component to produce the sound effect depending on the disc. • "MOVIE": The system provides the sound for movies. • "MUSIC": The system provides the sound for movies or music. SOUND MODE Enjoying Multiplex Broadcast Sound (DUAL MONO) You can select a suitable sound mode for music. Note •...
... setup items when you need to connect a TV or other component to the unit or surround amplifier. • When changing the sound mode while using the S-AIR receiver, sound from the S-AIR receiver may skip. Press AUDIO repeatedly until the desired mode appears in the... other component to produce the sound effect depending on the disc. • "MOVIE": The system provides the sound for movies. • "MUSIC": The system provides the sound for movies or music. SOUND MODE Enjoying Multiplex Broadcast Sound (DUAL MONO) You can select a suitable sound mode for music. Note •...
Operating Instructions
Page 53
...speeds may differ with some discs. Change a disc while playing another disc DISC SKIP Play the desired disc directly DISC 1-5 on the surround amplifier. (The sound of the system is set to normal playback, press H. Play one frame at a time STEP to go to the beginning of the current chapter, ... cannot search for "BRAVIA" Sync" (page 79). To return to PHONES jack on the the desired disc unit. twice in pause mode (DVD VIDEO/ DVD-R/DVD-RW only). To cancel, press it again or VOLUME + to normal speed, press H. To return to adjust the sound volume. Two speeds ...
...speeds may differ with some discs. Change a disc while playing another disc DISC SKIP Play the desired disc directly DISC 1-5 on the surround amplifier. (The sound of the system is set to normal playback, press H. Play one frame at a time STEP to go to the beginning of the current chapter, ... cannot search for "BRAVIA" Sync" (page 79). To return to PHONES jack on the the desired disc unit. twice in pause mode (DVD VIDEO/ DVD-R/DVD-RW only). To cancel, press it again or VOLUME + to normal speed, press H. To return to adjust the sound volume. Two speeds ...
Operating Instructions
Page 55
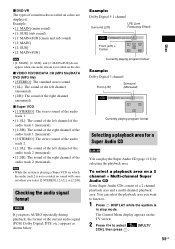
...; [2:STEREO]: The stereo sound of the audio track 2. • [2:1/L]: The sound of the left channel (monaural). • [2/R]: The sound of the right channel (monaural). To select a playback area on the TV screen. 2 Press X/x to . 1 Press DISPLAY while the system is in stop mode. The... ENGLISH DOLBY DIGITAL 3 / 2 .1 Front (L/R) + Center LCR LFE LS RS Currently playing program format Example: Dolby Digital 3 channel Front (L/R) Surround (Monaural) 1:SPANISH DOLBY DIGITAL 2 / 1 L R S Currently playing program format Selecting a playback area for a Super Audio CD You can select...
...; [2:STEREO]: The stereo sound of the audio track 2. • [2:1/L]: The sound of the left channel (monaural). • [2/R]: The sound of the right channel (monaural). To select a playback area on the TV screen. 2 Press X/x to . 1 Press DISPLAY while the system is in stop mode. The... ENGLISH DOLBY DIGITAL 3 / 2 .1 Front (L/R) + Center LCR LFE LS RS Currently playing program format Example: Dolby Digital 3 channel Front (L/R) Surround (Monaural) 1:SPANISH DOLBY DIGITAL 2 / 1 L R S Currently playing program format Selecting a playback area for a Super Audio CD You can select...
Operating Instructions
Page 72
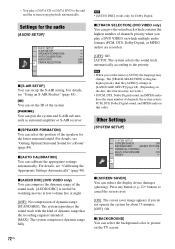
... the same number of the system. [PAIRING] You can compress the dynamic range of the sound track. [AUDIO DRC] is useful for the better surround sound. For details, see "Getting Optimal Surround Sound for about 15 minutes. [OFF]: Off. Other Settings [SYSTEM SETUP] SYSTEM SETUP SCREEN SAVER: ON BACKGROUND...] You can reduce the display device damages (ghosting). x [AUDIO DRC] (DVD VIDEO only) You can pair the system and S-AIR sub unit, such as surround amplifier or S-AIR receiver. The [TRACK SELECTION] setting has higher priority than the [AUDIO] settings in this function may...
... the same number of the system. [PAIRING] You can compress the dynamic range of the sound track. [AUDIO DRC] is useful for the better surround sound. For details, see "Getting Optimal Surround Sound for about 15 minutes. [OFF]: Off. Other Settings [SYSTEM SETUP] SYSTEM SETUP SCREEN SAVER: ON BACKGROUND...] You can reduce the display device damages (ghosting). x [AUDIO DRC] (DVD VIDEO only) You can pair the system and S-AIR sub unit, such as surround amplifier or S-AIR receiver. The [TRACK SELECTION] setting has higher priority than the [AUDIO] settings in this function may...
Operating Instructions
Page 73
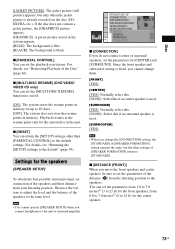
.... [NONE]: Select this if no center speaker is used. [SURROUND] [YES]: Normally select this. [NONE]: Select this if no surround speaker is black. Settings for the speakers [SPEAKER SETUP] To obtain the best possible surround sound, set the parameters of the speakers and their distance from the listening... position to 23 ft) for the center speaker. 73US Since the front speaker and subwoofer setting is already recorded on /off. [ON]: The system stores the resume points in...
.... [NONE]: Select this if no center speaker is used. [SURROUND] [YES]: Normally select this. [NONE]: Select this if no surround speaker is black. Settings for the speakers [SPEAKER SETUP] To obtain the best possible surround sound, set the parameters of the speakers and their distance from the listening... position to 23 ft) for the center speaker. 73US Since the front speaker and subwoofer setting is already recorded on /off. [ON]: The system stores the resume points in...
Operating Instructions
Page 74
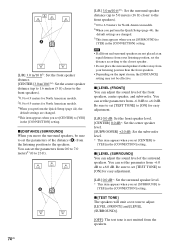
x [LEVEL (FRONT)] You can adjust the sound level of the surround speakers. x [LEVEL (SURROUND)] You can adjust the sound level of the distance (B) from the listening position to adjust [LEVEL (FRONT)] and [LEVEL (SURROUND)]. [OFF]: The test tone is not emitted from the speakers. 74US x [TEST TONE] The speakers will emit a test tone to the speakers...
x [LEVEL (FRONT)] You can adjust the sound level of the surround speakers. x [LEVEL (SURROUND)] You can adjust the sound level of the distance (B) from the listening position to adjust [LEVEL (FRONT)] and [LEVEL (SURROUND)]. [OFF]: The test tone is not emitted from the speakers. 74US x [TEST TONE] The speakers will emit a test tone to the speakers...
Operating Instructions
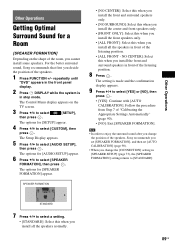
Page 89
... Press . The options for [SETUP] appear. 4 Press X/x to select [AUDIO SETUP], then press . Other Operations Other Operations Getting Optimal Surround Sound for a Room [SPEAKER FORMATION] Depending on the TV screen. 3 Press X/x to select [SETUP], then press . repeatedly until "DVD" ...front panel display. 2 Press DISPLAY while the system is made and the confirmation display appears. 9 Press C/c to select [YES] or [NO], then press . • [YES]: Continue with [AUTO CALIBRATION]. For the better surround sound, Sony recommends that first you cannot install some speakers....
... Press . The options for [SETUP] appear. 4 Press X/x to select [AUDIO SETUP], then press . Other Operations Other Operations Getting Optimal Surround Sound for a Room [SPEAKER FORMATION] Depending on the TV screen. 3 Press X/x to select [SETUP], then press . repeatedly until "DVD" ...front panel display. 2 Press DISPLAY while the system is made and the confirmation display appears. 9 Press C/c to select [YES] or [NO], then press . • [YES]: Continue with [AUTO CALIBRATION]. For the better surround sound, Sony recommends that first you cannot install some speakers....
Operating Instructions
Page 90
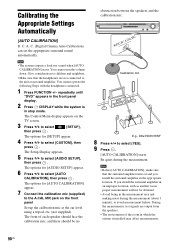
...system is in the measurement area and making noise during the measurement. AUDIO IN / A.CAL MIC Calibration mic E.g., DAV-HDX576WF 8 Press C/c to select [AUTO CALIBRATION], then press . Give consideration to children and neighbors. • Make sure that the surround... etc. (not supplied). repeatedly until "DVD" appears in the appropriate location. A. C. (Digital Cinema Auto Calibration) can set the appropriate surround sound automatically. The options for [AUDIO SETUP] appear. 6 Press X/x to select [YES]. 9 Press . [AUTO CALIBRATION] starts. Calibrating the...
...system is in the measurement area and making noise during the measurement. AUDIO IN / A.CAL MIC Calibration mic E.g., DAV-HDX576WF 8 Press C/c to select [AUTO CALIBRATION], then press . Give consideration to children and neighbors. • Make sure that the surround... etc. (not supplied). repeatedly until "DVD" appears in the appropriate location. A. C. (Digital Cinema Auto Calibration) can set the appropriate surround sound automatically. The options for [AUDIO SETUP] appear. 6 Press X/x to select [YES]. 9 Press . [AUTO CALIBRATION] starts. Calibrating the...


