Operating Instructions
Page 2
Owner's Record The model and serial numbers are designed to provide reasonable protection against harmful interference in this manual could void your Sony dealer regarding this product. DAV-FX900W Serial No WARNING This equipment has been tested and found to comply with this apparatus to rain or moisture. Connect the equipment into the cabinet, unplug the unit and have it checked...
Owner's Record The model and serial numbers are designed to provide reasonable protection against harmful interference in this manual could void your Sony dealer regarding this product. DAV-FX900W Serial No WARNING This equipment has been tested and found to comply with this apparatus to rain or moisture. Connect the equipment into the cabinet, unplug the unit and have it checked...
Operating Instructions
Page 4
... Where You Stopped the Disc 43 (Resume Play) Creating Your Own Program 44 (Program Play) Playing in Random Order 45 (Shuffle Play) Playing Repeatedly 46 (Repeat Play) Using the DVD's Menu 47 Changing the Sound 48 Selecting [ORIGINAL] or [PLAY LIST] on a DVD-R/DVD-RW 49 Viewing Information About the Disc 50 Changing the Angles 52 Displaying the Subtitles 52 Adjusting the Delay Between the Picture and Sound 53 (A/V SYNC) Selecting a Playback Area for a Super Audio CD 53 About...
... Where You Stopped the Disc 43 (Resume Play) Creating Your Own Program 44 (Program Play) Playing in Random Order 45 (Shuffle Play) Playing Repeatedly 46 (Repeat Play) Using the DVD's Menu 47 Changing the Sound 48 Selecting [ORIGINAL] or [PLAY LIST] on a DVD-R/DVD-RW 49 Viewing Information About the Disc 50 Changing the Angles 52 Displaying the Subtitles 52 Adjusting the Delay Between the Picture and Sound 53 (A/V SYNC) Selecting a Playback Area for a Super Audio CD 53 About...
Operating Instructions
Page 5
... Display or Sound Track Language 79 [LANGUAGE SETUP] Settings for the Display 80 [SCREEN SETUP] Custom Settings 82 [CUSTOM SETUP] Settings for the Speakers 83 [SPEAKER SETUP] Returning to the Default Settings.......... 85 Additional Information Precautions 86 Notes about the Discs 87 Troubleshooting 87 Self-diagnosis Function 91 (When letters/numbers appear in the display) Specifications 92 Glossary 94 Language Code List 98 Index to Parts and Controls 99 Guide to the Control Menu Display.... 102 DVD Setup Display List 105 AMP Menu...
... Display or Sound Track Language 79 [LANGUAGE SETUP] Settings for the Display 80 [SCREEN SETUP] Custom Settings 82 [CUSTOM SETUP] Settings for the Speakers 83 [SPEAKER SETUP] Returning to the Default Settings.......... 85 Additional Information Precautions 86 Notes about the Discs 87 Troubleshooting 87 Self-diagnosis Function 91 (When letters/numbers appear in the display) Specifications 92 Glossary 94 Language Code List 98 Index to Parts and Controls 99 Guide to the Control Menu Display.... 102 DVD Setup Display List 105 AMP Menu...
Operating Instructions
Page 21
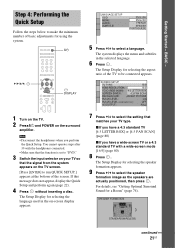
... screen. [Press [ENTER] to select a language. The system displays the menu and subtitles in the on the surround amplifier. SPEAKER FORMATION STANDARD(WIRELESS) continued 21US SCREEN SETUP TV TYPE: 16:9 HDMI RESOLUTION: 16:9 YCBCR/RGB (HDMI): 4:3 LETTER BOX SCREEN SAVER: 4:3 PAN SCAN BACKGROUND: JACKET PICTURE BLACK LEVEL: ON BLACK LEVEL (COMPONENT OUT): OFF 4:3 OUTPUT: FULL 7 Press X/x to select the setting that matches your TV so that the function is set to select the speaker formation image as the speakers...
... screen. [Press [ENTER] to select a language. The system displays the menu and subtitles in the on the surround amplifier. SPEAKER FORMATION STANDARD(WIRELESS) continued 21US SCREEN SETUP TV TYPE: 16:9 HDMI RESOLUTION: 16:9 YCBCR/RGB (HDMI): 4:3 LETTER BOX SCREEN SAVER: 4:3 PAN SCAN BACKGROUND: JACKET PICTURE BLACK LEVEL: ON BLACK LEVEL (COMPONENT OUT): OFF 4:3 OUTPUT: FULL 7 Press X/x to select the setting that matches your TV so that the function is set to select the speaker formation image as the speakers...
Operating Instructions
Page 22
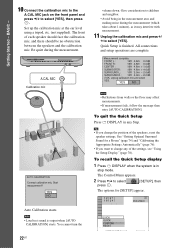
... change the position of the speakers, reset the speaker settings. Note • Loud test sound is output when [AUTO CALIBRATION] starts. The Control Menu appears. 2 Press X/x to select [YES], then press . All connections and setup operations are complete. See "Getting Optimal Surround Sound for [SETUP] appear. 1 2 ( 2 7 ) 1 8 ( 3 4 ) : : DVD VIDEO QUICK QUICK CUSTOM RESET BNR YES NO Note • Reflections from walls or the floor may interfere with measurement. 11 Unplug the calibration mic and press C/ c to select [YES]. A.CAL MIC Calibration mic AUTO CALIBRATION Connect...
... change the position of the speakers, reset the speaker settings. Note • Loud test sound is output when [AUTO CALIBRATION] starts. The Control Menu appears. 2 Press X/x to select [YES], then press . All connections and setup operations are complete. See "Getting Optimal Surround Sound for [SETUP] appear. 1 2 ( 2 7 ) 1 8 ( 3 4 ) : : DVD VIDEO QUICK QUICK CUSTOM RESET BNR YES NO Note • Reflections from walls or the floor may interfere with measurement. 11 Unplug the calibration mic and press C/ c to select [YES]. A.CAL MIC Calibration mic AUTO CALIBRATION Connect...
Operating Instructions
Page 23
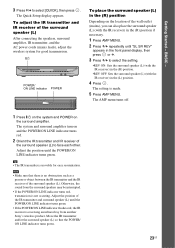
... and surround speaker (L) until the POWER/ON LINE indicator turns green. Getting Started - The Quick Setup display appears. "/1 POWER/ ON LINE indicator POWER POWER To place the surround speaker (L) in the (L) position. 4 Press . Adjust the position until the POWER/ON LINE indicator turns green. • If the POWER/ON LINE indicator flashes red, the IR receiver is made. 5 Press AMP MENU. The AMP menu turns off. 1 Press "/1 on the system and POWER on the surround amplifier. Note • Make...
... and surround speaker (L) until the POWER/ON LINE indicator turns green. Getting Started - The Quick Setup display appears. "/1 POWER/ ON LINE indicator POWER POWER To place the surround speaker (L) in the (L) position. 4 Press . Adjust the position until the POWER/ON LINE indicator turns green. • If the POWER/ON LINE indicator flashes red, the IR receiver is made. 5 Press AMP MENU. The AMP menu turns off. 1 Press "/1 on the system and POWER on the surround amplifier. Note • Make...

Operating Instructions
Page 35
DVD t TUNER FM t TUNER AM t XM t TV/VCR1 t TV/VCR2 t AUDIO t ... The output level is reflected. 6 Press AMP MENU. The setting is changed. • ATT OFF: normal input level. 5 Press . Refer to the AUDIO IN jack on the rear panel. Each time you use a VCR or other components. 1 Press FUNCTION +/- This is not a malfunction and will depend on the operation. The AMP menu turns off. 35US Note • When you press FUNCTION +/-, the mode of the...
DVD t TUNER FM t TUNER AM t XM t TV/VCR1 t TV/VCR2 t AUDIO t ... The output level is reflected. 6 Press AMP MENU. The setting is changed. • ATT OFF: normal input level. 5 Press . Refer to the AUDIO IN jack on the rear panel. Each time you use a VCR or other components. 1 Press FUNCTION +/- This is not a malfunction and will depend on the operation. The AMP menu turns off. 35US Note • When you press FUNCTION +/-, the mode of the...

Operating Instructions
Page 36
... 2 (OPTICAL DIGITAL IN) jack (digital connection) at the same time, the digital connection takes priority. repeatedly until "TV/VCR1" or "TV/VCR2" appears in the front panel display. 36US MOVIE/ MUSIC Basic Operations FUNCTION +/- 1 Press FUNCTION +/- Tip • When the movie or music mode is selected, "MOVIE" or "MUSIC" is underlined. • AUTO: selects the mode automatically to output the TV sound or stereo sound of sound field, see "TV Hookup (Advanced)" (page 27) and "Other Component Hookup...
... 2 (OPTICAL DIGITAL IN) jack (digital connection) at the same time, the digital connection takes priority. repeatedly until "TV/VCR1" or "TV/VCR2" appears in the front panel display. 36US MOVIE/ MUSIC Basic Operations FUNCTION +/- 1 Press FUNCTION +/- Tip • When the movie or music mode is selected, "MOVIE" or "MUSIC" is underlined. • AUTO: selects the mode automatically to output the TV sound or stereo sound of sound field, see "TV Hookup (Advanced)" (page 27) and "Other Component Hookup...

Operating Instructions
Page 37
SOUND FIELD Automatic outputting of the original sound x AUTO FORMAT DIRECT STANDARD The auto decoding function automatically detects the type of discs from multiple speakers. This mode presents the sound as it will generate a low frequency signal for output to front, center, and surround speakers. MULTI PRO LOGIC PLII MOVIE PLII MUSIC C. EX B* C. EX C* Outputting 2 channel sources like CDs by selecting one of system's preprogrammed sound fields. This is done using an advanced, high-purity matrix surround decoder that extracts...
SOUND FIELD Automatic outputting of the original sound x AUTO FORMAT DIRECT STANDARD The auto decoding function automatically detects the type of discs from multiple speakers. This mode presents the sound as it will generate a low frequency signal for output to front, center, and surround speakers. MULTI PRO LOGIC PLII MOVIE PLII MUSIC C. EX B* C. EX C* Outputting 2 channel sources like CDs by selecting one of system's preprogrammed sound fields. This is done using an advanced, high-purity matrix surround decoder that extracts...
Operating Instructions
Page 43
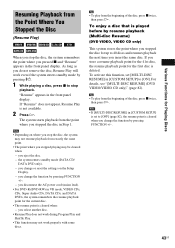
... [MULTI-DISC RESUME] in the front panel display. "Resume" appears in [CUSTOM SETUP] is cleared when you change or reset the settings on where you stop the disc, the system remembers the point where you insert the same disc. you change the function by resume playback (Multi-disc Resume) (DVD VIDEO, VIDEO CD only) This system stores the point where you do not remove the disc, Resume Play will work during Program Play and Shuffle Play...
... [MULTI-DISC RESUME] in the front panel display. "Resume" appears in [CUSTOM SETUP] is cleared when you change or reset the settings on where you stop the disc, the system remembers the point where you insert the same disc. you change the function by resume playback (Multi-disc Resume) (DVD VIDEO, VIDEO CD only) This system stores the point where you do not remove the disc, Resume Play will work during Program Play and Shuffle Play...

Operating Instructions
Page 68
... 9* COMPONENT 1 CLEAR* COMPONENT 2 PICTURE NAVI* COMPONENT 3 AUDIO* COMPONENT 4 SUBTITLE* HDMI 1 ANGLE* HDMI 2 SOUND FIELD* HDMI 3 68US For details, see the table) using the number buttons. If you do not operate the remote for the THEATRE SYNC function Register the TV's input source connected to this system (see the instructions of the buttons above. • The TV mode turns off when you successfully set with one button push. Note • Depending on your SONY TV and this system, changes the system mode to "DVD," and...
... 9* COMPONENT 1 CLEAR* COMPONENT 2 PICTURE NAVI* COMPONENT 3 AUDIO* COMPONENT 4 SUBTITLE* HDMI 1 ANGLE* HDMI 2 SOUND FIELD* HDMI 3 68US For details, see the table) using the number buttons. If you do not operate the remote for the THEATRE SYNC function Register the TV's input source connected to this system (see the instructions of the buttons above. • The TV mode turns off when you successfully set with one button push. Note • Depending on your SONY TV and this system, changes the system mode to "DVD," and...

Operating Instructions
Page 75
Connect the surround speakers to the system. cords and surround speakers using the wireless system. • [ALL FRONT]: when installing all the speakers in front of the listening position. • [NO SURROUND]: when installing the center and front speakers. • [SECOND ROOM]: when installing the front speakers in one room and surround speakers in front of the listening position. • [NO CENTER]: when installing the front and surround speakers. • [ALL FRONT - Advanced Settings and Adjustments continued...
Connect the surround speakers to the system. cords and surround speakers using the wireless system. • [ALL FRONT]: when installing all the speakers in front of the listening position. • [NO SURROUND]: when installing the center and front speakers. • [SECOND ROOM]: when installing the front speakers in one room and surround speakers in front of the listening position. • [NO CENTER]: when installing the front and surround speakers. • [ALL FRONT - Advanced Settings and Adjustments continued...

Operating Instructions
Page 76
... test sound is recommended you set [SPEAKER FORMATION], and then set [AUTO CALIBRATION]. • To set [AUTO CALIBRATION], you change the position of the speakers, it up at the ear level using a tripod, etc. (not supplied). The options for [AUTO CALIBRATION] appear. C. (Digital Cinema Auto Calibration) can set it is output when [AUTO CALIBRATION] starts. YES NO Connect the calibration mic to the A.CAL MIC jack on the front panel, and set the appropriate surround sound automatically. repeatedly until "DVD" appears in the front panel display. 2 Press DISPLAY...
... test sound is recommended you set [SPEAKER FORMATION], and then set [AUTO CALIBRATION]. • To set [AUTO CALIBRATION], you change the position of the speakers, it up at the ear level using a tripod, etc. (not supplied). The options for [AUTO CALIBRATION] appear. C. (Digital Cinema Auto Calibration) can set it is output when [AUTO CALIBRATION] starts. YES NO Connect the calibration mic to the A.CAL MIC jack on the front panel, and set the appropriate surround sound automatically. repeatedly until "DVD" appears in the front panel display. 2 Press DISPLAY...

Operating Instructions
Page 77
... turn off the power. - do not change the disc. - subwoofer is not connected. 6 Press C/X/x/c to retry. Measurement complete. The result is not connected. - During the measurement, test signals are output from the speakers. • Reflections from walls or the floor may affect measurements. Follow the message, then select [YES] to select [YES] or [NO], then press . do not change the function. - do not press any button. - the calibration mic...
... turn off the power. - do not change the disc. - subwoofer is not connected. 6 Press C/X/x/c to retry. Measurement complete. The result is not connected. - During the measurement, test signals are output from the speakers. • Reflections from walls or the floor may affect measurements. Follow the message, then select [YES] to select [YES] or [NO], then press . do not change the function. - do not press any button. - the calibration mic...

Operating Instructions
Page 82
... Dolby Digital, DTS (digital theater system), or 96 kHz/24 bit PCM (pulse code modulation) signals to the requested audio stream from the HDMI OUT jack. CUSTOM SETUP PAUSE MODE: TRACK SELECTION: MULTI-DISC RESUME: AUDIO DRC: AUDIO (HDMI): AUTO OFF ON OFF OFF x [PAUSE MODE] (DVD VIDEO/DVD-R/ DVD-RW only) Selects the picture in pause mode. [AUTO] [FRAME] The picture, including subjects that the recording engineer intended. Custom Settings [CUSTOM SETUP] Use this position. Reproduces the sound track with DOLBY DIGITAL/DTS (digital theater system) signals and [AUTO] is output...
... Dolby Digital, DTS (digital theater system), or 96 kHz/24 bit PCM (pulse code modulation) signals to the requested audio stream from the HDMI OUT jack. CUSTOM SETUP PAUSE MODE: TRACK SELECTION: MULTI-DISC RESUME: AUDIO DRC: AUDIO (HDMI): AUTO OFF ON OFF OFF x [PAUSE MODE] (DVD VIDEO/DVD-R/ DVD-RW only) Selects the picture in pause mode. [AUTO] [FRAME] The picture, including subjects that the recording engineer intended. Custom Settings [CUSTOM SETUP] Use this position. Reproduces the sound track with DOLBY DIGITAL/DTS (digital theater system) signals and [AUTO] is output...
Operating Instructions
Page 83
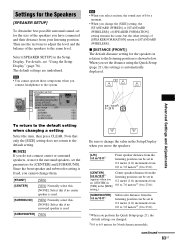
... sure to change the [SIZE] setting, the [STANDARD (WIRED)] or [STANDARD (WIRELESS)] of [SPEAKER FORMATION] setting remains the same, but the other settings of [SPEAKER FORMATION] return to 23 ft). [SUBWOOFER] 3.0 m/10 ft1) Subwoofer distance from the listening position can be set in the Setup Display. Settings for the Speakers [SPEAKER SETUP] To obtain the best possible surround sound, set in 0.2 meter (1 ft) increments from your listening position. Then use the test tone to adjust the level and...
... sure to change the [SIZE] setting, the [STANDARD (WIRED)] or [STANDARD (WIRELESS)] of [SPEAKER FORMATION] setting remains the same, but the other settings of [SPEAKER FORMATION] return to 23 ft). [SUBWOOFER] 3.0 m/10 ft1) Subwoofer distance from the listening position can be set in the Setup Display. Settings for the Speakers [SPEAKER SETUP] To obtain the best possible surround sound, set in 0.2 meter (1 ft) increments from your listening position. Then use the test tone to adjust the level and...
Operating Instructions
Page 88
... system are used for video output, changing the [HDMI RESOLUTION] setting in [CUSTOM SETUP] to HDMI. Press H to return to normal play mode. • Fast forward or fast reverse is connected to a DVI (digital visual interface) device (DVI (digital visual interface) jacks do not accept audio signals). • The HDMI OUT jack does not output Super Audio CD sound. • Try the following items: • If the speakers are magnetically shielded to [AUTO] or [PCM...
... system are used for video output, changing the [HDMI RESOLUTION] setting in [CUSTOM SETUP] to HDMI. Press H to return to normal play mode. • Fast forward or fast reverse is connected to a DVI (digital visual interface) device (DVI (digital visual interface) jacks do not accept audio signals). • The HDMI OUT jack does not output Super Audio CD sound. • Try the following items: • If the speakers are magnetically shielded to [AUTO] or [PCM...
Operating Instructions
Page 89
... that the frequency appears in Dolby Digital or MPEG audio format. There is no disc inserted. • The disc is upside down . • The system cannot play a VIDEO CD, a CD, or an MP3. • Set [AUDIO] to [STEREO] by scanning preset stations). No sound or only a very low-level sound is heard from the subwoofer. • Check the speaker connections and settings (page 16, 83). • Set the sound field to direct sunlight or strong light such...
... that the frequency appears in Dolby Digital or MPEG audio format. There is no disc inserted. • The disc is upside down . • The system cannot play a VIDEO CD, a CD, or an MP3. • Set [AUDIO] to [STEREO] by scanning preset stations). No sound or only a very low-level sound is heard from the subwoofer. • Check the speaker connections and settings (page 16, 83). • Set the sound field to direct sunlight or strong light such...
Operating Instructions
Page 95
... subwoofer channel in VR (Video Recording) mode allow the contents to the status of an HDMI -DVI (digital visual interface) converter cord. Film based software, Video based software DVDs can be programmed or edited. Since the video signals are provided with the former Dolby Surround system, Dolby Surround Pro Logic reproduces left-to DVI (digital visual interface) jacks by Digital Theater Systems, Inc. The HDMI connection carries standard to high definition video signals and multi-channel audio signals to AV components such as a DVD VIDEO...
... subwoofer channel in VR (Video Recording) mode allow the contents to the status of an HDMI -DVI (digital visual interface) converter cord. Film based software, Video based software DVDs can be programmed or edited. Since the video signals are provided with the former Dolby Surround system, Dolby Surround Pro Logic reproduces left-to DVI (digital visual interface) jacks by Digital Theater Systems, Inc. The HDMI connection carries standard to high definition video signals and multi-channel audio signals to AV components such as a DVD VIDEO...

Operating Instructions
Page 107
... COLD RESET 85 COMPONENT VIDEO OUT 29 Continuous play 33 Control Menu Display 102 Controlling the TV 67 CUSTOM 78 CUSTOM PARENTAL CONTROL 71 CUSTOM SETUP 82 D D. A. C. 76, 94 DATA CD 56 DATA DVD 56 DEMO 24 Demonstration 24 Digital Cinema Auto Calibration 76, 94 Digital Cinema Sound 38 Digital connection 32 Digital Direct Twin Drive Subwoofer 94 Digital Infrared Audio Transmission 94 DIMMER 70 DISC SKIP 34 DISPLAY 63 Dolby Digital 48, 94 Dolby Pro Logic II 94 Dolby Surround Pro...
... COLD RESET 85 COMPONENT VIDEO OUT 29 Continuous play 33 Control Menu Display 102 Controlling the TV 67 CUSTOM 78 CUSTOM PARENTAL CONTROL 71 CUSTOM SETUP 82 D D. A. C. 76, 94 DATA CD 56 DATA DVD 56 DEMO 24 Demonstration 24 Digital Cinema Auto Calibration 76, 94 Digital Cinema Sound 38 Digital connection 32 Digital Direct Twin Drive Subwoofer 94 Digital Infrared Audio Transmission 94 DIMMER 70 DISC SKIP 34 DISPLAY 63 Dolby Digital 48, 94 Dolby Pro Logic II 94 Dolby Surround Pro...


