
Limited Warranty (US Only)
Page 1
...; CD Players/Mini Disc Players/Audio Systems Hifi Audio LIMITED WARRANTY Sony Electronics Inc. ("Sony") warrants this Product is determined to be presented to state. After the warranty period, you must be defective, Sony will supply, at no charge, new or rebuilt replacements in exchange for defective parts for all labor charges. 2. This warranty does not cover customer instruction, installation, set up adjustments or signal reception problems...
...; CD Players/Mini Disc Players/Audio Systems Hifi Audio LIMITED WARRANTY Sony Electronics Inc. ("Sony") warrants this Product is determined to be presented to state. After the warranty period, you must be defective, Sony will supply, at no charge, new or rebuilt replacements in exchange for defective parts for all labor charges. 2. This warranty does not cover customer instruction, installation, set up adjustments or signal reception problems...
Operating Instructions
Page 2
... separation between the equipment and receiver. - To disconnect the cord, pull it out by the plug, never by qualified personnel before operating it is connected to rain or moisture. Owner's Record The model and serial numbers are located at the bottom of optical instruments with the instructions, may block the ventilation slots. • Do not install the unit near materials (curtains...
... separation between the equipment and receiver. - To disconnect the cord, pull it out by the plug, never by qualified personnel before operating it is connected to rain or moisture. Owner's Record The model and serial numbers are located at the bottom of optical instruments with the instructions, may block the ventilation slots. • Do not install the unit near materials (curtains...
Operating Instructions
Page 4
... Manual 6 This System Can Play the Following Discs 6 Guide to the Control Menu Display...... 10 Getting Started Unpacking 13 Inserting Batteries into the Remote....... 13 Hookup Overview 14 Step 1: Speaker System Hookup........... 15 Step 2: Antenna (Aerial) Hookup ......... 20 Step 3: TV Hookup 21 Step 4: Other Component Hookup........ 25 Step 5: Connecting the AC Power Cord (Mains Lead 27 Step 6: Turning off the Demonstration 27 Step 7: Performing the Quick Setup ..... 28 Speaker Setup 30 Playing Discs Playing Discs 31 Using the DVD's Menu 36 Selecting [ORIGINAL] or [PLAY...
... Manual 6 This System Can Play the Following Discs 6 Guide to the Control Menu Display...... 10 Getting Started Unpacking 13 Inserting Batteries into the Remote....... 13 Hookup Overview 14 Step 1: Speaker System Hookup........... 15 Step 2: Antenna (Aerial) Hookup ......... 20 Step 3: TV Hookup 21 Step 4: Other Component Hookup........ 25 Step 5: Connecting the AC Power Cord (Mains Lead 27 Step 6: Turning off the Demonstration 27 Step 7: Performing the Quick Setup ..... 28 Speaker Setup 30 Playing Discs Playing Discs 31 Using the DVD's Menu 36 Selecting [ORIGINAL] or [PLAY...
Operating Instructions
Page 5
Settings and Adjustments Using the Setup Display 72 Setting the Display or Sound Track Language 73 [LANGUAGE SETUP] Settings for the Display 74 [SCREEN SETUP] Custom Settings 76 [CUSTOM SETUP] Settings for the Speakers 77 [SPEAKER SETUP] Additional Information Precautions 80 Notes about the Discs 81 Troubleshooting 81 Self-diagnosis Function 84 (When letters/numbers appear in the display) Specifications 85 Glossary 86 Language Code List 89 Index to Parts and Controls 90 DVD Setup Display List 95 AMP Menu List 96 Index 97 5US
Settings and Adjustments Using the Setup Display 72 Setting the Display or Sound Track Language 73 [LANGUAGE SETUP] Settings for the Display 74 [SCREEN SETUP] Custom Settings 76 [CUSTOM SETUP] Settings for the Speakers 77 [SPEAKER SETUP] Additional Information Precautions 80 Notes about the Discs 81 Troubleshooting 81 Self-diagnosis Function 84 (When letters/numbers appear in the display) Specifications 85 Glossary 86 Language Code List 89 Index to Parts and Controls 90 DVD Setup Display List 95 AMP Menu List 96 Index 97 5US
Operating Instructions
Page 11
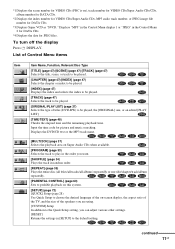
... DISPLAY. continued 11US Displays the DVD/CD text or the MP3 track name. [MULTI/2CH] (page 37) Selects the playback area on Super Audio CDs when available. [PROGRAM] (page 33) Selects the track to play in the order you can adjust various other settings. [RESET] Returns the settings in [SETUP] to the default setting. Input the time code for JPEG files. List of Control Menu items Item Item Name, Function, Relevant Disc...
... DISPLAY. continued 11US Displays the DVD/CD text or the MP3 track name. [MULTI/2CH] (page 37) Selects the playback area on Super Audio CDs when available. [PROGRAM] (page 33) Selects the track to play in the order you can adjust various other settings. [RESET] Returns the settings in [SETUP] to the default setting. Input the time code for JPEG files. List of Control Menu items Item Item Name, Function, Relevant Disc...

Operating Instructions
Page 33
you change the settings on a disc Total time of the disc, press x twice, then press H. the system enters standby mode (DATA CD only). • Resume Play does not work during Program Play and Shuffle Play. • This function may not work with some discs. • Depending on where you change the play mode. - The Control Menu appears. 2 Press X/x to [ON]. The options for the current disc. TRACK - - 3. TRACK - - 4. TRACK - - 7. you play from exactly...
you change the settings on a disc Total time of the disc, press x twice, then press H. the system enters standby mode (DATA CD only). • Resume Play does not work during Program Play and Shuffle Play. • This function may not work with some discs. • Depending on where you change the play mode. - The Control Menu appears. 2 Press X/x to [ON]. The options for the current disc. TRACK - - 3. TRACK - - 4. TRACK - - 7. you play from exactly...

Operating Instructions
Page 48
... . Tip • When the Control Menu display is turned off, you can search for a scene on the disc. 48US The system starts playback from the selected number. For example, to a number). [INDEX] x When playing a VIDEO CD/Super VCD with PBC Playback [SCENE] x When playing a Super Audio CD [TRACK] [INDEX] x When playing a CD [TRACK] x When playing a DATA CD (MP3 audio) [ALBUM] [TRACK] x When playing a DATA CD (JPEG file...
... . Tip • When the Control Menu display is turned off, you can search for a scene on the disc. 48US The system starts playback from the selected number. For example, to a number). [INDEX] x When playing a VIDEO CD/Super VCD with PBC Playback [SCENE] x When playing a Super Audio CD [TRACK] [INDEX] x When playing a CD [TRACK] x When playing a DATA CD (MP3 audio) [ALBUM] [TRACK] x When playing a DATA CD (JPEG file...

Operating Instructions
Page 51
... the frequency using the Control Menu. The display and the kinds of the current disc continued 51US x When playing a DVD VIDEO or DVDRW • T **:**:** Playing time of the current title • T-**:**:** Remaining time of the current title • C **:**:** Playing time of the current chapter • C-**:**:** Remaining time of the current chapter x When playing a VIDEO CD (with PBC functions, the playing time is set to "TUNER AM" or "TUNER...
... the frequency using the Control Menu. The display and the kinds of the current disc continued 51US x When playing a DVD VIDEO or DVDRW • T **:**:** Playing time of the current title • T-**:**:** Remaining time of the current title • C **:**:** Playing time of the current chapter • C-**:**:** Remaining time of the current chapter x When playing a VIDEO CD (with PBC functions, the playing time is set to "TUNER AM" or "TUNER...
Operating Instructions
Page 57
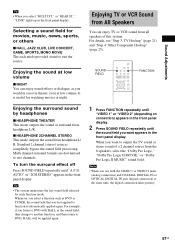
... function mode. Enjoying the sound at low volume x NIGHT You can enjoy TV or VCR sound from all speakers of a 2 channel source from headphone L/ R. Multi channel surround formats are downmixed to DVD, HALL will be applied again. 1 Press FUNCTION repeatedly until "VIDEO 1" or "VIDEO 2" (depending on connection) appears in the front panel display. 2 Press SOUND FIELD repeatedly until "A.F.D. Sound Adjustments Tip • When you use both the VIDEO 1 or VIDEO 2 jacks (analog connection) and COAXIAL DIGITAL IN or OPTICAL DIGITAL IN jack (digital connection...
... function mode. Enjoying the sound at low volume x NIGHT You can enjoy TV or VCR sound from all speakers of a 2 channel source from headphone L/ R. Multi channel surround formats are downmixed to DVD, HALL will be applied again. 1 Press FUNCTION repeatedly until "VIDEO 1" or "VIDEO 2" (depending on connection) appears in the front panel display. 2 Press SOUND FIELD repeatedly until "A.F.D. Sound Adjustments Tip • When you use both the VIDEO 1 or VIDEO 2 jacks (analog connection) and COAXIAL DIGITAL IN or OPTICAL DIGITAL IN jack (digital connection...

Operating Instructions
Page 61
... display will ask you to set . The [PARENTAL CONTROL] function allows you have not entered a password The display for your 4-digit password using the number buttons, then press ENTER. The Control Menu appears. The display for playback. The [CUSTOM PARENTAL CONTROL] display appears. To play a disc for which Custom Parental Control is set a playback limitation level. 1 Press DISPLAY while the system is already set 1 Insert the disc for entering the password appears. The system is set . Enter a 4-digit password using the number buttons...
... display will ask you to set . The [PARENTAL CONTROL] function allows you have not entered a password The display for your 4-digit password using the number buttons, then press ENTER. The Control Menu appears. The display for playback. The [CUSTOM PARENTAL CONTROL] display appears. To play a disc for which Custom Parental Control is set a playback limitation level. 1 Press DISPLAY while the system is already set 1 Insert the disc for entering the password appears. The system is set . Enter a 4-digit password using the number buttons...

Operating Instructions
Page 62
...; The Control Menu display will ask you play a disc for entering your password appears. 2 Enter your new password. The selection items for entering your password appears, enter your 4-digit password using the number buttons, then press ENTER. To play discs which Parental Control is canceled, the level returns to select [STANDARD], then press ENTER. The area is complete. When you enter a new 4-digit password, replace the disc in Step 8. The selection items for setting the...
...; The Control Menu display will ask you play a disc for entering your password appears. 2 Enter your new password. The selection items for entering your password appears, enter your 4-digit password using the number buttons, then press ENTER. To play discs which Parental Control is canceled, the level returns to select [STANDARD], then press ENTER. The area is complete. When you enter a new 4-digit password, replace the disc in Step 8. The selection items for setting the...
Operating Instructions
Page 65
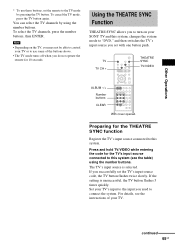
... number buttons, then ENTER. The TV's input source is unsuccessful, the TV button flashes 5 times quickly. Note • Depending on your TV. If you used to the TV mode by using the number buttons. Other Operations * To use some of your SONY TV and this system (see the table) using the number buttons. Using the THEATRE SYNC Function THEATRE SYNC allows you set the TV's input source code, the TV button flashes twice slowly. Set your TV or to use these buttons, set the remote to connect...
... number buttons, then ENTER. The TV's input source is unsuccessful, the TV button flashes 5 times quickly. Note • Depending on your TV. If you used to the TV mode by using the number buttons. Other Operations * To use some of your SONY TV and this system (see the table) using the number buttons. Using the THEATRE SYNC Function THEATRE SYNC allows you set the TV's input source code, the TV button flashes twice slowly. Set your TV or to use these buttons, set the remote to connect...
Operating Instructions
Page 66
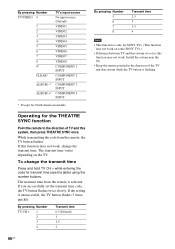
... quickly. If this function does not work, change the transmit time Press and hold TV CH + while entering the code for SONY TVs. (This function may not work on the TV. If the setting is selected. Install the system near the TV. • Keep the remote pointed in the direction of TV and this system, then press THEATRE SYNC once. By pressing Number TV/VIDEO 0 1 2 3 4 5 6 7 8 9* CLEAR* ALBUM -* ALBUM +* TV's input source...
... quickly. If this function does not work, change the transmit time Press and hold TV CH + while entering the code for SONY TVs. (This function may not work on the TV. If the setting is selected. Install the system near the TV. • Keep the remote pointed in the direction of TV and this system, then press THEATRE SYNC once. By pressing Number TV/VIDEO 0 1 2 3 4 5 6 7 8 9* CLEAR* ALBUM -* ALBUM +* TV's input source...

Operating Instructions
Page 68
... cover opened. To change the AM tuning interval (except for stereo program) appear in the front panel display. TUNER MENU Presetting radio stations You can be erased. until "FM" or "AM" appears in the front panel display. 3 Press TUNER MENU. 4 Press C/X/x/c repeatedly until the band you change the preset number Restart from Step 1. To change the AM tuning interval, first tune in the system's memory first (see "Presetting radio stations" (page 68)). 1 Press FUNCTION repeatedly until the auto...
... cover opened. To change the AM tuning interval (except for stereo program) appear in the front panel display. TUNER MENU Presetting radio stations You can be erased. until "FM" or "AM" appears in the front panel display. 3 Press TUNER MENU. 4 Press C/X/x/c repeatedly until the band you change the preset number Restart from Step 1. To change the AM tuning interval, first tune in the system's memory first (see "Presetting radio stations" (page 68)). 1 Press FUNCTION repeatedly until the auto...

Operating Instructions
Page 77
... position. When you set the parameters for [CENTER] and [SURROUND] and specify the surround speaker position. SPEAKER SETUP SIZE: DISTANCE: LEVEL(FRONT): LEVEL(SURROUND): TEST TONE: OFF FRONT: CENTER: SURROUND: SUBWOOFER: YES YES BEHIND YES To return to the default setting when changing a setting Select the item, then press CLEAR. Since the front speaker setting is automatically displayed. Settings and Adjustments Settings for the Speakers [SPEAKER SETUP] To obtain the best possible surround sound, set for the size of other speakers, subwoofer may be excessive...
... position. When you set the parameters for [CENTER] and [SURROUND] and specify the surround speaker position. SPEAKER SETUP SIZE: DISTANCE: LEVEL(FRONT): LEVEL(SURROUND): TEST TONE: OFF FRONT: CENTER: SURROUND: SUBWOOFER: YES YES BEHIND YES To return to the default setting when changing a setting Select the item, then press CLEAR. Since the front speaker setting is automatically displayed. Settings and Adjustments Settings for the Speakers [SPEAKER SETUP] To obtain the best possible surround sound, set for the size of other speakers, subwoofer may be excessive...
Operating Instructions
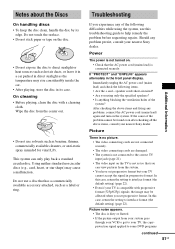
Page 81
... your nearest Sony dealer. Troubleshooting If you using the system, use this troubleshooting guide to interlace format (the default setting) (page 22). • Even if your TV is compatible with a cleaning cloth. In this case, return the setting to the correct TV input jack (page 21). • The video input on the system. This system can view pictures from the system. • You have set progressive format. Using neither standard nor circular discs (e.g., card, heart...
... your nearest Sony dealer. Troubleshooting If you using the system, use this troubleshooting guide to interlace format (the default setting) (page 22). • Even if your TV is compatible with a cleaning cloth. In this case, return the setting to the correct TV input jack (page 21). • The video input on the system. This system can view pictures from the system. • You have set progressive format. Using neither standard nor circular discs (e.g., card, heart...
Operating Instructions
Page 82
... sound field to normal play mode. • Fast forward or fast reverse is on (page 55). • Check the speaker connections and settings (page 15, 77). • Depending on the remote if "MUTING ON" is displayed in the front panel display. • The system is fixed. Operation Radio stations cannot be the entire 5.1 channel. Use direct tuning. • No stations have been preset or the preset stations have been cleared (when tuning by pressing AUDIO...
... sound field to normal play mode. • Fast forward or fast reverse is on (page 55). • Check the speaker connections and settings (page 15, 77). • Depending on the remote if "MUTING ON" is displayed in the front panel display. • The system is fixed. Operation Radio stations cannot be the entire 5.1 channel. Use direct tuning. • No stations have been preset or the preset stations have been cleared (when tuning by pressing AUDIO...
Operating Instructions
Page 87
... disc. Multi-angle function Various angles of a scene, or viewpoints of a CD. The limitation varies from disc to 5.1-channel surround. continued 87US Additional Information more realistic audio presence. The surround speakers output monaural sound. Furthermore, the data capacity of high quality digital audio. File A JPEG image recorded on . Film based DVDs contain the same images (24 frames per second. By using menu screens recorded on some DVDs. DTS Digital audio...
... disc. Multi-angle function Various angles of a scene, or viewpoints of a CD. The limitation varies from disc to 5.1-channel surround. continued 87US Additional Information more realistic audio presence. The surround speakers output monaural sound. Furthermore, the data capacity of high quality digital audio. File A JPEG image recorded on . Film based DVDs contain the same images (24 frames per second. By using menu screens recorded on some DVDs. DTS Digital audio...

Operating Instructions
Page 97
... 7 Multi-angle function 59, 87 MULTI-DISC RESUME 76 Multilingual function 87 Multiplex broadcast sound 67 Muting 32 N Naming preset stations 69 O On-screen display Control Menu display 10 Setup Display 72 ORIGINAL 37 OSD 73 Other Component Hookup 25 P PARENTAL CONTROL 61, 87 PAUSE MODE 76 PBC Playback 7, 38, 87 PICTURE NAVI 42, 49 PLAY LIST 37 Preset Station 68 Program Play 33 PROGRESSIVE AUTO 22 Progressive format 22, 88 PROGRESSIVE VIDEO 23 Q Quick Setup 28 R Radio 68 Rear Panel 92 Region Code 8, 88 Remote...
... 7 Multi-angle function 59, 87 MULTI-DISC RESUME 76 Multilingual function 87 Multiplex broadcast sound 67 Muting 32 N Naming preset stations 69 O On-screen display Control Menu display 10 Setup Display 72 ORIGINAL 37 OSD 73 Other Component Hookup 25 P PARENTAL CONTROL 61, 87 PAUSE MODE 76 PBC Playback 7, 38, 87 PICTURE NAVI 42, 49 PLAY LIST 37 Preset Station 68 Program Play 33 PROGRESSIVE AUTO 22 Progressive format 22, 88 PROGRESSIVE VIDEO 23 Q Quick Setup 28 R Radio 68 Rear Panel 92 Region Code 8, 88 Remote...
Marketing Specifications
Page 2
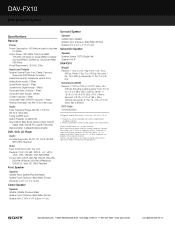
... 2 (Rear) Optical Audio Input(s): 1 (Rear) Coaxial Audio Digital Input(s): 1 (Rear) Composite Video Output(s): 1 (Rear) Composite Video Input(s): 2 (Rear) S-Video Output(s): 1 (Rear) Component Video (Y/Pb/Pr) Output(s): 1 (Rear) Antenna Terminal(s): Yes (FM 75 ohm, AM Loop) Audio Tuner Frequency Range: AM: 530-1,710 kHz FM: 87.5-108.0 MHz Tuning: AM/FM Tuner Station Preset(s): 10 AM/20 FM Sound Mode: Bass Boost function-DSGX, Dolby® Digital, dts®, Dolby® Pro Logic® II Decoding Digital Amplifier: S-Master® Digital Amplifier DVD, VCD, CD Player Audio Format(s) Supported...
... 2 (Rear) Optical Audio Input(s): 1 (Rear) Coaxial Audio Digital Input(s): 1 (Rear) Composite Video Output(s): 1 (Rear) Composite Video Input(s): 2 (Rear) S-Video Output(s): 1 (Rear) Component Video (Y/Pb/Pr) Output(s): 1 (Rear) Antenna Terminal(s): Yes (FM 75 ohm, AM Loop) Audio Tuner Frequency Range: AM: 530-1,710 kHz FM: 87.5-108.0 MHz Tuning: AM/FM Tuner Station Preset(s): 10 AM/20 FM Sound Mode: Bass Boost function-DSGX, Dolby® Digital, dts®, Dolby® Pro Logic® II Decoding Digital Amplifier: S-Master® Digital Amplifier DVD, VCD, CD Player Audio Format(s) Supported...


