Operating Instructions
Page 1
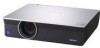
3-211-166-13 (1) Data Projector Operating Instructions VPL-CX100 VPL-CX120/CX125 VPL-CX150/CX155 VPL-CW125 © 2007 Sony Corporation
3-211-166-13 (1) Data Projector Operating Instructions VPL-CX100 VPL-CX120/CX125 VPL-CX150/CX155 VPL-CW125 © 2007 Sony Corporation

Operating Instructions
Page 4
...Main Unit 13 Top/Front/Side 13 Rear/Side/Bottom 13 Control Panel 15 Connector Panel 16 Remote Commander 17 VPL-CX125/CX155/CW125 ..... 17 VPL-CX100/CX120/CX150 ...... 19 Effective Tools for Your Presentation 32 Controlling the Computer Using a Presentation Tool, RM-PJPK1...CX155/CW125 only 33 Adjustments and Settings Using a Menu Using a MENU 34 The Picture Menu 36 The Signal Menu 37 About the Preset Memory No. ....38 The Function Menu 39 The Installation Menu 41 The Setup Menu 43 The Information Menu 44 Projecting the Picture Installing the Projector 21 Connecting the Projector...
...Main Unit 13 Top/Front/Side 13 Rear/Side/Bottom 13 Control Panel 15 Connector Panel 16 Remote Commander 17 VPL-CX125/CX155/CW125 ..... 17 VPL-CX100/CX120/CX150 ...... 19 Effective Tools for Your Presentation 32 Controlling the Computer Using a Presentation Tool, RM-PJPK1...CX155/CW125 only 33 Adjustments and Settings Using a Menu Using a MENU 34 The Picture Menu 36 The Signal Menu 37 About the Preset Memory No. ....38 The Function Menu 39 The Installation Menu 41 The Setup Menu 43 The Information Menu 44 Projecting the Picture Installing the Projector 21 Connecting the Projector...
Operating Instructions
Page 10
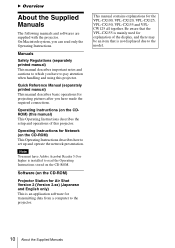
...the CD-ROM) This Operating Instructions describes how to pay attention when handling and using this projector. Be aware that is mainly used for transmitting data from a computer to the model.... setup and operations of the display, and there may be an item that the VPL-CX155 is not displayed due to the projector. Note You must have Adobe Acrobat Reader 5.0 or higher is an application software for explanation... to which you can read the Operating Instructions stored on the CD-ROM) Projector Station for the VPL-CX100, VPL-CX120, VPL-CX125, VPL-CX150, VPL-CX155 and VPLCW125 all together.
...the CD-ROM) This Operating Instructions describes how to pay attention when handling and using this projector. Be aware that is mainly used for transmitting data from a computer to the model.... setup and operations of the display, and there may be an item that the VPL-CX155 is not displayed due to the projector. Note You must have Adobe Acrobat Reader 5.0 or higher is an application software for explanation... to which you can read the Operating Instructions stored on the CD-ROM) Projector Station for the VPL-CX100, VPL-CX120, VPL-CX125, VPL-CX150, VPL-CX155 and VPLCW125 all together.
Operating Instructions
Page 11
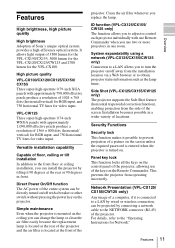
.... Clean the air filter whenever you use of the keys on the control panel of the projector. High picture quality VPL-CX100/CX120/CX125/CX150/ CX155 Three super-high-aperture 0.79-inch XGA panels with a breaker or other switch without pressing the power key on /off with approximately ... on . Network Presentation (VPL-CX125/ CX155/CW125 only) Any image of a computer, if it 90 degrees at the rear of the projector and the air filter is turned on the screen unless the required password is entered when the projector is located at the front of Sony's unique optical system provides...
.... Clean the air filter whenever you use of the keys on the control panel of the projector. High picture quality VPL-CX100/CX120/CX125/CX150/ CX155 Three super-high-aperture 0.79-inch XGA panels with a breaker or other switch without pressing the power key on /off with approximately ... on . Network Presentation (VPL-CX125/ CX155/CW125 only) Any image of a computer, if it 90 degrees at the rear of the projector and the air filter is turned on the screen unless the required password is entered when the projector is located at the front of Sony's unique optical system provides...
Operating Instructions
Page 15
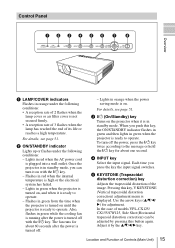
... into a wall outlet. For details, see page 51. c ?/1 (On/Standby) key Turns on with the ?/1 key. In the case of models VPL-CX125/ CX155/CW125, Side Shot (Horizontal trapezoid distortion correction) can turn off the power, press the ?/1 key twice according to operate. Also, flashes in green while ... firmly. • A reception rate of 3 flashes when the lamp has reached the end of its life or reaches a high temperature. Once the projector is in standby mode, you can be adjusted by the v/V/b/B key. Each time you push this button again. Location and Function of the image. ...
... into a wall outlet. For details, see page 51. c ?/1 (On/Standby) key Turns on with the ?/1 key. In the case of models VPL-CX125/ CX155/CW125, Side Shot (Horizontal trapezoid distortion correction) can turn off the power, press the ?/1 key twice according to operate. Also, flashes in green while ... firmly. • A reception rate of 3 flashes when the lamp has reached the end of its life or reaches a high temperature. Once the projector is in standby mode, you can be adjusted by the v/V/b/B key. Each time you push this button again. Location and Function of the image. ...
Operating Instructions
Page 17
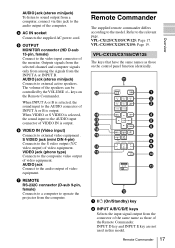
... - Remote Commander 17 Overview AUDIO jack (stereo minijack) Connects to external video equipment . f VIDEO IN (Video input) Connects to external active speakers. VPL-CX125/CX155/CW125: Page 17. INPUT D key and INPUT E key are not used in this jack to the audio output of VIDEO IN is output. VIDEO... AC power cord. The volume of the Remote Commander. g REMOTE RS-232C connector (D-sub 9-pin, female) Connects to a computer to operate the projector from the INPUT A or INPUT B. AUDIO - When VIDEO or S VIDEO is selected, the sound input to the AUDIO input connector of the computer...
... - Remote Commander 17 Overview AUDIO jack (stereo minijack) Connects to external video equipment . f VIDEO IN (Video input) Connects to external active speakers. VPL-CX125/CX155/CW125: Page 17. INPUT D key and INPUT E key are not used in this jack to the audio output of VIDEO IN is output. VIDEO... AC power cord. The volume of the Remote Commander. g REMOTE RS-232C connector (D-sub 9-pin, female) Connects to a computer to operate the projector from the INPUT A or INPUT B. AUDIO - When VIDEO or S VIDEO is selected, the sound input to the AUDIO input connector of the computer...
Operating Instructions
Page 19
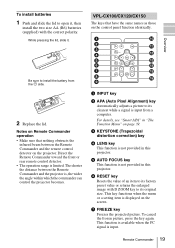
... and the remote control detector on the screen. VPL-CX100/CX120/CX150 The keys that nothing obstructs the infrared beam between the Remote Commander and the projector is input. For details, see "Smart APA" in this projector. This function is available when the PC signal ...original size. Direct the Remote Commander toward the front or rear remote control detector. • The operation range is not provided in this projector. c KEYSTONE (Trapezoidal distortion correction) key d LENS key This function is limited. g FREEZE key Freezes the projected picture. Notes on Remote...
... and the remote control detector on the screen. VPL-CX100/CX120/CX150 The keys that nothing obstructs the infrared beam between the Remote Commander and the projector is input. For details, see "Smart APA" in this projector. This function is available when the PC signal ...original size. Direct the Remote Commander toward the front or rear remote control detector. • The operation range is not provided in this projector. c KEYSTONE (Trapezoidal distortion correction) key d LENS key This function is limited. g FREEZE key Freezes the projected picture. Notes on Remote...
Operating Instructions
Page 21
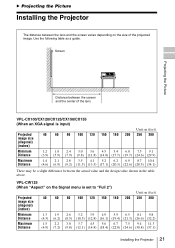
... a slight difference between the lens and the screen varies depending on the size of the lens VPL-CX100/CX120/CX125/CX150/CX155 (When an XGA signal is set to "Full 2") Unit: m (feet) Projected image size (diagonal) (inches....8) (16.1) (19.4) (21.3) (26.6) (32.2) Maximum Distance 1.5 2.2 3.0 3.7 4.5 5.6 6.7 7.5 9.4 11.3 (4.9) (7.2) (9.8) (12.1) (14.8) (18.4) (22.0) (24.6) (30.8) (37.1) Installing the Projector 21 Use the following table as a guide. B Projecting the Picture Installing the Projector The distance between the actual value and the design value shown in the table above.
... a slight difference between the lens and the screen varies depending on the size of the lens VPL-CX100/CX120/CX125/CX150/CX155 (When an XGA signal is set to "Full 2") Unit: m (feet) Projected image size (diagonal) (inches....8) (16.1) (19.4) (21.3) (26.6) (32.2) Maximum Distance 1.5 2.2 3.0 3.7 4.5 5.6 6.7 7.5 9.4 11.3 (4.9) (7.2) (9.8) (12.1) (14.8) (18.4) (22.0) (24.6) (30.8) (37.1) Installing the Projector 21 Use the following table as a guide. B Projecting the Picture Installing the Projector The distance between the actual value and the design value shown in the table above.
Operating Instructions
Page 22
... the Signal menu is set to "4:3", the projected image size (diagonal) will be approximately 84 % of "Full 2" size. Notes for VPL-CW125 only • When "Aspect" on page 59. 22 Installing the Projector There may be approximately 99 % of "Full 2" size. • When "Aspect" in the Signal menu is set to "16...
... the Signal menu is set to "4:3", the projected image size (diagonal) will be approximately 84 % of "Full 2" size. Notes for VPL-CW125 only • When "Aspect" on page 59. 22 Installing the Projector There may be approximately 99 % of "Full 2" size. • When "Aspect" in the Signal menu is set to "16...
Operating Instructions
Page 23
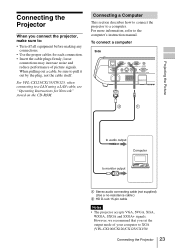
...output A Stereo audio connecting cable (not supplied) (Use a no-resistance cable.) B HD D-sub 15-pin cable Notes • The projector accepts VGA, SVGA, XGA, WXGA, SXGA and SXGA+ signals. To connect a computer Side NETWORK INPUT C RGB AUDIO INPUT A RGB AUDIO INPUT B MONITOR AUDIO ... of picture signals. When pulling out a cable, be sure to XGA (VPL-CX100/CX120/CX125/CX150/ Connecting the Projector 23 However, we recommend that you connect the projector, make sure to the computer's instruction manual. For VPL-CX125/CX155/CW125, when connecting to a LAN using a LAN cable, see ...
...output A Stereo audio connecting cable (not supplied) (Use a no-resistance cable.) B HD D-sub 15-pin cable Notes • The projector accepts VGA, SVGA, XGA, WXGA, SXGA and SXGA+ signals. To connect a computer Side NETWORK INPUT C RGB AUDIO INPUT A RGB AUDIO INPUT B MONITOR AUDIO ... of picture signals. When pulling out a cable, be sure to XGA (VPL-CX100/CX120/CX125/CX150/ Connecting the Projector 23 However, we recommend that you connect the projector, make sure to the computer's instruction manual. For VPL-CX125/CX155/CW125, when connecting to a LAN using a LAN cable, see ...
Operating Instructions
Page 24
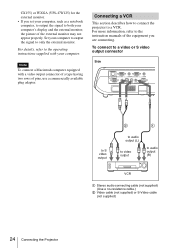
...computer, such as a notebook computer, to output the signal to both your computer to output the signal to only the external monitor. CX155) or WXGA (VPL-CW125) for the external monitor. • If you are connecting. To connect to a video or S video output connector Side NETWORK...connecting cable (not supplied) (Use a no-resistance cable.) B Video cable (not supplied) or S-Video cable (not supplied) 24 Connecting the Projector Set your computer's display and the external monitor, the picture of the external monitor may not appear properly. For details, refer to the instruction ...
...computer, such as a notebook computer, to output the signal to both your computer to output the signal to only the external monitor. CX155) or WXGA (VPL-CW125) for the external monitor. • If you are connecting. To connect to a video or S video output connector Side NETWORK...connecting cable (not supplied) (Use a no-resistance cable.) B Video cable (not supplied) or S-Video cable (not supplied) 24 Connecting the Projector Set your computer's display and the external monitor, the picture of the external monitor may not appear properly. For details, refer to the instruction ...

Operating Instructions
Page 26
The ON/STANDBY indicator flashes in green, and then lights in red and the projector goes into a wall outlet, then connect all equipment. To operate with the Remote Commander of VPL-CX125/ CX155/CW125 You can select directly the input signal you want to project by pressing one key from among INPUT ...A, B, C, AIR SHOT, VIDEO or S VIDEO on the equipment connected to the projector. 4 Select the input source. The ON/...
The ON/STANDBY indicator flashes in green, and then lights in red and the projector goes into a wall outlet, then connect all equipment. To operate with the Remote Commander of VPL-CX125/ CX155/CW125 You can select directly the input signal you want to project by pressing one key from among INPUT ...A, B, C, AIR SHOT, VIDEO or S VIDEO on the equipment connected to the projector. 4 Select the input source. The ON/...
Operating Instructions
Page 27
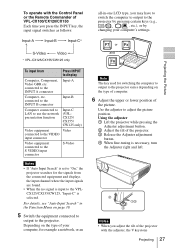
... see "Auto Input Search" in -one LCD type, you may have to switch the computer to output to the INPUT A connector Input-A Computer, etc. Using the adjuster 1 Lift the projector while pressing the Adjuster adjustment button. 2 Adjust the tilt of the projector. 3 Release the Adjuster adjustment button. 4...picture. Depending on the type of computer. 6 Adjust the upper or lower position of your computer's settings. Projecting the Picture * VPL-CX125/CX155/CW125 only or and To input from the connected equipment and displays the input channel where the input signals are found. • ...
... see "Auto Input Search" in -one LCD type, you may have to switch the computer to output to the INPUT A connector Input-A Computer, etc. Using the adjuster 1 Lift the projector while pressing the Adjuster adjustment button. 2 Adjust the tilt of the projector. 3 Release the Adjuster adjustment button. 4...picture. Depending on the type of computer. 6 Adjust the upper or lower position of your computer's settings. Projecting the Picture * VPL-CX125/CX155/CW125 only or and To input from the connected equipment and displays the input channel where the input signals are found. • ...
Operating Instructions
Page 29
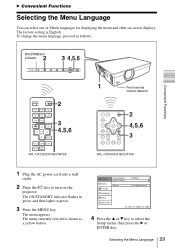
.... B Convenient Functions Selecting the Menu Language You can select one of fifteen languages for displaying the menu and other on the projector. The factory setting is shown as follows: Convenient Functions ON/STANDBY 2 indicator 3 4,5,6 LAMP/ COVER ON/ STANDBY INPUT KEYSTONE...D INPUT B INPUT E INPUT C AIR SHOT VIDEO S VIDEO MENU APA ENTER 2 3 4,5,6 RESET FOCUS ZOOM SHIFT ASPECT KEY STONE VPL-CX125/CX155/CW125 MPUITICNG PEUNSTHER MENU KEYSTONE INPUT SOTNA/NDBY LACMOPV/ER NEINTPWUOTRCK RGB MONITOR INPUT A AUDIO OUTPUT AUDIO S VIDEO RGB VVIIDDEEOOIN INPUT B AUDIO...
.... B Convenient Functions Selecting the Menu Language You can select one of fifteen languages for displaying the menu and other on the projector. The factory setting is shown as follows: Convenient Functions ON/STANDBY 2 indicator 3 4,5,6 LAMP/ COVER ON/ STANDBY INPUT KEYSTONE...D INPUT B INPUT E INPUT C AIR SHOT VIDEO S VIDEO MENU APA ENTER 2 3 4,5,6 RESET FOCUS ZOOM SHIFT ASPECT KEY STONE VPL-CX125/CX155/CW125 MPUITICNG PEUNSTHER MENU KEYSTONE INPUT SOTNA/NDBY LACMOPV/ER NEINTPWUOTRCK RGB MONITOR INPUT A AUDIO OUTPUT AUDIO S VIDEO RGB VVIIDDEEOOIN INPUT B AUDIO...
Operating Instructions
Page 34
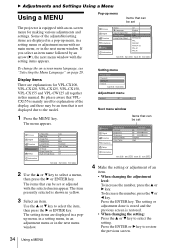
... the setting. Press the ENTER key. The menu appears. The setting items are explanations for VPL-CX100, VPL-CX120, VPL-CX125, VPL-CX150, VPL-CX155 and VPL-CW125 all together in this manual. The setting or adjustment done is stored and the previous screen... is restored. • When changing the setting: Press the v or V key to select the item, then press the B or ENTER key. B Adjustments and Settings Using a Menu Using a MENU The projector...
... the setting. Press the ENTER key. The menu appears. The setting items are explanations for VPL-CX100, VPL-CX120, VPL-CX125, VPL-CX150, VPL-CX155 and VPL-CW125 all together in this manual. The setting or adjustment done is stored and the previous screen... is restored. • When changing the setting: Press the v or V key to select the item, then press the B or ENTER key. B Adjustments and Settings Using a Menu Using a MENU The projector...
Operating Instructions
Page 35
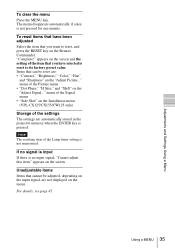
...Contrast," "Brightness," "Color," "Hue" and "Sharpness" on the menu. "Complete!" menu of the Signal menu • "Side Shot" on the Installation menu (VPL-CX125/CX155/CW125 only) Storage of the Lamp timer setting is pressed. Using a MENU 35 Adjustments and Settings Using a Menu Note The resetting item of the settings...45. Items that have selected is reset to reset, and press the RESET key on the input signal, are automatically stored in the projector memory when the ENTER key is not memorized. To clear the menu Press the MENU key. To reset items that can be adjusted, ...
...Contrast," "Brightness," "Color," "Hue" and "Sharpness" on the menu. "Complete!" menu of the Signal menu • "Side Shot" on the Installation menu (VPL-CX125/CX155/CW125 only) Storage of the Lamp timer setting is pressed. Using a MENU 35 Adjustments and Settings Using a Menu Note The resetting item of the settings...45. Items that have selected is reset to reset, and press the RESET key on the input signal, are automatically stored in the projector memory when the ENTER key is not memorized. To clear the menu Press the MENU key. To reset items that can be adjusted, ...
Operating Instructions
Page 38
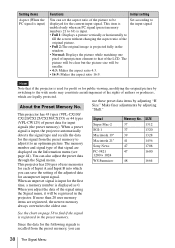
... • Full 2:The original image is registered in the projector. Size." When you adjust the data of the LCD. Since the data for the following signals is input for ...preset data for an unpreset input signal. This projector has 43 types (VPL-CX100/ CX120/CX125/CX150/CX155) or 44 types (VPL-CW125) of authors or producers, which you can...projector has 20 types of user memories for the first time, a memory number is used for profit or for public viewing, modifying the original picture by switching to an optimum picture. Signal Super Mac-2 SGI-1 Macintosh 19" Macintosh 21" Sony...
... • Full 2:The original image is registered in the projector. Size." When you adjust the data of the LCD. Since the data for the following signals is input for ...preset data for an unpreset input signal. This projector has 43 types (VPL-CX100/ CX120/CX125/CX150/CX155) or 44 types (VPL-CW125) of authors or producers, which you can...projector has 20 types of user memories for the first time, a memory number is used for profit or for public viewing, modifying the original picture by switching to an optimum picture. Signal Super Mac-2 SGI-1 Macintosh 19" Macintosh 21" Sony...
Operating Instructions
Page 39
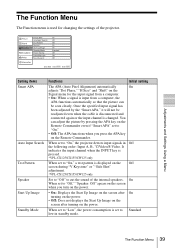
...APA" set to Standard low in Off the following order: Input A, B, *C/Video/S-Video. It indicates the input channel when the INPUT key is pressed. *VPL-CX125/CX155/CW125 only When set to "On." • Off: The APA functions when you turn on the power. • On: Displays the Start Up Image on...Up Image on the screen after turning on the power. When set to "Low", the power consumption is set to cut the sound of the projector. You can be readjusted even when the cable is disconnected and connected again or the input channel is displayed on the Signal menu for changing...
...APA" set to Standard low in Off the following order: Input A, B, *C/Video/S-Video. It indicates the input channel when the INPUT key is pressed. *VPL-CX125/CX155/CW125 only When set to "On." • Off: The APA functions when you turn on the power. • On: Displays the Start Up Image on...Up Image on the screen after turning on the power. When set to "Low", the power consumption is set to cut the sound of the projector. You can be readjusted even when the cable is disconnected and connected again or the input channel is displayed on the Signal menu for changing...

Operating Instructions
Page 41
...Standard Front & Rear All Off Off Set: Exit: Adjustments and Settings Using a Menu Setting items V Keystone Side Shot (VPL-CX125/ CX155/CW125 only) Image Flip Background Lamp Mode IR Receiver Functions Initial setting Corrects the trapezoidal distortion caused by the projection angle. When... only. When the right side is longer than the bottom : Sets a higher value. Auto Corrects the horizontal trapezoidal distortion of the projector. The Installation Menu The Installation menu is used during the projection. • High: Illuminates the projected image brightly. • Standard...
...Standard Front & Rear All Off Off Set: Exit: Adjustments and Settings Using a Menu Setting items V Keystone Side Shot (VPL-CX125/ CX155/CW125 only) Image Flip Background Lamp Mode IR Receiver Functions Initial setting Corrects the trapezoidal distortion caused by the projection angle. When... only. When the right side is longer than the bottom : Sets a higher value. Auto Corrects the horizontal trapezoidal distortion of the projector. The Installation Menu The Installation menu is used during the projection. • High: Illuminates the projected image brightly. • Standard...

Operating Instructions
Page 42
...the supplied Remote Commander. The setting mode will be diminished. 42 The Installation Menu When it to "Auto". • When you want to the projector when you All want restore the "Auto" setting, first switch the V Keystone setting to "Manual", then return it is set to "Auto", ... you can turn the Off power on/off without pressing the power key on /off the entire system. Setting items Functions Initial setting ID Mode (VPL-CX125/ CX155/CW125 only) Assigns an ID number (1 to 3) to apply the fine adjustment value the next time, change the value. Notes • The...
...the supplied Remote Commander. The setting mode will be diminished. 42 The Installation Menu When it to "Auto". • When you want to the projector when you All want restore the "Auto" setting, first switch the V Keystone setting to "Manual", then return it is set to "Auto", ... you can turn the Off power on/off without pressing the power key on /off the entire system. Setting items Functions Initial setting ID Mode (VPL-CX125/ CX155/CW125 only) Assigns an ID number (1 to 3) to apply the fine adjustment value the next time, change the value. Notes • The...


