
Operating Instructions
Page 4
... of Controls (Main Unit 13 Top/Front/Side 13 Rear/Side/Bottom 13 Control Panel 15 Connector Panel 16 Remote Commander 17 VPL-CX125/CX155/CW125 ..... 17 VPL-CX100/CX120/CX150 ...... 19 Effective Tools for Your Presentation 32 Controlling the Computer Using a Presentation Tool, RM-PJPK1 ... The Function Menu 39 The Installation Menu 41 The Setup Menu 43 The Information Menu 44 Projecting the Picture Installing the Projector 21 Connecting the Projector 23 Connecting a Computer 23 Connecting a VCR 24 Projecting 26 Turning Off the Power 28 Convenient Functions Selecting the Menu...
... of Controls (Main Unit 13 Top/Front/Side 13 Rear/Side/Bottom 13 Control Panel 15 Connector Panel 16 Remote Commander 17 VPL-CX125/CX155/CW125 ..... 17 VPL-CX100/CX120/CX150 ...... 19 Effective Tools for Your Presentation 32 Controlling the Computer Using a Presentation Tool, RM-PJPK1 ... The Function Menu 39 The Installation Menu 41 The Setup Menu 43 The Information Menu 44 Projecting the Picture Installing the Projector 21 Connecting the Projector 23 Connecting a Computer 23 Connecting a VCR 24 Projecting 26 Turning Off the Power 28 Convenient Functions Selecting the Menu...
Operating Instructions
Page 11
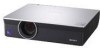
... maintenance Even when the projector is mounted on . ID function (VPL-CX125/CX155/ CW125 only) The function allows you to a LAN by wired or wireless connection, can be directly turned on the Remote Commander. High picture quality VPL-CX100/CX120/CX125/CX150/ CX155 Three super-high-aperture 0.79-inch XGA panels with one Remote Commander when you...
... maintenance Even when the projector is mounted on . ID function (VPL-CX125/CX155/ CW125 only) The function allows you to a LAN by wired or wireless connection, can be directly turned on the Remote Commander. High picture quality VPL-CX100/CX120/CX125/CX150/ CX155 Three super-high-aperture 0.79-inch XGA panels with one Remote Commander when you...
Operating Instructions
Page 16
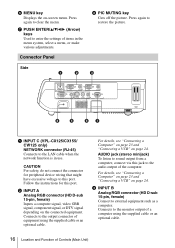
... the connected equipment. Connector Panel Side 1 2 3 NETWORK INPUT C RGB AUDIO INPUT A RGB AUDIO INPUT B MONITOR AUDIO S VIDEO VIDEO AUDIO OUTPUT VIDEO IN RS-232C REMOTE 4 5 67 a INPUT C (VPL-CX125/CX155/ CW125 only) NETWORK connector (RJ-45) Connects to the monitor output of Controls (Main Unit) CAUTION For safety, do not connect the...
... the connected equipment. Connector Panel Side 1 2 3 NETWORK INPUT C RGB AUDIO INPUT A RGB AUDIO INPUT B MONITOR AUDIO S VIDEO VIDEO AUDIO OUTPUT VIDEO IN RS-232C REMOTE 4 5 67 a INPUT C (VPL-CX125/CX155/ CW125 only) NETWORK connector (RJ-45) Connects to the monitor output of Controls (Main Unit) CAUTION For safety, do not connect the...
Operating Instructions
Page 17
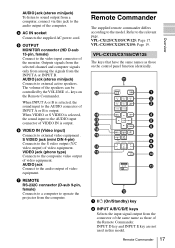
... this jack to the audio output of the Remote Commander. The volume of video equipment. VPL-CX125/CX155/CW125 The keys that have the same names as those on the Remote Commander. Remote Commander 17 Overview AUDIO jack (stereo minijack)... the connector of VIDEO IN is output. When VIDEO or S VIDEO is selected, the sound input to operate the projector from the INPUT A or INPUT B. Refer to external active speakers. When INPUT A or B is selected, the sound... jack (phono type) Connects to the video input connector of video equipment. VPL-CX100/CX120/CX150: Page 19. w;
... this jack to the audio output of the Remote Commander. The volume of video equipment. VPL-CX125/CX155/CW125 The keys that have the same names as those on the Remote Commander. Remote Commander 17 Overview AUDIO jack (stereo minijack)... the connector of VIDEO IN is output. When VIDEO or S VIDEO is selected, the sound input to operate the projector from the INPUT A or INPUT B. Refer to external active speakers. When INPUT A or B is selected, the sound... jack (phono type) Connects to the video input connector of video equipment. VPL-CX100/CX120/CX150: Page 19. w;
Operating Instructions
Page 19
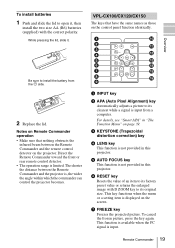
... or a setting item is limited. Overview To install batteries 1 Push and slide the lid to open it . VPL-CX100/CX120/CX150 The keys that nothing obstructs the infrared beam between the Remote Commander and the projector is not provided in "The Function Menu" on the screen. This function is available when the PC signal...
... or a setting item is limited. Overview To install batteries 1 Push and slide the lid to open it . VPL-CX100/CX120/CX150 The keys that nothing obstructs the infrared beam between the Remote Commander and the projector is not provided in "The Function Menu" on the screen. This function is available when the PC signal...
Operating Instructions
Page 23
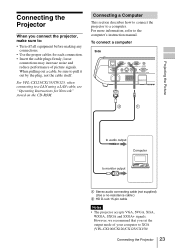
...-resistance cable.) B HD D-sub 15-pin cable Notes • The projector accepts VGA, SVGA, XGA, WXGA, SXGA and SXGA+ signals. For VPL-CX125/CX155/CW125, when connecting to XGA (VPL-CX100/CX120/CX125/CX150/ Connecting the Projector 23 To connect a computer Side NETWORK INPUT C RGB AUDIO INPUT A ...RGB AUDIO INPUT B MONITOR AUDIO OUTPUT S VIDEO VIDEO AUDIO VIDEO IN RS-232C REMOTE Projecting the ...
...-resistance cable.) B HD D-sub 15-pin cable Notes • The projector accepts VGA, SVGA, XGA, WXGA, SXGA and SXGA+ signals. For VPL-CX125/CX155/CW125, when connecting to XGA (VPL-CX100/CX120/CX125/CX150/ Connecting the Projector 23 To connect a computer Side NETWORK INPUT C RGB AUDIO INPUT A ...RGB AUDIO INPUT B MONITOR AUDIO OUTPUT S VIDEO VIDEO AUDIO VIDEO IN RS-232C REMOTE Projecting the ...
Operating Instructions
Page 24
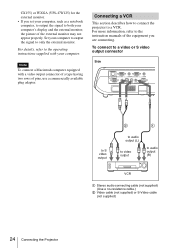
...no-resistance cable.) B Video cable (not supplied) or S-Video cable (not supplied) 24 Connecting the Projector To connect to a video or S video output connector Side NETWORK INPUT C RGB AUDIO INPUT A RGB... AUDIO INPUT B MONITOR AUDIO OUTPUT S VIDEO VIDEO AUDIO VIDEO IN RS-232C REMOTE to S video output to audio output (L) to video output to the operating instructions supplied ... to both your computer. Connecting a VCR This section describes how to connect the projector to only the external monitor. Note To connect a Macintosh computer equipped with your computer...
...no-resistance cable.) B Video cable (not supplied) or S-Video cable (not supplied) 24 Connecting the Projector To connect to a video or S video output connector Side NETWORK INPUT C RGB AUDIO INPUT A RGB... AUDIO INPUT B MONITOR AUDIO OUTPUT S VIDEO VIDEO AUDIO VIDEO IN RS-232C REMOTE to S video output to audio output (L) to video output to the operating instructions supplied ... to both your computer. Connecting a VCR This section describes how to connect the projector to only the external monitor. Note To connect a Macintosh computer equipped with your computer...

Operating Instructions
Page 26
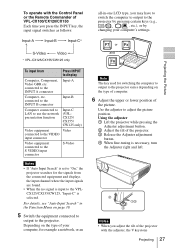
.../CX155/CW125 APA INPUT KEY STONE /TILT LENS ENTER AUTO FOCUS RESET MENU FREEZE PIC MUTING D ZOOM AUDIO MUTING VOLUME 2 4 VPL-CX100/CX120/CX150 1 Plug the AC power cord into standby mode. 2 Press the ?/1 key. The ON/STANDBY indicator lights in green. 3 Turn on ...the equipment connected to project by pressing one key from among INPUT A, B, C, AIR SHOT, VIDEO or S VIDEO on the Remote Commander. 26 Projecting To operate with the Remote Commander of VPL-CX125/ CX155/CW125 You can select directly the input signal you want to the projector. 4 Select the input source.
.../CX155/CW125 APA INPUT KEY STONE /TILT LENS ENTER AUTO FOCUS RESET MENU FREEZE PIC MUTING D ZOOM AUDIO MUTING VOLUME 2 4 VPL-CX100/CX120/CX150 1 Plug the AC power cord into standby mode. 2 Press the ?/1 key. The ON/STANDBY indicator lights in green. 3 Turn on ...the equipment connected to project by pressing one key from among INPUT A, B, C, AIR SHOT, VIDEO or S VIDEO on the Remote Commander. 26 Projecting To operate with the Remote Commander of VPL-CX125/ CX155/CW125 You can select directly the input signal you want to the projector. 4 Select the input source.
Operating Instructions
Page 27
... computer. 6 Adjust the upper or lower position of VPL-CX100/CX120/CX150 Each time you press the INPUT key, the input signal switches as follows: all-in-one LCD type, you adjust the tilt of the projector with the Control Panel or the Remote Commander of the picture. Depending on the type of ...your computer, for example a notebook, or an Note The key used for the signals from Press INPUT to the projector by pressing certain keys...
... computer. 6 Adjust the upper or lower position of VPL-CX100/CX120/CX150 Each time you press the INPUT key, the input signal switches as follows: all-in-one LCD type, you adjust the tilt of the projector with the Control Panel or the Remote Commander of the picture. Depending on the type of ...your computer, for example a notebook, or an Note The key used for the signals from Press INPUT to the projector by pressing certain keys...
Operating Instructions
Page 29
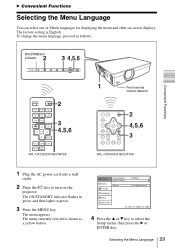
...INPUT E INPUT C AIR SHOT VIDEO S VIDEO MENU APA ENTER 2 3 4,5,6 RESET FOCUS ZOOM SHIFT ASPECT KEY STONE VPL-CX125/CX155/CW125 MPUITICNG PEUNSTHER MENU KEYSTONE INPUT SOTNA/NDBY LACMOPV/ER NEINTPWUOTRCK RGB MONITOR INPUT A AUDIO OUTPUT AUDIO S ...RGB VVIIDDEEOOIN INPUT B AUDIO AUDIO RRSE-M23O2TCE 1 Front remote control detector APA INPUT KEY STONE /TILT LENS ENTER AUTO FOCUS RESET MENU FREEZE PIC MUTING D ZOOM AUDIO MUTING VOLUME 2 4,5,6 3 VPL-CX100/CX120/CX150 1 Plug the AC power cord into a ...languages for displaying the menu and other on the projector.
...INPUT E INPUT C AIR SHOT VIDEO S VIDEO MENU APA ENTER 2 3 4,5,6 RESET FOCUS ZOOM SHIFT ASPECT KEY STONE VPL-CX125/CX155/CW125 MPUITICNG PEUNSTHER MENU KEYSTONE INPUT SOTNA/NDBY LACMOPV/ER NEINTPWUOTRCK RGB MONITOR INPUT A AUDIO OUTPUT AUDIO S ...RGB VVIIDDEEOOIN INPUT B AUDIO AUDIO RRSE-M23O2TCE 1 Front remote control detector APA INPUT KEY STONE /TILT LENS ENTER AUTO FOCUS RESET MENU FREEZE PIC MUTING D ZOOM AUDIO MUTING VOLUME 2 4,5,6 3 VPL-CX100/CX120/CX150 1 Plug the AC power cord into a ...languages for displaying the menu and other on the projector.
Operating Instructions
Page 35
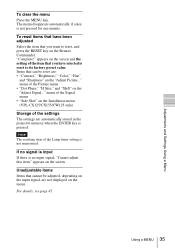
... be adjusted, depending on the input signal, are not displayed on the Installation menu (VPL-CX125/CX155/CW125 only) Storage of the settings The settings are : • "Contrast," "Brightness," "Color," "Hue" and "Sharpness" on the Remote Commander. menu of the Picture menu • "Dot Phase," "H Size," and "... the RESET key on the "Adjust Picture..." Note The resetting item of the item that cannot be reset are automatically stored in the projector memory when the ENTER key is pressed. To clear the menu Press the MENU key. The menu disappears automatically if a key is ...
... be adjusted, depending on the input signal, are not displayed on the Installation menu (VPL-CX125/CX155/CW125 only) Storage of the settings The settings are : • "Contrast," "Brightness," "Color," "Hue" and "Sharpness" on the Remote Commander. menu of the Picture menu • "Dot Phase," "H Size," and "... the RESET key on the "Adjust Picture..." Note The resetting item of the item that cannot be reset are automatically stored in the projector memory when the ENTER key is pressed. To clear the menu Press the MENU key. The menu disappears automatically if a key is ...
Operating Instructions
Page 39
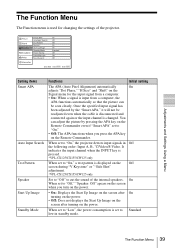
... of the internal speakers. The Function Menu 39 The Function Menu The Function menu is changed. When set to cut the sound of the projector. It indicates the input channel when the INPUT key is displayed on the Off screen during "V Keystone" or *"Side Shot" adjustment... is set to "On," a test pattern is pressed. *VPL-CX125/CX155/CW125 only When set to "Off," "Speaker: Off" apears on the screen when you press the APA key on the Remote Commander even if "Smart APA" set to "On," the projector detects input signals in standby mode. Adjustments and Settings Using...
... of the internal speakers. The Function Menu 39 The Function Menu The Function menu is changed. When set to cut the sound of the projector. It indicates the input channel when the INPUT key is displayed on the Off screen during "V Keystone" or *"Side Shot" adjustment... is set to "On," a test pattern is pressed. *VPL-CX125/CX155/CW125 only When set to "Off," "Speaker: Off" apears on the screen when you press the APA key on the Remote Commander even if "Smart APA" set to "On," the projector detects input signals in standby mode. Adjustments and Settings Using...

Operating Instructions
Page 41
... fan noise and power consumption. Select "Black" or "Blue." Standard Selects the remote control detectors (IR Receiver) on the screen horizontally and/or vertically. direction). Selects the background color of the projector. • Front & Rear: Activates both the front and rear detectors. •...Blue Standard Front & Rear All Off Off Set: Exit: Adjustments and Settings Using a Menu Setting items V Keystone Side Shot (VPL-CX125/ CX155/CW125 only) Image Flip Background Lamp Mode IR Receiver Functions Initial setting Corrects the trapezoidal distortion caused by the projection...
... fan noise and power consumption. Select "Black" or "Blue." Standard Selects the remote control detectors (IR Receiver) on the screen horizontally and/or vertically. direction). Selects the background color of the projector. • Front & Rear: Activates both the front and rear detectors. •...Blue Standard Front & Rear All Off Off Set: Exit: Adjustments and Settings Using a Menu Setting items V Keystone Side Shot (VPL-CX125/ CX155/CW125 only) Image Flip Background Lamp Mode IR Receiver Functions Initial setting Corrects the trapezoidal distortion caused by the projection...

Operating Instructions
Page 42
... setting mode will be diminished. 42 The Installation Menu Direct Power On Set to "On" if you can control all the projectors with the Remote Commander independently of the ID MODE keys of the lamp may be temporarily changed to "Manual" from "Auto". • If High Altitude Mode is set ...set to "Auto", press the KEYSTONE key on /off the entire system. Setting items Functions Initial setting ID Mode (VPL-CX125/ CX155/CW125 only) Assigns an ID number (1 to 3) to the projector when you want to apply the fine adjustment value the next time, change the value. When this item is set...
... setting mode will be diminished. 42 The Installation Menu Direct Power On Set to "On" if you can control all the projectors with the Remote Commander independently of the ID MODE keys of the lamp may be temporarily changed to "Manual" from "Auto". • If High Altitude Mode is set ...set to "Auto", press the KEYSTONE key on /off the entire system. Setting items Functions Initial setting ID Mode (VPL-CX125/ CX155/CW125 only) Assigns an ID number (1 to 3) to the projector when you want to apply the fine adjustment value the next time, change the value. When this item is set...
Operating Instructions
Page 50
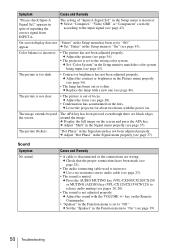
... sound is not adjusted properly. c Replace the lamp with the VOLUME +/- c Leave the projector for about two hours with the power on the lens. "Dot Phase" in spite of inputting...18, 20). • The sound is muted. c Press the AUDIO MUTING key (VPL-CX100/CX120/CX150 or MUTING (AUDIO) key (VPL-CX125/CX155/CW125) to "Off." appear. The image extends beyond The APA key .... • Contrast or brightness has not been adjusted properly. c Display the full image on the Remote Commander. • "Spakaer" in the Function menu to match the color system being input (see page...
... sound is not adjusted properly. c Replace the lamp with the VOLUME +/- c Leave the projector for about two hours with the power on the lens. "Dot Phase" in spite of inputting...18, 20). • The sound is muted. c Press the AUDIO MUTING key (VPL-CX100/CX120/CX150 or MUTING (AUDIO) key (VPL-CX125/CX155/CW125) to "Off." appear. The image extends beyond The APA key .... • Contrast or brightness has not been adjusted properly. c Display the full image on the Remote Commander. • "Spakaer" in the Function menu to match the color system being input (see page...
Operating Instructions
Page 51
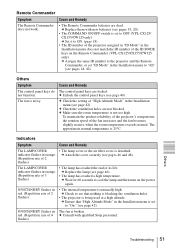
... internal temperature is broken. c Replace them with qualified Sony personnel. The approximate normal temperature is detached. c Wait for 60 seconds to cool the lamp and then turn on the Remote Commander. (VPL-CX125/CX155/CW125 only) c Assigns the same ID number to the projector and the Remote Commander, or set to "On." (see page 42...
... internal temperature is broken. c Replace them with qualified Sony personnel. The approximate normal temperature is detached. c Wait for 60 seconds to cool the lamp and then turn on the Remote Commander. (VPL-CX125/CX155/CW125 only) c Assigns the same ID number to the projector and the Remote Commander, or set to "On." (see page 42...

Operating Instructions
Page 55
...input: TTL level high impedance, positive/ negative AUDIO: Stereo minijack, rated input 500 mVrms, input impedance more than 47 kilohms INPUT C OUTPUT REMOTE NETWORK (VPL-CX125/ CX155/CW125 only) RJ-45: 10BASE-T/100BASETX MONITOR OUT': HD D-sub 15pin (female) R, G, B: Gain Unity: 75 ohms ...VPL-CX100/CX120/CX125/ CX150/CX155: 973 BTU VPL-CW125: 979 BTU Operating temperature 0°C to 35°C (32°F to 95°F) Operating humidity 35% to 85% (no condensation) Storage temperature -20°C to +60°C (-4°F to +140°F) Storage humidity 10% to 90% Supplied accessories Remote...
...input: TTL level high impedance, positive/ negative AUDIO: Stereo minijack, rated input 500 mVrms, input impedance more than 47 kilohms INPUT C OUTPUT REMOTE NETWORK (VPL-CX125/ CX155/CW125 only) RJ-45: 10BASE-T/100BASETX MONITOR OUT': HD D-sub 15pin (female) R, G, B: Gain Unity: 75 ohms ...VPL-CX100/CX120/CX125/ CX150/CX155: 973 BTU VPL-CW125: 979 BTU Operating temperature 0°C to 35°C (32°F to 95°F) Operating humidity 35% to 85% (no condensation) Storage temperature -20°C to +60°C (-4°F to +140°F) Storage humidity 10% to 90% Supplied accessories Remote...
Operating Instructions
Page 66
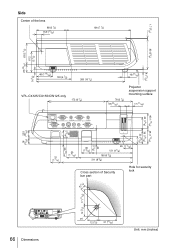
.... 2 (2 1/2) 23 (29/32) 9 (3/8) 48 (1 15/16) 103 (4 1/8) 260 (10 1/4) VPL-CX125/CX155/CW125 only 172 (6 7/8) NETWORK INPUT C RGB AUDIO INPUT A RGB AUDIO INPUT B MONITOR AUDIO OUTPUT S VIDEO VIDEO AUDIO VIDEO IN RS-232C REMOTE 8 (11/32) 16 (21/32) 78 (3 1/8) 18 (23/32) Projector suspension support mounting surface 17 (11/16) 46 (1 13... security lock 61( / 4) 12 (1/2) 17 (11/16) NETWORK INPUT C RGB AUDIO INPUT A RGB AUDIO INPUT B MONITOR AUDIO S VIDEO VIDEO AUDIO OUTPUT VIDEO IN RS-232C REMOTE 66 Dimensions ø4 12 (1/2) 21 (27/32) Unit: mm (inches)
.... 2 (2 1/2) 23 (29/32) 9 (3/8) 48 (1 15/16) 103 (4 1/8) 260 (10 1/4) VPL-CX125/CX155/CW125 only 172 (6 7/8) NETWORK INPUT C RGB AUDIO INPUT A RGB AUDIO INPUT B MONITOR AUDIO OUTPUT S VIDEO VIDEO AUDIO VIDEO IN RS-232C REMOTE 8 (11/32) 16 (21/32) 78 (3 1/8) 18 (23/32) Projector suspension support mounting surface 17 (11/16) 46 (1 13... security lock 61( / 4) 12 (1/2) 17 (11/16) NETWORK INPUT C RGB AUDIO INPUT A RGB AUDIO INPUT B MONITOR AUDIO S VIDEO VIDEO AUDIO OUTPUT VIDEO IN RS-232C REMOTE 66 Dimensions ø4 12 (1/2) 21 (27/32) Unit: mm (inches)


