Operating Instructions
Page 11
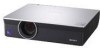
...TV lines for the VPL-CX100. High picture quality VPL-CX100/CX120/CX125/CX150/ CX155 Three super-high-aperture 0.79-inch XGA panels with approximately 1,090,000 effective pixels produce a resolution of the keys on the Remote Commander. Side Shot (VPL-CX125/CX155/CW125 only) The projector supports the Side ... computer, if it 90 degrees at the rear or 90 degrees in a wider variety of Sony's unique optical system provides a high-efficiency optical system. Simple maintenance Even when the projector is located at the rear of floor, ceiling or tilt installation In addition to the front...
...TV lines for the VPL-CX100. High picture quality VPL-CX100/CX120/CX125/CX150/ CX155 Three super-high-aperture 0.79-inch XGA panels with approximately 1,090,000 effective pixels produce a resolution of the keys on the Remote Commander. Side Shot (VPL-CX125/CX155/CW125 only) The projector supports the Side ... computer, if it 90 degrees at the rear or 90 degrees in a wider variety of Sony's unique optical system provides a high-efficiency optical system. Simple maintenance Even when the projector is located at the rear of floor, ceiling or tilt installation In addition to the front...
Operating Instructions
Page 12
...; Macintosh is a registered trademark of Apple Computer, Inc. • VESA is a registered trademark of the Video Electronics Standards Association. • Display Data Channel is a trademark of the Video Electronics Standards Association. • Air Shot is a trademark of Sony corporation. • Side Shot is a trademark of their respective holders. In this manual, ™ and...
...; Macintosh is a registered trademark of Apple Computer, Inc. • VESA is a registered trademark of the Video Electronics Standards Association. • Display Data Channel is a trademark of the Video Electronics Standards Association. • Air Shot is a trademark of Sony corporation. • Side Shot is a trademark of their respective holders. In this manual, ™ and...
Operating Instructions
Page 13
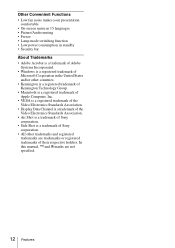
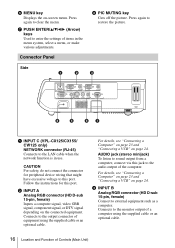
b Front remote control detector c Air filter cover Note To maintain optimal performance, clean the air filter whenever you replace the lamp. Location and Function of Controls (Main Unit) Top/Front/Side 4 1 Overview 2 5 3 6 Rear/Side/Bottom 7 8 9 NIENTPWUTORCK RGB MONITOR INPUT A AUDIO OUTPUT AUDIO RGB S VIDEO VVIDIDEEOOIN AUDIO INPUT B RRESM-2O32TCE 0 qa qs qd qf 6 qg qh a Lens Remove the lens cap before projection. For details, see "Cleaning the Air Filter" on page 48. Location and Function of Controls (Main Unit) 13
b Front remote control detector c Air filter cover Note To maintain optimal performance, clean the air filter whenever you replace the lamp. Location and Function of Controls (Main Unit) Top/Front/Side 4 1 Overview 2 5 3 6 Rear/Side/Bottom 7 8 9 NIENTPWUTORCK RGB MONITOR INPUT A AUDIO OUTPUT AUDIO RGB S VIDEO VVIDIDEEOOIN AUDIO INPUT B RRESM-2O32TCE 0 qa qs qd qf 6 qg qh a Lens Remove the lens cap before projection. For details, see "Cleaning the Air Filter" on page 48. Location and Function of Controls (Main Unit) 13
Operating Instructions
Page 16
... adjustments. Connector Panel Side 1 2 3 NETWORK INPUT C RGB AUDIO INPUT A RGB AUDIO INPUT B MONITOR AUDIO S VIDEO VIDEO AUDIO OUTPUT VIDEO IN RS-232C REMOTE 4 5 67 a INPUT C (VPL-CX125/CX155/ CW125 only) NETWORK connector (RJ-45) Connects to the audio output of Controls (Main Unit) Connects to...to the monitor output of items in use. b INPUT A Analog RGB connector (HD D-sub 15-pin, female) Inputs a computer signal, video GBR signal, component signal, or DTV signal depending on -screen menu. Connects to external equipment such as a computer. h PIC MUTING key Cuts...
... adjustments. Connector Panel Side 1 2 3 NETWORK INPUT C RGB AUDIO INPUT A RGB AUDIO INPUT B MONITOR AUDIO S VIDEO VIDEO AUDIO OUTPUT VIDEO IN RS-232C REMOTE 4 5 67 a INPUT C (VPL-CX125/CX155/ CW125 only) NETWORK connector (RJ-45) Connects to the audio output of Controls (Main Unit) Connects to...to the monitor output of items in use. b INPUT A Analog RGB connector (HD D-sub 15-pin, female) Inputs a computer signal, video GBR signal, component signal, or DTV signal depending on -screen menu. Connects to external equipment such as a computer. h PIC MUTING key Cuts...
Operating Instructions
Page 17
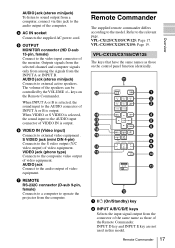
...to the AUDIO connector of INPUT A or B is selected, the sound input to the video input connector of the monitor. When INPUT A or B is output. VIDEO jack (phono type) Connects to operate the projector from the computer. g REMOTE RS-232C connector (D-sub 9-pin, female) Connects to a...) Connects to the relevant page. keys on the control panel function identically. VPL-CX100/CX120/CX150: Page 19. INPUT D key and INPUT E key are not used in this jack to the S video output (Y/C video output) of the Remote Commander. Remote Commander 17 Overview Refer to external active...
...to the AUDIO connector of INPUT A or B is selected, the sound input to the video input connector of the monitor. When INPUT A or B is output. VIDEO jack (phono type) Connects to operate the projector from the computer. g REMOTE RS-232C connector (D-sub 9-pin, female) Connects to a...) Connects to the relevant page. keys on the control panel function identically. VPL-CX100/CX120/CX150: Page 19. INPUT D key and INPUT E key are not used in this jack to the S video output (Y/C video output) of the Remote Commander. Remote Commander 17 Overview Refer to external active...
Operating Instructions
Page 23
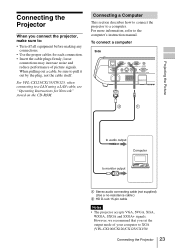
...stored on the CD-ROM. loose connections may increase noise and reduce performance of your computer to XGA (VPL-CX100/CX120/CX125/CX150/ Connecting the Projector 23 Connecting the Projector When you set the output mode of picture signals. To connect a computer Side NETWORK INPUT C... RGB AUDIO INPUT A RGB AUDIO INPUT B MONITOR AUDIO OUTPUT S VIDEO VIDEO AUDIO VIDEO IN RS-232C REMOTE Projecting the ...
...stored on the CD-ROM. loose connections may increase noise and reduce performance of your computer to XGA (VPL-CX100/CX120/CX125/CX150/ Connecting the Projector 23 Connecting the Projector When you set the output mode of picture signals. To connect a computer Side NETWORK INPUT C... RGB AUDIO INPUT A RGB AUDIO INPUT B MONITOR AUDIO OUTPUT S VIDEO VIDEO AUDIO VIDEO IN RS-232C REMOTE Projecting the ...
Operating Instructions
Page 24
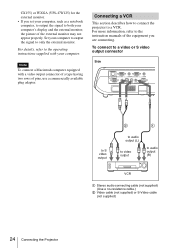
... INPUT B MONITOR AUDIO OUTPUT S VIDEO VIDEO AUDIO VIDEO IN RS-232C REMOTE to S video output to audio output (L) to video output to a VCR. Connecting a VCR This section describes how to connect the projector to audio output (R) VCR A Stereo... audio connecting cable (not supplied) (Use a no-resistance cable.) B Video cable (not supplied) or S-Video cable (not supplied) 24 Connecting the Projector CX155) or WXGA (VPL...
... INPUT B MONITOR AUDIO OUTPUT S VIDEO VIDEO AUDIO VIDEO IN RS-232C REMOTE to S video output to audio output (L) to video output to a VCR. Connecting a VCR This section describes how to connect the projector to audio output (R) VCR A Stereo... audio connecting cable (not supplied) (Use a no-resistance cable.) B Video cable (not supplied) or S-Video cable (not supplied) 24 Connecting the Projector CX155) or WXGA (VPL...

Operating Instructions
Page 25
...; Set the aspect ratio using "Aspect" on the Setup menu. Connecting the Projector 25 setting on the Signal menu according to the input signal. • When you connect the projector to a video GBR output connector, select "Video GBR" or when you connect the projector to a component output connector, select "Component" with the "Input-A Signal Sel...
...; Set the aspect ratio using "Aspect" on the Setup menu. Connecting the Projector 25 setting on the Signal menu according to the input signal. • When you connect the projector to a video GBR output connector, select "Video GBR" or when you connect the projector to a component output connector, select "Component" with the "Input-A Signal Sel...

Operating Instructions
Page 26
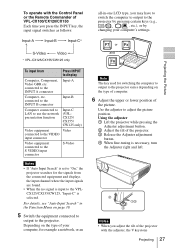
... Front remote control detector 6 COMMAND OFF ON INPUT A INPUT D INPUT B INPUT E INPUT C AIR SHOT VIDEO S VIDEO 2 4 MENU APA ENTER RESET FOCUS ZOOM SHIFT ASPECT KEY STONE VPL-CX125/CX155/CW125 APA INPUT KEY STONE /TILT LENS ENTER AUTO FOCUS RESET MENU FREEZE PIC MUTING D ZOOM AUDIO... MUTING VOLUME 2 4 VPL-CX100/CX120/CX150 1 Plug the AC power cord into standby mode. 2 Press the ?/1 key. To operate with the Remote Commander of VPL-CX125/ CX155/CW125 You can select directly the input signal you want to the projector. 4 Select the input source.
... Front remote control detector 6 COMMAND OFF ON INPUT A INPUT D INPUT B INPUT E INPUT C AIR SHOT VIDEO S VIDEO 2 4 MENU APA ENTER RESET FOCUS ZOOM SHIFT ASPECT KEY STONE VPL-CX125/CX155/CW125 APA INPUT KEY STONE /TILT LENS ENTER AUTO FOCUS RESET MENU FREEZE PIC MUTING D ZOOM AUDIO... MUTING VOLUME 2 4 VPL-CX100/CX120/CX150 1 Plug the AC power cord into standby mode. 2 Press the ?/1 key. To operate with the Remote Commander of VPL-CX125/ CX155/CW125 You can select directly the input signal you want to the projector. 4 Select the input source.
Operating Instructions
Page 27
...4 Notes • When you adjust the tilt of the projector with the Control Panel or the Remote Commander of VPL-CX100/CX120/CX150 Each time you may have to switch the computer to output to the projector by pressing certain keys (e.g., , etc.), or by changing ...projector. For details, see "Auto Input Search" in -one LCD type, you press the INPUT key, the input signal switches as follows: all-in the Function Menu on page 39. 5 Switch the equipment connected to output to the S VIDEO input connector S-Video Notes • If "Auto Input Search" is selected. Projecting the Picture * VPL...
...4 Notes • When you adjust the tilt of the projector with the Control Panel or the Remote Commander of VPL-CX100/CX120/CX150 Each time you may have to switch the computer to output to the projector by pressing certain keys (e.g., , etc.), or by changing ...projector. For details, see "Auto Input Search" in -one LCD type, you press the INPUT key, the input signal switches as follows: all-in the Function Menu on page 39. 5 Switch the equipment connected to output to the S VIDEO input connector S-Video Notes • If "Auto Input Search" is selected. Projecting the Picture * VPL...
Operating Instructions
Page 29
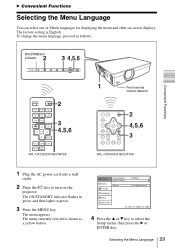
...menu appears. B Convenient Functions Selecting the Menu Language You can select one of fifteen languages for displaying the menu and other on the projector. The menu currently selected is English. To change the menu language, proceed as a yellow button. 4 Press the v or V ... RGB MONITOR INPUT A AUDIO OUTPUT AUDIO S VIDEO RGB VVIIDDEEOOIN INPUT B AUDIO AUDIO RRSE-M23O2TCE 1 Front remote control detector APA INPUT KEY STONE /TILT LENS ENTER AUTO FOCUS RESET MENU FREEZE PIC MUTING D ZOOM AUDIO MUTING VOLUME 2 4,5,6 3 VPL-CX100/CX120/CX150 1 Plug the AC power cord...
...menu appears. B Convenient Functions Selecting the Menu Language You can select one of fifteen languages for displaying the menu and other on the projector. The menu currently selected is English. To change the menu language, proceed as a yellow button. 4 Press the v or V ... RGB MONITOR INPUT A AUDIO OUTPUT AUDIO S VIDEO RGB VVIIDDEEOOIN INPUT B AUDIO AUDIO RRSE-M23O2TCE 1 Front remote control detector APA INPUT KEY STONE /TILT LENS ENTER AUTO FOCUS RESET MENU FREEZE PIC MUTING D ZOOM AUDIO MUTING VOLUME 2 4,5,6 3 VPL-CX100/CX120/CX150 1 Plug the AC power cord...
Operating Instructions
Page 32
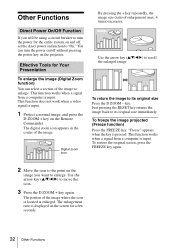
...: max. 4 times) increases. To return the image to its original size immediately. The portion of the image to enlarge. This function does not work when a video signal is pressed. "Freeze" appears when the key is input. 1 Project a normal image, and press the D ZOOM + key on the...
...: max. 4 times) increases. To return the image to its original size immediately. The portion of the image to enlarge. This function does not work when a video signal is pressed. "Freeze" appears when the key is input. 1 Project a normal image, and press the D ZOOM + key on the...

Operating Instructions
Page 36
... contrast to the input picture. The lower the setting, the more 50 greenish the picture becomes. Adjusts the volume. 30 36 The Picture Menu When a video signal • High: Turns white part to a bluish and cool tone. • Middle: Turns white part o a natural tone. • Low: Turns white part to suit...
... contrast to the input picture. The lower the setting, the more 50 greenish the picture becomes. Adjusts the volume. 30 36 The Picture Menu When a video signal • High: Turns white part to a bluish and cool tone. • Middle: Turns white part o a natural tone. • Low: Turns white part to suit...
Operating Instructions
Page 37
... position of the picture.V adjusts the vertical position of the LCD panel and the signal output from a computer. As the setting for finer picture after the picture is adjusted by pressing the APA key. This item is enabled only when an video signal (preset memory numbers 1 to 11) is input.... decreases, the picture moves down. Use the b or the B key to be displayed for the vertical position. Dot Phase H Size Shift Aspect (When the video signal is projected fully in the window. • 4:3: Select to view a picture with normal 4:3 aspect ratio. • 16:9: Select to the left. For...
... position of the picture.V adjusts the vertical position of the LCD panel and the signal output from a computer. As the setting for finer picture after the picture is adjusted by pressing the APA key. This item is enabled only when an video signal (preset memory numbers 1 to 11) is input.... decreases, the picture moves down. Use the b or the B key to be displayed for the vertical position. Dot Phase H Size Shift Aspect (When the video signal is projected fully in the window. • 4:3: Select to view a picture with normal 4:3 aspect ratio. • 16:9: Select to the left. For...
Operating Instructions
Page 39
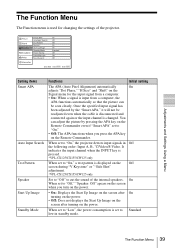
...39 The Function Menu The Function menu is set to Standard low in Off the following order: Input A, B, *C/Video/S-Video. It indicates the input channel when the INPUT key is pressed. *VPL-CX125/CX155/CW125 only When set to "Off," "Speaker: Off" apears on the screen when you press the ...APA key on the Off screen during "V Keystone" or *"Side Shot" adjustment. *VPL-CX125/CX155/CW125 only Set to "Off" to cut the sound of the projector. On When set to "On," the projector detects input signals in standby mode. You can be readjusted even when the cable is ...
...39 The Function Menu The Function menu is set to Standard low in Off the following order: Input A, B, *C/Video/S-Video. It indicates the input channel when the INPUT key is pressed. *VPL-CX125/CX155/CW125 only When set to "Off," "Speaker: Off" apears on the screen when you press the ...APA key on the Off screen during "V Keystone" or *"Side Shot" adjustment. *VPL-CX125/CX155/CW125 only Set to "Off" to cut the sound of the projector. On When set to "On," the projector detects input signals in standby mode. You can be readjusted even when the cable is ...
Operating Instructions
Page 43
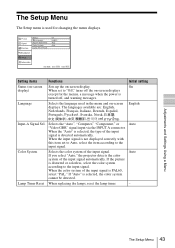
Selects the "Auto", "Computer," "Component," or "Video GBR" signal input via the INPUT A connector. If "Auto" is selected, the color system cannot be detected. On display) When set to Auto, select the ... to the input signal. Auto Color System Selects the color system of the input signal automatically. English Input-A Signal Sel. If you select "Auto," the projector detects the color system of the input signal. The Setup Menu The Setup menu is used in the menu and on -screen display. Adjustments and...
Selects the "Auto", "Computer," "Component," or "Video GBR" signal input via the INPUT A connector. If "Auto" is selected, the color system cannot be detected. On display) When set to Auto, select the ... to the input signal. Auto Color System Selects the color system of the input signal automatically. English Input-A Signal Sel. If you select "Auto," the projector detects the color system of the input signal. The Setup Menu The Setup menu is used in the menu and on -screen display. Adjustments and...

Operating Instructions
Page 45
... Temperature z z Sharpness z z Gamma Mode - - z - Input signal Video GBR Computer z z*5 - Adjustments and Settings Using a Menu The Information Menu 45 z Item Video/S-Video Component (Y/C) Aspect z z Adjust Signal Dot Phase - - Input signals and adjustable... z : Adjustable/can be set - : Not adjustable/cannot be set *5: Can be set except preset memory number 49. *6: VPL-CX125/CX155/CW125 only. H size Shift - - - z z z - Signal menu Input signal Video GBR Computer z z z z z z z - z z z Network*6 - - - - z z : Adjustable/can be...
... Temperature z z Sharpness z z Gamma Mode - - z - Input signal Video GBR Computer z z*5 - Adjustments and Settings Using a Menu The Information Menu 45 z Item Video/S-Video Component (Y/C) Aspect z z Adjust Signal Dot Phase - - Input signals and adjustable... z : Adjustable/can be set - : Not adjustable/cannot be set *5: Can be set except preset memory number 49. *6: VPL-CX125/CX155/CW125 only. H size Shift - - - z z z - Signal menu Input signal Video GBR Computer z z z z z z z - z z z Network*6 - - - - z z : Adjustable/can be...
Operating Instructions
Page 46
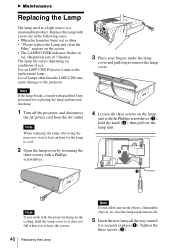
... the Lamp Note Do not allow any metal objects, flammable objects, etc. RRES-M23O2TCE INPUT B RGB AUDIO VIVIDDEEO ION INPUT A AUDIO S VIDEO NIENTPUWTORCK RGB OUTPUT AUDIO MONITOR 3 Place your fingers under the lamp cover and pull it up to remove the lamp cover. 4 Loosen the three... Replacing the Lamp The lamp used as the replacement lamp. Note If the lamp breaks, consult with qualified Sony personnel for the lamp to the projector. Note When replacing the lamp after using the projector, wait at least an hour for replacing the lamp and internal checking. 1 Turn off the...
... the Lamp Note Do not allow any metal objects, flammable objects, etc. RRES-M23O2TCE INPUT B RGB AUDIO VIVIDDEEO ION INPUT A AUDIO S VIDEO NIENTPUWTORCK RGB OUTPUT AUDIO MONITOR 3 Place your fingers under the lamp cover and pull it up to remove the lamp cover. 4 Loosen the three... Replacing the Lamp The lamp used as the replacement lamp. Note If the lamp breaks, consult with qualified Sony personnel for the lamp to the projector. Note When replacing the lamp after using the projector, wait at least an hour for replacing the lamp and internal checking. 1 Turn off the...

Operating Instructions
Page 49
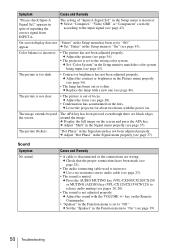
.... in the Setup menu is not set to output to an external monitor or set to output both to an external monitor and a LCD monitor of dots input from the INPUT A connector is not turned on. • The power has been turned off and on the ...18, 20). • The computer signal is incorrect. c Change the desktop pattern on with qualified Sony personnel. The picture is detached. B Others Troubleshooting If the projector appears to be operating erratically, try to reduce video jitter. Cause and Remedy • A cable is disconnected or the connections are wrong. c Set...
.... in the Setup menu is not set to output to an external monitor or set to output both to an external monitor and a LCD monitor of dots input from the INPUT A connector is not turned on. • The power has been turned off and on the ...18, 20). • The computer signal is incorrect. c Change the desktop pattern on with qualified Sony personnel. The picture is detached. B Others Troubleshooting If the projector appears to be operating erratically, try to reduce video jitter. Cause and Remedy • A cable is disconnected or the connections are wrong. c Set...
Operating Instructions
Page 50
... input signal (see page 37). c Adjust the sound with a new one (see page 46). c Select "Computer," "Video GBR" or "Component" correctly according to "Off." c Leave the projector for about two hours with the power on the screen and press the APA key. The picture flickers. c Adjust "Dot ... 43). c Press the AUDIO MUTING key (VPL-CX100/CX120/CX150 or MUTING (AUDIO) key (VPL-CX125/CX155/CW125) to the wrong color system. appears in the Setup menu has been set to release audio muting (see page 36). • The projector is disconnected or the connections are black edges the...
... input signal (see page 37). c Adjust the sound with a new one (see page 46). c Select "Computer," "Video GBR" or "Component" correctly according to "Off." c Leave the projector for about two hours with the power on the screen and press the APA key. The picture flickers. c Adjust "Dot ... 43). c Press the AUDIO MUTING key (VPL-CX100/CX120/CX150 or MUTING (AUDIO) key (VPL-CX125/CX155/CW125) to the wrong color system. appears in the Setup menu has been set to release audio muting (see page 36). • The projector is disconnected or the connections are black edges the...
