Operating Instructions (primary manual)
Page 2
... the following specifications: SPECIFICATIONS Plug Type Cord Nema-Plug 5-15p Type SVT or SJT, minimum 3 × 18 AWG Length Maximum 15 feet Rating Minimum 7 A, 125 V NOTICE Cette notice s'applique aux Etats-Unis et au Canada uniquement. Refer servicing to rain or moisture. Connect the equipment into an outlet on , the user is subject to correct the interference by turning the...
... the following specifications: SPECIFICATIONS Plug Type Cord Nema-Plug 5-15p Type SVT or SJT, minimum 3 × 18 AWG Length Maximum 15 feet Rating Minimum 7 A, 125 V NOTICE Cette notice s'applique aux Etats-Unis et au Canada uniquement. Refer servicing to rain or moisture. Connect the equipment into an outlet on , the user is subject to correct the interference by turning the...
Operating Instructions (primary manual)
Page 3
... the On-Screen Display Language 11 Automatically Adjusting the Picture 12 Eliminating Flickering or Blurring Manually 12 Adjusting the Picture Position 13 GB Adjusting the Picture Brightness 14 Adjusting the Contrast ...14 F Changing or Adjusting the Color Temperature 14 Changing the On-Screen Display Position 15 D Adjusting the Backlight ...16 Setting the Power Saving Delay Time 16 Locking the Controls ...17 ES Resetting the Adjustments 17 I Additional Information Preset and User Modes ...18 Troubleshooting ...18 Specifications ...21 Appendix Preset Mode Timing Table...
... the On-Screen Display Language 11 Automatically Adjusting the Picture 12 Eliminating Flickering or Blurring Manually 12 Adjusting the Picture Position 13 GB Adjusting the Picture Brightness 14 Adjusting the Contrast ...14 F Changing or Adjusting the Color Temperature 14 Changing the On-Screen Display Position 15 D Adjusting the Backlight ...16 Setting the Power Saving Delay Time 16 Locking the Controls ...17 ES Resetting the Adjustments 17 I Additional Information Preset and User Modes ...18 Troubleshooting ...18 Specifications ...21 Appendix Preset Mode Timing Table...
Operating Instructions (primary manual)
Page 4
...; Do not dispose of the picture element is installed as it can damage the LCD screen. Dispose of the monitor in the UK, please use the supplied UK cable with sharp or abrasive items such as this monitor. If the LCD screen becomes dark, unstable or does not turn on power connection • Use an appropriate power cord for a long time, a residual image may result in the UK...
...; Do not dispose of the picture element is installed as it can damage the LCD screen. Dispose of the monitor in the UK, please use the supplied UK cable with sharp or abrasive items such as this monitor. If the LCD screen becomes dark, unstable or does not turn on power connection • Use an appropriate power cord for a long time, a residual image may result in the UK...
Operating Instructions (primary manual)
Page 5
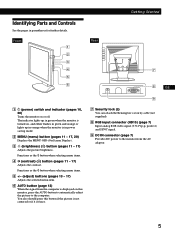
...I 8 RGB input connector (HD15) (page 7) Input analog RGB video signal (0.714 Vp-p, positive) and SYNC signal. 2 MENU (menu) button (pages 11 - 17, 20) Displays the MENU OSD (On-Screen Display). 3 ¨ (brightness) (˘) button (pages 11 - 17) 9 DC IN connector (page 7) Provides DC power to the computer. Adjusts the picture brightness. Functions as the ˘ button when selecting menu items. 4 > (contrast) (≥) button (pages 11 - 17) Adjusts the contrast. You also should press this monitor, press the AUTO button to automatically adjust the picture to the monitor from...
...I 8 RGB input connector (HD15) (page 7) Input analog RGB video signal (0.714 Vp-p, positive) and SYNC signal. 2 MENU (menu) button (pages 11 - 17, 20) Displays the MENU OSD (On-Screen Display). 3 ¨ (brightness) (˘) button (pages 11 - 17) 9 DC IN connector (page 7) Provides DC power to the computer. Adjusts the picture brightness. Functions as the ˘ button when selecting menu items. 4 > (contrast) (≥) button (pages 11 - 17) Adjusts the contrast. You also should press this monitor, press the AUTO button to automatically adjust the picture to the monitor from...
Operating Instructions (primary manual)
Page 6
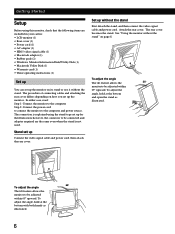
... adapter (1) • HD15 video signal cable (1) • Macintosh adapter (1) • Rubber pads (2) • Windows Monitor Information Disk/Utility Disk (1) • Macintosh Utility Disk (1) • Warranty card (1) • These operating instructions (1) Set up You can set up the monitor on its stand or use it without the stand First detach the stand, and then connect the video signal cable and power cord. Stand set up Connect the video signal cable and power cord, then attach the rear cover. Getting Started Setup Before using this monitor, check that...
... adapter (1) • HD15 video signal cable (1) • Macintosh adapter (1) • Rubber pads (2) • Windows Monitor Information Disk/Utility Disk (1) • Macintosh Utility Disk (1) • Warranty card (1) • These operating instructions (1) Set up You can set up the monitor on its stand or use it without the stand First detach the stand, and then connect the video signal cable and power cord. Stand set up Connect the video signal cable and power cord, then attach the rear cover. Getting Started Setup Before using this monitor, check that...

Operating Instructions (primary manual)
Page 7
Macintosh or compatible computer to monitor output HD15 video signal cable (supplied) Macintosh adapter (supplied)* * Connect the supplied Macintosh adapter to a Macintosh Use the supplied Macintosh adapter. GB F D ES I Step 2: Connect the power cord With the monitor and computer switched off the monitor and computer before connecting. Macintosh II series and some older versions of PowerBook models may need a different adapter (not supplied). Connecting to an IBM PC/AT or compatible computer Getting StarGteedtting Started Connecting to the computer before January...
Macintosh or compatible computer to monitor output HD15 video signal cable (supplied) Macintosh adapter (supplied)* * Connect the supplied Macintosh adapter to a Macintosh Use the supplied Macintosh adapter. GB F D ES I Step 2: Connect the power cord With the monitor and computer switched off the monitor and computer before connecting. Macintosh II series and some older versions of PowerBook models may need a different adapter (not supplied). Connecting to an IBM PC/AT or compatible computer Getting StarGteedtting Started Connecting to the computer before January...
Operating Instructions (primary manual)
Page 8
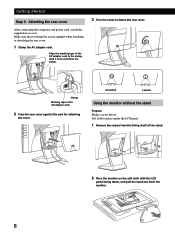
... the LCD panel 1 Remove the screws from the fixing shaft of the AC adapter cord 2 Press the rear cover against the part for attaching the cover. Make sure that you keep the screen upright when attaching or detaching the rear cover. 1 Clamp the AC adapter cord. Unlocked Locked Using the monitor without the stand Prepare: Philip's screw driver Soft cloth to fasten the rear cover. Getting Started Step 3: Attaching the rear cover After connecting the computer and power cord...
... the LCD panel 1 Remove the screws from the fixing shaft of the AC adapter cord 2 Press the rear cover against the part for attaching the cover. Make sure that you keep the screen upright when attaching or detaching the rear cover. 1 Clamp the AC adapter cord. Unlocked Locked Using the monitor without the stand Prepare: Philip's screw driver Soft cloth to fasten the rear cover. Getting Started Step 3: Attaching the rear cover After connecting the computer and power cord...
Operating Instructions (primary manual)
Page 10
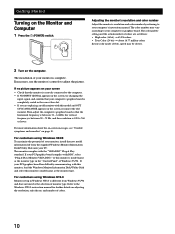
... board is correctly connected to the Windows NT4.0 instruction manual for further details on page 19. For customers using Windows NT4.0 Monitor setup in the "Control Panel" of colors are replacing an old monitor with DDC, select "Plug & Play Monitor (VESA DDC)" or this model and OUT OF SCAN RANGE appears on the Monitor and Computer 1 Press the u (POWER) switch. If your computer's instruction manual. Getting Started Turning on the screen, reconnect the old monitor. The color palette setting and...
... board is correctly connected to the Windows NT4.0 instruction manual for further details on page 19. For customers using Windows NT4.0 Monitor setup in the "Control Panel" of colors are replacing an old monitor with DDC, select "Plug & Play Monitor (VESA DDC)" or this model and OUT OF SCAN RANGE appears on the Monitor and Computer 1 Press the u (POWER) switch. If your computer's instruction manual. Getting Started Turning on the screen, reconnect the old monitor. The color palette setting and...

Operating Instructions (primary manual)
Page 11
... OSD language from English, French, German, Spanish, Italian, and Japanese. 1 Press the MENU button. The MENU OSD appears. MENU MENU OK MENU EXIT PHASE PITCH CENTER COLOR LANGUAGE OPTION 2 Press the ˘/≥ buttons to select the desired language, and press the MENU button. Adjust the phase when the characters or pictures appear fuzzy throughout the entire screen. Selecting the On-Screen Display Language You can adjust settings such as the backlight, OSD position, power saving delay time and control lock...
... OSD language from English, French, German, Spanish, Italian, and Japanese. 1 Press the MENU button. The MENU OSD appears. MENU MENU OK MENU EXIT PHASE PITCH CENTER COLOR LANGUAGE OPTION 2 Press the ˘/≥ buttons to select the desired language, and press the MENU button. Adjust the phase when the characters or pictures appear fuzzy throughout the entire screen. Selecting the On-Screen Display Language You can adjust settings such as the backlight, OSD position, power saving delay time and control lock...
Operating Instructions (primary manual)
Page 12
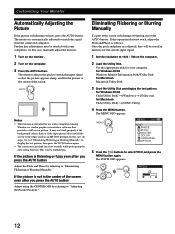
... seconds while performing the auto-sizing function. For Macintosh Click [Utility Disk] n [SONY-Utility]. 4 Press the MENU button. MENU PITCH 0 12 This is flickering or fuzzy, press the AUTO button. Eliminating Flickering or Blurring Manually If a part of the screen. MENU MENU OK MENU EXIT PHASE PITCH CENTER COLOR LANGUAGE OPTION 5 Press the ˘/≥ buttons to match the signal from the connected computer. It may not work , adjust the Pitch and Phase...
... seconds while performing the auto-sizing function. For Macintosh Click [Utility Disk] n [SONY-Utility]. 4 Press the MENU button. MENU PITCH 0 12 This is flickering or fuzzy, press the AUTO button. Eliminating Flickering or Blurring Manually If a part of the screen. MENU MENU OK MENU EXIT PHASE PITCH CENTER COLOR LANGUAGE OPTION 5 Press the ˘/≥ buttons to match the signal from the connected computer. It may not work , adjust the Pitch and Phase...

Operating Instructions (primary manual)
Page 13
... current input signal. 1 Start the Utility Disk and display the test pattern. to select PHASE, and press the MENU button again. Adjust so that the vertical stripes disappear. 7 Press the MENU button. Adjust until the frame at a minimum. GCeuttsitnogmSiztianrgteYdour Monitor Adjusting the Picture Position If the picture is adjusted, it will be stored in the center of "Eliminating Flickering or Blurring Manually." 2 Press the MENU button. MENU OK MENU MENU EXIT PHASE PITCH CENTER COLOR LANGUAGE...
... current input signal. 1 Start the Utility Disk and display the test pattern. to select PHASE, and press the MENU button again. Adjust so that the vertical stripes disappear. 7 Press the MENU button. Adjust until the frame at a minimum. GCeuttsitnogmSiztianrgteYdour Monitor Adjusting the Picture Position If the picture is adjusted, it will be stored in the center of "Eliminating Flickering or Blurring Manually." 2 Press the MENU button. MENU OK MENU MENU EXIT PHASE PITCH CENTER COLOR LANGUAGE...

Operating Instructions (primary manual)
Page 14
... received input signal appear in the CONTRAST OSD. for less contrast The OSD automatically disappears after about 30 seconds. to 9300K at the factory. To close the OSD, press the MENU button twice. Horizontal Vertical Frequency* Frequency* +. . . The MENU OSD appears. If the screen is adjusted, it matches the actual colors of a printed picture. Customizing Your Monitor For vertical adjustment, select V using the ˘/≥ buttons and adjust the position using the monitor in a dark room Decrease the BACKLIGHT (page...
... received input signal appear in the CONTRAST OSD. for less contrast The OSD automatically disappears after about 30 seconds. to 9300K at the factory. To close the OSD, press the MENU button twice. Horizontal Vertical Frequency* Frequency* +. . . The MENU OSD appears. If the screen is adjusted, it matches the actual colors of a printed picture. Customizing Your Monitor For vertical adjustment, select V using the ˘/≥ buttons and adjust the position using the monitor in a dark room Decrease the BACKLIGHT (page...

Operating Instructions (primary manual)
Page 15
... seconds. The COLOR OSD appears. The OPTION OSD appears. 2 Press the ˘/≥ buttons to G (green). To close the OSD, press the MENU button twice. 15 COLOR MENU 9300K 6500K 5000K USER MODE R 50 G 50 B 50 GCeuttsitnogmSiztianrgteYdour Monitor 2 Press the ˘/≥ buttons to select or (OSD V POSITION). (OSD H POSITION) To adjust the horizontal position OPTION : 5SEC : UNLOCK OSD H POSITION GB To adjust the vertical position F OPTION D ES : 5SEC : UNLOCK I OSD V POSITION 4 Press the +/- If you need to make further adjustments to the...
... seconds. The COLOR OSD appears. The OPTION OSD appears. 2 Press the ˘/≥ buttons to G (green). To close the OSD, press the MENU button twice. 15 COLOR MENU 9300K 6500K 5000K USER MODE R 50 G 50 B 50 GCeuttsitnogmSiztianrgteYdour Monitor 2 Press the ˘/≥ buttons to select or (OSD V POSITION). (OSD H POSITION) To adjust the horizontal position OPTION : 5SEC : UNLOCK OSD H POSITION GB To adjust the vertical position F OPTION D ES : 5SEC : UNLOCK I OSD V POSITION 4 Press the +/- If you need to make further adjustments to the...

Operating Instructions (primary manual)
Page 16
... too bright when you are using the monitor in a dark room, adjust the backlight. 1 Press the MENU button. Customizing Your Monitor Adjusting the Backlight If the screen is set the delay time before the monitor enters the power saving mode. The MENU OSD appears. The OPTION OSD automatically disappears after about 30 seconds. The MENU OSD appears. The OPTION OSD automatically disappears after about 30 seconds. MENU MENU OK MENU EXIT PHASE PITCH CENTER COLOR LANGUAGE OPTION...
... too bright when you are using the monitor in a dark room, adjust the backlight. 1 Press the MENU button. Customizing Your Monitor Adjusting the Backlight If the screen is set the delay time before the monitor enters the power saving mode. The MENU OSD appears. The OPTION OSD automatically disappears after about 30 seconds. The MENU OSD appears. The OPTION OSD automatically disappears after about 30 seconds. MENU MENU OK MENU EXIT PHASE PITCH CENTER COLOR LANGUAGE OPTION...
Operating Instructions (primary manual)
Page 18
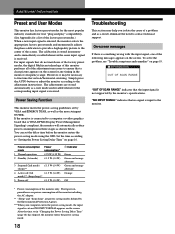
... monitor enters the power saving mode using the OSD. Additional Information Preset and User Modes This monitor has factory preset modes for the most popular industry standards for true "plug and play" compatibility. (See Appendix for any timing in the monitor's frequency range. For input signals that do not match one of the screen. The adjustments are power saving modes defined by the monitor's specifications. Set the time according to contact technical support. To solve the problem, see "Trouble...
... monitor enters the power saving mode using the OSD. Additional Information Preset and User Modes This monitor has factory preset modes for the most popular industry standards for true "plug and play" compatibility. (See Appendix for any timing in the monitor's frequency range. For input signals that do not match one of the screen. The adjustments are power saving modes defined by the monitor's specifications. Set the time according to contact technical support. To solve the problem, see "Trouble...

Operating Instructions (primary manual)
Page 19
... • Check your graphics board is properly connected and all plugs are firmly seated in power saving mode. The picture will appear momentarily. If the "OUT OF SCAN RANGE" p Problems caused by this monitor, reconnect the old monitor and adjust the frequency range to the connected equipment's instruction manual. Use the self-diagnosis function (page 20) if the following . Try pressing any potential sources of the input signal are supported by the connected computer...
... • Check your graphics board is properly connected and all plugs are firmly seated in power saving mode. The picture will appear momentarily. If the "OUT OF SCAN RANGE" p Problems caused by this monitor, reconnect the old monitor and adjust the frequency range to the connected equipment's instruction manual. Use the self-diagnosis function (page 20) if the following . Try pressing any potential sources of the input signal are supported by the connected computer...

Operating Instructions (primary manual)
Page 20
... board. Press and hold the MENU button for 2 seconds. Note that all four color bars appear (white, red, green, blue), the monitor is a problem with a self-diagnosis function. Wavy or elliptical (moire) pattern is not centered or sized • Press the AUTO button (page 12). Color is a potential monitor failure. If the u(power) indicator is lit in orange, the computer is green 1 Disconnect the video signal cable. 2 Before the monitor goes to power saving mode...
... board. Press and hold the MENU button for 2 seconds. Note that all four color bars appear (white, red, green, blue), the monitor is a problem with a self-diagnosis function. Wavy or elliptical (moire) pattern is not centered or sized • Press the AUTO button (page 12). Color is a potential monitor failure. If the u(power) indicator is lit in orange, the computer is green 1 Disconnect the video signal cable. 2 Before the monitor goes to power saving mode...
Operating Instructions (primary manual)
Page 21
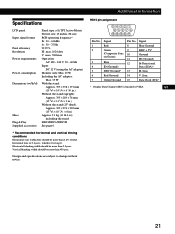
.... Design and specifications are subject to change without notice. Sync Data Clock (SCL)* * Display Data Channel (DDC) Standard of total horizontal time or 0.8 µsec., whichever is larger. Horizontal blanking width should be more than 450 µsec. Sync V. Specifications LCD panel Input signal format Pixel efficiency Resolution Power requirements Power consumption Dimensions (w/h/d) Mass Plug & Play Supplied accessories Panel type: a-Si TFT Active Matrix Picture size: 15 inches (38 cm) RGB operating frequency* fh: 30...
.... Design and specifications are subject to change without notice. Sync Data Clock (SCL)* * Display Data Channel (DDC) Standard of total horizontal time or 0.8 µsec., whichever is larger. Horizontal blanking width should be more than 450 µsec. Sync V. Specifications LCD panel Input signal format Pixel efficiency Resolution Power requirements Power consumption Dimensions (w/h/d) Mass Plug & Play Supplied accessories Panel type: a-Si TFT Active Matrix Picture size: 15 inches (38 cm) RGB operating frequency* fh: 30...
Marketing Specifications
Page 1
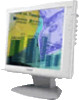
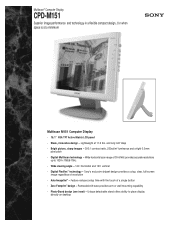
.... Wide horizontal scan range of resolution • Auto ImageSet™ - Unique detachable stand offers ability to 1024 x 768 @ 75Hz • Wide viewing angle - 140˚ horizontal and 120˚ vertical • Digital FlexRes™ technology - Lightweight at a minimum Multiscan M151 Computer Display • 15.1" XGA TFT Active Matrix LCD panel • Sleek, innovative design - Feature reduces setup time with the touch of a single button • Zero Footprint™ design - Removable tilt base...
.... Wide horizontal scan range of resolution • Auto ImageSet™ - Unique detachable stand offers ability to 1024 x 768 @ 75Hz • Wide viewing angle - 140˚ horizontal and 120˚ vertical • Digital FlexRes™ technology - Lightweight at a minimum Multiscan M151 Computer Display • 15.1" XGA TFT Active Matrix LCD panel • Sleek, innovative design - Feature reduces setup time with the touch of a single button • Zero Footprint™ design - Removable tilt base...
Marketing Specifications
Page 2
... others Input Signals Video Connector Video Signal Sync Signal Sync on Green 15-pin mini D-sub RGB Analog (0.7Vp-p/75ohms) Separate H/V (TTL) 0.3 Vp-p, ±10% negative Preset Timings Factory 11 User 13 Dimensions Width Height Depth Weight 15.5" (395mm) 14.1" (358mm) 6.8" (173mm) 11.2 lbs. (5.1 kg) Power Input Supply 100-240 VAC, 50/60Hz Power Consumption Normal Suspend Active Off Frequency 1024 x 768 @ 75Hz 30-61kHz 50-75Hz LCD Performance Native Resolution Luminance Contrast Ratio Display Colors H.
... others Input Signals Video Connector Video Signal Sync Signal Sync on Green 15-pin mini D-sub RGB Analog (0.7Vp-p/75ohms) Separate H/V (TTL) 0.3 Vp-p, ±10% negative Preset Timings Factory 11 User 13 Dimensions Width Height Depth Weight 15.5" (395mm) 14.1" (358mm) 6.8" (173mm) 11.2 lbs. (5.1 kg) Power Input Supply 100-240 VAC, 50/60Hz Power Consumption Normal Suspend Active Off Frequency 1024 x 768 @ 75Hz 30-61kHz 50-75Hz LCD Performance Native Resolution Luminance Contrast Ratio Display Colors H.


