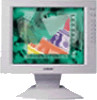
Operating Instructions (primary manual)
Page 3
... this manual. 3 TABLE OF CONTENTS Getting Started Precautions 4 Identifying Parts and Controls 5 Setup 6 Automatically Adjusting the Picture 8 Selecting the On-Screen Display Language 8 Customizing Your Monitor Adjusting the Picture Brightness 9 Adjusting the Contrast 9 Introducing the On-Screen Display System 10 Using the Utility Disk 10 Eliminating Flickering or Blurring 11 Adjusting...
... this manual. 3 TABLE OF CONTENTS Getting Started Precautions 4 Identifying Parts and Controls 5 Setup 6 Automatically Adjusting the Picture 8 Selecting the On-Screen Display Language 8 Customizing Your Monitor Adjusting the Picture Brightness 9 Adjusting the Contrast 9 Introducing the On-Screen Display System 10 Using the Utility Disk 10 Eliminating Flickering or Blurring 11 Adjusting...
Operating Instructions (primary manual)
Page 4
... transport this monitor, grip the...monitor becomes warm, the screen returns to mount the monitor on a wall or an arm. For the customers in the UK If you transport this monitor...appear. Dispose of the monitor in the UK, please...this monitor. This... points of the monitor with both hands....monitor near equipment which generates magnetism, such as the...monitor... include the monitor with an... the monitor near...monitor, you may be injured or the monitor...8226; If the monitor is used in ...the monitor in accordance with a mild detergent solution. Do not mount the monitor yourself...you place the monitor by allowing ...
... transport this monitor, grip the...monitor becomes warm, the screen returns to mount the monitor on a wall or an arm. For the customers in the UK If you transport this monitor...appear. Dispose of the monitor in the UK, please...this monitor. This... points of the monitor with both hands....monitor near equipment which generates magnetism, such as the...monitor... include the monitor with an... the monitor near...monitor, you may be injured or the monitor...8226; If the monitor is used in ...the monitor in accordance with a mild detergent solution. Do not mount the monitor yourself...you place the monitor by allowing ...
Operating Instructions (primary manual)
Page 5
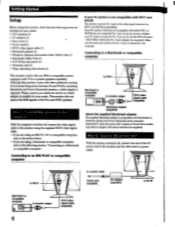
... or compatible system equipped with VGA or greater graphics capability. Make sure the male side (without the No. 9 pin) adapter (not supplied). This monitor also can receive the RGB signals of the PAL and N'TSC systems. II 1 1.)i it tir ko t With the computer switched off , connect ...adapter The supplied Macintosh adapter is connected to the computer. Macintosh 11 series and some older versions of the DC power cord to the monitor and the other platforms running at horizontal frequencies between 30 and 70 kHz, including Macintosh and Power Macintosh systems, a cable adapter is ...
... or compatible system equipped with VGA or greater graphics capability. Make sure the male side (without the No. 9 pin) adapter (not supplied). This monitor also can receive the RGB signals of the PAL and N'TSC systems. II 1 1.)i it tir ko t With the computer switched off , connect ...adapter The supplied Macintosh adapter is connected to the computer. Macintosh 11 series and some older versions of the DC power cord to the monitor and the other platforms running at horizontal frequencies between 30 and 70 kHz, including Macintosh and Power Macintosh systems, a cable adapter is ...
Operating Instructions (primary manual)
Page 6
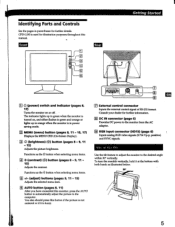
CPD-L150 is used for further information. El MENU (menu) button (pages 8, 11 - 15, 17) Displays the MENU OSD (On-Screen Display). E DC IN connector (page 6) Provides DC power to the computer. Functions as illustrated below. 30° 0 9 5 E AUTO button (pages 8, 11) After you have connected this monitor... the b button when selecting menu items. El +1- (adjust) buttons (pages 9, 11 - 15) Adjusts the selected menu item. To turn the monitor vertically, hold it is in parentheses for further details. El * (brightness) (0) button (pages 8 - 9, 11 - 15) Adjusts the picture ...
CPD-L150 is used for further information. El MENU (menu) button (pages 8, 11 - 15, 17) Displays the MENU OSD (On-Screen Display). E DC IN connector (page 6) Provides DC power to the computer. Functions as illustrated below. 30° 0 9 5 E AUTO button (pages 8, 11) After you have connected this monitor... the b button when selecting menu items. El +1- (adjust) buttons (pages 9, 11 - 15) Adjusts the selected menu item. To turn the monitor vertically, hold it is in parentheses for further details. El * (brightness) (0) button (pages 8 - 9, 11 - 15) Adjusts the picture ...
Operating Instructions (primary manual)
Page 7
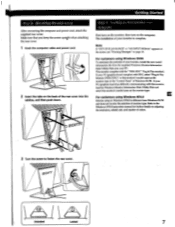
...the screen, see "Warning Messages" on the computer. If your PC/graphics board complies with DDC, select "Plug & Play Monitor (VESA DDC)" or this monitor's model name as the monitor type in Windows NT4.0 is complete. Getting Started - Make sure that you keep the screen upright when attaching the rear cover... tabs on ad casting the resolution, refresh rate, and number of the rear cover into the catches, and then push down. First turn on the monitor, then turn on page 18. Refer to faiten the rear cover. 0 Unlocked Locked 7 me. 3 Turn the screw to the Windows NT4.0 instruction...
...the screen, see "Warning Messages" on the computer. If your PC/graphics board complies with DDC, select "Plug & Play Monitor (VESA DDC)" or this monitor's model name as the monitor type in Windows NT4.0 is complete. Getting Started - Make sure that you keep the screen upright when attaching the rear cover... tabs on ad casting the resolution, refresh rate, and number of the rear cover into the catches, and then push down. First turn on the monitor, then turn on page 18. Refer to faiten the rear cover. 0 Unlocked Locked 7 me. 3 Turn the screw to the Windows NT4.0 instruction...

Operating Instructions (primary manual)
Page 8
... is automatically adjusted to select the desired language, and press the MENU button. To close the OSD, press the MENU button again. The monitor is dark or if the input picture does not fill the screen to fit the center of the selected language appears. This is flickering or... fuzzy, press the AUTO button. The MENU OSD of the screen. In this case, manually adjust the monitor by referring to select LANGUAGE, and press the MENU button. The picture is flickering or fuzzy even after about 30 seconds. If the picture ...
... is automatically adjusted to select the desired language, and press the MENU button. To close the OSD, press the MENU button again. The monitor is dark or if the input picture does not fill the screen to fit the center of the selected language appears. This is flickering or... fuzzy, press the AUTO button. The MENU OSD of the screen. In this case, manually adjust the monitor by referring to select LANGUAGE, and press the MENU button. The picture is flickering or fuzzy even after about 30 seconds. If the picture ...

Operating Instructions (primary manual)
Page 9
... more contrast -. . . If the screen is adjusted, it will be stored in a dark room Decrease the BACKLIGHT (page 14). 9 Customizing Your Monitor Before adjusting Connect the monitor and the computer, and turn them on. Adjusting the Picture Brightness Once the brightness is too bright when using the... monitor in memory for all input signals received. 1 Press the CO (contrast) 0 button. The BRIGHTNESS OSD appears. Horizontal Vertical Frequency Frequency + ... for ...
... more contrast -. . . If the screen is adjusted, it will be stored in a dark room Decrease the BACKLIGHT (page 14). 9 Customizing Your Monitor Before adjusting Connect the monitor and the computer, and turn them on. Adjusting the Picture Brightness Once the brightness is too bright when using the... monitor in memory for all input signals received. 1 Press the CO (contrast) 0 button. The BRIGHTNESS OSD appears. Horizontal Vertical Frequency Frequency + ... for ...

Operating Instructions (primary manual)
Page 10
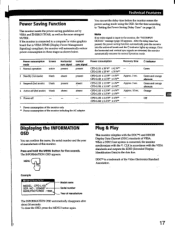
...Select FULL MODE to display the picture using the MENU OSD. For Windows 95/98 Windows Monitor Information Disk/Utility Disk For Macintosh Macintosh Utility Disk 3 Select the pitch, phase, or centering from the monitors MENU OSD, and adjust the screen while viewing the test pattern (pages 11, 12)....LANGUAGE Displays the LANGUAGE OSD for adjusting the color temperature. 1 Set ZOOM to display the picture at its actual resolution. Customizing Your Monitor Introducing the On-Screen Display System Most adjustments are not dear at some parts of the screen. Adjust the phase when the characters or...
...Select FULL MODE to display the picture using the MENU OSD. For Windows 95/98 Windows Monitor Information Disk/Utility Disk For Macintosh Macintosh Utility Disk 3 Select the pitch, phase, or centering from the monitors MENU OSD, and adjust the screen while viewing the test pattern (pages 11, 12)....LANGUAGE Displays the LANGUAGE OSD for adjusting the color temperature. 1 Set ZOOM to display the picture at its actual resolution. Customizing Your Monitor Introducing the On-Screen Display System Most adjustments are not dear at some parts of the screen. Adjust the phase when the characters or...

Operating Instructions (primary manual)
Page 11
..., and press the MENU button again. If you are at a minimum. u- 5 Press the MENU button. The PITCH OSD appears. *Lti MENU PITCH 0 0 1328 C Customizing Your Monitor 6 Press the 0/0 buttons to select PITCH, and press the MENU button again. MENUI:( / 01 O PHASE A 0 26 C 7 Press the +/- The MENU OSD appears. Once the pitch...
..., and press the MENU button again. If you are at a minimum. u- 5 Press the MENU button. The PITCH OSD appears. *Lti MENU PITCH 0 0 1328 C Customizing Your Monitor 6 Press the 0/0 buttons to select PITCH, and press the MENU button again. MENUI:( / 01 O PHASE A 0 26 C 7 Press the +/- The MENU OSD appears. Once the pitch...

Operating Instructions (primary manual)
Page 12
If this operation does not work, adjust the centering as follows. CI MENU CENTER O 26 O Displaying the Picture at the Actual Resolution The monitor is set , it will be stored in step 3 to select CENTER, and press .the MENU button again. MENU MENU OK -T711 A.PHASE OD... using the +/- buttons. + ... The OSD automatically disappears after about 30 seconds. To close the OSD, press the MENU button again. Customizing Your Monitor Adjusting the Picture Position If the picture is not in full, irrespective of the screen, press the AUTO button. to select REAL MODE, and press...
If this operation does not work, adjust the centering as follows. CI MENU CENTER O 26 O Displaying the Picture at the Actual Resolution The monitor is set , it will be stored in step 3 to select CENTER, and press .the MENU button again. MENU MENU OK -T711 A.PHASE OD... using the +/- buttons. + ... The OSD automatically disappears after about 30 seconds. To close the OSD, press the MENU button again. Customizing Your Monitor Adjusting the Picture Position If the picture is not in full, irrespective of the screen, press the AUTO button. to select REAL MODE, and press...

Operating Instructions (primary manual)
Page 13
... OSD appears. MENU OK- To dose the OSD, press the MENU button again. To dose the OSD, press the MENU button again. 13 Customizing Your Monitor Changing or Adjusting the Color Temperature The color temperature is adjusted, it matches the actual colors of a printed picture. To adjust the horizontal position To...
... OSD appears. MENU OK- To dose the OSD, press the MENU button again. To dose the OSD, press the MENU button again. 13 Customizing Your Monitor Changing or Adjusting the Color Temperature The color temperature is adjusted, it matches the actual colors of a printed picture. To adjust the horizontal position To...
Operating Instructions (primary manual)
Page 14
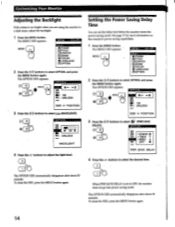
...to select (BACKLIGHT). buttons to select OPTION, and press the MENU button again. When2WR SAVE DELAY is too bright when you are using the monitor in a dark room, adjust the backlight. 1 Press the MENU button. The OPTION OSD appears. The OPTION OSD automatically disappears after about 30 ...press the MENU button again. To dose the OSD, press the MENU button again. 14 Customizing Your Monitor Adjusting the Backlight If the screen is set the delay time before the monitor enters the power saving mode. MENU MENU OK-15:1 >:4 r APHASE PITCH OCENTER g2ZOOM IN COLOR...
...to select (BACKLIGHT). buttons to select OPTION, and press the MENU button again. When2WR SAVE DELAY is too bright when you are using the monitor in a dark room, adjust the backlight. 1 Press the MENU button. The OPTION OSD appears. The OPTION OSD automatically disappears after about 30 ...press the MENU button again. To dose the OSD, press the MENU button again. 14 Customizing Your Monitor Adjusting the Backlight If the screen is set the delay time before the monitor enters the power saving mode. MENU MENU OK-15:1 >:4 r APHASE PITCH OCENTER g2ZOOM IN COLOR...
Operating Instructions (primary manual)
Page 15
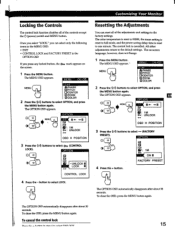
... T TATT rv-ne- 15 The OPTION OSD appears. EP: un Oh ON FACTORY PRESET The OPTION OSD automatically disappears after about 30 seconds. Customizing Your Monitor Locking the Controls The control lock function disables all of the controls except the ()I (power) switch and MENU button. OPTION O 4 Press th-e + button. OPTION •...
... T TATT rv-ne- 15 The OPTION OSD appears. EP: un Oh ON FACTORY PRESET The OPTION OSD automatically disappears after about 30 seconds. Customizing Your Monitor Locking the Controls The control lock function disables all of the controls except the ()I (power) switch and MENU button. OPTION O 4 Press th-e + button. OPTION •...
Operating Instructions (primary manual)
Page 16
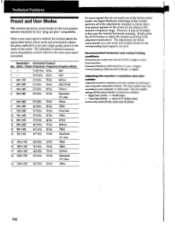
...the most popular industry standards for any timing in memory and is immediately recalled whenever the same input signal is entered, the monitor selects the appropriate factory preset mode and momentarily adjusts the phase calibration to provide a high quality picture to the center of ...the adjustments necessary to ensure that do not match one of the factory preset modes, the digital Multiscan technology of this monitor performs all of the screen. or higher. Horizontal blanking width should be necessary to your computer's instruction manual. or higher. Simply...
...the most popular industry standards for any timing in memory and is immediately recalled whenever the same input signal is entered, the monitor selects the appropriate factory preset mode and momentarily adjusts the phase calibration to provide a high quality picture to the center of ...the adjustments necessary to ensure that do not match one of the factory preset modes, the digital Multiscan technology of this monitor performs all of the screen. or higher. Horizontal blanking width should be necessary to your computer's instruction manual. or higher. Simply...
Operating Instructions (primary manual)
Page 17
... present absent Vertical sync signal present present absent absent Power consumption CPD-L133 5 30 W* 542 W** CPD-L150 5 25 W* ≤ 35 W** CPD-L133 51.5 W* ≤ 4 W** CPD-L150 5 1.5 W* 5 4 W** CPD-L133 51.5 W* 5 4 W** CPD-L150 ≤ 1.5 W* ≤ 4 W** CPD-L133 51.5 W* 5 4 W** CPD-L150 51.5 W* ≤ 4 W** CPD-L133 51.5 W* 5 4 W** CPD-L150 5 1.5 W* ≤ 4 W** Recovery time Approx. 3 sec. DDCTM' is connected, the monitor synchronizes with the VESA standards and outputs the EDID (Extended Display...
... present absent Vertical sync signal present present absent absent Power consumption CPD-L133 5 30 W* 542 W** CPD-L150 5 25 W* ≤ 35 W** CPD-L133 51.5 W* ≤ 4 W** CPD-L150 5 1.5 W* 5 4 W** CPD-L133 51.5 W* 5 4 W** CPD-L150 ≤ 1.5 W* ≤ 4 W** CPD-L133 51.5 W* 5 4 W** CPD-L150 51.5 W* ≤ 4 W** CPD-L133 51.5 W* 5 4 W** CPD-L150 5 1.5 W* ≤ 4 W** Recovery time Approx. 3 sec. DDCTM' is connected, the monitor synchronizes with the VESA standards and outputs the EDID (Extended Display...
Operating Instructions (primary manual)
Page 18
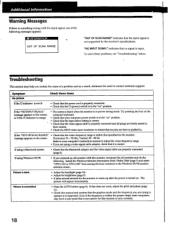
...that your computer's instruction manual to operate at is not supported by the monitor's specifications. Install the Windows Monitor Information Disk/Utility Disk (page 7) and select "CPD-L133 or CPD-L150" from among the Sony monitors in the "on " position. • Check that the input select ...setting is correct. • Check that is in the Windows 95/98 monitor selection screen. - Troubleshooting This section may have...
...that your computer's instruction manual to operate at is not supported by the monitor's specifications. Install the Windows Monitor Information Disk/Utility Disk (page 7) and select "CPD-L133 or CPD-L150" from among the Sony monitors in the "on " position. • Check that the input select ...setting is correct. • Check that is in the Windows 95/98 monitor selection screen. - Troubleshooting This section may have...
Operating Instructions (primary manual)
Page 19
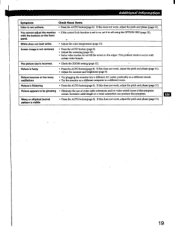
... use of video cable extensions and/or video switchboxes if this does not work , adjust the pitch and phase (page 11). You cannot adjust the monitor • If the control lock function is set it to off using the OPTION OSD (page 15). Additional Information Symptom Color is not centered. •... phase (page 11). 19 The picture size is flickering • Press the AUTO button(page 8). Picture bounces or has wavy oscillations • Try plugging the monitor into a different AC outlet, preferably on a different circuit. • Try the...
... use of video cable extensions and/or video switchboxes if this does not work , adjust the pitch and phase (page 11). You cannot adjust the monitor • If the control lock function is set it to off using the OPTION OSD (page 15). Additional Information Symptom Color is not centered. •... phase (page 11). 19 The picture size is flickering • Press the AUTO button(page 8). Picture bounces or has wavy oscillations • Try plugging the monitor into a different AC outlet, preferably on a different circuit. • Try the...
Operating Instructions (primary manual)
Page 20
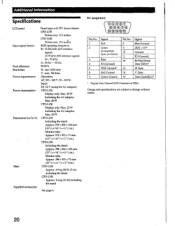
... - 60 Hz Input: DC 12 V (using the AC adaptor) CPD-L133 Display only: Max. 30 W Including the AC adaptor: Max. 42 W CPD-L150 Display only: Max. 25 W Including the AC adaptor: Max. 35 W CPD-L133 Including the stand: Approx. 373 x 358 x 165 mm (14 3 / 4 x 14 1/ 8 x 6 1/ 2 in.) Monitor only: Approx. 373 x 272 x 71 mm (14 3 / 4 x 10 3 / 4 x 2 7 /sin...
... - 60 Hz Input: DC 12 V (using the AC adaptor) CPD-L133 Display only: Max. 30 W Including the AC adaptor: Max. 42 W CPD-L150 Display only: Max. 25 W Including the AC adaptor: Max. 35 W CPD-L133 Including the stand: Approx. 373 x 358 x 165 mm (14 3 / 4 x 14 1/ 8 x 6 1/ 2 in.) Monitor only: Approx. 373 x 272 x 71 mm (14 3 / 4 x 10 3 / 4 x 2 7 /sin...
Marketing Specifications
Page 2
...desktop space is compatible with other users. This monitor is perfect for themselves the suitability and compatibility of non-Sony products you and may choose to see your ...CPD-L150) 13.3" (CPD-L133) RGB Vertical Stripes .297mm (CPD-L150) .264mm (CPD-L133) Anti-Glare Coating Active Display Size Horizontal Vetical 11.9" (304mm-CPD-L150) 10.6" (270.5mm-CPD-L133) 8.9" (22.8mm-CPD-L150) 8.0" (203mm-CPD-L133) Video Input Max. Information Technologies Marketing Division 3300 Zanker Road, San Jose, California 95134 For more information: 1.800.352.SONY Web address: http://www.sony...
...desktop space is compatible with other users. This monitor is perfect for themselves the suitability and compatibility of non-Sony products you and may choose to see your ...CPD-L150) 13.3" (CPD-L133) RGB Vertical Stripes .297mm (CPD-L150) .264mm (CPD-L133) Anti-Glare Coating Active Display Size Horizontal Vetical 11.9" (304mm-CPD-L150) 10.6" (270.5mm-CPD-L133) 8.9" (22.8mm-CPD-L150) 8.0" (203mm-CPD-L133) Video Input Max. Information Technologies Marketing Division 3300 Zanker Road, San Jose, California 95134 For more information: 1.800.352.SONY Web address: http://www.sony...


