Operating Instructions (primary manual)
Page 3
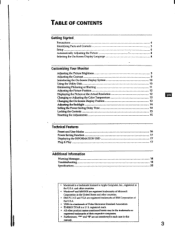
... Using the Utility Disk 10 Eliminating Flickering or Blurring 11 Adjusting the Picture Position 12 Displaying the Picture at the Actual Resolution 12 Changing or Adjusting the Color Temperature 13 Changing the On-Screen Display Position 13 Adjusting the Backlight 14 Setting the Power Saving Delay Time 14 Locking the Controls 15 Resetting the Adjustments 15 Technical Features Preset and User Modes 16 Power Saving Function 17 Displaying the INFORMATION OSD 17 Plug & Play 17 Additional Information Warning Messages 18 Troubleshooting 18 Specifications...
... Using the Utility Disk 10 Eliminating Flickering or Blurring 11 Adjusting the Picture Position 12 Displaying the Picture at the Actual Resolution 12 Changing or Adjusting the Color Temperature 13 Changing the On-Screen Display Position 13 Adjusting the Backlight 14 Setting the Power Saving Delay Time 14 Locking the Controls 15 Resetting the Adjustments 15 Technical Features Preset and User Modes 16 Power Saving Function 17 Displaying the INFORMATION OSD 17 Plug & Play 17 Additional Information Warning Messages 18 Troubleshooting 18 Specifications...
Operating Instructions (primary manual)
Page 4
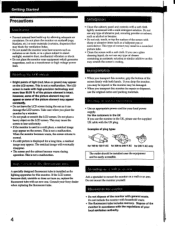
... a heavy object on , replace the fluorescent tube with the regulations of the picture element is displayed for a long time, a residual image may be damaged. • When you transport this monitor, grip the bottom of the monitor in a scratched picture tube. • Clean the screen with both hands. fail • Use an appropriate power cord for this may cause the screen to direct sunlight...
... a heavy object on , replace the fluorescent tube with the regulations of the picture element is displayed for a long time, a residual image may be damaged. • When you transport this monitor, grip the bottom of the monitor in a scratched picture tube. • Clean the screen with both hands. fail • Use an appropriate power cord for this may cause the screen to direct sunlight...
Operating Instructions (primary manual)
Page 5
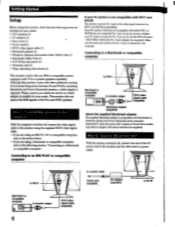
... connected to monitor output HD15 video signal cable (supplied) If you are using a Macintosh or compatible computer, refer to the following items are included in the video signal connector for DDC1 and DDC2B compatibility. Getting Started Setup Before using this monitor works with either DDC1 or DDC2B may need an adapter with DDC1 and DDC2B This monitor uses the No. 9 pin in your carton: • LCD monitor (1) • AC adaptor (1) 7- • Rear cover (1) • Power cord...
... connected to monitor output HD15 video signal cable (supplied) If you are using a Macintosh or compatible computer, refer to the following items are included in the video signal connector for DDC1 and DDC2B compatibility. Getting Started Setup Before using this monitor works with either DDC1 or DDC2B may need an adapter with DDC1 and DDC2B This monitor uses the No. 9 pin in your carton: • LCD monitor (1) • AC adaptor (1) 7- • Rear cover (1) • Power cord...
Operating Instructions (primary manual)
Page 6
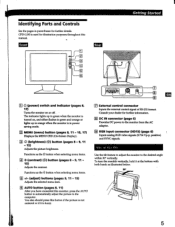
... this manual. CPD-L150 is in power saving mode. The indicator lights up in green when the monitor is turned on or off. . Functions as the b button when selecting menu items. El +1- (adjust) buttons (pages 9, 11 - 15) Adjusts the selected menu item. i Use the tilt feature to adjust the monitor to the monitor from the AC adaptor. 09 RGB input connector (HD15) (page 6) Inputs analog RGB video signals (0.714 Vp-p, positive) and SYNC signals. El MENU (menu) button (pages 8, 11 - 15, 17) Displays the MENU OSD (On-Screen Display...
... this manual. CPD-L150 is in power saving mode. The indicator lights up in green when the monitor is turned on or off. . Functions as the b button when selecting menu items. El +1- (adjust) buttons (pages 9, 11 - 15) Adjusts the selected menu item. i Use the tilt feature to adjust the monitor to the monitor from the AC adaptor. 09 RGB input connector (HD15) (page 6) Inputs analog RGB video signals (0.714 Vp-p, positive) and SYNC signals. El MENU (menu) button (pages 8, 11 - 15, 17) Displays the MENU OSD (On-Screen Display...
Operating Instructions (primary manual)
Page 7
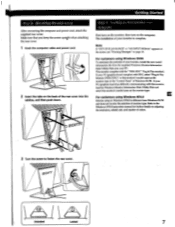
... connecting the computer and power cord, attach the supplied rear cover. For customers using Windows NT4.0 LI Monitor setup in the "Control Panel" of the rear cover into the catches, and then push down. Make sure that you keep the screen upright when attaching the rear cover. 1 Hook the computer cable and power cord. 2 Insert the tabs on page 18. Note If "OUT OF SCAN RANGE" or "NO INPUT SIGNAL" appears on the screen...
... connecting the computer and power cord, attach the supplied rear cover. For customers using Windows NT4.0 LI Monitor setup in the "Control Panel" of the rear cover into the catches, and then push down. Make sure that you keep the screen upright when attaching the rear cover. 1 Hook the computer cable and power cord. 2 Insert the tabs on page 18. Note If "OUT OF SCAN RANGE" or "NO INPUT SIGNAL" appears on the screen...

Operating Instructions (primary manual)
Page 8
... may not work properly if the background color is adjusted to the edges (such as an MS-DOS prompt). • The screen may be needed with a computer running Windows or similar graphic user interface software that provides a full-screen picture. Getting Started Automatically Adjusting the Picture Selecting the On-Screen Display Language If the picture is flickering or fuzzy even after about 30 seconds. CI MENU LANGUAGE FRANcAIS DEUTSCH ESPAROL...
... may not work properly if the background color is adjusted to the edges (such as an MS-DOS prompt). • The screen may be needed with a computer running Windows or similar graphic user interface software that provides a full-screen picture. Getting Started Automatically Adjusting the Picture Selecting the On-Screen Display Language If the picture is flickering or fuzzy even after about 30 seconds. CI MENU LANGUAGE FRANcAIS DEUTSCH ESPAROL...

Operating Instructions (primary manual)
Page 9
... Your Monitor Before adjusting Connect the monitor and the computer, and turn them on. Wait for at least 30 minutes before making adjustments for more contrast -. . . for the best result. for less brightness Adjusting the Contrast Once the contrast is adjusted, it will be stored in memory for all input signals received. 1 Press the CO (contrast) 0 button. The horizontal and vertical frequencies for the received input signal appear in memory for less contrast The OSD...
... Your Monitor Before adjusting Connect the monitor and the computer, and turn them on. Wait for at least 30 minutes before making adjustments for more contrast -. . . for the best result. for less brightness Adjusting the Contrast Once the contrast is adjusted, it will be stored in memory for all input signals received. 1 Press the CO (contrast) 0 button. The horizontal and vertical frequencies for the received input signal appear in memory for less contrast The OSD...

Operating Instructions (primary manual)
Page 10
... COLOR aEl LANGUAGE OPTION EXIT Closes the MENU OSD. PHASE Displays the PHASE OSD. These test patterns will help you have finished, click IENDS on the screen, or a part of the screen. Select FULL MODE to display the picture using the MENU OSD. You can adjust settings such as the backlight, OSD position, power saving delay time and control lock. 10 Customizing Your Monitor Introducing the On-Screen Display System Most adjustments are made using the entire screen, or select REAL MODE...
... COLOR aEl LANGUAGE OPTION EXIT Closes the MENU OSD. PHASE Displays the PHASE OSD. These test patterns will help you have finished, click IENDS on the screen, or a part of the screen. Select FULL MODE to display the picture using the MENU OSD. You can adjust settings such as the backlight, OSD position, power saving delay time and control lock. 10 Customizing Your Monitor Introducing the On-Screen Display System Most adjustments are made using the entire screen, or select REAL MODE...

Operating Instructions (primary manual)
Page 11
... not work, adjust the Pitch and Phase as follows. Once the pitch and phase are using the Utility Disk, adjust until the horizontal stripes are observed over the entire screen, adjust the Phase in memory for the current input signal. 1 Load the Utility Disk (page 10). 2 Press the MENU button. Eliminating Flickering or Blurring If a part of the screen is flickering or blurring, press the AUTO button...
... not work, adjust the Pitch and Phase as follows. Once the pitch and phase are using the Utility Disk, adjust until the horizontal stripes are observed over the entire screen, adjust the Phase in memory for the current input signal. 1 Load the Utility Disk (page 10). 2 Press the MENU button. Eliminating Flickering or Blurring If a part of the screen is flickering or blurring, press the AUTO button...

Operating Instructions (primary manual)
Page 12
... horizontal adjustment, select H using the 0/0 buttons and adjust the position using the +/- The CENTER OSD appears. CI MENU CENTER O 26 O Displaying the Picture at its actual resolution. The MENU OSD appears. •0' The OSD automatically disappears after about 30 seconds. The MENU OSD appears. buttons. + ... Once the centering is set , it will be stored in memory for the current input signal. 1 Press the MENU button. to select FULL MODE. To dose the OSD, press the MENU button...
... horizontal adjustment, select H using the 0/0 buttons and adjust the position using the +/- The CENTER OSD appears. CI MENU CENTER O 26 O Displaying the Picture at its actual resolution. The MENU OSD appears. •0' The OSD automatically disappears after about 30 seconds. The MENU OSD appears. buttons. + ... Once the centering is set , it will be stored in memory for the current input signal. 1 Press the MENU button. to select FULL MODE. To dose the OSD, press the MENU button...

Operating Instructions (primary manual)
Page 13
... 50 0 50 Changing the On-Screen Display Position You can change the OSD position (for all input signals received. 1 Press the MENU button. MENU OK- To dose the OSD, press the MENU button again. 13 You can change the color temperature to select COLOR, and press the MENU button again. To adjust the horizontal position To adjust the vertical position OPTION OPTION 4- -* O fil?: 1M 4>n : UNLOCK ogrami t 7371 : 1M On: UNLOCK 4.4- buttons to move the OSD to G (green). The OSD automatically disappears after...
... 50 0 50 Changing the On-Screen Display Position You can change the OSD position (for all input signals received. 1 Press the MENU button. MENU OK- To dose the OSD, press the MENU button again. 13 You can change the color temperature to select COLOR, and press the MENU button again. To adjust the horizontal position To adjust the vertical position OPTION OPTION 4- -* O fil?: 1M 4>n : UNLOCK ogrami t 7371 : 1M On: UNLOCK 4.4- buttons to move the OSD to G (green). The OSD automatically disappears after...
Operating Instructions (primary manual)
Page 14
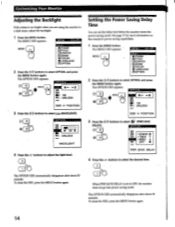
... MENU button again. The MENU OSD appears. buttons to select OPTION, and press the MENU button again. Customizing Your Monitor Adjusting the Backlight If the screen is set the delay time before the monitor enters the power saving mode. A PHASE la PITCH EICENTER E2ZOOM IQ COLOR It1LANGUAGE EIOPTION 2 Press the 0/0 buttons to adjust the light level. When2WR SAVE DELAY is too bright when you are using the monitor in a dark room, adjust the backlight. 1 Press the MENU button. buttons...
... MENU button again. The MENU OSD appears. buttons to select OPTION, and press the MENU button again. Customizing Your Monitor Adjusting the Backlight If the screen is set the delay time before the monitor enters the power saving mode. A PHASE la PITCH EICENTER E2ZOOM IQ COLOR It1LANGUAGE EIOPTION 2 Press the 0/0 buttons to adjust the light level. When2WR SAVE DELAY is too bright when you are using the monitor in a dark room, adjust the backlight. 1 Press the MENU button. buttons...
Operating Instructions (primary manual)
Page 15
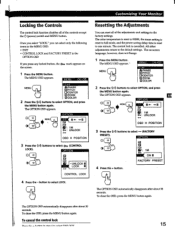
... Your Monitor Locking the Controls The control lock function disables all of the controls except the ()I (power) switch and MENU button. The OPTION OSD automatically disappears after about 30 seconds. The OPTION OSD appears. The MENU OSD appears. Once you select "LOCK," you press any locked button, the om mark appears on -screen language, however, does not change. 1 Press the MENU button. The color temperature is reset to 9300K, the zoom setting is reset to the factory settings. To...
... Your Monitor Locking the Controls The control lock function disables all of the controls except the ()I (power) switch and MENU button. The OPTION OSD automatically disappears after about 30 seconds. The OPTION OSD appears. The MENU OSD appears. Once you select "LOCK," you press any locked button, the om mark appears on -screen language, however, does not change. 1 Press the MENU button. The color temperature is reset to 9300K, the zoom setting is reset to the factory settings. To...
Operating Instructions (primary manual)
Page 16
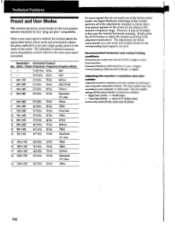
...) -. The adjustments are as a user mode and recalled whenever the corresponding input signal is received. The color number may be 450 ysec. Horizontal blanking width should be necessary to the center of total horizontal time. or higher. The calibration is stored in the monitor's frequency range. Simply press the AUTO button or adjust the monitor according to your computer or video board. about 16.77 million colors In true color mode (24...
...) -. The adjustments are as a user mode and recalled whenever the corresponding input signal is received. The color number may be 450 ysec. Horizontal blanking width should be necessary to the center of total horizontal time. or higher. The calibration is stored in the monitor's frequency range. Simply press the AUTO button or adjust the monitor according to your computer or video board. about 16.77 million colors In true color mode (24...
Operating Instructions (primary manual)
Page 17
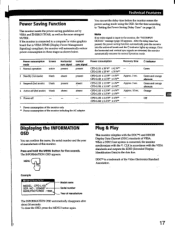
... the power saving mode using the OSD. MENU Plug & Play This monitor complies with the VESA standards and outputs the EDID (Extended Display Identification Data) to "Setting the Power Saving Delay Time" on page 14. When a DDC1 host system is VESA DPMS (Display Power Management Signaling) compliant, the monitor will automatically reduce power consumption in accordance with the DDC1111 and DDC2B Display Data Channel (DDC) standards of this monitor. Example 0 INFORMATION MODEL : CPD...
... the power saving mode using the OSD. MENU Plug & Play This monitor complies with the VESA standards and outputs the EDID (Extended Display Identification Data) to "Setting the Power Saving Delay Time" on page 14. When a DDC1 host system is VESA DPMS (Display Power Management Signaling) compliant, the monitor will automatically reduce power consumption in accordance with the DDC1111 and DDC2B Display Data Channel (DDC) standards of this monitor. Example 0 INFORMATION MODEL : CPD...
Operating Instructions (primary manual)
Page 18
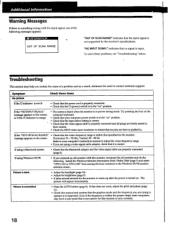
...'s instruction manual to adjust the video frequency range. • If you replaced an old monitor with the input signal, one of a problem and as a result, eliminate the need to operate at is properly connected. • Check that no pins are bent or pushed in. Symptom No picture Check these problems, see "Troubleshooting" below. message ap_pears on " position. "NO INPUT SIGNAL" indicates that the 6 (power) switch is scrambled. • Press the AUTO button (page 8). Install the Windows Monitor Information...
...'s instruction manual to adjust the video frequency range. • If you replaced an old monitor with the input signal, one of a problem and as a result, eliminate the need to operate at is properly connected. • Check that no pins are bent or pushed in. Symptom No picture Check these problems, see "Troubleshooting" below. message ap_pears on " position. "NO INPUT SIGNAL" indicates that the 6 (power) switch is scrambled. • Press the AUTO button (page 8). Install the Windows Monitor Information...
Operating Instructions (primary manual)
Page 19
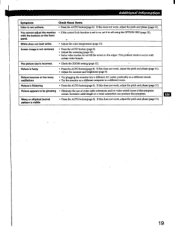
... screen to off using the OPTION OSD (page 15). The picture size is flickering • Press the AUTO button(page 8). Picture is incorrect. • Check the ZOOM setting (page 12). - If this symptom occurs. This problem tends to be ghosting • Eliminate the use of video cable extensions and/or video switchboxes if this does not work , adjust the pitch and phase (page 11). • Adjust the contrast and brightness (page 9). Picture...
... screen to off using the OPTION OSD (page 15). The picture size is flickering • Press the AUTO button(page 8). Picture is incorrect. • Check the ZOOM setting (page 12). - If this symptom occurs. This problem tends to be ghosting • Eliminate the use of video cable extensions and/or video switchboxes if this does not work , adjust the pitch and phase (page 11). • Adjust the contrast and brightness (page 9). Picture...
Operating Instructions (primary manual)
Page 20
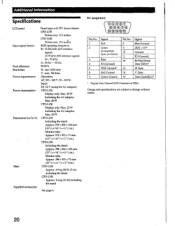
... VESA Design and specifications are subject to change without notice. 20 Sync V. Pin assignment VXXXX) OCXXX) SgOOO Pin No. 1 2 Signal Red Green (Composite Sync on Green) 3 Blue 4 ID (Ground) 5 DDC Ground* 6 Red Ground 7 Green Ground Pin No. 8 9 10 11 1-2 13 14 15 Signal Blue Ground DDC + 5V* Ground ID (Ground) Bi-Directional Data (SDA)* H. Mass Supplied accessories Panel type: a-Si TFT Active Matrix CPD-L133 Picture size: 13.3 inches CPD-L150 Picture size: 15.0 inches RGB operating frequency...
... VESA Design and specifications are subject to change without notice. 20 Sync V. Pin assignment VXXXX) OCXXX) SgOOO Pin No. 1 2 Signal Red Green (Composite Sync on Green) 3 Blue 4 ID (Ground) 5 DDC Ground* 6 Red Ground 7 Green Ground Pin No. 8 9 10 11 1-2 13 14 15 Signal Blue Ground DDC + 5V* Ground ID (Ground) Bi-Directional Data (SDA)* H. Mass Supplied accessories Panel type: a-Si TFT Active Matrix CPD-L133 Picture size: 13.3 inches CPD-L150 Picture size: 15.0 inches RGB operating frequency...
Marketing Specifications
Page 1
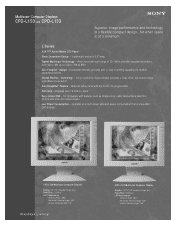
..., color, temperature selection, control lock and information screen • Low Power Consumption - Lightweight and only 6.5" deep • Digital Multiscan® Technology - Wide horizontal scan range of resolution • Auto ImageSet™ Feature - Removable tilt base provides arm or wall mounting capability for when space is at a much lower standard power consumption than comparable CRT displays CPD-L150 Multiscan Computer Display Display: 15" (15" viewable image size) Pixel Pitch: .297mm LCD Performance Contrast Ratio: 300:1 Horizontal Viewing Angle: 140˚ Vertical Viewing...
..., color, temperature selection, control lock and information screen • Low Power Consumption - Lightweight and only 6.5" deep • Digital Multiscan® Technology - Wide horizontal scan range of resolution • Auto ImageSet™ Feature - Removable tilt base provides arm or wall mounting capability for when space is at a much lower standard power consumption than comparable CRT displays CPD-L150 Multiscan Computer Display Display: 15" (15" viewable image size) Pixel Pitch: .297mm LCD Performance Contrast Ratio: 300:1 Horizontal Viewing Angle: 140˚ Vertical Viewing...
Marketing Specifications
Page 2
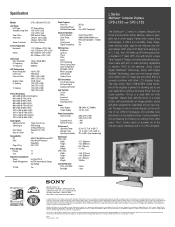
... input signal. The Energy Star emblem does not represent EPA endorsement of the hardware and software in this product is prohibited. Resolution H. Frequency 1024 x 768 @ 85Hz 30-70kHz 50-85Hz LCD Performance Native Resolution Luminance Contrast Ratio Display Colors H. Zoom Control Lock Digital Smoothing OSD Controls Brightness Contrast Phase Pitch Zoom H/V Positioning Power Saving Delay Color Temperature Backlight Control Multi-Language Control Lock Factory Preset OSD Information Out of Apple Inc. Operating Humidity Dimensions CPD-L150: Width Height Depth Weight CPD-L133: Width Height...
... input signal. The Energy Star emblem does not represent EPA endorsement of the hardware and software in this product is prohibited. Resolution H. Frequency 1024 x 768 @ 85Hz 30-70kHz 50-85Hz LCD Performance Native Resolution Luminance Contrast Ratio Display Colors H. Zoom Control Lock Digital Smoothing OSD Controls Brightness Contrast Phase Pitch Zoom H/V Positioning Power Saving Delay Color Temperature Backlight Control Multi-Language Control Lock Factory Preset OSD Information Out of Apple Inc. Operating Humidity Dimensions CPD-L150: Width Height Depth Weight CPD-L133: Width Height...


