Operating Instructions
Page 2
..., install only a UL LISTED/CSA LABELLED power supply cord meeting the following two conditions: (1) This device may cause harmful interference to Part 15 of the FCC Rules. Declaration of Conformity Trade Name: Model No.: Responsible Party: Address: Telephone No.: Sony CPD-E400 Sony Electronics Inc. 1 Sony Drive, Park Ridge, NJ. 07656 USA 201-930-6970 This device complies with the instructions, may...
..., install only a UL LISTED/CSA LABELLED power supply cord meeting the following two conditions: (1) This device may cause harmful interference to Part 15 of the FCC Rules. Declaration of Conformity Trade Name: Model No.: Responsible Party: Address: Telephone No.: Sony CPD-E400 Sony Electronics Inc. 1 Sony Drive, Park Ridge, NJ. 07656 USA 201-930-6970 This device complies with the instructions, may...
Operating Instructions
Page 3
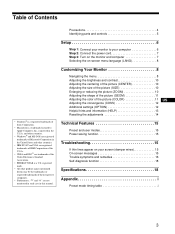
... the picture (COLOR 11 US Adjusting the convergence (CONV 12 Additional settings (OPTION 12 Helpful hints and information (HELP 13 Resetting the adjustments 14 Technical Features 15 Preset and user modes 15 Power saving function 15 Troubleshooting 15 If thin lines appear on your computer 6 Step 2: Connect the power cord 7 Step 3: Turn on the monitor and computer 7 Selecting the on-screen menu language (LANG 8 Customizing Your Monitor 8 Navigating the menu 8 Adjusting the brightness and contrast 10 Adjusting...
... the picture (COLOR 11 US Adjusting the convergence (CONV 12 Additional settings (OPTION 12 Helpful hints and information (HELP 13 Resetting the adjustments 14 Technical Features 15 Preset and user modes 15 Power saving function 15 Troubleshooting 15 If thin lines appear on your computer 6 Step 2: Connect the power cord 7 Step 3: Turn on the monitor and computer 7 Selecting the on-screen menu language (LANG 8 Customizing Your Monitor 8 Navigating the menu 8 Adjusting the brightness and contrast 10 Adjusting...

Operating Instructions
Page 4
... a scratched picture tube. • Clean the cabinet, panel and controls with a soft cloth lightly moistened with both hands when you do not use the appropriate cord, this monitor will not conform to mandatory FCC standards. Use of the monitor when you use a glass cleaning liquid, do not use any type of the screen with your fingers at least 30 seconds after turning off the power to...
... a scratched picture tube. • Clean the cabinet, panel and controls with a soft cloth lightly moistened with both hands when you do not use the appropriate cord, this monitor will not conform to mandatory FCC standards. Use of the monitor when you use a glass cleaning liquid, do not use any type of the screen with your fingers at least 30 seconds after turning off the power to...

Operating Instructions
Page 5
... Ground* 6 Red Ground 7 Green Ground 8 Blue Ground 9 - 10 Ground 11 ID (Ground) 12 Bi-Directional Data (SDA)* 13 H. Signal 1 Red 2 Green (Sync on and off. Pin No. Front RESET MENU RESET MENU Rear AC IN (HD15) 1 1 RESET button (page 14) This button resets the adjustments to the factory settings. 4 AC IN connector (page 7) This connector provides AC power to the monitor, including brightness and contrast positive) and sync signals. Sync 14 V. Identifying parts and controls See the pages in power saving mode. Sync 15...
... Ground* 6 Red Ground 7 Green Ground 8 Blue Ground 9 - 10 Ground 11 ID (Ground) 12 Bi-Directional Data (SDA)* 13 H. Signal 1 Red 2 Green (Sync on and off. Pin No. Front RESET MENU RESET MENU Rear AC IN (HD15) 1 1 RESET button (page 14) This button resets the adjustments to the factory settings. 4 AC IN connector (page 7) This connector provides AC power to the monitor, including brightness and contrast positive) and sync signals. Sync 14 V. Identifying parts and controls See the pages in power saving mode. Sync 15...
Operating Instructions
Page 6
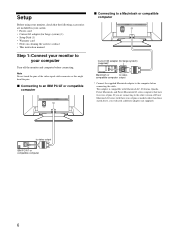
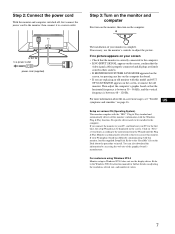
... on cleaning the screen's surface • This instruction manual Step 1: Connect your monitor to the other than those stated above, you will need a different adapter (not supplied). to the computer before connecting. Note Do not touch the pins of the video signal cable connector as this might bend the pins. Setup Before using your monitor, check that have two rows of pins or models other version of Power Macintosh G3 series with...
... on cleaning the screen's surface • This instruction manual Step 1: Connect your monitor to the other than those stated above, you will need a different adapter (not supplied). to the computer before connecting. Note Do not touch the pins of the video signal cable connector as this might bend the pins. Setup Before using your monitor, check that have two rows of pins or models other version of Power Macintosh G3 series with...
Operating Instructions
Page 7
... detects all plugs are firmly seated in Windows NT4.0 does not use the monitor's controls to your PC, and then boot your PC/graphics board has difficulty communicating with the Windows Plug & Play function. Setup on the Disk about the on-screen messages, see "Trouble US symptoms and remedies" on adjusting the resolution, refresh rate, and number of the graphics board's manufacturer. No specific driver needs to be displayed on the...
... detects all plugs are firmly seated in Windows NT4.0 does not use the monitor's controls to your PC, and then boot your PC/graphics board has difficulty communicating with the Windows Plug & Play function. Setup on the Disk about the on-screen messages, see "Trouble US symptoms and remedies" on adjusting the resolution, refresh rate, and number of the graphics board's manufacturer. No specific driver needs to be displayed on the...

Operating Instructions
Page 8
... COLOR menu to English Press the RESET button while the LANGUAGE menu is English. 1 Press the center of the control button. To reset to adjust the picture's color temperature. MENU MENU OK MENU COLOR CENTER CONV GEOM EXIT HELP LANG SIZE OPTION Use the control button to your screen. The default setting is displayed on using the control button. You can make numerous adjustments to select one of the control button again. GEOMETRY 26 4 HELP (page 13) Selects the HELP menu to a printed picture's colors. Selecting the on-screen menu language (LANG) English...
... COLOR menu to English Press the RESET button while the LANGUAGE menu is English. 1 Press the center of the control button. To reset to adjust the picture's color temperature. MENU MENU OK MENU COLOR CENTER CONV GEOM EXIT HELP LANG SIZE OPTION Use the control button to your screen. The default setting is displayed on using the control button. You can make numerous adjustments to select one of the control button again. GEOMETRY 26 4 HELP (page 13) Selects the HELP menu to a printed picture's colors. Selecting the on-screen menu language (LANG) English...

Operating Instructions
Page 9
... current input signal x Using the control button 1 Display the main MENU. MENU OK MENU COLOR CENTER CONV GEOM EXIT HELP LANG SIZE OPTION the resolution of the current input signal 68 . 7kHz / 85Hz 1024 768 the horizontal and vertical frequencies of the current input signal are displayed in the main MENU. MENU 2 Select the menu you want to go down (m), and left ( CONVERGENCE 26 7 LANG (page 8) Selects the LANG menu to choose the on your screen...
... current input signal x Using the control button 1 Display the main MENU. MENU OK MENU COLOR CENTER CONV GEOM EXIT HELP LANG SIZE OPTION the resolution of the current input signal 68 . 7kHz / 85Hz 1024 768 the horizontal and vertical frequencies of the current input signal are displayed in the main MENU. MENU 2 Select the menu you want to go down (m), and left ( CONVERGENCE 26 7 LANG (page 8) Selects the LANG menu to choose the on your screen...
Operating Instructions
Page 10
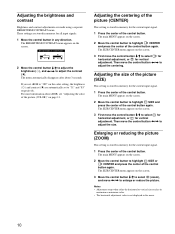
These settings are made using a separate BRIGHTNESS/CONTRAST menu. The BRIGHTNESS/CONTRAST menu appears on the screen. BR I GHTNESS / CONTRAS T 31 85 2 Move the control button m/M to adjust the brightness ( ), and Adjusting the brightness and contrast Brightness and contrast adjustments are stored in memory for all input signals. 1 Move the control button in any direction.
These settings are made using a separate BRIGHTNESS/CONTRAST menu. The BRIGHTNESS/CONTRAST menu appears on the screen. BR I GHTNESS / CONTRAS T 31 85 2 Move the control button m/M to adjust the brightness ( ), and Adjusting the brightness and contrast Brightness and contrast adjustments are stored in memory for all input signals. 1 Move the control button in any direction.
Operating Instructions
Page 11
The GEOMETRY menu appears on the screen. 2 Move the control button to highlight GEOM and press the center of the control button again. The (rotation) setting is stored in memory for all input signals. The main MENU appears on the screen. 3 First move the control button Adjusting the shape of the picture (GEOM) The GEOM settings allow you to adjust the rotation and shape of the control button. All other settings are stored in memory for the current input signal. 1 Press the center of the picture. Then move the control button m/M to select the desired adjustment item.
The GEOMETRY menu appears on the screen. 2 Move the control button to highlight GEOM and press the center of the control button again. The (rotation) setting is stored in memory for all input signals. The main MENU appears on the screen. 3 First move the control button Adjusting the shape of the picture (GEOM) The GEOM settings allow you to adjust the rotation and shape of the control button. All other settings are stored in memory for the current input signal. 1 Press the center of the picture. Then move the control button m/M to select the desired adjustment item.
Operating Instructions
Page 12
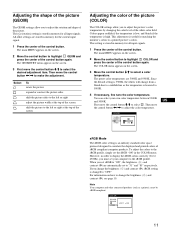
... the control button Then move the control button m/M to highlight CONV and press the center of the red, green, and blue color signals. Adjusting the convergence (CONV) The CONV settings allow you see red or blue shadows around letters or lines, adjust the convergence. These settings are stored in memory for vertical adjustment. The CONVERGENCE menu appears on the screen. 2 Move the control button to select for horizontal adjustment, or for all input signals. 1 Press...
... the control button Then move the control button m/M to highlight CONV and press the center of the red, green, and blue color signals. Adjusting the convergence (CONV) The CONV settings allow you see red or blue shadows around letters or lines, adjust the convergence. These settings are stored in memory for vertical adjustment. The CONVERGENCE menu appears on the screen. 2 Move the control button to select for horizontal adjustment, or for all input signals. 1 Press...
Operating Instructions
Page 13
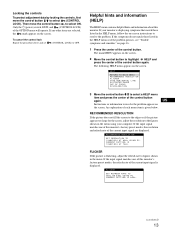
... the menu using your monitor is displaying symptoms that match those listed in the HELP menu or if the problem persists, see "Trouble symptoms and remedies" on the screen. To cancel the control lock Repeat the procedure above and set (CONTROL LOCK) to select (CONTROL LOCK). FLICKER If the picture is flickering, adjust the refresh rate to figures shown in the menu. CURRENT SE T T I NG I S 1280X1024 AT 75Hz . An explanation of the current input signal...
... the menu using your monitor is displaying symptoms that match those listed in the HELP menu or if the problem persists, see "Trouble symptoms and remedies" on the screen. To cancel the control lock Repeat the procedure above and set (CONTROL LOCK) to select (CONTROL LOCK). FLICKER If the picture is flickering, adjust the refresh rate to figures shown in the menu. CURRENT SE T T I NG I S 1280X1024 AT 75Hz . An explanation of the current input signal...
Operating Instructions
Page 14
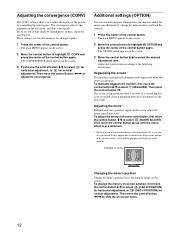
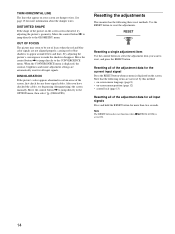
... menu is displayed, the contrast, brightness and moire adjustment settings are not aligned properly, causing red or blue shadows to reset, and press the RESET button. Try adjusting the picture's convergence to the CONVERGENCE menu. See page 15 for any loose signal cables. After you want to appear around letters and lines. Resetting all of focus when the red and blue color signals are automatically reset for all input signals. Note that appear on -screen menu position...
... menu is displayed, the contrast, brightness and moire adjustment settings are not aligned properly, causing red or blue shadows to reset, and press the RESET button. Try adjusting the picture's convergence to the CONVERGENCE menu. See page 15 for any loose signal cables. After you want to appear around letters and lines. Resetting all of focus when the red and blue color signals are automatically reset for all input signals. Note that appear on -screen menu position...
Operating Instructions
Page 15
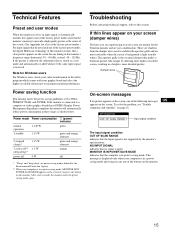
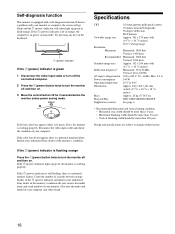
... of the factory preset modes, the digital Multiscan technology of the buttons on your computer is not supported by the monitor's specifications. Power saving function This monitor meets the power-saving guidelines set by allowing more detailed picture. If the picture is adjusted, the adjustment data is stored as shown below. Damper wires On-screen messages If no signal is light (usually white). NO INPUT SIGNAL indicates that makes a Trinitron picture tube unique by VESA, ENERGY...
... of the factory preset modes, the digital Multiscan technology of the buttons on your computer is not supported by the monitor's specifications. Power saving function This monitor meets the power-saving guidelines set by allowing more detailed picture. If the picture is adjusted, the adjustment data is stored as shown below. Damper wires On-screen messages If no signal is light (usually white). NO INPUT SIGNAL indicates that makes a Trinitron picture tube unique by VESA, ENERGY...
Operating Instructions
Page 16
... for the monitor to sync correctly. • Adjust the computer's refresh rate (vertical frequency) to the following . If using a Macintosh system • Check that the Macintosh adapter and the video signal cable are properly connected (page 6). If you replaced an old monitor with this monitor ("CPD-E400") from power lines or place a magnetic shield near the monitor. • Try plugging the monitor into a different AC outlet, preferably on " position. Picture is green or flashing orange • Use the...
... for the monitor to sync correctly. • Adjust the computer's refresh rate (vertical frequency) to the following . If using a Macintosh system • Check that the Macintosh adapter and the video signal cable are properly connected (page 6). If you replaced an old monitor with this monitor ("CPD-E400") from power lines or place a magnetic shield near the monitor. • Try plugging the monitor into a different AC outlet, preferably on " position. Picture is green or flashing orange • Use the...
Operating Instructions
Page 17
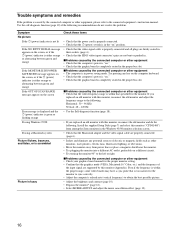
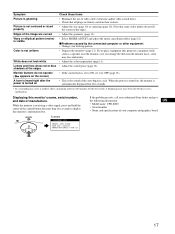
... the power is turned on Check these items • Eliminate the use of video cable extensions and/or video switch boxes. • Check that all plugs are curved Wavy or elliptical pattern (moire) is visible Color is not a malfunction. Displaying this is not uniform White does not look white Letters and lines show red or blue shadows at the edges Monitor buttons do not fill the screen to the...
... the power is turned on Check these items • Eliminate the use of video cable extensions and/or video switch boxes. • Check that all plugs are curved Wavy or elliptical pattern (moire) is visible Color is not a malfunction. Displaying this is not uniform White does not look white Letters and lines show red or blue shadows at the edges Monitor buttons do not fill the screen to the...
Operating Instructions
Page 18
... (white, red, green, blue), the monitor is working properly. If the 1 (power) indicator lights up green or flash orange. Be sure to turn the monitor off the connected computer. 2 Press the 1 (power) button twice to note the model name and serial number of your authorized Sony dealer of the monitor's condition. RESET MENU 1 (power) indicator If the 1 (power) indicator is working properly. If the 1 (power) indicator is still flashing, there is equipped with your computer. Specifications CRT Viewable image size Resolution Maximum...
... (white, red, green, blue), the monitor is working properly. If the 1 (power) indicator lights up green or flash orange. Be sure to turn the monitor off the connected computer. 2 Press the 1 (power) button twice to note the model name and serial number of your authorized Sony dealer of the monitor's condition. RESET MENU 1 (power) indicator If the 1 (power) indicator is working properly. If the 1 (power) indicator is still flashing, there is equipped with your computer. Specifications CRT Viewable image size Resolution Maximum...

Operating Instructions
Page 51
... 81.3 kHz 65 Hz VESA 28 1600 × 1200 87.5 kHz 70 Hz VESA 29 1600 × 1200 93.8 kHz 75 Hz VESA If the input signal does not match one of the factory preset modes above, the Generalized Timing Formula feature of this monitor will automatically provide an optimal image for the screen as long as the signal is GTF compliant.
... 81.3 kHz 65 Hz VESA 28 1600 × 1200 87.5 kHz 70 Hz VESA 29 1600 × 1200 93.8 kHz 75 Hz VESA If the input signal does not match one of the factory preset modes above, the Generalized Timing Formula feature of this monitor will automatically provide an optimal image for the screen as long as the signal is GTF compliant.
Marketing Specifications
Page 1
...; OSD menu control - Supports resolutions up , troubleshooting and adjustment Produces superior contrast and grayscale performance • HiDensity™ Electron Gun with reduced glare • 0.24-0.25mm Aperture Grille pitch (variable) - For consistent, accurate focus across the screen, even in image clarity and precision • Digital Multiscan technology - Simplifies monitor set-up to 1800 x 1440 @ 60Hz • High-contrast black screen coating - Multiscan® Computer Display CPD-E400 Virtually-flat FD...
...; OSD menu control - Supports resolutions up , troubleshooting and adjustment Produces superior contrast and grayscale performance • HiDensity™ Electron Gun with reduced glare • 0.24-0.25mm Aperture Grille pitch (variable) - For consistent, accurate focus across the screen, even in image clarity and precision • Digital Multiscan technology - Simplifies monitor set-up to 1800 x 1440 @ 60Hz • High-contrast black screen coating - Multiscan® Computer Display CPD-E400 Virtually-flat FD...
Marketing Specifications
Page 2
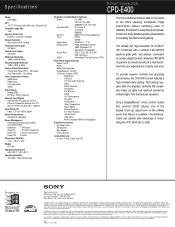
Specifications Model CPD-E400 CRT 19" FD Trinitron® with HiDensity™ Electron Gun Viewable Image Size 18.0" Aperture Grille Pitch 0.24mm - 0.25mm (variable) Screen Treatment High contrast AR Coating Horizontal Scan Range 30-96kHz Vertical Scan Range 48-120Hz Maximum Resolution 1800 x 1440 @ 60Hz Recommended Resolution 1280 x 1024 @ 85Hz Factory Preset Resolutions Timing Data Table (TDT) - 28 modes User Adjustable - 15 settings Color Temperature Presets 5000 Kelvin 9300 Kelvin User-adjustable sRGB Signal Inputs Analog RGB 0.7Vp-p, 75ohm...
Specifications Model CPD-E400 CRT 19" FD Trinitron® with HiDensity™ Electron Gun Viewable Image Size 18.0" Aperture Grille Pitch 0.24mm - 0.25mm (variable) Screen Treatment High contrast AR Coating Horizontal Scan Range 30-96kHz Vertical Scan Range 48-120Hz Maximum Resolution 1800 x 1440 @ 60Hz Recommended Resolution 1280 x 1024 @ 85Hz Factory Preset Resolutions Timing Data Table (TDT) - 28 modes User Adjustable - 15 settings Color Temperature Presets 5000 Kelvin 9300 Kelvin User-adjustable sRGB Signal Inputs Analog RGB 0.7Vp-p, 75ohm...


