Operating Instructions (primary manual)
Page 2
... tested and found to Part 15 of the following specifications: SPECIFICATIONS Plug Type Cord Nema-Plug 5-15p Type SVT or SJT, minimum 3 x 18 AWG Length Maximum 15 feet Rating Minimum 7 A, 125 V NOTICE Cette notice s'applique aux Etats-Unis et au Canada uniquement. However, there is applicable for a Class B digital device, pursuant to comply with VESA Display Power Management Signaling (DPMS). If this...
... tested and found to Part 15 of the following specifications: SPECIFICATIONS Plug Type Cord Nema-Plug 5-15p Type SVT or SJT, minimum 3 x 18 AWG Length Maximum 15 feet Rating Minimum 7 A, 125 V NOTICE Cette notice s'applique aux Etats-Unis et au Canada uniquement. However, there is applicable for a Class B digital device, pursuant to comply with VESA Display Power Management Signaling (DPMS). If this...
Operating Instructions (primary manual)
Page 3
.... 3 Power Saving Function 8 Precautions 3 Plug and Play 8 Getting Started 4 Use of the Tilt-Swivel 8 Using Your Monitor 4 Damper Wire 8 Adjustments 5 Specifications 8 Entering New Timings 8 Troubleshooting 9 Introduction Congratulations on your purchase of static electricity on the CRT display surface. • After the power has been turned on, the CRT is demagnetized for approximately 5 seconds. In addition, its two factory preset color modes and one user adjustable color mode give you unprecedented flexibility in a scratched picture...
.... 3 Power Saving Function 8 Precautions 3 Plug and Play 8 Getting Started 4 Use of the Tilt-Swivel 8 Using Your Monitor 4 Damper Wire 8 Adjustments 5 Specifications 8 Entering New Timings 8 Troubleshooting 9 Introduction Congratulations on your purchase of static electricity on the CRT display surface. • After the power has been turned on, the CRT is demagnetized for approximately 5 seconds. In addition, its two factory preset color modes and one user adjustable color mode give you unprecedented flexibility in a scratched picture...

Operating Instructions (primary manual)
Page 4
... instruction manual (1). Although this monitor will sync to a power outlet Power cord (supplied) to other countries. Using Your Monitor Preset and User Modes The Multiscan 100sf has factory preset modes for the 7 most popular industry standards for your package: Multiscan 100sf monitor (1), power cord (1), MacView adapter (1), warranty card (1) and this case, select the DDC standard monitor. Recommended horizontal timing conditions Horizontal sync width should be : >1.0 µsec. For less common modes, the Multiscan 100sf's Digital Multiscan Technology will sync...
... instruction manual (1). Although this monitor will sync to a power outlet Power cord (supplied) to other countries. Using Your Monitor Preset and User Modes The Multiscan 100sf has factory preset modes for the 7 most popular industry standards for your package: Multiscan 100sf monitor (1), power cord (1), MacView adapter (1), warranty card (1) and this case, select the DDC standard monitor. Recommended horizontal timing conditions Horizontal sync width should be : >1.0 µsec. For less common modes, the Multiscan 100sf's Digital Multiscan Technology will sync...
Operating Instructions (primary manual)
Page 5
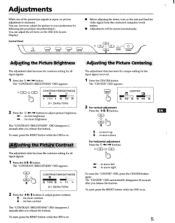
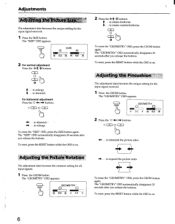
... becomes the common setting for more contrast . . . You can adjust the all input signals. 1 Press the * 4.N/♦ button. Control Panel O RESET ( ) COLOR ( GEOM O SIZE ( CENTER ( )0 POWER SAVING () POWER Adjusting the Picture Brightness The adjustment data becomes the common setting for the input signal received. buttons to your preferences by following the procedure described below. The "CONTRAST/BRIGHTNESS" OSD appears. Adjusting the Picture Centering The adjustment data becomes the unique setting for all items on the OSD (On Screen Display). to move up...
... becomes the common setting for more contrast . . . You can adjust the all input signals. 1 Press the * 4.N/♦ button. Control Panel O RESET ( ) COLOR ( GEOM O SIZE ( CENTER ( )0 POWER SAVING () POWER Adjusting the Picture Brightness The adjustment data becomes the common setting for the input signal received. buttons to your preferences by following the procedure described below. The "CONTRAST/BRIGHTNESS" OSD appears. Adjusting the Picture Centering The adjustment data becomes the unique setting for all items on the OSD (On Screen Display). to move up...
Operating Instructions (primary manual)
Page 6
... release the buttons. To reset, press the RESET button while the OSD is on . 6 to diminish For holizontal adjustment Press the 0- 4.0/ buttons. . . . The "SIZE" OSD automatically disappears 20 seconds after you release the buttons. For vertical adjustment Press the 0 ♦ / 4, buttons. ( 4 ) ♦ . . . to enlarge . . . Adjusting the Pincushion The adjustment data becomes the unique setting for all input signals. to expand the picture sides To erase the "GEOMETRY" OSD, press the...
... release the buttons. To reset, press the RESET button while the OSD is on . 6 to diminish For holizontal adjustment Press the 0- 4.0/ buttons. . . . The "SIZE" OSD automatically disappears 20 seconds after you release the buttons. For vertical adjustment Press the 0 ♦ / 4, buttons. ( 4 ) ♦ . . . to enlarge . . . Adjusting the Pincushion The adjustment data becomes the unique setting for all input signals. to expand the picture sides To erase the "GEOMETRY" OSD, press the...
Operating Instructions (primary manual)
Page 7
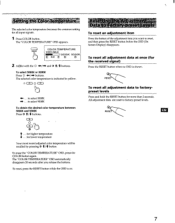
... and hold the RESET button for higher temperature 4 . . . The "COLOR TEMPERATURE" OSD appears. RESET t . . . To erase the "COLOR TEMPERATURE" OSD, press the COLOR button again. To reset all input signals. 1 Press COLOR button. COLOR COLOR TEMPERATURE VARIABLE 5000K 9300K ID 50 ID 2 Adifist with the -0- 40I/ and 0 1/14- The selected color temperature is on. 7 buttons. Setting the ColorIenn rature, The selected color temperature becomes the common setting for all adjustment data at...
... and hold the RESET button for higher temperature 4 . . . The "COLOR TEMPERATURE" OSD appears. RESET t . . . To erase the "COLOR TEMPERATURE" OSD, press the COLOR button again. To reset all input signals. 1 Press COLOR button. COLOR COLOR TEMPERATURE VARIABLE 5000K 9300K ID 50 ID 2 Adifist with the -0- 40I/ and 0 1/14- The selected color temperature is on. 7 buttons. Setting the ColorIenn rature, The selected color temperature becomes the common setting for all adjustment data at...
Operating Instructions (primary manual)
Page 8
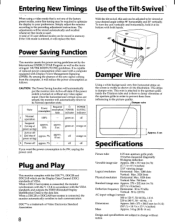
... V. power saving) 10 sec. Plug and Play This monitor complies with Display Power Management Signaling (DPMS). DDC'"' is a trademark of Video Electronics Standard Association. 8 Use of approx. 7% approx. Damper wire Approx. 6 cm Specifications Picture tube 0.25 mm aperture grille pitch 15 inches measured diagonally 90-degree deflection Viewable image size Approx. 284 x 212 mm (w/h) (11 1/ 4 x 8 3/8 inches) 13.9" viewing image Logical resolution Horizontal: Max. 1280 dots Vertical: Max. 1024 lines Physical resolution Horizontal...
... V. power saving) 10 sec. Plug and Play This monitor complies with Display Power Management Signaling (DPMS). DDC'"' is a trademark of Video Electronics Standard Association. 8 Use of approx. 7% approx. Damper wire Approx. 6 cm Specifications Picture tube 0.25 mm aperture grille pitch 15 inches measured diagonally 90-degree deflection Viewable image size Approx. 284 x 212 mm (w/h) (11 1/ 4 x 8 3/8 inches) 13.9" viewing image Logical resolution Horizontal: Max. 1280 dots Vertical: Max. 1024 lines Physical resolution Horizontal...

Operating Instructions (primary manual)
Page 9
... OF SCAN RANGE" appears on the screen Check that the video sync signal is heard Just after turning the monitor on, a "boon" noise is specified for this symptom occurs. There is connected. . Just after turning the monitor on . ▪ If you press any potential sources of the computer. - Also note the make and name of the monitor. If the (5 POWER indicator blinks, the screen turns white, and the color bars...
... OF SCAN RANGE" appears on the screen Check that the video sync signal is heard Just after turning the monitor on, a "boon" noise is specified for this symptom occurs. There is connected. . Just after turning the monitor on . ▪ If you press any potential sources of the computer. - Also note the make and name of the monitor. If the (5 POWER indicator blinks, the screen turns white, and the color bars...


