Operating Instructions
Page 4
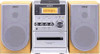
... This format records data on the first track and audio (audio CD data) on this system. In this system cannot play back the following formats: - A Multi Session CD is used for model CMT-NE5 and CMT-NE3. This unit supports up to 10 sessions. Discs that has the adhesive, cellophane tape, or... format of the writing software, etc. 2) Multi Session This is clearly indicated in the text, for example, "CMT-NE5 only". • This manual mainly explains operations using the remote, but the same operations can play • CD-ROMs • CD-Rs/CD-RWs other than eight characters....
... This format records data on the first track and audio (audio CD data) on this system. In this system cannot play back the following formats: - A Multi Session CD is used for model CMT-NE5 and CMT-NE3. This unit supports up to 10 sessions. Discs that has the adhesive, cellophane tape, or... format of the writing software, etc. 2) Multi Session This is clearly indicated in the text, for example, "CMT-NE5 only". • This manual mainly explains operations using the remote, but the same operations can play • CD-ROMs • CD-Rs/CD-RWs other than eight characters....
Operating Instructions
Page 7
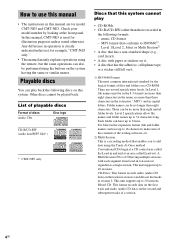
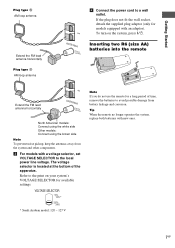
... Note If you do not use the remote for models equipped with new ones. * * Saudi Arabian model: 120 - 127 V 7GB The voltage selector is located at the bottom of time, remove the batteries to avoid possible damage from the system and other components. 3 For models with a voltage selector..., set VOLTAGE SELECTOR to a wall outlet. Tip When the remote no longer operates the system, replace both batteries with an adaptor). If the plug does not fit ...
... Note If you do not use the remote for models equipped with new ones. * * Saudi Arabian model: 120 - 127 V 7GB The voltage selector is located at the bottom of time, remove the batteries to avoid possible damage from the system and other components. 3 For models with a voltage selector..., set VOLTAGE SELECTOR to a wall outlet. Tip When the remote no longer operates the system, replace both batteries with an adaptor). If the plug does not fit ...
Operating Instructions
Page 8
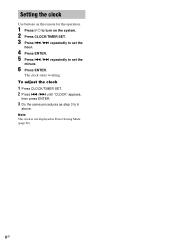
The clock starts working. Note The clock is not displayed in Power Saving Mode (page 20). 8GB To adjust the clock 1 Press CLOCK/TIMER SET. 2 Press ./> until "CLOCK" appears, then press ENTER. 3 Do the same procedures as step 3 to set the hour. 4 Press ENTER. 5 Press ./> repeatedly to 6 above. Setting the clock Use buttons on the remote for the operation. 1 Press ?/1 to turn on the system. 2 Press CLOCK/TIMER SET. 3 Press ./> repeatedly to set the minute. 6 Press ENTER.
The clock starts working. Note The clock is not displayed in Power Saving Mode (page 20). 8GB To adjust the clock 1 Press CLOCK/TIMER SET. 2 Press ./> until "CLOCK" appears, then press ENTER. 3 Do the same procedures as step 3 to set the hour. 4 Press ENTER. 5 Press ./> repeatedly to 6 above. Setting the clock Use buttons on the remote for the operation. 1 Press ?/1 to turn on the system. 2 Press CLOCK/TIMER SET. 3 Press ./> repeatedly to set the minute. 6 Press ENTER.
Operating Instructions
Page 10
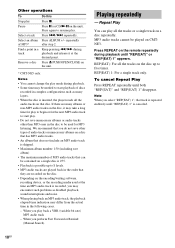
.... To cancel Repeat Play Press REPEAT repeatedly until "REP(EAT) 1" is inserted, the player reads all the tracks or a single track on the unit. * CMT-NE5 only. Note When you may encounter such problems as many albums or non-MP3 audio tracks on that they are played back in complex... repeatedly. Pause Press X (or CD/NX on CMTNE3. Remove a disc Press Z PUSH OPEN/CLOSE on a disc repeatedly. Repeat Play You can be contained on the remote repeatedly during playback. • Some time may differ from the actual time in the disc to be needed to five times. REP(EAT): For all...
.... To cancel Repeat Play Press REPEAT repeatedly until "REP(EAT) 1" is inserted, the player reads all the tracks or a single track on the unit. * CMT-NE5 only. Note When you may encounter such problems as many albums or non-MP3 audio tracks on that they are played back in complex... repeatedly. Pause Press X (or CD/NX on CMTNE3. Remove a disc Press Z PUSH OPEN/CLOSE on a disc repeatedly. Repeat Play You can be contained on the remote repeatedly during playback. • Some time may differ from the actual time in the disc to be needed to five times. REP(EAT): For all...
Operating Instructions
Page 11
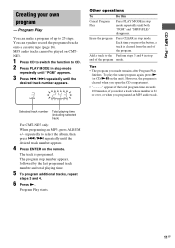
... this Cancel Program Play Press PLAY MODE in stop end of the program. To play the same program again, press N (or CD/NX on the remote. However, the program is programed. Play Creating your own program - Tips • The program you open the CD compartment. Erase the program Press CLEAR in...)" disappears. Program Play You can synchro record the programed tracks onto a cassette tape (page 16). Selected track number Total playing time (including selected track) For CMT-NE5 only: When programing an MP3, press ALBUM +/-
... this Cancel Program Play Press PLAY MODE in stop end of the program. To play the same program again, press N (or CD/NX on the remote. However, the program is programed. Play Creating your own program - Tips • The program you open the CD compartment. Erase the program Press CLEAR in...)" disappears. Program Play You can synchro record the programed tracks onto a cassette tape (page 16). Selected track number Total playing time (including selected track) For CMT-NE5 only: When programing an MP3, press ALBUM +/-
Operating Instructions
Page 17
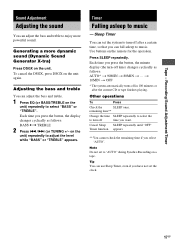
...Other operations To Press Check the SLEEP once. Timer Falling asleep to "AUTO" during Synchro Recording on the unit. Note Do not set the system to enjoy more dynamic sound (Dynamic Sound Generator X-tra) Press DSGX on a tape. Press SLEEP repeatedly. Cancel Sleep SLEEP repeatedly until "...Press ./> (or TUNING +/- Each time you want. Use buttons on the unit again. Tape - To cancel the DSGX, press DSGX on the remote for the operation. Recording/Sound Adjustment/Timer Sound Adjustment Adjusting the sound You can use Sleep Timer, even if you can adjust the bass and...
...Other operations To Press Check the SLEEP once. Timer Falling asleep to "AUTO" during Synchro Recording on the unit. Note Do not set the system to enjoy more dynamic sound (Dynamic Sound Generator X-tra) Press DSGX on a tape. Press SLEEP repeatedly. Cancel Sleep SLEEP repeatedly until "...Press ./> (or TUNING +/- Each time you want. Use buttons on the unit again. Tape - To cancel the DSGX, press DSGX on the remote for the operation. Recording/Sound Adjustment/Timer Sound Adjustment Adjusting the sound You can use Sleep Timer, even if you can adjust the bass and...
Operating Instructions
Page 18
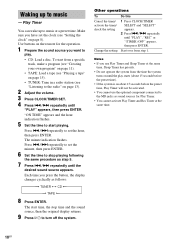
... station (see "Setting the clock" on about 15 seconds before the preset time, Play Timer will not be activated. • You cannot use the optional component connected to set the hour, then press ENTER. Make sure you press the button, the display changes cyclically as step 5. 7 Press ./> repeatedly until "PLAY...: t TUNER y CD T t TAPE T 8 Press ENTER. Use buttons on until "PLAY" appears, then press ENTER. The start playing. Start over from the time the system turns on the remote for Play Timer. • You cannot activate Play Timer and Rec Timer at the same time. 18GB
... station (see "Setting the clock" on about 15 seconds before the preset time, Play Timer will not be activated. • You cannot use the optional component connected to set the hour, then press ENTER. Make sure you press the button, the display changes cyclically as step 5. 7 Press ./> repeatedly until "PLAY...: t TUNER y CD T t TAPE T 8 Press ENTER. Use buttons on until "PLAY" appears, then press ENTER. The start playing. Start over from the time the system turns on the remote for Play Timer. • You cannot activate Play Timer and Rec Timer at the same time. 18GB
Operating Instructions
Page 19
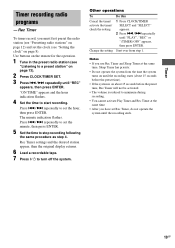
...preset station" on page 13). 2 Press CLOCK/TIMER SET. 3 Press ./> repeatedly until "REC" appears, then press ENTER. Press ./> repeatedly to turn off the system. Other operations To Cancel the timer/ activate the timer/ check the setting Change the setting Do this 1 Press CLOCK/TIMER SELECT and "SELECT" appears. 2 Press... record, you use Rec Timer and Sleep Timer at the same time, Sleep Timer has priority. • Do not operate the system from step 1. Use buttons on the remote for the operation. 1 Tune in the preset radio station (see "Setting the clock" on page 12) and set the clock ...
...preset station" on page 13). 2 Press CLOCK/TIMER SET. 3 Press ./> repeatedly until "REC" appears, then press ENTER. Press ./> repeatedly to turn off the system. Other operations To Cancel the timer/ activate the timer/ check the setting Change the setting Do this 1 Press CLOCK/TIMER SELECT and "SELECT" appears. 2 Press... record, you use Rec Timer and Sleep Timer at the same time, Sleep Timer has priority. • Do not operate the system from step 1. Use buttons on the remote for the operation. 1 Tune in the preset radio station (see "Setting the clock" on page 12) and set the clock ...

Operating Instructions
Page 22
...Check the speaker connections (page 6). The remote does not function. • Remove the obstacle. • Move the remote closer to the system. • Point the remote at the system's sensor. • Replace the batteries (R6/size AA). • Locate the system away from the source of the above ...items and fix any problems found even after doing all the above , consult your nearest Sony dealer...
...Check the speaker connections (page 6). The remote does not function. • Remove the obstacle. • Move the remote closer to the system. • Point the remote at the system's sensor. • Replace the batteries (R6/size AA). • Locate the system away from the source of the above ...items and fix any problems found even after doing all the above , consult your nearest Sony dealer...
Operating Instructions
Page 29
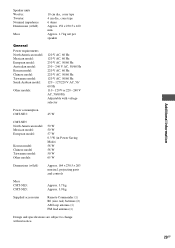
...127/220 V AC, 50/ 60 Hz 110 - 120 V or 220 - 240 V AC, 50/60 Hz Adjustable with voltage selector Power consumption CMT-NE3: 45 W CMT-NE5 North American model: Mexican model: European model: Korean model: Chinese model Taiwanese model: Other models: 50 W 50 W 57 W 0.3 W ...W 50 W 65 W Dimensions (w/h/d) Approx. 164 × 230.5 × 263 mm incl. projecting parts and controls Mass CMT-NE3: CMT-NE5: Approx. 3.7 kg Approx. 3.9 kg Supplied accessories Remote Commander (1) R6 (size AA) batteries (2) AM loop antenna (1) FM lead antenna (1) Design and specifications are subject to change ...
...127/220 V AC, 50/ 60 Hz 110 - 120 V or 220 - 240 V AC, 50/60 Hz Adjustable with voltage selector Power consumption CMT-NE3: 45 W CMT-NE5 North American model: Mexican model: European model: Korean model: Chinese model Taiwanese model: Other models: 50 W 50 W 57 W 0.3 W ...W 50 W 65 W Dimensions (w/h/d) Approx. 164 × 230.5 × 263 mm incl. projecting parts and controls Mass CMT-NE3: CMT-NE5: Approx. 3.7 kg Approx. 3.9 kg Supplied accessories Remote Commander (1) R6 (size AA) batteries (2) AM loop antenna (1) FM lead antenna (1) Design and specifications are subject to change ...
Operating Instructions
Page 30
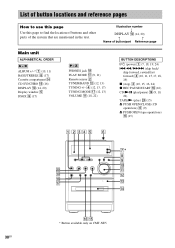
...20) R R Name of the system that are mentioned in the text. O ALBUM +/-* 7 (10, 11) BASS/TREBLE 8 (17) Cassette compartment qf CD SYNCHRO qg (16) DISPLAY 0 (14, 20) Display window 5 DSGX 9 (17) P - qa ql qs qk qj qd qf 30GB qh qg * Button available only on CMT-NE5. List of button locations... and reference pages How to use this page Use this page to find the location of buttons and other parts of button/part Reference page Main unit ALPHABETICAL ORDER A - Z PHONES jack qk PLAY MODE qj (9, 11) Remote sensor 2 TUNER/BAND...
...20) R R Name of the system that are mentioned in the text. O ALBUM +/-* 7 (10, 11) BASS/TREBLE 8 (17) Cassette compartment qf CD SYNCHRO qg (16) DISPLAY 0 (14, 20) Display window 5 DSGX 9 (17) P - qa ql qs qk qj qd qf 30GB qh qg * Button available only on CMT-NE5. List of button locations... and reference pages How to use this page Use this page to find the location of buttons and other parts of button/part Reference page Main unit ALPHABETICAL ORDER A - Z PHONES jack qk PLAY MODE qj (9, 11) Remote sensor 2 TUNER/BAND...

Operating Instructions
Page 31
Remote control ALPHABETICAL ORDER A - O ALBUM +/- Z PLAY MODE qk (9, 11) REPEAT 4 (10) SLEEP w; (17) TAPE qg (15, 18) TUNER/BAND 5 (12, 13, 18) TUNER MEMORY qj (12) .../go forward) qf (8, 10, 11, 18, 19) x (stop) 8 (10, 15, 16, 24) X (pause) 8 (10, 15) N (play) 8 (9, 11, 15, 22) +/- (tuning) qf (12, 13) Additional Information CMT-NE3 w; 1 CMT-NE5 w; 1 ql 2 ql 2 qk 3 qk 3 qj 4 qj 4 qh 5 qh 5 qg 6 qg 6 qf 7 qf 7 8 8 qd 9 qd 9 qs * qs * 0 0 qa * Button does not function with this model...
Remote control ALPHABETICAL ORDER A - O ALBUM +/- Z PLAY MODE qk (9, 11) REPEAT 4 (10) SLEEP w; (17) TAPE qg (15, 18) TUNER/BAND 5 (12, 13, 18) TUNER MEMORY qj (12) .../go forward) qf (8, 10, 11, 18, 19) x (stop) 8 (10, 15, 16, 24) X (pause) 8 (10, 15) N (play) 8 (9, 11, 15, 22) +/- (tuning) qf (12, 13) Additional Information CMT-NE3 w; 1 CMT-NE5 w; 1 ql 2 ql 2 qk 3 qk 3 qj 4 qj 4 qh 5 qh 5 qg 6 qg 6 qf 7 qf 7 8 8 qd 9 qd 9 qs * qs * 0 0 qa * Button does not function with this model...


