Operating Instructions
Page 1
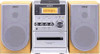
4-253-397-11(2) Micro Hi-Fi Component System Operating Instructions Owner's Record The model and serial numbers are located on the rear of the unit. Refer to them whenever you call upon your Sony dealer regarding this product. Model No Serial No CMT-NE5 CMT-NE3 ©2004 Sony Corporation Record the serial number in the space provided below.
4-253-397-11(2) Micro Hi-Fi Component System Operating Instructions Owner's Record The model and serial numbers are located on the rear of the unit. Refer to them whenever you call upon your Sony dealer regarding this product. Model No Serial No CMT-NE5 CMT-NE3 ©2004 Sony Corporation Record the serial number in the space provided below.
Operating Instructions
Page 2
... harmful interference to Part 15 of it correctly as a CLASS 1 LASER product. This equipment generates, uses, and can be of sufficient magnitude to constitute a risk of important operating and maintenance (servicing) instructions in this manual could void your authority to operate this product meets the ENERGY STAR® guidelines for a Class B digital device, pursuant to radio communications. Connect the equipment...
... harmful interference to Part 15 of it correctly as a CLASS 1 LASER product. This equipment generates, uses, and can be of sufficient magnitude to constitute a risk of important operating and maintenance (servicing) instructions in this manual could void your authority to operate this product meets the ENERGY STAR® guidelines for a Class B digital device, pursuant to radio communications. Connect the equipment...
Operating Instructions
Page 3
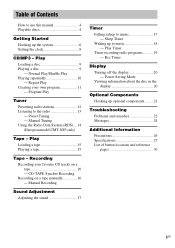
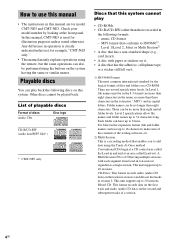
...European model CMT-NE5 only) Tape - CD-TAPE Synchro Recording Recording on a tape 16 - Play Loading a tape 15 Playing a tape 15 Tape - Manual Recording Sound Adjustment Adjusting the sound 17 Timer Falling asleep to the radio 13 - Rec Timer Display Turning off the display 20 - Program Play Tuner Presetting radio stations 12 Listening to music 17 - Recording Recording your own program 11 - Play Timer Timer recording radio programs........... 19 - Play Loading a disc 9 Playing a disc 9 - Sleep Timer Waking up optional components......... 21 Troubleshooting Problems...
...European model CMT-NE5 only) Tape - CD-TAPE Synchro Recording Recording on a tape 16 - Play Loading a tape 15 Playing a tape 15 Tape - Manual Recording Sound Adjustment Adjusting the sound 17 Timer Falling asleep to the radio 13 - Rec Timer Display Turning off the display 20 - Program Play Tuner Presetting radio stations 12 Listening to music 17 - Recording Recording your own program 11 - Play Timer Timer recording radio programs........... 19 - Play Loading a disc 9 Playing a disc 9 - Sleep Timer Waking up optional components......... 21 Troubleshooting Problems...
Operating Instructions
Page 4
... the writing software, etc. 2) Multi Session This is used for model CMT-NE5 and CMT-NE3. This unit supports up to 10 sessions. In this manual, CMT-NE5 is a recording method that enables you to add data using the buttons on the system having multiple sessions, with paper or stickers on it. • A disc that has the adhesive, cellophane tape, or a sticker still left...
... the writing software, etc. 2) Multi Session This is used for model CMT-NE5 and CMT-NE3. This unit supports up to 10 sessions. In this manual, CMT-NE5 is a recording method that enables you to add data using the buttons on the system having multiple sessions, with paper or stickers on it. • A disc that has the adhesive, cellophane tape, or a sticker still left...
Operating Instructions
Page 7
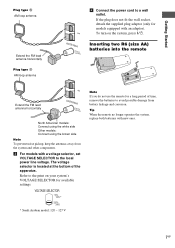
... remote no longer operates the system, replace both batteries with a voltage selector, set VOLTAGE SELECTOR to the local power line voltage. If the plug does not fit the wall socket, detach the supplied plug adaptor (only for a long period of the apparatus. Getting Started Plug type B AM loop antenna Extend the FM lead antenna horizontally Plug type C AM loop antenna AM ANTENNA FCMOA7X5IAL 4 Connect the power cord...
... remote no longer operates the system, replace both batteries with a voltage selector, set VOLTAGE SELECTOR to the local power line voltage. If the plug does not fit the wall socket, detach the supplied plug adaptor (only for a long period of the apparatus. Getting Started Plug type B AM loop antenna Extend the FM lead antenna horizontally Plug type C AM loop antenna AM ANTENNA FCMOA7X5IAL 4 Connect the power cord...
Operating Instructions
Page 12
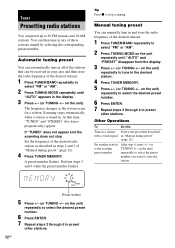
... the existing preset number After step 4, press +/- (or TUNING +/- Manual tuning preset You can manually tune in and store the radio frequency of the desired radio station as the system scans for stereo program only) appear. Set another station to select "FM" or "AM". 2 Press TUNING MODE on the unit) repeatedly to 20 FM stations and 10 AM stations. Tuner Presetting radio stations You can preset up to tune in the desired station. 4 Press TUNER MEMORY. 5 Press +/- (or TUNING +/- If "TUNED" does...
... the existing preset number After step 4, press +/- (or TUNING +/- Manual tuning preset You can manually tune in and store the radio frequency of the desired radio station as the system scans for stereo program only) appear. Set another station to select "FM" or "AM". 2 Press TUNING MODE on the unit) repeatedly to 20 FM stations and 10 AM stations. Tuner Presetting radio stations You can preset up to tune in the desired station. 4 Press TUNER MEMORY. 5 Press +/- (or TUNING +/- If "TUNED" does...
Operating Instructions
Page 13
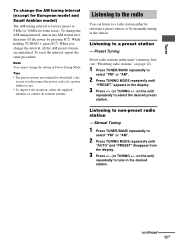
... "Presetting radio stations" on page 12). 1 Press TUNER/BAND repeatedly to select "FM" or "AM". 2 Press TUNING MODE repeatedly until "PRESET" appears in the station. Manual Tuning 1 Press TUNER/BAND repeatedly to select "FM" or "AM". 2 Press TUNING MODE repeatedly until "AUTO" and "PRESET" disappear from the display. 3 Press +/- (or TUNING +/- When you disconnect the power cord or if a power failure occurs. • To improve the reception, adjust the supplied antennas or connect an external antenna...
... "Presetting radio stations" on page 12). 1 Press TUNER/BAND repeatedly to select "FM" or "AM". 2 Press TUNING MODE repeatedly until "PRESET" appears in the station. Manual Tuning 1 Press TUNER/BAND repeatedly to select "FM" or "AM". 2 Press TUNING MODE repeatedly until "AUTO" and "PRESET" disappear from the display. 3 Press +/- (or TUNING +/- When you disconnect the power cord or if a power failure occurs. • To improve the reception, adjust the supplied antennas or connect an external antenna...
Operating Instructions
Page 14
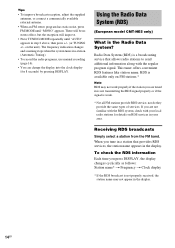
... • To improve broadcast reception, adjust the supplied antennas, or connect a commercially available external antenna. • When an FM stereo program has static noise, press FM MODE until "AUTO" appears in the display. Using the Radio Data System (RDS) (European model CMT-NE5 only) What is not properly received, the station name may not work properly if the station you tune in a station that allows radio stations to send additional information along...
... • To improve broadcast reception, adjust the supplied antennas, or connect a commercially available external antenna. • When an FM stereo program has static noise, press FM MODE until "AUTO" appears in the display. Using the Radio Data System (RDS) (European model CMT-NE5 only) What is not properly received, the station name may not work properly if the station you tune in a station that allows radio stations to send additional information along...
Operating Instructions
Page 16
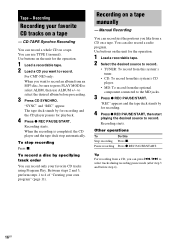
... Press x. Manual Recording You can record a whole CD on a tape. "REC" appears and the tape deck stands by for the operation. 1 Load a recordable tape. 2 Select the desired source to record. • TUNER: To record from this system's tuner. • CD: To record from an MP3 disc, be sure to press PLAY MODE to record. You can also record a radio program. Recording starts. You can use ALBUM +/- Tip...
... Press x. Manual Recording You can record a whole CD on a tape. "REC" appears and the tape deck stands by for the operation. 1 Load a recordable tape. 2 Select the desired source to record. • TUNER: To record from this system's tuner. • CD: To record from an MP3 disc, be sure to press PLAY MODE to record. You can also record a radio program. Recording starts. You can use ALBUM +/- Tip...
Operating Instructions
Page 17
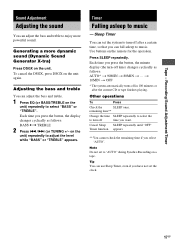
... not set to music - Sleep Timer You can fall asleep to select "BASS" or "TREBLE". Use buttons on the unit. t 10MIN t OFF * The system automatically turns off in 100 minutes or after a certain time, so that you press the button, the minute display (the turn off time) changes cyclically as follows: BASS y TREBLE 2 Press ./> (or TUNING +/- Each time you can set the system to turn -off after the current CD or tape finishes playing...
... not set to music - Sleep Timer You can fall asleep to select "BASS" or "TREBLE". Use buttons on the unit. t 10MIN t OFF * The system automatically turns off in 100 minutes or after a certain time, so that you press the button, the minute display (the turn off time) changes cyclically as follows: BASS y TREBLE 2 Press ./> (or TUNING +/- Each time you can set the system to turn -off after the current CD or tape finishes playing...
Operating Instructions
Page 18
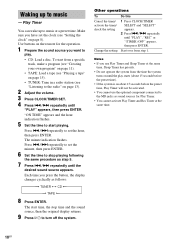
... component connected to music - The minute indication flashes. Press ./> repeatedly to set the minute, then press ENTER. 6 Set the time to music at the same time. 18GB "ON TIME" appears and the hour indication flashes. 5 Set the time to turn off the system. Each time you press the button, the display changes cyclically as follows: t TUNER y CD T t TAPE T 8 Press ENTER. Play Timer You can wake up to the MD jacks as sound sources for the operation...
... component connected to music - The minute indication flashes. Press ./> repeatedly to set the minute, then press ENTER. 6 Set the time to music at the same time. 18GB "ON TIME" appears and the hour indication flashes. 5 Set the time to turn off the system. Each time you press the button, the display changes cyclically as follows: t TUNER y CD T t TAPE T 8 Press ENTER. Play Timer You can wake up to the MD jacks as sound sources for the operation...
Operating Instructions
Page 19
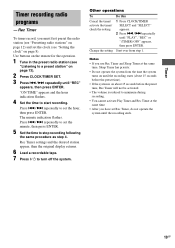
... ENTER. Use buttons on page 13). 2 Press CLOCK/TIMER SET. 3 Press ./> repeatedly until the recording starts (about 15 seconds before the preset time, Rec Timer will not be activated. • The volume is reduced to start recording. Press ./> repeatedly to a preset station" on the remote for the operation. 1 Tune in the preset radio station (see "Listening to set Rec Timer, do not operate the system until "PLAY", "REC...
... ENTER. Use buttons on page 13). 2 Press CLOCK/TIMER SET. 3 Press ./> repeatedly until the recording starts (about 15 seconds before the preset time, Rec Timer will not be activated. • The volume is reduced to start recording. Press ./> repeatedly to a preset station" on the remote for the operation. 1 Tune in the preset radio station (see "Listening to set Rec Timer, do not operate the system until "PLAY", "REC...
Operating Instructions
Page 20
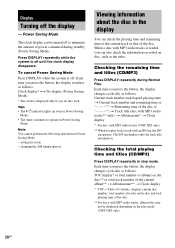
... press the button, the display changes cyclically as the titles. changing the AM tuning interval Viewing information about the disc in Power Saving Mode. Checking the remaining time and titles (CD/MP3) Press DISPLAY repeatedly during standby (Power Saving Mode). Note You cannot perform the following operations in stop mode. Checking the total playing time and titles (CD/MP3) Press DISPLAY repeatedly in Power Saving Mode. - displays current disc number, total number of tracks...
... press the button, the display changes cyclically as the titles. changing the AM tuning interval Viewing information about the disc in Power Saving Mode. Checking the remaining time and titles (CD/MP3) Press DISPLAY repeatedly during standby (Power Saving Mode). Note You cannot perform the following operations in stop mode. Checking the total playing time and titles (CD/MP3) Press DISPLAY repeatedly in Power Saving Mode. - displays current disc number, total number of tracks...

Operating Instructions
Page 22
... channel, or unbalanced left and right volumes are not connected. • Check the speaker connections (page 6). CD/MP3 player The sound drops out. • The lens is the voltage selector set correctly. After ?/1 indicator stops flashing, reconnect the power cord and turn VOLUME on the TV screen is loaded. • Wipe the disc clean (page 26). • Replace the disc. • Load the disc that this system can play . 22GB Set...
... channel, or unbalanced left and right volumes are not connected. • Check the speaker connections (page 6). CD/MP3 player The sound drops out. • The lens is the voltage selector set correctly. After ?/1 indicator stops flashing, reconnect the power cord and turn VOLUME on the TV screen is loaded. • Wipe the disc clean (page 26). • Replace the disc. • Load the disc that this system can play . 22GB Set...
Operating Instructions
Page 23
... that conforms with bass sounds at high volume, the speaker vibration may take longer to play back than MPEG1, 2 Audio Layer-3 files cannot be received in MP3 format. • Discs containing tracks other components. • Consult your nearest Sony dealer if the supplied AM antenna has come off the plastic stand. • Try turning off surrounding electrical equipment. if the cords are dirty. The...
... that conforms with bass sounds at high volume, the speaker vibration may take longer to play back than MPEG1, 2 Audio Layer-3 files cannot be received in MP3 format. • Discs containing tracks other components. • Consult your nearest Sony dealer if the supplied AM antenna has come off the plastic stand. • Try turning off surrounding electrical equipment. if the cords are dirty. The...
Operating Instructions
Page 24
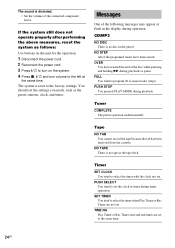
... disc in the player. You should set the settings you made, such as follows: Use buttons on the unit for the operation. 1 Disconnect the power cord. 2 Reconnect the power cord. 3 Press ?/1 to turn on the system. 4 Press x, ?/1 and turn volume to select the timer when Play Timer or Rec Timer are set the clock or timer during playback or pause. FULL You tried to the factory settings. NO TAPE There is reset...
... disc in the player. You should set the settings you made, such as follows: Use buttons on the unit for the operation. 1 Disconnect the power cord. 2 Reconnect the power cord. 3 Press ?/1 to turn on the system. 4 Press x, ?/1 and turn volume to select the timer when Play Timer or Rec Timer are set the clock or timer during playback or pause. FULL You tried to the factory settings. NO TAPE There is reset...
Operating Instructions
Page 26
... used : - Never pull the cord itself has been turned off. • Unplug the system from the center out. • Do not use discs encircled with the voltage of your local power supply. • The voltage selector is located at the qualified service shop. Subject to be played on the label side of the disc or that used discs with mild detergent solution. On operation...
... used : - Never pull the cord itself has been turned off. • Unplug the system from the center out. • Do not use discs encircled with the voltage of your local power supply. • The voltage selector is located at the qualified service shop. Subject to be played on the label side of the disc or that used discs with mild detergent solution. On operation...
Operating Instructions
Page 27
... the parts of use . For details, refer to the instructions of the demagnetizing cassette. For details, refer to 30 hours of the tape deck and become damaged. Specifications AUDIO POWER SPECIFICATIONS POWER OUTPUT AND TOTAL HARMONIC DISTORTION: (The United States model only) With 6 ohm loads, both channels driven, from side A or B as play, stop, and fast-winding frequently. Main unit Amplifier section CMT-NE3 North American model: Continuous RMS power output...
... the parts of use . For details, refer to the instructions of the demagnetizing cassette. For details, refer to 30 hours of the tape deck and become damaged. Specifications AUDIO POWER SPECIFICATIONS POWER OUTPUT AND TOTAL HARMONIC DISTORTION: (The United States model only) With 6 ohm loads, both channels driven, from side A or B as play, stop, and fast-winding frequently. Main unit Amplifier section CMT-NE3 North American model: Continuous RMS power output...
Operating Instructions
Page 28
... Tape deck section CMT-NE3 Recording system Frequency response 4-track 2-channel, stereo 50 - 13,000 Hz (±3 dB), using Sony TYPE I cassettes Wow and flutter ±0.15% W. Peak (IEC) 0.1% W. RMS (NAB) ±0.2% W. Peak (DIN) CMT-NE5 Recording system Frequency response Wow and flutter 4-track 2-channel, stereo 50 - 13,000 Hz (±3 dB), using Sony TYPE I cassettes ±0.15% W. (6 ohms at 1 kHz, 10% THD) European model: DIN power output (rated): 16 + 16 W (6 ohms...
... Tape deck section CMT-NE3 Recording system Frequency response 4-track 2-channel, stereo 50 - 13,000 Hz (±3 dB), using Sony TYPE I cassettes Wow and flutter ±0.15% W. Peak (IEC) 0.1% W. RMS (NAB) ±0.2% W. Peak (DIN) CMT-NE5 Recording system Frequency response Wow and flutter 4-track 2-channel, stereo 50 - 13,000 Hz (±3 dB), using Sony TYPE I cassettes ±0.15% W. (6 ohms at 1 kHz, 10% THD) European model: DIN power output (rated): 16 + 16 W (6 ohms...

Operating Instructions
Page 31
... (11) CLOCK/TIMER SELECT 2 (18, 19) CLOCK/TIMER SET 3 (8, 18, 19) DISPLAY ql (14, 20) ENTER 9 (8, 11, 12, 18, 19) EQ qs (17) FM MODE 4 (13) FUNCTION 6 (21) P - Remote control ALPHABETICAL ORDER A - O ALBUM +/- Z PLAY MODE qk (9, 11) REPEAT 4 (10) SLEEP w; (17) TAPE qg (15, 18) TUNER/BAND 5 (12, 13, 18) TUNER MEMORY qj (12) TUNING MODE qk (12, 13) VOLUME +/- 0 (18, 22) BUTTON DESCRIPTIONS ?/1 (power) 1 (7, 18, 19...
... (11) CLOCK/TIMER SELECT 2 (18, 19) CLOCK/TIMER SET 3 (8, 18, 19) DISPLAY ql (14, 20) ENTER 9 (8, 11, 12, 18, 19) EQ qs (17) FM MODE 4 (13) FUNCTION 6 (21) P - Remote control ALPHABETICAL ORDER A - O ALBUM +/- Z PLAY MODE qk (9, 11) REPEAT 4 (10) SLEEP w; (17) TAPE qg (15, 18) TUNER/BAND 5 (12, 13, 18) TUNER MEMORY qj (12) TUNING MODE qk (12, 13) VOLUME +/- 0 (18, 22) BUTTON DESCRIPTIONS ?/1 (power) 1 (7, 18, 19...


