Primary User Manual
Page 3
...Presetting radio stations 9 Listening to the radio 11 Using the Radio Data System (RDS)* .... 11 Tape Loading a tape 12 Playing a tape 12 Recording to music - Daily Timer 16 Optional Components Hooking up the system 6 Inserting two size-AA (R6) batteries into the remote control ... 14 Sound Adjustment Adjusting the sound 15 Display Using the display 16 Other Features Falling asleep to audio from a connected component 18 Recording on a connected component ... 18 Troubleshooting Problems and remedies 19 Additional Information Precautions 21 Specifications 22 * European model only ...
...Presetting radio stations 9 Listening to the radio 11 Using the Radio Data System (RDS)* .... 11 Tape Loading a tape 12 Playing a tape 12 Recording to music - Daily Timer 16 Optional Components Hooking up the system 6 Inserting two size-AA (R6) batteries into the remote control ... 14 Sound Adjustment Adjusting the sound 15 Display Using the display 16 Other Features Falling asleep to audio from a connected component 18 Recording on a connected component ... 18 Troubleshooting Problems and remedies 19 Additional Information Precautions 21 Specifications 22 * European model only ...
Primary User Manual
Page 13
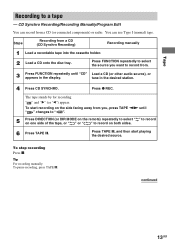
Press FUNCTION repeatedly to record from a CD (or connected components) or radio. " " and "B" (or "b") appear. To start playing the desired source. Tape Recording to record on the side facing away from a CD (CD Synchro Recording) .... 2 Load a CD onto the disc tray. Steps Recording from you want to select the source you , press TAPE nN until "CD" Load a CD (or other audio source), or appears in the desired station. 4 Press CD SYNCHRO. Press z REC. Tip For recording manually: To pause recording, press TAPE X. Press TAPE X, and then...
Press FUNCTION repeatedly to record from a CD (or connected components) or radio. " " and "B" (or "b") appear. To start playing the desired source. Tape Recording to record on the side facing away from a CD (CD Synchro Recording) .... 2 Load a CD onto the disc tray. Steps Recording from you want to select the source you , press TAPE nN until "CD" Load a CD (or other audio source), or appears in the desired station. 4 Press CD SYNCHRO. Press z REC. Tip For recording manually: To pause recording, press TAPE X. Press TAPE X, and then...
Primary User Manual
Page 18
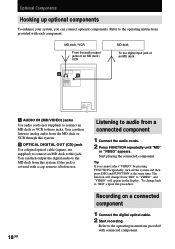
... jacks. B OPTICAL DIGITAL OUT (CD) jack Use a digital optical cable (square, not supplied) to connect an MD deck to audio from this jack. Optional Components Hooking up optional components To enhance your system, you cannot select "VIDEO" by pressing FUNCTION repeatedly, turn off the system and then press DSG and FUNCTION at the same time.
... jacks. B OPTICAL DIGITAL OUT (CD) jack Use a digital optical cable (square, not supplied) to connect an MD deck to audio from this jack. Optional Components Hooking up optional components To enhance your system, you cannot select "VIDEO" by pressing FUNCTION repeatedly, turn off the system and then press DSG and FUNCTION at the same time.
Primary User Manual
Page 22
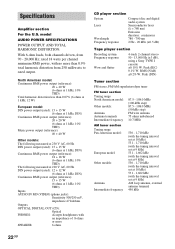
...000 Hz; rated 18 watts per channel minimum RMS power, with no more SPEAKER: 6 ohms CD player section System Laser Wavelength Frequency response Compact disc and digital audio system Semiconductor laser (λ = 780 nm) Emission duration: continuous 780 - 790 nm 2 Hz - 20 kHz ...(±0.5 dB) Tape player section Recording system Frequency response Wow and flutter 4-track 2-channel stereo 50 - 13,000 Hz (±3 dB), using a Sony TYPE I cassette ±...
...000 Hz; rated 18 watts per channel minimum RMS power, with no more SPEAKER: 6 ohms CD player section System Laser Wavelength Frequency response Compact disc and digital audio system Semiconductor laser (λ = 780 nm) Emission duration: continuous 780 - 790 nm 2 Hz - 20 kHz ...(±0.5 dB) Tape player section Recording system Frequency response Wow and flutter 4-track 2-channel stereo 50 - 13,000 Hz (±3 dB), using a Sony TYPE I cassette ±...


