Operating Instructions
Page 3
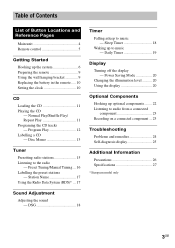
...display - Program Play 12 Labelling a CD - Sleep Timer 18 Waking up the system 6 Preparing the remote 9 Using the wall hanging bracket 9 Replacing the battery in the remote ..... 10 Setting the clock 10 CD Loading the CD 11 Playing the CD - Disc Memo 13 Tuner Presetting radio... stations 15 Listening to music - DSG 18 Timer Falling asleep to the radio - Power Saving Mode 20 Changing the illumination level .......... 20 Using the display 20 Optional Components Hooking up optional components ...
...display - Program Play 12 Labelling a CD - Sleep Timer 18 Waking up the system 6 Preparing the remote 9 Using the wall hanging bracket 9 Replacing the battery in the remote ..... 10 Setting the clock 10 CD Loading the CD 11 Playing the CD - Disc Memo 13 Tuner Presetting radio... stations 15 Listening to music - DSG 18 Timer Falling asleep to the radio - Power Saving Mode 20 Changing the illumination level .......... 20 Using the display 20 Optional Components Hooking up optional components ...
Operating Instructions
Page 4
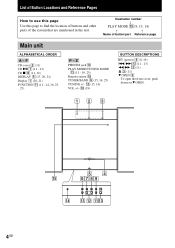
... of buttons and other parts of button/part Reference page Main unit ALPHABETICAL ORDER A - Illustration number r PLAY MODE qg (9, 13, 14) R R Name of the system that are mentioned in the text. F CD cover 2 (11) CD u 7 (11 - 13) CD x 8 (11, 12) DISPLAY 6 (17, 20, 21) Display 1 (20, 21) FUNCTION qa (11 - 14, 16, 23, 25) P -
... of buttons and other parts of button/part Reference page Main unit ALPHABETICAL ORDER A - Illustration number r PLAY MODE qg (9, 13, 14) R R Name of the system that are mentioned in the text. F CD cover 2 (11) CD u 7 (11 - 13) CD x 8 (11, 12) DISPLAY 6 (17, 20, 21) Display 1 (20, 21) FUNCTION qa (11 - 14, 16, 23, 25) P -
Operating Instructions
Page 5
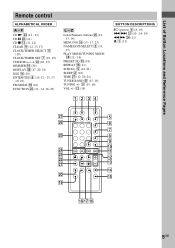
...) REPEAT qh (11) SCROLL 5 (14, 21) SLEEP 2 (18) TIME wj (12, 20, 21) TUNER BAND wa (15, 16) TUNING +/- qg ql qkqjqh 5GB F CD N wd (11 - 13) CD X ws (11) CD x qs (11, 12) CLEAR 9 (12, 13, 17) CLOCK/TIMER SELECT 6 (19) CLOCK/TIMER SET 7 (10, 19) CURSOR T/t wf (10, 13) DIMMER ql...
...) REPEAT qh (11) SCROLL 5 (14, 21) SLEEP 2 (18) TIME wj (12, 20, 21) TUNER BAND wa (15, 16) TUNING +/- qg ql qkqjqh 5GB F CD N wd (11 - 13) CD X ws (11) CD x qs (11, 12) CLEAR 9 (12, 13, 17) CLOCK/TIMER SELECT 6 (19) CLOCK/TIMER SET 7 (10, 19) CURSOR T/t wf (10, 13) DIMMER ql...
Operating Instructions
Page 11
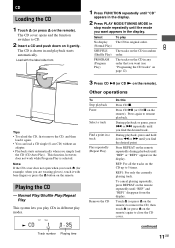
...stop mode repeatedly until the mode you find the desired track. Playing the CD - Normal Play/Shuffle Play/Repeat Play This system lets you simply load the CD (CD Auto Play). CD Tips • To reload the CD, first remove the CD, and then load it gently. or > repeatedly until "REP" and "...REP1" disappear from the display. REP: For all the tracks on the CD in the display. PROGRAM...
...stop mode repeatedly until the mode you find the desired track. Playing the CD - Normal Play/Shuffle Play/Repeat Play This system lets you simply load the CD (CD Auto Play). CD Tips • To reload the CD, first remove the CD, and then load it gently. or > repeatedly until "REP" and "...REP1" disappear from the display. REP: For all the tracks on the CD in the display. PROGRAM...
Operating Instructions
Page 12
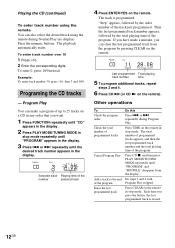
...last programmed track Do this Press . Last programmed Total playing track number time 5 To program additional tracks, repeat steps 3 and 4. 6 Press CD u (or CD N on the remote in the display. 3 Press . Press TIME on the remote). Each time you press the button, the last programmed track... Then the last programmed track number appears, followed by the order number of the program. The playback automatically starts. or > repeatedly until "CD" appears in the display. 2 Press PLAY MODE/TUNING MODE in the display. The total number of programmed tracks appears, and then the ...
...last programmed track Do this Press . Last programmed Total playing track number time 5 To program additional tracks, repeat steps 3 and 4. 6 Press CD u (or CD N on the remote in the display. 3 Press . Press TIME on the remote). Each time you press the button, the last programmed track... Then the last programmed track number appears, followed by the order number of the program. The playback automatically starts. or > repeatedly until "CD" appears in the display. 2 Press PLAY MODE/TUNING MODE in the display. The total number of programmed tracks appears, and then the ...
Operating Instructions
Page 13
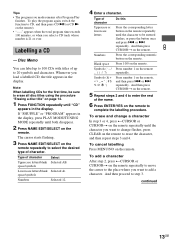
...PROGRAM" appears in the display, press PLAY MODE/TUNING MODE repeatedly until both disappear. 2 Press NAME EDIT/SELECT on page 14. 1 Press FUNCTION repeatedly until "CD" appears in the display. The cursor starts flashing. 3 Press NAME EDIT/SELECT on the remote repeatedly to erase the character, and then repeat steps 3 and.../0 on the remote. And then press CURSORt on the remote to 20 symbols and characters. continued 13GB Disc Memo You can label up to 100 CDs with titles of the name. 6 Press ENTER/YES on the remote. 5 Repeat steps 3 and 4 to enter the rest of up to complete the ...
...PROGRAM" appears in the display, press PLAY MODE/TUNING MODE repeatedly until both disappear. 2 Press NAME EDIT/SELECT on page 14. 1 Press FUNCTION repeatedly until "CD" appears in the display. The cursor starts flashing. 3 Press NAME EDIT/SELECT on the remote repeatedly to erase the character, and then repeat steps 3 and.../0 on the remote. And then press CURSORt on the remote to 20 symbols and characters. continued 13GB Disc Memo You can label up to 100 CDs with titles of the name. 6 Press ENTER/YES on the remote. 5 Repeat steps 3 and 4 to enter the rest of up to complete the ...
Operating Instructions
Page 14
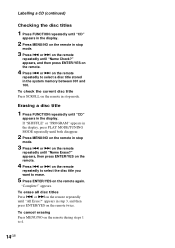
...mode. 3 Press . or > on the remote repeatedly to select the disc title you want to 4. 14GB To erase all disc titles Press . Labelling a CD (continued) Checking the disc titles 1 Press FUNCTION repeatedly until both disappear. 2 Press MENU/NO on the remote in stop mode. 3 Press . "Complete!" ...?" appears, then press ENTER/YES on the remote. 4 Press . or > on the remote twice. or > on the remote repeatedly until "CD" appears in the system memory between 001 and 100. Erasing a disc title 1 Press FUNCTION repeatedly until "Name Erase?" or > on the remote repeatedly to select a ...
...mode. 3 Press . or > on the remote repeatedly to select the disc title you want to 4. 14GB To erase all disc titles Press . Labelling a CD (continued) Checking the disc titles 1 Press FUNCTION repeatedly until both disappear. 2 Press MENU/NO on the remote in stop mode. 3 Press . "Complete!" ...?" appears, then press ENTER/YES on the remote. 4 Press . or > on the remote twice. or > on the remote repeatedly until "CD" appears in the system memory between 001 and 100. Erasing a disc title 1 Press FUNCTION repeatedly until "Name Erase?" or > on the remote repeatedly to select a ...
Operating Instructions
Page 17
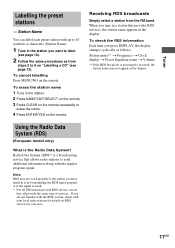
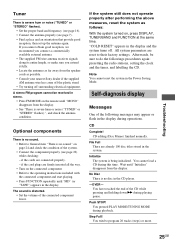
.... * Not all FM stations provide RDS service, nor do they all provide the same type of services. If you are not familiar with the RDS system, check with up to 6 on the remote. Note RDS may not appear in the station. 2 Press NAME EDIT/SELECT on the remote. 3 Press ... characters (Station Name). 1 Tune in a station that allows radio stations to erase the name. 4 Press ENTER/YES on "Labelling a CD" (see page 13). Radio Data System (RDS)* is the Radio Data System? When you have tuned in is not transmitting the RDS signal properly or if the signal is not properly received...
.... * Not all FM stations provide RDS service, nor do they all provide the same type of services. If you are not familiar with the RDS system, check with up to 6 on the remote. Note RDS may not appear in the station. 2 Press NAME EDIT/SELECT on the remote. 3 Press ... characters (Station Name). 1 Tune in a station that allows radio stations to erase the name. 4 Press ENTER/YES on "Labelling a CD" (see page 13). Radio Data System (RDS)* is the Radio Data System? When you have tuned in is not transmitting the RDS signal properly or if the signal is not properly received...
Operating Instructions
Page 18
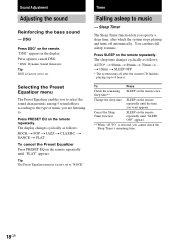
Press again to cancel DSG. * DSG: Dynamic Sound Generator Tip DSG is selected, you specify a sleep time, after the current CD finishes playing (up to "ROCK". The sleep time changes cyclically as follows: ROCK t POP t JAZZ t CLASSIC t DANCE t FLAT To cancel the Preset ... Press SLEEP on the remote repeatedly until "FLAT" appears. You can thus fall asleep to music - t 10min t SLEEP OFF * The system turns off after which the system stops playing and turns off automatically. DSG Press DSG* on the remote once. Sound Adjustment Adjusting the sound Reinforcing the bass sound - To...
Press again to cancel DSG. * DSG: Dynamic Sound Generator Tip DSG is selected, you specify a sleep time, after the current CD finishes playing (up to "ROCK". The sleep time changes cyclically as follows: ROCK t POP t JAZZ t CLASSIC t DANCE t FLAT To cancel the Preset ... Press SLEEP on the remote repeatedly until "FLAT" appears. You can thus fall asleep to music - t 10min t SLEEP OFF * The system turns off after which the system stops playing and turns off automatically. DSG Press DSG* on the remote once. Sound Adjustment Adjusting the sound Reinforcing the bass sound - To...
Operating Instructions
Page 19
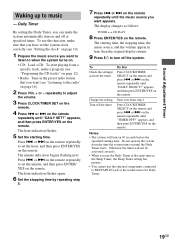
... you want appears. The hour indication flashes again. 6 Set the stopping time by repeating step 5. 7 Press . Do not operate the system from step 1. To use the optional components connected to set the minute, and then press ENTER/ YES on the remote. 4 Press . Press . Start over from the time the... system turns on the remote. appears, and then press ENTER/YES on the remote. or > on the remote repeatedly to MD/TAPE IN jack as follows: TUNER y CD ...
... you want appears. The hour indication flashes again. 6 Set the stopping time by repeating step 5. 7 Press . Do not operate the system from step 1. To use the optional components connected to set the minute, and then press ENTER/ YES on the remote. 4 Press . Press . Start over from the time the... system turns on the remote. appears, and then press ENTER/YES on the remote. or > on the remote repeatedly to MD/TAPE IN jack as follows: TUNER y CD ...
Operating Instructions
Page 20
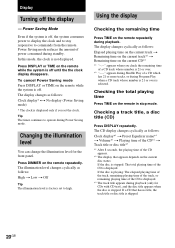
...(Power Saving mode) * The clock is displayed only if you check the remaining time of a CD track whose number is 21 or over is off the display - Power Saving Mode Even if the system is not displayed. In this mode, the clock is off until the the clock display disappears. ... follows: High t Low t Off Tip The illumination level is off , the system consumes power to display the clock and to stay responsive to high. Changing the illumination level You can change the illumination level for CDs with CD text), and the disc title appears when the disc is displayed. *3 The track...
...(Power Saving mode) * The clock is displayed only if you check the remaining time of a CD track whose number is 21 or over is off the display - Power Saving Mode Even if the system is not displayed. In this mode, the clock is off until the the clock display disappears. ... follows: High t Low t Off Tip The illumination level is off , the system consumes power to display the clock and to stay responsive to high. Changing the illumination level You can change the illumination level for CDs with CD text), and the disc title appears when the disc is displayed. *3 The track...
Operating Instructions
Page 21
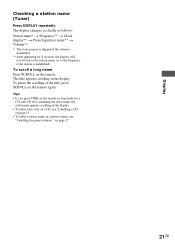
The title appears scrolling in the display. • To label a disc title on a CD, see "Labelling a CD" on page 13. • To label a station name on a preset station, see "Labelling the preset stations " on the remote in stop mode for 8 seconds, the ...display will revert back to the station name (or to the frequency if the station is unlabelled. ** After appearing for a CD with CD text containing the artist name, the artist name appears scrolling in the display. To pause the scrolling of the title, press SCROLL on the remote...
The title appears scrolling in the display. • To label a disc title on a CD, see "Labelling a CD" on page 13. • To label a station name on a preset station, see "Labelling the preset stations " on the remote in stop mode for 8 seconds, the ...display will revert back to the station name (or to the frequency if the station is unlabelled. ** After appearing for a CD with CD text containing the artist name, the artist name appears scrolling in the display. To pause the scrolling of the title, press SCROLL on the remote...
Operating Instructions
Page 22
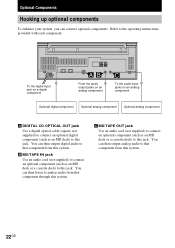
... system. You can then listen to this jack. You can then output digital audio to the operating instructions provided with each component. To the digital input jack on a digital component From the audio output jacks on an analog component To the audio input jacks on an analog component Optional digital component Optional analog component Optional analog component A DIGITAL CD...
... system. You can then listen to this jack. You can then output digital audio to the operating instructions provided with each component. To the digital input jack on a digital component From the audio output jacks on an analog component To the audio input jacks on an analog component Optional digital component Optional analog component Optional analog component A DIGITAL CD...
Operating Instructions
Page 24
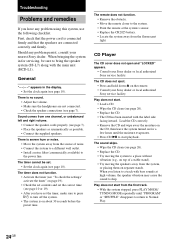
...CD has been inserted with the main unit (HCD-L1). Play does not start from the system, or placing them on page 19). • Check the set contents and set the correct time (see page 10 or 19). • After you have any problem persist, consult your Sony dealer or local authorized Sony...light. The sound skips. • Wipe the CD clean (see page 7). Load the CD correctly. • Remove the CD and wipe away the moisture on the CD, then leave the system turned on the remote. • Consult your Sony dealer or local authorized Sony service facility. First, check that the speakers ...
...CD has been inserted with the main unit (HCD-L1). Play does not start from the system, or placing them on page 19). • Check the set contents and set the correct time (see page 10 or 19). • After you have any problem persist, consult your Sony dealer or local authorized Sony...light. The sound skips. • Wipe the CD clean (see page 7). Load the CD correctly. • Remove the CD and wipe away the moisture on the CD, then leave the system turned on the remote. • Consult your Sony dealer or local authorized Sony service facility. First, check that the speakers ...
Operating Instructions
Page 25
...presetting the radio stations, setting the clock and the timer, and labelling the CD. Wait until "MONO" disappears from the display. • See "There is distorted. • Set the volume of the system. • Connect the component properly (see page 7). • Find a place and an orientation that ... ("TUNED" or "STEREO" flashes).", and check the antenna condition. If the system still does not operate properly after performing the above measures, reset the system as possible. • Consult your nearest Sony dealer if the supplied AM antenna wire has come off the plastic stand. •...
...presetting the radio stations, setting the clock and the timer, and labelling the CD. Wait until "MONO" disappears from the display. • See "There is distorted. • Set the volume of the system. • Connect the component properly (see page 7). • Find a place and an orientation that ... ("TUNED" or "STEREO" flashes).", and check the antenna condition. If the system still does not operate properly after performing the above measures, reset the system as possible. • Consult your nearest Sony dealer if the supplied AM antenna wire has come off the plastic stand. •...
Operating Instructions
Page 26
...TV set once, and after 15 to a warm place, or is not a malfunction. Dusty or dirty - Remove the CD and leave the system turned on the lens inside the CD player. Besides, the discs, which magnets are not yet finalized at a large volume, the temperature of the rear side of... the power of your nearest Sony dealer. Very humid - Subject to direct sunlight • Use caution when placing the unit or speakers on some TV sets becomes magnetically distorted. On heat buildup • Although the unit heats up in the system, place the system in locations where it will ...
...TV set once, and after 15 to a warm place, or is not a malfunction. Dusty or dirty - Remove the CD and leave the system turned on the lens inside the CD player. Besides, the discs, which magnets are not yet finalized at a large volume, the temperature of the rear side of... the power of your nearest Sony dealer. Very humid - Subject to direct sunlight • Use caution when placing the unit or speakers on some TV sets becomes magnetically distorted. On heat buildup • Although the unit heats up in the system, place the system in locations where it will ...

Operating Instructions
Page 27
... 250 mV, impedance 1 kilohmes PHONES (stereo minijack): Accepts headphones with an impedance of 8 ohms or more DIGITAL CD OPTICAL OUT (Supported sampling frequency: 44.1 kHz) CD player section System Laser Frequency response Compact disc and digital audio system Semiconductor laser (λ = 795 nm) Emission duration: continuous 2 Hz - 20 kHz Tuner section FM stereo, FM... no more than 10% total harmonic distortion from 120 - 10,000 Hz; rated 25 watts per speaker continued Additional Information 27GB Specifications Main unit (HCD-L1) Amplifier section For the U.S.
... 250 mV, impedance 1 kilohmes PHONES (stereo minijack): Accepts headphones with an impedance of 8 ohms or more DIGITAL CD OPTICAL OUT (Supported sampling frequency: 44.1 kHz) CD player section System Laser Frequency response Compact disc and digital audio system Semiconductor laser (λ = 795 nm) Emission duration: continuous 2 Hz - 20 kHz Tuner section FM stereo, FM... no more than 10% total harmonic distortion from 120 - 10,000 Hz; rated 25 watts per speaker continued Additional Information 27GB Specifications Main unit (HCD-L1) Amplifier section For the U.S.


