Operating Instructions
Page 3
...Button Locations and Reference Pages Main unit 4 Remote control 5 Getting Started Hooking up optional components ........ 22 Listening to audio from a connected component 23 Recording on a connected component ... 23 Troubleshooting Problems and remedies 24 Self-diagnosis display 25 Additional Information Precautions 26 ...asleep to the radio - Power Saving Mode 20 Changing the illumination level .......... 20 Using the display 20 Optional Components Hooking up the system 6 Preparing the remote 9 Using the wall hanging bracket 9 Replacing the battery in the remote ..... 10 ...
...Button Locations and Reference Pages Main unit 4 Remote control 5 Getting Started Hooking up optional components ........ 22 Listening to audio from a connected component 23 Recording on a connected component ... 23 Troubleshooting Problems and remedies 24 Self-diagnosis display 25 Additional Information Precautions 26 ...asleep to the radio - Power Saving Mode 20 Changing the illumination level .......... 20 Using the display 20 Optional Components Hooking up the system 6 Preparing the remote 9 Using the wall hanging bracket 9 Replacing the battery in the remote ..... 10 ...
Operating Instructions
Page 22
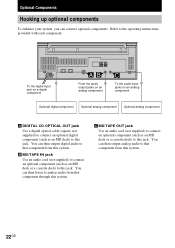
... then output digital audio to that component from this system. You can then listen to analog audio from that component through this system. You can connect optional components. To the digital input jack on a digital component From the audio output jacks on an analog component To the audio input jacks on an analog component Optional digital component Optional analog component Optional analog component A DIGITAL CD...
... then output digital audio to that component from this system. You can then listen to analog audio from that component through this system. You can connect optional components. To the digital input jack on a digital component From the audio output jacks on an analog component To the audio input jacks on an analog component Optional digital component Optional analog component Optional analog component A DIGITAL CD...
Operating Instructions
Page 23
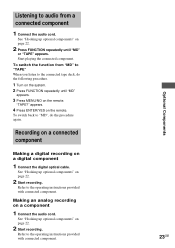
... listen to "MD", do the following procedure. 1 Turn on the system. 2 Press FUNCTION repeatedly until "MD" or "TAPE" appears. Listening to the operating instructions provided with connected component. To switch the function from a connected component 1 Connect the audio cord. Start playing the connected component. To switch back to the connected tape deck, do the procedure...
... listen to "MD", do the following procedure. 1 Turn on the system. 2 Press FUNCTION repeatedly until "MD" or "TAPE" appears. Listening to the operating instructions provided with connected component. To switch the function from a connected component 1 Connect the audio cord. Start playing the connected component. To switch back to the connected tape deck, do the procedure...
Operating Instructions
Page 26
... the moisture evaporates. On placement • Do not place the system in an inclined position. • Do not place the system in which are attached or used batteries according to their interaction with wax, oil, polish, etc.) as audio racks, TV stands, and toys. Extremely hot or cold -... be played on surfaces that the operating voltage of your nearest Sony dealer. Wipe the CD from the wall outlet (mains) if it is brought directly from a cold place to vibrations - Discard used near the speaker system, such as staining or discoloration of explosion if battery is not...
... the moisture evaporates. On placement • Do not place the system in an inclined position. • Do not place the system in which are attached or used batteries according to their interaction with wax, oil, polish, etc.) as audio racks, TV stands, and toys. Extremely hot or cold -... be played on surfaces that the operating voltage of your nearest Sony dealer. Wipe the CD from the wall outlet (mains) if it is brought directly from a cold place to vibrations - Discard used near the speaker system, such as staining or discoloration of explosion if battery is not...

Operating Instructions
Page 27
Specifications Main unit (HCD-L1) Amplifier section For the U.S. model AUDIO POWER SPECIFICATIONS POWER OUTPUT AND TOTAL HARMONIC DISTORTION: With 4-ohm loads, both channels driven, from 250 milliwatts to rated output. North American model:...): Accepts headphones with an impedance of 8 ohms or more DIGITAL CD OPTICAL OUT (Supported sampling frequency: 44.1 kHz) CD player section System Laser Frequency response Compact disc and digital audio system Semiconductor laser (λ = 795 nm) Emission duration: continuous 2 Hz - 20 kHz Tuner section FM stereo, FM/AM superheterodyne tuner ...
Specifications Main unit (HCD-L1) Amplifier section For the U.S. model AUDIO POWER SPECIFICATIONS POWER OUTPUT AND TOTAL HARMONIC DISTORTION: With 4-ohm loads, both channels driven, from 250 milliwatts to rated output. North American model:...): Accepts headphones with an impedance of 8 ohms or more DIGITAL CD OPTICAL OUT (Supported sampling frequency: 44.1 kHz) CD player section System Laser Frequency response Compact disc and digital audio system Semiconductor laser (λ = 795 nm) Emission duration: continuous 2 Hz - 20 kHz Tuner section FM stereo, FM/AM superheterodyne tuner ...


