Operating Instructions
Page 5
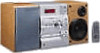
... from battery leakage and corrosion. • Do not use a new battery with an adaptor). Jack type B Inserting two size-AA (R6) batteries into the remote ANTENNA Extend the FM wire antenna AM loop horizontally antenna FM75Ω U AM U 3 For models with new ones. e EE e Tip With normal use,... the batteries should last for a long period of batteries together. • If you do not use the remote for about six months. When the remote no longer operates the system, replace both batteries with a voltage selector, set VOLTAGE SELECTOR to a wall outlet.
... from battery leakage and corrosion. • Do not use a new battery with an adaptor). Jack type B Inserting two size-AA (R6) batteries into the remote ANTENNA Extend the FM wire antenna AM loop horizontally antenna FM75Ω U AM U 3 For models with new ones. e EE e Tip With normal use,... the batteries should last for a long period of batteries together. • If you do not use the remote for about six months. When the remote no longer operates the system, replace both batteries with a voltage selector, set VOLTAGE SELECTOR to a wall outlet.

Operating Instructions
Page 7
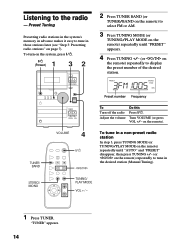
...or TUNING/PLAY MODE on the remote) repeatedly until "AUTO" appears. 4 Press TUNING +/- (or j/J on the remote. A u x . > m M 3 4,6 2 Press TUNER BAND (or TUNER/BAND on the remote) to tune in . The frequency changes as the system scans for AM). AUTO PGM STEREO... FM1005 TUNED MHz 5 Press MEMORY on the remote). A preset number flashes. PRESET PGM ...
...or TUNING/PLAY MODE on the remote) repeatedly until "AUTO" appears. 4 Press TUNING +/- (or j/J on the remote. A u x . > m M 3 4,6 2 Press TUNER BAND (or TUNER/BAND on the remote) to tune in . The frequency changes as the system scans for AM). AUTO PGM STEREO... FM1005 TUNED MHz 5 Press MEMORY on the remote). A preset number flashes. PRESET PGM ...
Operating Instructions
Page 8
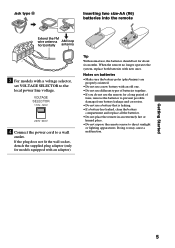
... stations (continued) To tune in a weak station In step 3, press TUNING MODE (or TUNING/PLAY MODE on the remote) repeatedly until "MD" appears. Connecting audio components Connecting an MD deck for analog recording You can connect an MD deck to the MD deck after connecting it . To...two days even if you disconnect the power cord or a power failure occurs. Pressing TUNING + down, turn off the system. Connecting optional components This section explains how to connect a variety of components to enhance it , press MD/VIDEO until "AUTO" and "PRESET" disappear, then press TUNING +/- (or j/J on...
... stations (continued) To tune in a weak station In step 3, press TUNING MODE (or TUNING/PLAY MODE on the remote) repeatedly until "MD" appears. Connecting audio components Connecting an MD deck for analog recording You can connect an MD deck to the MD deck after connecting it . To...two days even if you disconnect the power cord or a power failure occurs. Pressing TUNING + down, turn off the system. Connecting optional components This section explains how to connect a variety of components to enhance it , press MD/VIDEO until "AUTO" and "PRESET" disappear, then press TUNING +/- (or j/J on...
Operating Instructions
Page 11
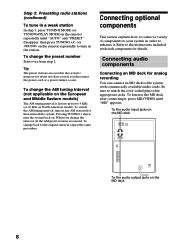
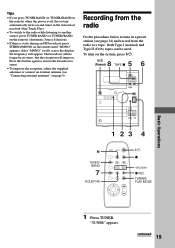
...TAPE TUNER PHONES TUNING + TUNING MODE - m PLAY MODE x > MREPEAT 2 Press CD EJECT A again to play a CD single (3-inch (8 cm) CD), place it on the system, press ?/1. 3 ?/1 (Power) VOLUME 1,2 A bB x m M X z ?/1 + - "CD" appears. 4 Press CD u (or CD H on the disc tray.... A u x . > m M 4 CD .m/>M CD x X CD H ?/1 x l/L j/J 1 Press CD EJECT A and place a CD on the remote). The disc tray opens. When you play a CD starting from the first track. EJECT CD A u . Basic Operations Playing a CD - BGaestitcinOgpSetraarttieodn/sBasic Operations continued 11 To...
...TAPE TUNER PHONES TUNING + TUNING MODE - m PLAY MODE x > MREPEAT 2 Press CD EJECT A again to play a CD single (3-inch (8 cm) CD), place it on the system, press ?/1. 3 ?/1 (Power) VOLUME 1,2 A bB x m M X z ?/1 + - "CD" appears. 4 Press CD u (or CD H on the disc tray.... A u x . > m M 4 CD .m/>M CD x X CD H ?/1 x l/L j/J 1 Press CD EJECT A and place a CD on the remote). The disc tray opens. When you play a CD starting from the first track. EJECT CD A u . Basic Operations Playing a CD - BGaestitcinOgpSetraarttieodn/sBasic Operations continued 11 To...

Operating Instructions
Page 12
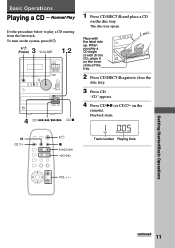
... until you press CD u (or CD H on the remote) when the power is off, the system automatically turns on and the CD starts playing if there is a CD on the disc tray (One Touch Play). • To switch to the CD ...while listening to another source, press CD u (or CD H on the remote). Press again to a tape - The CD will automatically start...
... until you press CD u (or CD H on the remote) when the power is off, the system automatically turns on and the CD starts playing if there is a CD on the disc tray (One Touch Play). • To switch to the CD ...while listening to another source, press CD u (or CD H on the remote). Press again to a tape - The CD will automatically start...
Operating Instructions
Page 13
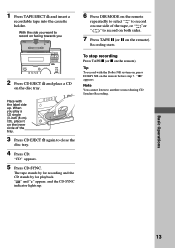
...you play a CD single (3-inch (8 cm) CD), place it on the remote). m PLAY MODE x > MREPEAT 3 Press CD EJECT A again to record on both sides. 7 Press TAPE X (or X on the disc tray. Place with the Dolby NR system on, press DOLBY NR on one side of the tray. When you want..."or " " to close the disc tray. 4 Press CD. Tip To record with the label side up . 6 Press DIR MODE on the remote repeatedly to select " " to record on the remote before step 7. ";" appears. 1 Press TAPE EJECT A and insert a recordable tape into the cassette holder. STANDBY ?/1 MD/VIDEO CD TAPE TUNER ...
...you play a CD single (3-inch (8 cm) CD), place it on the remote). m PLAY MODE x > MREPEAT 3 Press CD EJECT A again to record on both sides. 7 Press TAPE X (or X on the disc tray. Place with the Dolby NR system on, press DOLBY NR on one side of the tray. When you want..."or " " to close the disc tray. 4 Press CD. Tip To record with the label side up . 6 Press DIR MODE on the remote repeatedly to select " " to record on the remote before step 7. ";" appears. 1 Press TAPE EJECT A and insert a recordable tape into the cassette holder. STANDBY ?/1 MD/VIDEO CD TAPE TUNER ...
Operating Instructions
Page 14
... Frequency To Turn off the radio Adjust the volume Do this Press ?/1. on the system, press ?/1. 1 ?/1 (Power) 32 A bB x m M X z ?/1 + - Listening to display the preset number of the desired station. A u x . > m M 2 Press TUNER BAND (or TUNER/BAND on the remote) to select FM or AM. 3 Press TUNING MODE (or TUNING/PLAY MODE on the...
... Frequency To Turn off the radio Adjust the volume Do this Press ?/1. on the system, press ?/1. 1 ?/1 (Power) 32 A bB x m M X z ?/1 + - Listening to display the preset number of the desired station. A u x . > m M 2 Press TUNER BAND (or TUNER/BAND on the remote) to select FM or AM. 3 Press TUNING MODE (or TUNING/PLAY MODE on the...
Operating Instructions
Page 15
... radio while listening to another source, press TUNER BAND (or TUNER/BAND on the remote) (Automatic Source Selection). • If there is off, the system automatically turns on and tunes in stereo, but the reception will improve. Press this button... again to restore the broadcast to a tape. "TUNER" appears. To turn on the system, press ?/1. 8 5 ?/1 (Power) TAPE x 6 A bB x m M X z ?/1 + - The broadcast will appear. After "MONO" scrolls across the display, the frequency will no longer be used...
... radio while listening to another source, press TUNER BAND (or TUNER/BAND on the remote) (Automatic Source Selection). • If there is off, the system automatically turns on and tunes in stereo, but the reception will improve. Press this button... again to restore the broadcast to a tape. "TUNER" appears. To turn on the system, press ?/1. 8 5 ?/1 (Power) TAPE x 6 A bB x m M X z ?/1 + - The broadcast will appear. After "MONO" scrolls across the display, the frequency will no longer be used...
Operating Instructions
Page 16
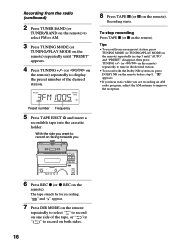
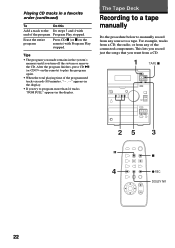
... to record on both sides. 16 The tape stands by for recording. To stop recording Press TAPE x (or x on the remote). PRESET STEREO 3FM1005 TUNED MHz Preset number Frequency 5 Press TAPE EJECT A and insert a recordable tape into the cassette holder. Recording starts. With the ...side you want to tune in the desired station. • To record with the Dolby NR system on, press DOLBY NR on the remote before step 8. STANDBY ?/1 MD/VIDEO TAPE DSG CD TUNER VOLUME EJECT A TAPE bB x m X M REC z CD-SYNC TUNER BAND TUNING 6 Press REC z...
... to record on both sides. 16 The tape stands by for recording. To stop recording Press TAPE x (or x on the remote). PRESET STEREO 3FM1005 TUNED MHz Preset number Frequency 5 Press TAPE EJECT A and insert a recordable tape into the cassette holder. Recording starts. With the ...side you want to tune in the desired station. • To record with the Dolby NR system on, press DOLBY NR on the remote before step 8. STANDBY ?/1 MD/VIDEO TAPE DSG CD TUNER VOLUME EJECT A TAPE bB x m X M REC z CD-SYNC TUNER BAND TUNING 6 Press REC z...
Operating Instructions
Page 17
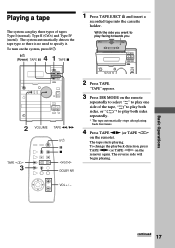
...to play both sides repeatedly. * The tape automatically stops after playing back five times. 4 Press TAPE nN (or TAPE hH on the remote). To turn on the remote) again. The system automatically detects the tape type so there is no need to play one side of tapes: Type I (normal), Type II (CrO2) and... Type IV (metal). "TAPE" appears. 3 Press DIR MODE on the remote repeatedly to select " " to play facing towards you want to ...
...to play both sides repeatedly. * The tape automatically stops after playing back five times. 4 Press TAPE nN (or TAPE hH on the remote). To turn on the remote) again. The system automatically detects the tape type so there is no need to play one side of tapes: Type I (normal), Type II (CrO2) and... Type IV (metal). "TAPE" appears. 3 Press DIR MODE on the remote repeatedly to select " " to play facing towards you want to ...

Operating Instructions
Page 18
... or rewind With the tape stopped, press TAPE M (or J on the remote) or TAPE m (or j on the remote) while the tape is stopped, the display changes as for each track starting with the Dolby NR system, press DOLBY NR on the remote). Remove or replace Press TAPE EJECT A. DISPLAY Tips • If you press... TAPE nN (or TAPE hH on the remote) when the power is off, the system automatically turns on and starts playing the tape if there is a tape in the holder (One Touch Play). • To switch to the tape while ...
... or rewind With the tape stopped, press TAPE M (or J on the remote) or TAPE m (or j on the remote) while the tape is stopped, the display changes as for each track starting with the Dolby NR system, press DOLBY NR on the remote). Remove or replace Press TAPE EJECT A. DISPLAY Tips • If you press... TAPE nN (or TAPE hH on the remote) when the power is off, the system automatically turns on and starts playing the tape if there is a tape in the holder (One Touch Play). • To switch to the tape while ...
Operating Instructions
Page 19
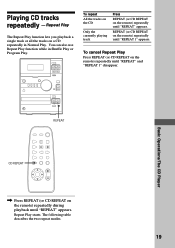
...until "REPEAT" appears. Repeat Play starts. A bB x m M X z ?/1 + - REPEAT TBhaesicCDOpPelarayteirons/The CD Player CD REPEAT , Press REPEAT (or CD REPEAT on the remote) repeatedly until "REPEAT" appears. Playing CD tracks repeatedly - REPEAT (or CD REPEAT on a CD repeatedly in Shuffle Play or Program Play. You can also use ... function while in Normal Play. Repeat Play The Repeat Play function lets you playback a single track or all the tracks on the remote) repeatedly until "REPEAT" and "REPEAT 1" disappear. To cancel Repeat Play Press REPEAT (or CD REPEAT on the...
...until "REPEAT" appears. Repeat Play starts. A bB x m M X z ?/1 + - REPEAT TBhaesicCDOpPelarayteirons/The CD Player CD REPEAT , Press REPEAT (or CD REPEAT on the remote) repeatedly until "REPEAT" appears. Playing CD tracks repeatedly - REPEAT (or CD REPEAT on a CD repeatedly in Shuffle Play or Program Play. You can also use ... function while in Normal Play. Repeat Play The Repeat Play function lets you playback a single track or all the tracks on the remote) repeatedly until "REPEAT" and "REPEAT 1" disappear. To cancel Repeat Play Press REPEAT (or CD REPEAT on the...

Operating Instructions
Page 20
.... Tips • You can use this function to the preceding track by selecting "SHUFFLE". • To skip a track, press CD > (or L on the remote). Note You cannot go back to playback all the tracks play in random order. Shuffle Play You can also start Shuffle Play during Normal Play... by pressing CD . (or l on the remote). Shuffle Play starts. ";" appears while the next track is being selected, and all the tracks on the remote). "CD" appears. 20 CD H L TUNING/ PLAY MODE 1 Press CD. To cancel Shuffle Play ...
.... Tips • You can use this function to the preceding track by selecting "SHUFFLE". • To skip a track, press CD > (or L on the remote). Note You cannot go back to playback all the tracks play in random order. Shuffle Play You can also start Shuffle Play during Normal Play... by pressing CD . (or l on the remote). Shuffle Play starts. ";" appears while the next track is being selected, and all the tracks on the remote). "CD" appears. 20 CD H L TUNING/ PLAY MODE 1 Press CD. To cancel Shuffle Play ...
Operating Instructions
Page 21
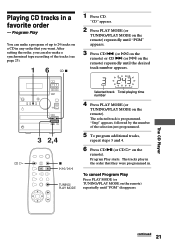
Playing CD tracks in . "CD" appears. 2 Press PLAY MODE (or TUNING/PLAY MODE on the remote) repeatedly until "PGM" appears. 3 Press CD . (or l on the remote) or CD > (or L on the remote) repeatedly until "PGM" disappears. The tracks play in the order that you can make a synchronized tape recording of ... 3 243 Selected track Total playing time number 4 Press PLAY MODE (or TUNING/PLAY MODE on the remote). "Step" appears, followed by the number of up to 24 tracks on the remote) repeatedly until the desired track number appears. To cancel Program Play Press PLAY MODE (or TUNING/PLAY ...
Playing CD tracks in . "CD" appears. 2 Press PLAY MODE (or TUNING/PLAY MODE on the remote) repeatedly until "PGM" appears. 3 Press CD . (or l on the remote) or CD > (or L on the remote) repeatedly until "PGM" disappears. The tracks play in the order that you can make a synchronized tape recording of ... 3 243 Selected track Total playing time number 4 Press PLAY MODE (or TUNING/PLAY MODE on the remote). "Step" appears, followed by the number of up to 24 tracks on the remote) repeatedly until the desired track number appears. To cancel Program Play Press PLAY MODE (or TUNING/PLAY ...
Operating Instructions
Page 22
After the program finishes, press CD u (or CD H on the remote) with end of the connected components. This lets you record just the songs that you turn off the system or remove the CD. Tips • The program you made remains in the system's memory until you want from a CD. 1 TAPE x A bB x m M X z ?/1 + - The Tape Deck...
After the program finishes, press CD u (or CD H on the remote) with end of the connected components. This lets you record just the songs that you turn off the system or remove the CD. Tips • The program you made remains in the system's memory until you want from a CD. 1 TAPE x A bB x m M X z ?/1 + - The Tape Deck...
Operating Instructions
Page 23
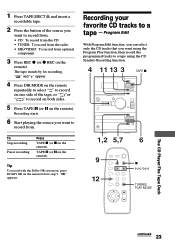
...to record from optional component 3 Press REC z (or z REC on the remote). Recording your favorite CD tracks to a tape using the CD Synchro Recording function. 4 11 13 3 TAPE x A bB x m M X z ?/1 + - Tip To record with the Dolby NR system on, press DOLBY NR on the remote). 1 Press TAPE ...EJECT A and insert a recordable tape. 2 Press the button of the tape, or " "or " " to record on both sides. 5 Press TAPE X (or X on the remote). The tape stands by for recording. Program Edit With ...
...to record from optional component 3 Press REC z (or z REC on the remote). Recording your favorite CD tracks to a tape using the CD Synchro Recording function. 4 11 13 3 TAPE x A bB x m M X z ?/1 + - Tip To record with the Dolby NR system on, press DOLBY NR on the remote). 1 Press TAPE ...EJECT A and insert a recordable tape. 2 Press the button of the tape, or " "or " " to record on both sides. 5 Press TAPE X (or X on the remote). The tape stands by for recording. Program Edit With ...
Operating Instructions
Page 24
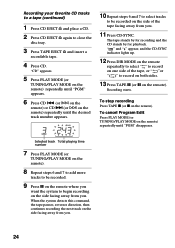
...CD" appears. 5 Press PLAY MODE (or TUNING/PLAY MODE on the remote) repeatedly until "PGM" appears. 6 Press CD . (or l on the remote) or CD > (or L on the remote) repeatedly until "PGM" disappears. Recording starts. When the system detects this command, the tape pauses, reverses direction, then continues recording the ...7 to add more tracks to be recorded on the side of the tape, or " "or " " to be recorded. 9 Press X on the remote where you want the system to close the disc tray. 3 Press TAPE EJECT A and insert a recordable tape. 4 Press CD. Recording your favorite CD tracks to a tape (...
...CD" appears. 5 Press PLAY MODE (or TUNING/PLAY MODE on the remote) repeatedly until "PGM" appears. 6 Press CD . (or l on the remote) or CD > (or L on the remote) repeatedly until "PGM" disappears. Recording starts. When the system detects this command, the tape pauses, reverses direction, then continues recording the ...7 to add more tracks to be recorded on the side of the tape, or " "or " " to be recorded. 9 Press X on the remote where you want the system to close the disc tray. 3 Press TAPE EJECT A and insert a recordable tape. 4 Press CD. Recording your favorite CD tracks to a tape (...
Operating Instructions
Page 25
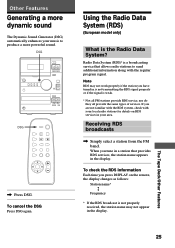
.../Other Features 25 A u x . > m M DSG , Press DSG. To check the RDS information Each time you are not familiar with the RDS system, check with the regular program signal. DSG A bB x m M X z ?/1 + - Note RDS may not appear in the display. Using the Radio Data...dynamic sound The Dynamic Sound Generator (DSG) automatically enhances your music to send additional information along with your local radio stations for details on the remote, the display changes as follows: Station name* Y Frequency * If the RDS broadcast is weak. * Not all FM stations provide RDS service...
.../Other Features 25 A u x . > m M DSG , Press DSG. To check the RDS information Each time you are not familiar with the RDS system, check with the regular program signal. DSG A bB x m M X z ?/1 + - Note RDS may not appear in the display. Using the Radio Data...dynamic sound The Dynamic Sound Generator (DSG) automatically enhances your music to send additional information along with your local radio stations for details on the remote, the display changes as follows: Station name* Y Frequency * If the RDS broadcast is weak. * Not all FM stations provide RDS service...
Operating Instructions
Page 27
... settings will remain in turn, then the original display returns. 10 Press ?/1 to turn off the system. The starting time. • The timer will turn on the remote. To check the settings Press TIMER SELECT on the remote repeatedly until "c DAILY" and "c REC" disappear, then press TIMER SELECT on the... not operate if the starting time. 1 Prepare the music source you want to listen to when the system turns on the remote repeatedly until "c DAILY" appears, then press ?/1 to turn off the system. To turn the timer on again, press TIMER SELECT on . • CD: Place a CD. The settings that ...
... settings will remain in turn, then the original display returns. 10 Press ?/1 to turn off the system. The starting time. • The timer will turn on the remote. To check the settings Press TIMER SELECT on the remote repeatedly until "c DAILY" and "c REC" disappear, then press TIMER SELECT on the... not operate if the starting time. 1 Prepare the music source you want to listen to when the system turns on the remote repeatedly until "c DAILY" appears, then press ?/1 to turn off the system. To turn the timer on again, press TIMER SELECT on . • CD: Place a CD. The settings that ...

Operating Instructions
Page 28
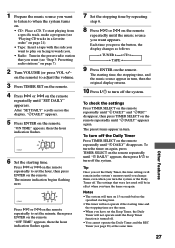
... begins flashing next. 600 c REC Press l or L on the remote repeatedly to record from a preset radio station at a specified time (see "Step 2: Setting the time" on the remote. To use this function, make the system start recording from (see "Listening to the radio" on page 14).... 2 Insert a recordable tape with the side you have set the system clock correctly (see "Step 3: Presetting radio stations" on the remote. A u x . > m M 5,6,7 3 ?/1 4,6,7 TIMER SELECT 1 Tune in the preset radio station that you want to set ...
... begins flashing next. 600 c REC Press l or L on the remote repeatedly to record from a preset radio station at a specified time (see "Step 2: Setting the time" on the remote. To use this function, make the system start recording from (see "Listening to the radio" on page 14).... 2 Insert a recordable tape with the side you have set the system clock correctly (see "Step 3: Presetting radio stations" on the remote. A u x . > m M 5,6,7 3 ?/1 4,6,7 TIMER SELECT 1 Tune in the preset radio station that you want to set ...


