

Operating Instructions
Page 1
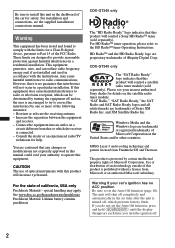
To cancel the demonstration (DEMO) display, see page 4. Pour annuler l'affichage de démonstration (DEMO), reportez-vous à la page 4. Model No. Refer to these numbers in the spaces provided below. CDX-GT340 CDX-GT240 ©2009 Sony Corporation Serial No. Record these numbers whenever you call upon your Sony dealer regarding this product. 4-149-110-21(1) FM/AM Compact Disc Player Operating Instructions US Mode d'emploi FR Owner's Record The model and serial numbers are located on the bottom of the unit.
To cancel the demonstration (DEMO) display, see page 4. Pour annuler l'affichage de démonstration (DEMO), reportez-vous à la page 4. Model No. Refer to these numbers in the spaces provided below. CDX-GT340 CDX-GT240 ©2009 Sony Corporation Serial No. Record these numbers whenever you call upon your Sony dealer regarding this product. 4-149-110-21(1) FM/AM Compact Disc Player Operating Instructions US Mode d'emploi FR Owner's Record The model and serial numbers are located on the bottom of the unit.
Operating Instructions
Page 2
... in a residential installation. MPEG Layer-3 audio coding technology and patents licensed from Microsoft or an authorized Microsoft subsidiary. This product is connected. - For the state of the car for a Class B digital device, pursuant to Part 15 of Sirius XM Radio Inc. For HD RadioTM tuner operation, please refer to the HD RadioTM tuner Operating Instructions. and XM Satellite Radio Inc. Be sure to install this unit in the...
... in a residential installation. MPEG Layer-3 audio coding technology and patents licensed from Microsoft or an authorized Microsoft subsidiary. This product is connected. - For the state of the car for a Class B digital device, pursuant to Part 15 of Sirius XM Radio Inc. For HD RadioTM tuner operation, please refer to the HD RadioTM tuner Operating Instructions. and XM Satellite Radio Inc. Be sure to install this unit in the...
Operating Instructions
Page 3
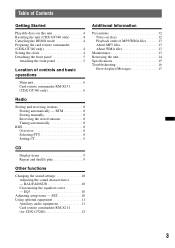
... 13 Removing the unit 14 Specifications 15 Troubleshooting 16 Error displays/Messages 17 3 Table of Contents Getting Started Playable discs on discs 12 Playback order of controls and basic operations Main unit 6 Card remote commander RM-X151 (CDX-GT340 only 6 Radio Storing and receiving stations 8 Storing automatically - EQ3 10 Adjusting setup items - BTM 8 Storing manually 8 Receiving the stored stations 8 Tuning automatically 8 RDS 8 Overview 8 Selecting PTY 8 Setting CT 9 CD Display items 9 Repeat and shuffle play 9 Other functions Changing the sound settings 10...
... 13 Removing the unit 14 Specifications 15 Troubleshooting 16 Error displays/Messages 17 3 Table of Contents Getting Started Playable discs on discs 12 Playback order of controls and basic operations Main unit 6 Card remote commander RM-X151 (CDX-GT340 only 6 Radio Storing and receiving stations 8 Storing automatically - EQ3 10 Adjusting setup items - BTM 8 Storing manually 8 Receiving the stored stations 8 Tuning automatically 8 RDS 8 Overview 8 Selecting PTY 8 Setting CT 9 CD Display items 9 Repeat and shuffle play 9 Other functions Changing the sound settings 10...
Operating Instructions
Page 4
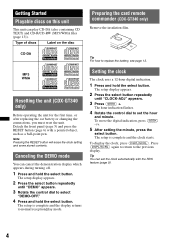
... control dial to replace the battery, see page 13. The setup display appears. 2 Press the select button repeatedly until "CLOCK-ADJ" appears. 3 Press (SEEK) +. The setup is complete and the clock starts. To move the digital indication, press (SEEK) -/+. 5 After setting the minute, press the select button. MP3 WMA Resetting the unit (CDX-GT340 only) Before operating the unit for the first time, or after replacing the car battery or changing the connections, you must reset the unit...
... control dial to replace the battery, see page 13. The setup display appears. 2 Press the select button repeatedly until "CLOCK-ADJ" appears. 3 Press (SEEK) +. The setup is complete and the clock starts. To move the digital indication, press (SEEK) -/+. 5 After setting the minute, press the select button. MP3 WMA Resetting the unit (CDX-GT340 only) Before operating the unit for the first time, or after replacing the car battery or changing the connections, you must reset the unit...

Operating Instructions
Page 5
... alarm will sound for a few seconds. Avoid leaving it off . 2 Press , then pull it in amplifier is turned off towards you turn the ignition switch to heat/high temperature or moisture. Attaching the front panel Engage part A of the front panel with part B of this unit to prevent theft. A B Note Do not put excessive pressure on the front panel and display window...
... alarm will sound for a few seconds. Avoid leaving it off . 2 Press , then pull it in amplifier is turned off towards you turn the ignition switch to heat/high temperature or moisture. Attaching the front panel Engage part A of the front panel with part B of this unit to prevent theft. A B Note Do not put excessive pressure on the front panel and display window...
Operating Instructions
Page 6
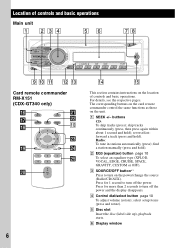
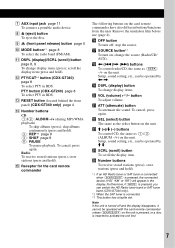
... wa ws q; The corresponding buttons on the card remote commander control the same functions as those on the location of controls and basic operations Main unit 1 234 56 78 SEEK MODE SEEK SOURCE OFF EQ3 SCRL DSPL PUSH SELECT AUX PTY ALBUM 1 2 REP SHUF PAUSE 3 4 5 6 9 q; Radio: To tune in stations automatically (press); C SOURCE/OFF button*1 Press to turn on the power/change the source (Radio/CD/AUX). F Display window Location of controls and basic operations. For details, see...
... wa ws q; The corresponding buttons on the card remote commander control the same functions as those on the location of controls and basic operations Main unit 1 234 56 78 SEEK MODE SEEK SOURCE OFF EQ3 SCRL DSPL PUSH SELECT AUX PTY ALBUM 1 2 REP SHUF PAUSE 3 4 5 6 9 q; Radio: To tune in stations automatically (press); C SOURCE/OFF button*1 Press to turn on the power/change the source (Radio/CD/AUX). F Display window Location of controls and basic operations. For details, see...
Operating Instructions
Page 7
... To connect a portable audio device. Setup, sound setting, etc., can be operated by < ,. Remove the insulation film before use (page 4). wd M (+)/m (-) buttons To control CD, the same as (1)/(2) (ALBUM -/+) on the card remote commander have also different buttons/functions from the unit. H Z (eject) button To eject the disc. To cancel, press again. qj SOURCE button*1 To turn off and the display disappears, it cannot be operated with the card remote commander unless (SOURCE/OFF) on ; change the source (Radio/CD/ AUX). PTY button (CDX...
... To connect a portable audio device. Setup, sound setting, etc., can be operated by < ,. Remove the insulation film before use (page 4). wd M (+)/m (-) buttons To control CD, the same as (1)/(2) (ALBUM -/+) on the card remote commander have also different buttons/functions from the unit. H Z (eject) button To eject the disc. To cancel, press again. qj SOURCE button*1 To turn off and the display disappears, it cannot be operated with the card remote commander unless (SOURCE/OFF) on ; change the source (Radio/CD/ AUX). PTY button (CDX...
Operating Instructions
Page 8
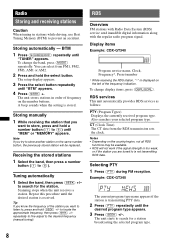
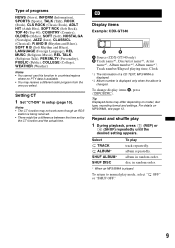
... not work if the signal strength is received. The unit starts to is stored. The unit stores stations in stations while driving, use Best Tuning Memory (BTM) to locate the approximate frequency, then press (SEEK) +/- RDS Overview FM stations with Radio Data System (RDS) service send inaudible digital information along with the regular radio program signal. Also searches your selected program type. You can select from the RDS transmission sets the clock...
... not work if the signal strength is received. The unit starts to is stored. The unit stores stations in stations while driving, use Best Tuning Memory (BTM) to locate the approximate frequency, then press (SEEK) +/- RDS Overview FM stations with Radio Data System (RDS) service send inaudible digital information along with the regular radio program signal. Also searches your selected program type. You can select from the RDS transmission sets the clock...
Operating Instructions
Page 9
... a CD TEXT, MP3/WMA is displayed. *2 Album number is displayed only when the album is changed. Select TRACK ALBUM* SHUF ALBUM* SHUF DISC To play 1 During playback, press (3) (REP) or (4) (SHUF) repeatedly until the desired setting appears. album in setup (page 10). OFF" 9 CD Display items Example: CDX-GT340 A A Source (CDX-GT340 only) B Track name*1, Disc/artist name*1, Artist name*1, Album number*2, Album name*1, Track number/Elapsed playing time, Clock *1 The information of programs...
... a CD TEXT, MP3/WMA is displayed. *2 Album number is displayed only when the album is changed. Select TRACK ALBUM* SHUF ALBUM* SHUF DISC To play 1 During playback, press (3) (REP) or (4) (SHUF) repeatedly until the desired setting appears. album in setup (page 10). OFF" 9 CD Display items Example: CDX-GT340 A A Source (CDX-GT340 only) B Track name*1, Disc/artist name*1, Artist name*1, Album number*2, Album name*1, Track number/Elapsed playing time, Clock *1 The information of programs...
Operating Instructions
Page 10
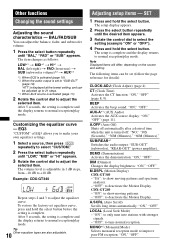
... (front-rear) t SUB (subwoofer volume)*2 t AUX*3 *1 When EQ3 is activated (page 10). *2 When the audio output is complete and the display returns to normal reception/play mode. The setup is set equalizer curve, press and hold the select button before the setting is complete and the display returns to normal reception/play mode. DEMO (Demonstration) Activates the demonstration: "ON," "OFF." DIM (Dimmer) Changes the display brightness: "ON," "OFF." MONO*2 (Monaural Mode) Selects monaural reception mode to adjust the equalizer curve...
... (front-rear) t SUB (subwoofer volume)*2 t AUX*3 *1 When EQ3 is activated (page 10). *2 When the audio output is complete and the display returns to normal reception/play mode. The setup is set equalizer curve, press and hold the select button before the setting is complete and the display returns to normal reception/play mode. DEMO (Demonstration) Activates the demonstration: "ON," "OFF." DIM (Dimmer) Changes the display brightness: "ON," "OFF." MONO*2 (Monaural Mode) Selects monaural reception mode to adjust the equalizer curve...

Operating Instructions
Page 11
... unit. 5 Press the select button repeatedly until "AUX" appears. HPF (High Pass Filter) Selects the front/rear speaker cut -off frequency: "OFF," "80Hz," "100Hz," "120Hz," "140Hz," "160Hz." Using optional equipment Auxiliary audio equipment By connecting an optional portable audio device to the AUX input jack (stereo mini jack) on the unit and then simply selecting the source, you can listen on the unit. 3 Connect to adjust the volume for clear sound at a moderate volume. 4 Set your car speakers. Adjust the volume level...
... unit. 5 Press the select button repeatedly until "AUX" appears. HPF (High Pass Filter) Selects the front/rear speaker cut -off frequency: "OFF," "80Hz," "100Hz," "120Hz," "140Hz," "160Hz." Using optional equipment Auxiliary audio equipment By connecting an optional portable audio device to the AUX input jack (stereo mini jack) on the unit and then simply selecting the source, you can listen on the unit. 3 Connect to adjust the volume for clear sound at a moderate volume. 4 Set your car speakers. Adjust the volume level...
Operating Instructions
Page 12
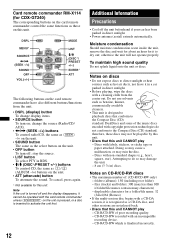
Card remote commander RM-X114 (for CDX-GT240) The corresponding buttons on the card remote commander control the same functions as those on this unit. DSPL MENU* SOURCE
Card remote commander RM-X114 (for CDX-GT240) The corresponding buttons on the card remote commander control the same functions as those on this unit. DSPL MENU* SOURCE
Operating Instructions
Page 13
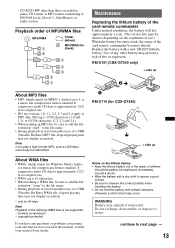
... MP3/WMA Folder (album) MP3/WMA file (track) Maintenance Replacing the lithium battery of in music CD format or MP3 format conforming to observe the correct polarity when installing the battery. • Do not hold the battery with a new CR2025 lithium battery. copyright-protected If you play a high-bit-rate MP3, such as 320 kbps, sound may present a risk of its original size. • WMA tag is not supported. - Replace...
... MP3/WMA Folder (album) MP3/WMA file (track) Maintenance Replacing the lithium battery of in music CD format or MP3 format conforming to observe the correct polarity when installing the battery. • Do not hold the battery with a new CR2025 lithium battery. copyright-protected If you play a high-bit-rate MP3, such as 320 kbps, sound may present a risk of its original size. • WMA tag is not supported. - Replace...

Operating Instructions
Page 14
... simultaneously until they click. Hook facing inwards. 2 Pull the release keys to unseat the unit. 3 Slide the unit out of the front panel Notes • For safety, turn off the ignition before cleaning the connectors, and remove the key from the ignition switch. • Never touch the connectors directly with a cotton swab. If the fuse blows again after replacement, there may be damaged...
... simultaneously until they click. Hook facing inwards. 2 Pull the release keys to unseat the unit. 3 Slide the unit out of the front panel Notes • For safety, turn off the ignition before cleaning the connectors, and remove the key from the ignition switch. • Never touch the connectors directly with a cotton swab. If the fuse blows again after replacement, there may be damaged...
Operating Instructions
Page 15
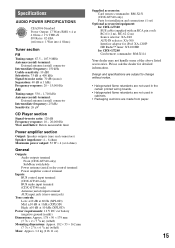
... Frequency response: 10 - 20,000 Hz Wow and flutter: Below measurable limit Power amplifier section Output: Speaker outputs (sure seal connectors) Speaker impedance: 4 - 8 ohms Maximum power output: 52 W × 4 (at 4 ohms) General Outputs: Audio outputs terminal Front (CDX-GT340 only) Sub/Rear switchable Power antenna (aerial) relay control terminal Power amplifier control terminal Inputs: BUS control input terminal (CDX-GT340 only) BUS audio input terminal (CDX-GT340 only) Antenna (aerial) input terminal AUX input jack (stereo mini jack) Tone controls: Low: ±10 dB at 60 Hz (XPLOD...
... Frequency response: 10 - 20,000 Hz Wow and flutter: Below measurable limit Power amplifier section Output: Speaker outputs (sure seal connectors) Speaker impedance: 4 - 8 ohms Maximum power output: 52 W × 4 (at 4 ohms) General Outputs: Audio outputs terminal Front (CDX-GT340 only) Sub/Rear switchable Power antenna (aerial) relay control terminal Power amplifier control terminal Inputs: BUS control input terminal (CDX-GT340 only) BUS audio input terminal (CDX-GT340 only) Antenna (aerial) input terminal AUX input jack (stereo mini jack) Tone controls: Low: ±10 dB at 60 Hz (XPLOD...
Operating Instructions
Page 16
.... The Auto Off function activates after turning off the unit. 16 Radio reception The stations cannot be operated with your car has built-in FM/AM antenna (aerial) in the memory. • The broadcast signal is performed for audio use (page 12). t Connect a power antenna (aerial) control lead (blue) or accessory power supply lead (red) to the power supply lead of the power antenna (aerial) control lead. t Perform manual tuning. An FM program broadcast in stereo is...
.... The Auto Off function activates after turning off the unit. 16 Radio reception The stations cannot be operated with your car has built-in FM/AM antenna (aerial) in the memory. • The broadcast signal is performed for audio use (page 12). t Connect a power antenna (aerial) control lead (blue) or accessory power supply lead (red) to the power supply lead of the power antenna (aerial) control lead. t Perform manual tuning. An FM program broadcast in stereo is...
Operating Instructions
Page 17
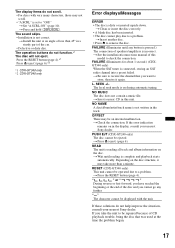
... the installation/connections manual of speakers/amplifiers is reading all track and album information on during automatic tuning. t Insert a music CD in the display, consult your nearest Sony dealer. t Wait until any further. SEEK +/- t Insert another disc. • Press Z to be displayed with very many characters, those may take the unit to remove the disc. Press the RESET button (page 4).*1 Press Z (eject) (page 6).*2 *1 CDX-GT340 only *2 CDX-GT240 only Error displays/Messages ERROR...
... the installation/connections manual of speakers/amplifiers is reading all track and album information on during automatic tuning. t Insert a music CD in the display, consult your nearest Sony dealer. t Wait until any further. SEEK +/- t Insert another disc. • Press Z to be displayed with very many characters, those may take the unit to remove the disc. Press the RESET button (page 4).*1 Press Z (eject) (page 6).*2 *1 CDX-GT340 only *2 CDX-GT240 only Error displays/Messages ERROR...
Operating Instructions
Page 36
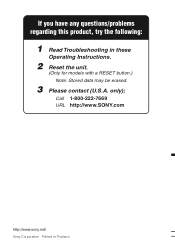
Call 1-800-222-7669 URL http://www.SONY.com http://www.sony.net/ Sony Corporation Printed in these Operating Instructions. 2 Reset the unit. (Only for models with a RESET button.) Note: Stored data may be erased. 3 Please contact (U.S.A. only); If you have any questions/problems regarding this product, try the following: 1 Read Troubleshooting in Thailand
Call 1-800-222-7669 URL http://www.SONY.com http://www.sony.net/ Sony Corporation Printed in these Operating Instructions. 2 Reset the unit. (Only for models with a RESET button.) Note: Stored data may be erased. 3 Please contact (U.S.A. only); If you have any questions/problems regarding this product, try the following: 1 Read Troubleshooting in Thailand


