Operating Instructions
Page 4
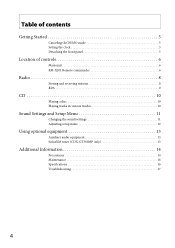
Table of contents Getting Started 5 Canceling the DEMO mode 5 Setting the clock 5 Detaching the front panel 5 Location of controls 6 Main unit 6 RM-X201 Remote commander 6 Radio 8 Storing and receiving stations 8 RDS 9 CD 10 Playing a disc 10 Playing tracks in various modes 10 Sound Settings and Setup Menu 11 Changing the sound settings 11 Adjusting setup items 12 Using optional equipment 13 Auxiliary audio equipment 13 SiriusXM tuner (CDX-GT360MP only 13 Additional Information 14 Precautions 14 Maintenance 16 Specifications 16 Troubleshooting 17 4
Table of contents Getting Started 5 Canceling the DEMO mode 5 Setting the clock 5 Detaching the front panel 5 Location of controls 6 Main unit 6 RM-X201 Remote commander 6 Radio 8 Storing and receiving stations 8 RDS 9 CD 10 Playing a disc 10 Playing tracks in various modes 10 Sound Settings and Setup Menu 11 Changing the sound settings 11 Adjusting setup items 12 Using optional equipment 13 Auxiliary audio equipment 13 SiriusXM tuner (CDX-GT360MP only 13 Additional Information 14 Precautions 14 Maintenance 16 Specifications 16 Troubleshooting 17 4
Operating Instructions
Page 6
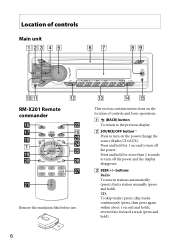
... press again within about 1 second and hold ). Press and hold for more than 2 seconds to turn on the location of controls Main unit RM-X201 Remote commander Remove the insulation film before use. 6 This section contains instructions on the power/change the source (Radio/CD/AUX). Location of controls and basic...
... press again within about 1 second and hold ). Press and hold for more than 2 seconds to turn on the location of controls Main unit RM-X201 Remote commander Remove the insulation film before use. 6 This section contains instructions on the power/change the source (Radio/CD/AUX). Location of controls and basic...
Operating Instructions
Page 7
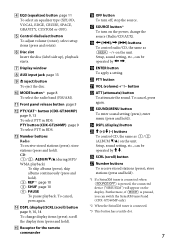
..., etc., can be operated by SCRL (scroll) button Number buttons To receive stored stations (press); store stations (press and hold ). Receptor for the remote commander OFF button To turn on the unit. enter menu (press and hold). DSPL (display) button buttons To control CD, the same as...
..., etc., can be operated by SCRL (scroll) button Number buttons To receive stored stations (press); store stations (press and hold ). Receptor for the remote commander OFF button To turn on the unit. enter menu (press and hold). DSPL (display) button buttons To control CD, the same as...
Operating Instructions
Page 8
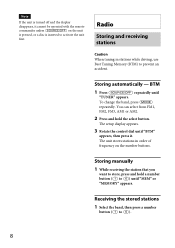
...; to prevent an accident. Storing automatically - The setup display appears. 3 Rotate the control dial until "BTM" appears, then press it cannot be operated with the remote commander unless on the number buttons. Radio Storing and receiving stations Caution When tuning in order of frequency on the unit is pressed, or a disc...
...; to prevent an accident. Storing automatically - The setup display appears. 3 Rotate the control dial until "BTM" appears, then press it cannot be operated with the remote commander unless on the number buttons. Radio Storing and receiving stations Caution When tuning in order of frequency on the unit is pressed, or a disc...
Operating Instructions
Page 16
... to -noise ratio: 120 dB Frequency response: 10 - 20,000 Hz Wow and flutter: Below measurable limit Do not recharge, disassemble, or dispose of the remote commander becomes shorter. Use of children. Do not apply too much force. NOT APPLICABLE IN CANADA, INCLUDING IN THE PROVINCE OF QUEBEC. Specifications FOR UNITED... the ignition switch. • Never touch the connectors directly with your fingers or with a new CR2025 lithium battery. Maintenance Replacing the lithium battery of the remote commander When the battery becomes weak, the range of in fire.
... to -noise ratio: 120 dB Frequency response: 10 - 20,000 Hz Wow and flutter: Below measurable limit Do not recharge, disassemble, or dispose of the remote commander becomes shorter. Use of children. Do not apply too much force. NOT APPLICABLE IN CANADA, INCLUDING IN THE PROVINCE OF QUEBEC. Specifications FOR UNITED... the ignition switch. • Never touch the connectors directly with your fingers or with a new CR2025 lithium battery. Maintenance Replacing the lithium battery of the remote commander When the battery becomes weak, the range of in fire.
Operating Instructions
Page 17
... 4 ohms) General Outputs: Audio outputs terminal (rear/sub switchable) Power antenna (aerial)/Power amplifier control terminal (REM OUT) Inputs: SiriusXM input terminal Remote controller input terminal Antenna (aerial) input terminal AUX input jack (stereo mini jack) Tone controls: Low: ±10 dB at 60 Hz (XPLOD)... you are not using the fuse and removing the unit from the dashboard, refer to the installation/connections manual supplied with the remote commander. - Before going through the checklist below, check the connection and operating procedures. No sound. The ATT function...
... 4 ohms) General Outputs: Audio outputs terminal (rear/sub switchable) Power antenna (aerial)/Power amplifier control terminal (REM OUT) Inputs: SiriusXM input terminal Remote controller input terminal Antenna (aerial) input terminal AUX input jack (stereo mini jack) Tone controls: Low: ±10 dB at 60 Hz (XPLOD)... you are not using the fuse and removing the unit from the dashboard, refer to the installation/connections manual supplied with the remote commander. - Before going through the checklist below, check the connection and operating procedures. No sound. The ATT function...
Marketing Specifications
Page 1
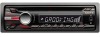
...52 watt x 4 high power amplifier • 2 Volt rear/sub selectable preamp outputs with HPF/LPF • Radio Data System (RDS) • Convenient wireless remote (RM-X201) • Red key illumination Features Detach face with compatible radio station broadcasts. Internal high power and EQ The CDX-GT260MP delivers 52 watts...digital MP3/WMA files from 20 Hz to -read single line LCD display shows clock, station ID and track data when playing back your Sony® CDX-GT260MP car stereo receiver. RDS also allows expanded channel playback with front aux input The easy-to 20 kHz with less ...
...52 watt x 4 high power amplifier • 2 Volt rear/sub selectable preamp outputs with HPF/LPF • Radio Data System (RDS) • Convenient wireless remote (RM-X201) • Red key illumination Features Detach face with compatible radio station broadcasts. Internal high power and EQ The CDX-GT260MP delivers 52 watts...digital MP3/WMA files from 20 Hz to -read single line LCD display shows clock, station ID and track data when playing back your Sony® CDX-GT260MP car stereo receiver. RDS also allows expanded channel playback with front aux input The easy-to 20 kHz with less ...
Marketing Specifications
Page 3
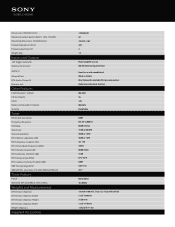
... Preout output level (V) Weight (kg) Inputs and Outputs 12V Trigger Output(s) Antenna Terminal(s) Audio In Infrared Port RCA Audio Output(s) Remote Jack Other Features Card Remote ( ): Option CD lock mode Clock Rotary commander ( ):Option Security Tuner FM Usable Sensitivity Frequency Response S/N Ratio Selectivity Stereo Separation ...162 220 2 1.2 Power amplifier turn on AM/FM Antenna Input Terminal Front Aux in with variable level Wireless remote Rear/Subwoofer selectable RCA pre-amp outputs Optional wired remote terminal RM-X201 Yes 12H (RM-X4S) Detachable 8 dBf FM: 20-15,000 Hz 80 dB (stereo...
... Preout output level (V) Weight (kg) Inputs and Outputs 12V Trigger Output(s) Antenna Terminal(s) Audio In Infrared Port RCA Audio Output(s) Remote Jack Other Features Card Remote ( ): Option CD lock mode Clock Rotary commander ( ):Option Security Tuner FM Usable Sensitivity Frequency Response S/N Ratio Selectivity Stereo Separation ...162 220 2 1.2 Power amplifier turn on AM/FM Antenna Input Terminal Front Aux in with variable level Wireless remote Rear/Subwoofer selectable RCA pre-amp outputs Optional wired remote terminal RM-X201 Yes 12H (RM-X4S) Detachable 8 dBf FM: 20-15,000 Hz 80 dB (stereo...

Marketing Specifications
Page 4
Supplied Accessories Parts for installation and connections (1 set) RM-X201 wireless remote © 2011 Sony Electronics Inc. Sony and the Sony logo are subject to change without written permission is a trademark of Sony. iPod is prohibited. Updated: September 8, 2011 Reproduction in whole or in part without notice. All rights reserved. Features and specifications are trademarks of Apple Inc.
Supplied Accessories Parts for installation and connections (1 set) RM-X201 wireless remote © 2011 Sony Electronics Inc. Sony and the Sony logo are subject to change without written permission is a trademark of Sony. iPod is prohibited. Updated: September 8, 2011 Reproduction in whole or in part without notice. All rights reserved. Features and specifications are trademarks of Apple Inc.


