
Operating Instructions
Page 4
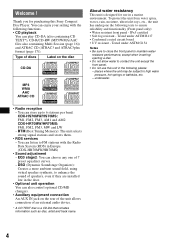
...You can enjoy your sailing with the Radio Data System (RDS) in Europe. (CDX-HR70MW/HR70MS) • Sound adjustment - Welcome ! To protect the unit from... device. * A CD TEXT disc is designed for purchasing this unit in a marine environment. BTM (Best Tuning Memory): The unit selects strong signal stations and stores ...control optional CD/MD changers. • Auxiliary equipment connection An AUX IN jack on the rear of the unit allows connection of discs...the following places: - CDX-HS70MW/HS70MS: FM1, FM2, FM3, AM1 and AM2 CDX-HR70MW/HR70MS: FM1, FM2, FM3, MW and LW -...
...You can enjoy your sailing with the Radio Data System (RDS) in Europe. (CDX-HR70MW/HR70MS) • Sound adjustment - Welcome ! To protect the unit from... device. * A CD TEXT disc is designed for purchasing this unit in a marine environment. BTM (Best Tuning Memory): The unit selects strong signal stations and stores ...control optional CD/MD changers. • Auxiliary equipment connection An AUX IN jack on the rear of the unit allows connection of discs...the following places: - CDX-HS70MW/HS70MS: FM1, FM2, FM3, AM1 and AM2 CDX-HR70MW/HR70MS: FM1, FM2, FM3, MW and LW -...
Operating Instructions
Page 7
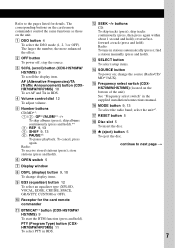
...select switch" in RDS. To cancel, press again. L SEEK -/+ buttons CD: To skip tracks (press); C SCRL (scroll) button (CDX-HS70MW/ HS70MS) 9 To scroll the display item. PTY (Program Type) button (CDXHR70MW/HR70MS) 11 To select PTY in the supplied installation/connections manual. F... OPEN switch 5 G Display window H DSPL (display) button 9, 10 To change the source (Radio/CD/ MD*1/AUX). E Number buttons CD/MD*1: (1)/(2): ...
...select switch" in RDS. To cancel, press again. L SEEK -/+ buttons CD: To skip tracks (press); C SCRL (scroll) button (CDX-HS70MW/ HS70MS) 9 To scroll the display item. PTY (Program Type) button (CDXHR70MW/HR70MS) 11 To select PTY in the supplied installation/connections manual. F... OPEN switch 5 G Display window H DSPL (display) button 9, 10 To change the source (Radio/CD/ MD*1/AUX). E Number buttons CD/MD*1: (1)/(2): ...
Operating Instructions
Page 12
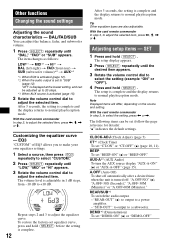
Other functions Changing the sound settings Adjusting the sound characteristics - BAL/FAD/SUB You can be adjusted up to 20 steps. *3 When AUX source is set to adjust the selected item. "ATT" is displayed at the lowest setting, and can adjust the balance, fader, and subwoofer ... to normal play/reception mode. The item changes as follows: LOW*1 t MID*1 t HI*1 t BAL (left-right) t FAD (front-rear) t SUB (subwoofer volume)*2 t AUX*3 *1 When EQ3 is activated (page 12). *2 When the audio output is activated (page 15). 2 Rotate the volume control dial to "SUB" (page 12). After 3 seconds...
Other functions Changing the sound settings Adjusting the sound characteristics - BAL/FAD/SUB You can be adjusted up to 20 steps. *3 When AUX source is set to adjust the selected item. "ATT" is displayed at the lowest setting, and can adjust the balance, fader, and subwoofer ... to normal play/reception mode. The item changes as follows: LOW*1 t MID*1 t HI*1 t BAL (left-right) t FAD (front-rear) t SUB (subwoofer volume)*2 t AUX*3 *1 When EQ3 is activated (page 12). *2 When the audio output is activated (page 15). 2 Rotate the volume control dial to "SUB" (page 12). After 3 seconds...
Operating Instructions
Page 15
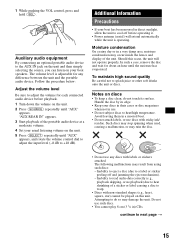
...listening volume on the unit. 5 Press (SELECT) repeatedly until the moisture has evaporated. Notes on the unit. 2 Press (SOURCE) repeatedly until "AUX" appears. Attempting to adjust the volume for each connected audio device before operating it. • Power antenna (aerial) will not operate properly. ...to next page t 15 Auxiliary audio equipment By connecting an optional portable audio device to warp. • Discs with sticky ink/ residue. "AUX REAR IN" appears. 3 Start playback of the unit. In such a case, remove the disc and wait for any discs with labels or...
...listening volume on the unit. 5 Press (SELECT) repeatedly until the moisture has evaporated. Notes on the unit. 2 Press (SOURCE) repeatedly until "AUX" appears. Attempting to adjust the volume for each connected audio device before operating it. • Power antenna (aerial) will not operate properly. ...to next page t 15 Auxiliary audio equipment By connecting an optional portable audio device to warp. • Discs with sticky ink/ residue. "AUX REAR IN" appears. 3 Start playback of the unit. In such a case, remove the disc and wait for any discs with labels or...

Operating Instructions
Page 18
...audio input terminal Remote controller input terminal Antenna (aerial) input terminal AUX input terminal Tone controls: Low: ±10 dB at 60... - 20,000 Hz Wow and flutter: Below measurable limit Tuner section CDX-HS70MW/HS70MS: FM Tuning range: 87.5 - 108.0 MHz (at 50 kHz ... dB at 400 kHz Signal-to-noise ratio: 67 dB (stereo), 69 dB (mono) Harmonic distortion at 1 kHz: 0.5 % (stereo), 0.3 % (mono) Separation: 35 dB at 1 kHz ... and connections (1 set) Optional accessories/equipment*: Marine remote commander: RM-X55M Rotary commander: RM-X4S BUS cable (supplied with no more than 5% total ...
...audio input terminal Remote controller input terminal Antenna (aerial) input terminal AUX input terminal Tone controls: Low: ±10 dB at 60... - 20,000 Hz Wow and flutter: Below measurable limit Tuner section CDX-HS70MW/HS70MS: FM Tuning range: 87.5 - 108.0 MHz (at 50 kHz ... dB at 400 kHz Signal-to-noise ratio: 67 dB (stereo), 69 dB (mono) Harmonic distortion at 1 kHz: 0.5 % (stereo), 0.3 % (mono) Separation: 35 dB at 1 kHz ... and connections (1 set) Optional accessories/equipment*: Marine remote commander: RM-X55M Rotary commander: RM-X4S BUS cable (supplied with no more than 5% total ...


