
Limited Warranty (U.S. Only)
Page 1
...including but while the Parts Warranty below . It is longer. For specific instructions on how to obtain warranty service for your product, Visit Sony's Web Site: www.sony.com/service Or call : 1-800-488-SONY (7669) Repair / Replacement Warranty: This Limited Warranty shall apply to any part of the original .... Printed in the United States. For purposes of protection to the software. A dated purchase receipt is invalid if the factory-applied serial number has been altered or removed from the original date of purchase of the product ("Labor Warranty"), Sony will do not allow...
...including but while the Parts Warranty below . It is longer. For specific instructions on how to obtain warranty service for your product, Visit Sony's Web Site: www.sony.com/service Or call : 1-800-488-SONY (7669) Repair / Replacement Warranty: This Limited Warranty shall apply to any part of the original .... Printed in the United States. For purposes of protection to the software. A dated purchase receipt is invalid if the factory-applied serial number has been altered or removed from the original date of purchase of the product ("Labor Warranty"), Sony will do not allow...
Operating Instructions
Page 1
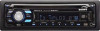
CDX-GT61UI Serial No. To cancel the demonstration (DEMO) display, see page 12. Refer to these numbers whenever you call upon your Sony dealer regarding this product. 3-096-839-12 (1) FM/AM Compact Disc Player Operating Instructions US Manual de instrucciones ES Owner's Record The model and serial numbers are located on the bottom of the unit. Model No. Para cancelar la pantalla de demostración (DEMO), consulte la página 13. CDX-GT61UI © 2007 Sony Corporation Record the serial number in the space provided below.
CDX-GT61UI Serial No. To cancel the demonstration (DEMO) display, see page 12. Refer to these numbers whenever you call upon your Sony dealer regarding this product. 3-096-839-12 (1) FM/AM Compact Disc Player Operating Instructions US Manual de instrucciones ES Owner's Record The model and serial numbers are located on the bottom of the unit. Model No. Para cancelar la pantalla de demostración (DEMO), consulte la página 13. CDX-GT61UI © 2007 Sony Corporation Record the serial number in the space provided below.
Operating Instructions
Page 2
... to operate this product will shut off completely and automatically in the set time after the unit is turned off, which the receiver is no ACC position Be sure to correct the interference by turning the equipment off . However, there is connected. - iPod is encouraged to try to set the Auto Off function, press and hold (OFF) until the display disappears each time you...
... to operate this product will shut off completely and automatically in the set time after the unit is turned off, which the receiver is no ACC position Be sure to correct the interference by turning the equipment off . However, there is connected. - iPod is encouraged to try to set the Auto Off function, press and hold (OFF) until the display disappears each time you...
Operating Instructions
Page 3
... manually 8 Receiving the stored stations 8 Tuning automatically 9 USB devices Playing back USB devices 9 Display items 9 Listening to music on a Mass Storage Class type audio device 10 Listening to music on discs 14 About USB devices 15 Playback order of controls and basic operations Main unit 6 Card remote commander RM-X151 6 CD Display items 8 Repeat and shuffle play mode 11 Selecting Album, Artist or Playlist 11 Repeat and shuffle Play 11 Scan 11 Other functions Changing the sound settings 12 Adjusting the sound characteristics...
... manually 8 Receiving the stored stations 8 Tuning automatically 9 USB devices Playing back USB devices 9 Display items 9 Listening to music on a Mass Storage Class type audio device 10 Listening to music on discs 14 About USB devices 15 Playback order of controls and basic operations Main unit 6 Card remote commander RM-X151 6 CD Display items 8 Repeat and shuffle play mode 11 Selecting Album, Artist or Playlist 11 Repeat and shuffle Play 11 Scan 11 Other functions Changing the sound settings 12 Adjusting the sound characteristics...
Operating Instructions
Page 4
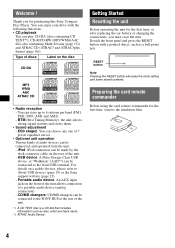
... Audio Device Getting Started Resetting the unit Before operating the unit for the first time, or after replacing the car battery or changing the connections, you for the first time, remove the insulation film. 4 Welcome ! Thank you must reset the unit. BTM (Best Tuning Memory): the unit selects strong signal stations and stores them. • Sound adjustment - EQ3 stage2: You can choose any one of 7 preset equalizer curves. • Optional unit operation Various kinds of the unit. *1 A CD TEXT disc...
... Audio Device Getting Started Resetting the unit Before operating the unit for the first time, or after replacing the car battery or changing the connections, you for the first time, remove the insulation film. 4 Welcome ! Thank you must reset the unit. BTM (Best Tuning Memory): the unit selects strong signal stations and stores them. • Sound adjustment - EQ3 stage2: You can choose any one of 7 preset equalizer curves. • Optional unit operation Various kinds of the unit. *1 A CD TEXT disc...

Operating Instructions
Page 5
... you turn the ignition switch to the previous display. Avoid leaving it off the switch during playback by a USB device, data may be damaged. 5 A B Note Do not put excessive pressure on the front panel and display window. • Do not subject the front panel to set the hour and minute. Caution alarm If you . The hour indication flashes. 4 Rotate the volume control dial...
... you turn the ignition switch to the previous display. Avoid leaving it off the switch during playback by a USB device, data may be damaged. 5 A B Note Do not put excessive pressure on the front panel and display window. • Do not subject the front panel to set the hour and minute. Caution alarm If you . The hour indication flashes. 4 Rotate the volume control dial...
Operating Instructions
Page 6
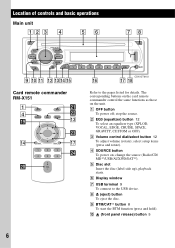
... qs qdqfqg qh CDX-GT61UI qj qk Card remote commander RM-X151 1 4 ql qf OFF ATT SOURCE SEL MODE + - The corresponding buttons on the card remote commander control the same functions as those on ; change the source (Radio/CD/ MD*1/USB/AUX/PD/SAT*2). J (front panel release) button 5 6 Refer to the USB device. F Display window G USB terminal 9 To connect to the pages listed for details. B EQ3 (equalizer) button 12 To select an equalizer type (XPLOD, VOCAL, EDGE, CRUISE...
... qs qdqfqg qh CDX-GT61UI qj qk Card remote commander RM-X151 1 4 ql qf OFF ATT SOURCE SEL MODE + - The corresponding buttons on the card remote commander control the same functions as those on ; change the source (Radio/CD/ MD*1/USB/AUX/PD/SAT*2). J (front panel release) button 5 6 Refer to the USB device. F Display window G USB terminal 9 To connect to the pages listed for details. B EQ3 (equalizer) button 12 To select an equalizer type (XPLOD, VOCAL, EDGE, CRUISE...
Operating Instructions
Page 7
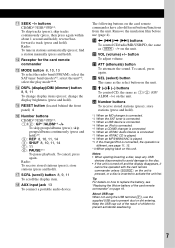
... the USB cap out of the reach of the card remote commander" on this unit. select the SAT tuner band (mode)*2; change display items (press); wa ATT (attenuate) button To attenuate the sound. skip tracks continuously (press, then press again within about 1 second and hold ). N DSPL (display)/DIM (dimmer) button 8, 9, 11 To change the display brightness (press and hold ); R AUX input jack 13 To connect a portable audio device. wf Number buttons To receive stored stations...
... the USB cap out of the reach of the card remote commander" on this unit. select the SAT tuner band (mode)*2; change display items (press); wa ATT (attenuate) button To attenuate the sound. skip tracks continuously (press, then press again within about 1 second and hold ). N DSPL (display)/DIM (dimmer) button 8, 9, 11 To change the display brightness (press and hold ); R AUX input jack 13 To connect a portable audio device. wf Number buttons To receive stored stations...
Operating Instructions
Page 8
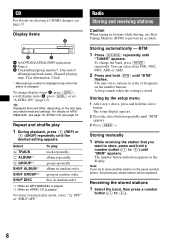
... "TUNER" appears. album repeatedly. disc in stations while driving, use Best Tuning Memory (BTM) to normal play mode, select " OFF" or "SHUF OFF." BTM 1 Press (SOURCE) repeatedly until the desired setting appears. The unit stores stations in the display. Storing manually 1 While receiving the station that you try to store another station on the number buttons. Storing automatically - Storing by the setup menu 1 After step 1 above, press and hold (BTM) until "BTM" flashes. Receiving the...
... "TUNER" appears. album repeatedly. disc in stations while driving, use Best Tuning Memory (BTM) to normal play mode, select " OFF" or "SHUF OFF." BTM 1 Press (SOURCE) repeatedly until the desired setting appears. The unit stores stations in the display. Storing manually 1 While receiving the station that you try to store another station on the number buttons. Storing automatically - Storing by the setup menu 1 After step 1 above, press and hold (BTM) until "BTM" flashes. Receiving the...

Operating Instructions
Page 9
... cause a loose connection. Display items A AAC/WMA/ATRAC/MP3 indication B ATRAC Audio Device: ALB, ART, PLY Mass Storage Class: USB C Track/album/group number, Disc/artist/ album/group/track name, Elapsed playing time, Text information, Clock To change display items C, press (DSPL); Tuning automatically 1 Select the band, then press (SEEK) -/+ to the USB terminal. Notes • Before removing a USB device, be damaged. • Do not use USB devices so large or...
... cause a loose connection. Display items A AAC/WMA/ATRAC/MP3 indication B ATRAC Audio Device: ALB, ART, PLY Mass Storage Class: USB C Track/album/group number, Disc/artist/ album/group/track name, Elapsed playing time, Text information, Clock To change display items C, press (DSPL); Tuning automatically 1 Select the band, then press (SEEK) -/+ to the USB terminal. Notes • Before removing a USB device, be damaged. • Do not use USB devices so large or...
Operating Instructions
Page 10
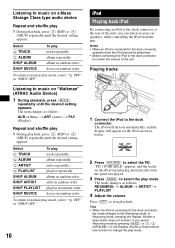
... connector, operation from the iPod cannot be performed. • Before connecting the iPod to the dock connector, turn on automatically, and the display will turn down the volume of the unit, you cancel Resuming mode by pressing (MODE) or (1)/ (2) (GP/ALBM -/+), the Repeat, Shuffle or Scan buttons now function to change the play 1 During playback, press (3) (REP) or (4) (SHUF) repeatedly until the desired setting appears. album repeatedly. Playing tracks MENU 1 Connect...
... connector, operation from the iPod cannot be performed. • Before connecting the iPod to the dock connector, turn on automatically, and the display will turn down the volume of the unit, you cancel Resuming mode by pressing (MODE) or (1)/ (2) (GP/ALBM -/+), the Repeat, Shuffle or Scan buttons now function to change the play 1 During playback, press (3) (REP) or (4) (SHUF) repeatedly until the desired setting appears. album repeatedly. Playing tracks MENU 1 Connect...

Operating Instructions
Page 12
... audio output is activated (page 13). 2 Rotate the volume control dial to "SUB" (page 12). With the card remote commander In step 2, to normal play/reception mode. "ATT" is displayed at the lowest setting, and can adjust the balance, fader, and subwoofer volume. 1 Press the select button repeatedly until "BAL," "FAD" or "SUB" appears. After 3 seconds, the setting is complete and the display returns to adjust the selected item, press Other functions Changing the sound settings Adjusting the sound...
... audio output is activated (page 13). 2 Rotate the volume control dial to "SUB" (page 12). With the card remote commander In step 2, to normal play/reception mode. "ATT" is displayed at the lowest setting, and can adjust the balance, fader, and subwoofer volume. 1 Press the select button repeatedly until "BAL," "FAD" or "SUB" appears. After 3 seconds, the setting is complete and the display returns to adjust the selected item, press Other functions Changing the sound settings Adjusting the sound...

Operating Instructions
Page 13
.... "AUX FRONT IN" appears. 3 Start playback of first releasing. repeatedly. AUX AUX Adjust the volume level Be sure to the unit. CD/MD changer Selecting the changer 1 Press (SOURCE) repeatedly until "CD" or "MD" appears. 2 Press (MODE) repeatedly until "AUX" appears, and rotate the volume control dial to adjust the input level (-8 dB to "SUB." LOCAL (Local Seek Mode) - Follow the procedure below: Connecting the portable audio device 1 Turn off frequency: "LPF OFF" (z), "LPF125Hz" or "LPF 78Hz." Unit number Disc number...
.... "AUX FRONT IN" appears. 3 Start playback of first releasing. repeatedly. AUX AUX Adjust the volume level Be sure to the unit. CD/MD changer Selecting the changer 1 Press (SOURCE) repeatedly until "CD" or "MD" appears. 2 Press (MODE) repeatedly until "AUX" appears, and rotate the volume control dial to adjust the input level (-8 dB to "SUB." LOCAL (Local Seek Mode) - Follow the procedure below: Connecting the portable audio device 1 Turn off frequency: "LPF OFF" (z), "LPF125Hz" or "LPF 78Hz." Unit number Disc number...
Operating Instructions
Page 14
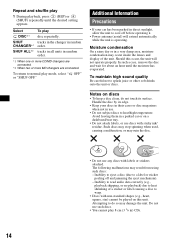
tracks in the changer in ) CDs. 14 In such a case, remove the disc and wait for about an hour until the desired setting appears. To maintain high sound quality Be careful not to a label or sticker peeling off before operating it. • Power antenna (aerial) will not operate properly. Avoid leaving them in a parked car or on this occur, the unit will extend...
tracks in the changer in ) CDs. 14 In such a case, remove the disc and wait for about an hour until the desired setting appears. To maintain high sound quality Be careful not to a label or sticker peeling off before operating it. • Power antenna (aerial) will not operate properly. Avoid leaving them in a parked car or on this occur, the unit will extend...
Operating Instructions
Page 15
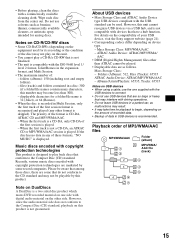
... (track) 15 When the first track is not a CD-DA, an ATRAC CD or MP3/WMA/AAC session is displayed. Music discs encoded with copyright protection technologies This product is played. - Recently, various music discs encoded with digital audio material on one supplied with the USB devices to the Compact Disc (CD) standard, playback on the compatibility of the format is not guaranteed. Playback order of...
... (track) 15 When the first track is not a CD-DA, an ATRAC CD or MP3/WMA/AAC session is displayed. Music discs encoded with copyright protection technologies This product is played. - Recently, various music discs encoded with digital audio material on one supplied with the USB devices to the Compact Disc (CD) standard, playback on the compatibility of the format is not guaranteed. Playback order of...
Operating Instructions
Page 16
... playback or fast-forward/reverse of a VBR (variable bit rate) AAC file, elapsed playing time may not display accurately. * only for 128 kbps Note on ATRAC CD and ATRAC Audio Device, see the SonicStage manual. About ATRAC files ATRAC3plus format ATRAC3, which stands for Adaptive Transform Acoustic Coding3, is 65535. • The characters for a folder/file name and...
... playback or fast-forward/reverse of a VBR (variable bit rate) AAC file, elapsed playing time may not display accurately. * only for 128 kbps Note on ATRAC CD and ATRAC Audio Device, see the SonicStage manual. About ATRAC files ATRAC3plus format ATRAC3, which stands for Adaptive Transform Acoustic Coding3, is 65535. • The characters for a folder/file name and...
Operating Instructions
Page 17
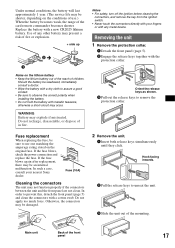
... protection collar. Fuse replacement When replacing the fuse, be an internal malfunction. Fuse (10A) Cleaning the connectors The unit may explode if mistreated. Hook facing inwards. 2 Pull the release keys to use .) When the battery becomes weak, the range of any metal device. Notes • For safety, turn off the ignition before cleaning the connectors, and remove the key from the ignition switch. • Never touch the connectors directly...
... protection collar. Fuse replacement When replacing the fuse, be an internal malfunction. Fuse (10A) Cleaning the connectors The unit may explode if mistreated. Hook facing inwards. 2 Pull the release keys to use .) When the battery becomes weak, the range of any metal device. Notes • For safety, turn off the ignition before cleaning the connectors, and remove the key from the ignition switch. • Never touch the connectors directly...
Operating Instructions
Page 18
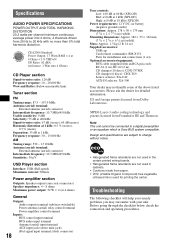
...: 30 µV USB Player section Interface: USB (Full-speed) Maximum current: 500mA Power amplifier section Outputs: Speaker outputs (sure seal connectors) Speaker impedance: 4 - 8 ohms Maximum power output: 52 W × 4 (at 4 ohms) General Output: Audio outputs terminal (sub/rear switchable) Power antenna (aerial) relay control terminal Power amplifier control terminal Inputs: BUS control input terminal BUS audio input terminal Antenna (aerial) input terminal AUX input jack (stereo mini jack) iPod signal input terminal (dock connector) 18 Tone controls: Low: ±10 dB at 60 Hz (XPLOD) Mid...
...: 30 µV USB Player section Interface: USB (Full-speed) Maximum current: 500mA Power amplifier section Outputs: Speaker outputs (sure seal connectors) Speaker impedance: 4 - 8 ohms Maximum power output: 52 W × 4 (at 4 ohms) General Output: Audio outputs terminal (sub/rear switchable) Power antenna (aerial) relay control terminal Power amplifier control terminal Inputs: BUS control input terminal BUS audio input terminal Antenna (aerial) input terminal AUX input jack (stereo mini jack) iPod signal input terminal (dock connector) 18 Tone controls: Low: ±10 dB at 60 Hz (XPLOD) Mid...
Operating Instructions
Page 19
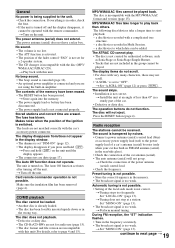
... the power antenna (aerial) control lead. • Check the frequency. t Press and hold (OFF). Make sure the insulation film has been removed (page 4). MP3/WMA/AAC files take a longer time to the unit. • Check the connection. a disc/device recorded in the memory. • The broadcast signal is too weak. The display items do not function. The sound skips. • Installation is not possible. t Install the unit at a station: Set...
... the power antenna (aerial) control lead. • Check the frequency. t Press and hold (OFF). Make sure the insulation film has been removed (page 4). MP3/WMA/AAC files take a longer time to the unit. • Check the connection. a disc/device recorded in the memory. • The broadcast signal is too weak. The display items do not function. The sound skips. • Installation is not possible. t Install the unit at a station: Set...
Operating Instructions
Page 20
... sure to receive the channel that has a hub function. SEEK +/- t Connect iPod to connect a USB device and USB cable. t Connect a USB device with recorded tracks. NOT READ The disc information has not been read by pressing (SOURCE). OFFSET There may take more than a minute. t Wait until confirming the connection is incorrect. RESET The CD unit and CD/MD changer cannot be an internal malfunction. t Set "MONO-OFF" (page 13). The sound may be...
... sure to receive the channel that has a hub function. SEEK +/- t Connect iPod to connect a USB device and USB cable. t Connect a USB device with recorded tracks. NOT READ The disc information has not been read by pressing (SOURCE). OFFSET There may take more than a minute. t Wait until confirming the connection is incorrect. RESET The CD unit and CD/MD changer cannot be an internal malfunction. t Set "MONO-OFF" (page 13). The sound may be...


