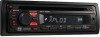
Operating Instructions
Page 3
... 10 Auxiliary audio equipment 10 Additional Information Precautions 11 Notes on discs 11 Playback order of controls and basic operations Main unit 6 CD Display items 8 Repeat and shuffle play 8 Radio Storing and receiving stations 8 Storing automatically - BTM 8 Storing manually 8 Receiving the stored stations 8 Tuning automatically 9 Other functions Changing the sound settings 9 Adjusting... 12 About MP3 files 12 About WMA files 12 Maintenance 13 Removing the unit 13 Specifications 14 Troubleshooting 14 Error displays/Messages 15 3 EQ3 9 Adjusting setup items -
... 10 Auxiliary audio equipment 10 Additional Information Precautions 11 Notes on discs 11 Playback order of controls and basic operations Main unit 6 CD Display items 8 Repeat and shuffle play 8 Radio Storing and receiving stations 8 Storing automatically - BTM 8 Storing manually 8 Receiving the stored stations 8 Tuning automatically 9 Other functions Changing the sound settings 9 Adjusting... 12 About MP3 files 12 About WMA files 12 Maintenance 13 Removing the unit 13 Specifications 14 Troubleshooting 14 Error displays/Messages 15 3 EQ3 9 Adjusting setup items -
Operating Instructions
Page 4
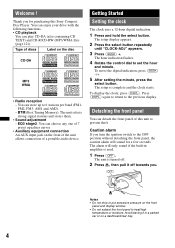
...8226; Do not subject the front panel to prevent theft. EQ3 stage2: You can detach the front panel of this Sony Compact Disc Player. To display the clock, press (DSPL). Press (DSPL) again to return to set the hour ... containing CD TEXT) and CD-R/CD-RW (MP3/WMA files (page 12)). Notes • Do not drop or put excessive pressure on a dashboard/rear tray. 4 Avoid leaving it off . 2 Press , then pull it in amplifier is complete and the clock starts. The setup is... the front of the unit allows connection of discs Label on the disc CD-DA MP3 WMA • Radio reception -
...8226; Do not subject the front panel to prevent theft. EQ3 stage2: You can detach the front panel of this Sony Compact Disc Player. To display the clock, press (DSPL). Press (DSPL) again to return to set the hour ... containing CD TEXT) and CD-R/CD-RW (MP3/WMA files (page 12)). Notes • Do not drop or put excessive pressure on a dashboard/rear tray. 4 Avoid leaving it off . 2 Press , then pull it in amplifier is complete and the clock starts. The setup is... the front of the unit allows connection of discs Label on the disc CD-DA MP3 WMA • Radio reception -
Operating Instructions
Page 6
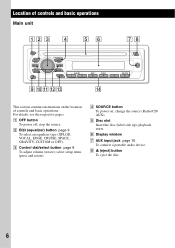
... PUSH SELECT SOURCE SEEK MODE BTM ALBUM 1 2 REP 3 SHUF 4 PAUSE 5 6 9 q; select setup items (press and rotate). A OFF button To power off; E Disc slot Insert the disc (label side up), playback starts. H Z (eject) button To eject the disc. 6 change the source (Radio/CD/ AUX). B EQ3 (equalizer) button page 9 To select an equalizer type (XPLOD...
... PUSH SELECT SOURCE SEEK MODE BTM ALBUM 1 2 REP 3 SHUF 4 PAUSE 5 6 9 q; select setup items (press and rotate). A OFF button To power off; E Disc slot Insert the disc (label side up), playback starts. H Z (eject) button To eject the disc. 6 change the source (Radio/CD/ AUX). B EQ3 (equalizer) button page 9 To select an equalizer type (XPLOD...
Operating Instructions
Page 10
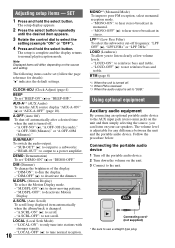
...equipment Auxiliary audio equipment By connecting an optional portable audio device to the AUX input jack (stereo mini jack) on your car speakers. Adjusting setup items - "A.OFF-NO" (z), "A.OFF-30S (Seconds)," "A.OFF-30M (Minutes)" or "A.OFF-60M (Minutes)." A.SCRL (Auto Scroll) To... Display) To select the Motion Display mode. - "LOUD-OFF" (z): to deactivate Motion Display. "DIM-OFF" (z): to normal play/reception mode. The setup is adjustable for details): "z" indicates the default settings. SUB/REAR*1 To switch the audio output. - "A.SCRL-ON" (z): to tune normal reception. 10...
...equipment Auxiliary audio equipment By connecting an optional portable audio device to the AUX input jack (stereo mini jack) on your car speakers. Adjusting setup items - "A.OFF-NO" (z), "A.OFF-30S (Seconds)," "A.OFF-30M (Minutes)" or "A.OFF-60M (Minutes)." A.SCRL (Auto Scroll) To... Display) To select the Motion Display mode. - "LOUD-OFF" (z): to deactivate Motion Display. "DIM-OFF" (z): to normal play/reception mode. The setup is adjustable for details): "z" indicates the default settings. SUB/REAR*1 To switch the audio output. - "A.SCRL-ON" (z): to tune normal reception. 10...


