Operating Instructions
Page 1
... à la page 10. CDX-GT23W Serial No. Para cancelar la pantalla de demostración (DEMO), consulte la página 10. Refer to these numbers whenever you call upon your Sony dealer regarding this product. 3-878-427-11 (1) FM/AM Compact Disc Player Operating Instructions US Mode d'emploi FR Manual de instrucciones ES Owner's Record The model and serial numbers are located on the bottom of the unit.
... à la page 10. CDX-GT23W Serial No. Para cancelar la pantalla de demostración (DEMO), consulte la página 10. Refer to these numbers whenever you call upon your Sony dealer regarding this product. 3-878-427-11 (1) FM/AM Compact Disc Player Operating Instructions US Mode d'emploi FR Manual de instrucciones ES Owner's Record The model and serial numbers are located on the bottom of the unit.
Operating Instructions
Page 2
... outlet on , the user is connected. - The unit will increase eye hazard. Reorient or relocate the receiving antenna. - Microsoft, Windows Media, and the Windows logo are designed to provide reasonable protection against harmful interference in this manual could void your car's ignition has no guarantee that to which can radiate radio frequency energy and, if not installed and used in accordance with...
... outlet on , the user is connected. - The unit will increase eye hazard. Reorient or relocate the receiving antenna. - Microsoft, Windows Media, and the Windows logo are designed to provide reasonable protection against harmful interference in this manual could void your car's ignition has no guarantee that to which can radiate radio frequency energy and, if not installed and used in accordance with...
Operating Instructions
Page 3
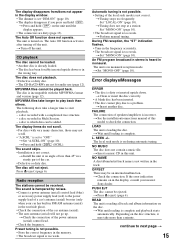
... 13 Removing the unit 13 Specifications 14 Troubleshooting 14 Error displays/Messages 15 3 BAL/FAD/SUB 9 Customizing the equalizer curve - BTM 8 Storing manually 8 Receiving the stored stations 8 Tuning automatically 9 Other functions Changing the sound settings 9 Adjusting the sound characteristics - SET 10 Using optional equipment 10 Auxiliary audio equipment 10 Additional Information Precautions 11 Notes on discs 11 Playback order of controls and basic operations Main unit 6 CD Display items 8 Repeat and shuffle play 8 Radio Storing and receiving stations 8 Storing...
... 13 Removing the unit 13 Specifications 14 Troubleshooting 14 Error displays/Messages 15 3 BAL/FAD/SUB 9 Customizing the equalizer curve - BTM 8 Storing manually 8 Receiving the stored stations 8 Tuning automatically 9 Other functions Changing the sound settings 9 Adjusting the sound characteristics - SET 10 Using optional equipment 10 Auxiliary audio equipment 10 Additional Information Precautions 11 Notes on discs 11 Playback order of controls and basic operations Main unit 6 CD Display items 8 Repeat and shuffle play 8 Radio Storing and receiving stations 8 Storing...
Operating Instructions
Page 4
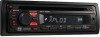
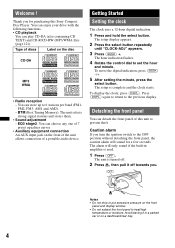
... drive with the following functions. • CD playback You can detach the front panel of 7 preset equalizer curves. • Auxiliary equipment connection An AUX input jack on the front panel and display window. • Do not subject the front panel to prevent theft. You can choose any one of this Sony Compact Disc Player. BTM (Best Tuning Memory): The unit selects strong signal stations and stores them. • Sound adjustment - Getting Started Setting the clock The clock uses...
... drive with the following functions. • CD playback You can detach the front panel of 7 preset equalizer curves. • Auxiliary equipment connection An AUX input jack on the front panel and display window. • Do not subject the front panel to prevent theft. You can choose any one of this Sony Compact Disc Player. BTM (Best Tuning Memory): The unit selects strong signal stations and stores them. • Sound adjustment - Getting Started Setting the clock The clock uses...
Operating Instructions
Page 5
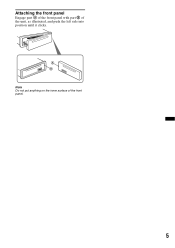
A B Note Do not put anything on the inner surface of the unit, as illustrated, and push the left side into position until it clicks. Attaching the front panel Engage part A of the front panel with part B of the front panel. 5
A B Note Do not put anything on the inner surface of the unit, as illustrated, and push the left side into position until it clicks. Attaching the front panel Engage part A of the front panel with part B of the front panel. 5
Operating Instructions
Page 6
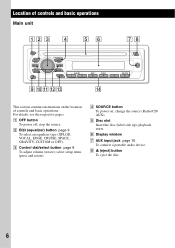
... SELECT SOURCE SEEK MODE BTM ALBUM 1 2 REP 3 SHUF 4 PAUSE 5 6 9 q; select setup items (press and rotate). E Disc slot Insert the disc (label side up), playback starts. qa qs qd qf This section contains instructions on ; change the source (Radio/CD/ AUX). Location of controls and basic operations. For details, see the respective pages. H Z (eject) button To eject the disc. 6 C Control dial/select button page 9 To adjust volume (rotate); F Display window G AUX input jack page 10 To connect a portable audio device. A OFF button To power...
... SELECT SOURCE SEEK MODE BTM ALBUM 1 2 REP 3 SHUF 4 PAUSE 5 6 9 q; select setup items (press and rotate). E Disc slot Insert the disc (label side up), playback starts. qa qs qd qf This section contains instructions on ; change the source (Radio/CD/ AUX). Location of controls and basic operations. For details, see the respective pages. H Z (eject) button To eject the disc. 6 C Control dial/select button page 9 To adjust volume (rotate); F Display window G AUX input jack page 10 To connect a portable audio device. A OFF button To power...
Operating Instructions
Page 7
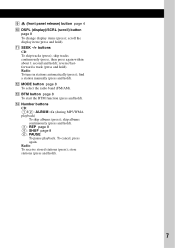
... and hold ). scroll the display item (press and hold ). 7 I (front panel release) button page 4 J DSPL (display)/SCRL (scroll) button page 8 To change display items (press); skip tracks continuously (press, then press again within about 1 second and hold ). find a station manually (press and hold ); Radio: To receive stored stations (press); Radio: To tune in stations automatically (press); L MODE button page 8 To select the radio band (FM/AM). N Number buttons CD: (1)/(2): ALBUM -/+ (during MP3...
... and hold ). scroll the display item (press and hold ). 7 I (front panel release) button page 4 J DSPL (display)/SCRL (scroll) button page 8 To change display items (press); skip tracks continuously (press, then press again within about 1 second and hold ). find a station manually (press and hold ); Radio: To receive stored stations (press); Radio: To tune in stations automatically (press); L MODE button page 8 To select the radio band (FM/AM). N Number buttons CD: (1)/(2): ALBUM -/+ (during MP3...
Operating Instructions
Page 8
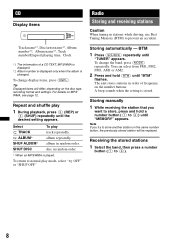
... (SOURCE) repeatedly until "BTM" flashes. Radio Storing and receiving stations Caution When tuning in order of a CD TEXT, MP3/WMA is displayed. *2 Album number is displayed only when the album is stored. CD Display items Track name*1, Disc/artist name*1, Album number*2, Album name*1, Track number/Elapsed playing time, Clock *1 The information of frequency on MP3/ WMA, see page 12. For details on the number buttons. The unit stores stations in stations while driving, use Best Tuning Memory...
... (SOURCE) repeatedly until "BTM" flashes. Radio Storing and receiving stations Caution When tuning in order of a CD TEXT, MP3/WMA is displayed. *2 Album number is displayed only when the album is stored. CD Display items Track name*1, Disc/artist name*1, Album number*2, Album name*1, Track number/Elapsed playing time, Clock *1 The information of frequency on MP3/ WMA, see page 12. For details on the number buttons. The unit stores stations in stations while driving, use Best Tuning Memory...

Operating Instructions
Page 9
... the display returns to normal play /reception mode. The item changes as follows: LOW*1 t MID*1 t HI*1 t BAL (left-right) t FAD (front-rear) t SUB (subwoofer volume)*2 t AUX*3 *1 When EQ3 is activated (page 9). *2 When the audio output is set equalizer curve, press and hold (SEEK) -/+ to locate the approximate frequency, then press (SEEK) -/+ repeatedly to fine adjust to the desired frequency (manual tuning). EQ3 "CUSTOM" of the station you to make your own equalizer settings. 1 Select a source, then...
... the display returns to normal play /reception mode. The item changes as follows: LOW*1 t MID*1 t HI*1 t BAL (left-right) t FAD (front-rear) t SUB (subwoofer volume)*2 t AUX*3 *1 When EQ3 is activated (page 9). *2 When the audio output is set equalizer curve, press and hold (SEEK) -/+ to locate the approximate frequency, then press (SEEK) -/+ repeatedly to fine adjust to the desired frequency (manual tuning). EQ3 "CUSTOM" of the station you to make your own equalizer settings. 1 Select a source, then...
Operating Instructions
Page 10
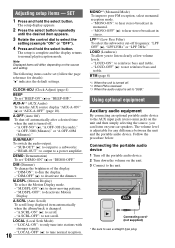
... unit is complete and the display returns to a power amplifier. The setup is turned off , - "REAR-OUT": to output to normal play/reception mode. "LOUD-OFF" (z): to a subwoofer. - Follow the procedure below: Connecting the portable audio device 1 Turn off frequency: "LPF OFF" (z), "LPF125Hz" or "LPF 78Hz." CLOCK-ADJ (Clock Adjust) (page 4) BEEP To set "DEMO-ON" (z) or "DEMO-OFF." SUB/REAR*1 To switch the audio output. - "SUB-OUT" (z): to output to not reinforce bass and treble. M.DSPL (Motion Display) To select the Motion Display mode...
... unit is complete and the display returns to a power amplifier. The setup is turned off , - "REAR-OUT": to output to normal play/reception mode. "LOUD-OFF" (z): to a subwoofer. - Follow the procedure below: Connecting the portable audio device 1 Turn off frequency: "LPF OFF" (z), "LPF125Hz" or "LPF 78Hz." CLOCK-ADJ (Clock Adjust) (page 4) BEEP To set "DEMO-ON" (z) or "DEMO-OFF." SUB/REAR*1 To switch the audio output. - "SUB-OUT" (z): to output to not reinforce bass and treble. M.DSPL (Motion Display) To select the Motion Display mode...

Operating Instructions
Page 11
... each connected audio device before operating it. • Power antenna (aerial) will not operate properly. Do not use such discs. • You cannot play 8 cm (3 1/4 in a parked car or on a dashboard/rear tray. • Do not attach labels, or use discs with non-standard shapes (e.g., heart, square, star) cannot be played on the unit. 5 Press the select button repeatedly until "AUX" appears, and rotate the control dial to adjust the input level (-8 dB...
... each connected audio device before operating it. • Power antenna (aerial) will not operate properly. Do not use such discs. • You cannot play 8 cm (3 1/4 in a parked car or on a dashboard/rear tray. • Do not attach labels, or use discs with non-standard shapes (e.g., heart, square, star) cannot be played on the unit. 5 Press the select button repeatedly until "AUX" appears, and rotate the control dial to adjust the input level (-8 dB...

Operating Instructions
Page 12
...music discs encoded with digital audio material on this manual, consult your nearest Sony dealer. 12 copyright-protected If you play back discs that are not covered in a disc: 300 (if a folder/file names contain many characters, this unit. • You cannot play on the equipment used... disc is recorded in any questions or problems concerning your unit that conform to the Compact Disc (CD) standard. When the first track is a CD-DA, only CD-DA of these formats, "NO MUSIC" is displayed. Music discs encoded with a commercially available cleaning cloth. However, since the audio...
...music discs encoded with digital audio material on this manual, consult your nearest Sony dealer. 12 copyright-protected If you play back discs that are not covered in a disc: 300 (if a folder/file names contain many characters, this unit. • You cannot play on the equipment used... disc is recorded in any questions or problems concerning your unit that conform to the Compact Disc (CD) standard. When the first track is a CD-DA, only CD-DA of these formats, "NO MUSIC" is displayed. Music discs encoded with a commercially available cleaning cloth. However, since the audio...
Operating Instructions
Page 13
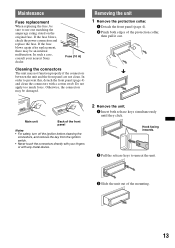
... safety, turn off the ignition before cleaning the connectors, and remove the key from the ignition switch. • Never touch the connectors directly with your nearest Sony dealer. If the fuse blows, check the power connection and replace the fuse. Maintenance Fuse replacement When replacing the fuse, be damaged. If the fuse blows again after replacement, there may not function properly if the connectors between the unit and the front panel are...
... safety, turn off the ignition before cleaning the connectors, and remove the key from the ignition switch. • Never touch the connectors directly with your nearest Sony dealer. If the fuse blows, check the power connection and replace the fuse. Maintenance Fuse replacement When replacing the fuse, be damaged. If the fuse blows again after replacement, there may not function properly if the connectors between the unit and the front panel are...
Operating Instructions
Page 14
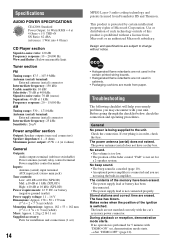
...,000 Hz AM Tuning range: 530 - 1,710 kHz Antenna (aerial) terminal: External antenna (aerial) connector Intermediate frequency: 25 kHz Sensitivity: 26 µV Power amplifier section Output: Speaker outputs (sure seal connectors) Speaker impedance: 4 - 8 ohms Maximum power output: 45 W × 4 (at 4 ohms) General Outputs: Audio outputs terminal (sub/rear switchable) Power antenna (aerial) relay control terminal Power amplifier control terminal Inputs: Antenna (aerial) input terminal AUX input jack (stereo mini jack) Tone controls: Low: ±10 dB at 60 Hz (XPLOD) Mid: ±10...
...,000 Hz AM Tuning range: 530 - 1,710 kHz Antenna (aerial) terminal: External antenna (aerial) connector Intermediate frequency: 25 kHz Sensitivity: 26 µV Power amplifier section Output: Speaker outputs (sure seal connectors) Speaker impedance: 4 - 8 ohms Maximum power output: 45 W × 4 (at 4 ohms) General Outputs: Audio outputs terminal (sub/rear switchable) Power antenna (aerial) relay control terminal Power amplifier control terminal Inputs: Antenna (aerial) input terminal AUX input jack (stereo mini jack) Tone controls: Low: ±10 dB at 60 Hz (XPLOD) Mid: ±10...
Operating Instructions
Page 15
... unit until the display appears. • The connectors are not for audio use (page 12). The Auto Off function activates after turning off the unit. The disc is not correct. a disc recorded with the MP3/WMA format and version (page 12). The sound skips. • Installation is incompatible with a complicated tree structure. - t Perform manual tuning. FAILURE The connection of speakers/amplifiers is complete. The Auto Off function does not operate. t Install the unit at a station: Set...
... unit until the display appears. • The connectors are not for audio use (page 12). The Auto Off function activates after turning off the unit. The disc is not correct. a disc recorded with the MP3/WMA format and version (page 12). The sound skips. • Installation is incompatible with a complicated tree structure. - t Perform manual tuning. FAILURE The connection of speakers/amplifiers is complete. The Auto Off function does not operate. t Install the unit at a station: Set...
Operating Instructions
Page 16
"" The character cannot be repaired because of the disc and you take the unit to be displayed with the unit. If these solutions do not help improve the situation, consult your nearest Sony dealer. If you cannot go any further. " " or " " During reverse or fast-forward, you have reached the beginning or the end of CD playback trouble, bring the disc that was used at the time the problem began. 16
"" The character cannot be repaired because of the disc and you take the unit to be displayed with the unit. If these solutions do not help improve the situation, consult your nearest Sony dealer. If you cannot go any further. " " or " " During reverse or fast-forward, you have reached the beginning or the end of CD playback trouble, bring the disc that was used at the time the problem began. 16
Operating Instructions
Page 52
Call 1-800-222-7669 URL http://www.SONY.com http://www.sony.net/ Sony Corporation Printed in these Operating Instructions. 2 Please contact (U.S.A. If you have any questions/problems regarding this product, try the following: 1 Read Troubleshooting in China only);
Call 1-800-222-7669 URL http://www.SONY.com http://www.sony.net/ Sony Corporation Printed in these Operating Instructions. 2 Please contact (U.S.A. If you have any questions/problems regarding this product, try the following: 1 Read Troubleshooting in China only);


