Operating Instructions
Page 1
Model No. MVC-CD500 © 2003 Sony Corporation 3-081-837-12(1) Getting started Shooting still images Viewing still images Deleting still images Before advanced operations Advanced still image shooting Advanced still image ... to these numbers whenever you call upon your computer _______ Troubleshooting Additional information Index Owner's Record The model and serial numbers are located on your Sony dealer regarding this manual thoroughly, and retain it for future reference. Digital Still Camera Operating Instructions Before operating the unit, please read this product. MVC...
Model No. MVC-CD500 © 2003 Sony Corporation 3-081-837-12(1) Getting started Shooting still images Viewing still images Deleting still images Before advanced operations Advanced still image shooting Advanced still image ... to these numbers whenever you call upon your computer _______ Troubleshooting Additional information Index Owner's Record The model and serial numbers are located on your Sony dealer regarding this manual thoroughly, and retain it for future reference. Digital Still Camera Operating Instructions Before operating the unit, please read this product. MVC...
Operating Instructions
Page 3
...UNLESS THE BLADES CAN BE FULLY INSERTED TO PREVENT BLADE EXPOSURE. If the plug supplied with or mark) must be sure to this camera. Notice Certain countries may influence the picture and sound of this equipment for using connection cables shorter than 3 meters (9.8 feet). For... consult with BS 1363 is indicated under the lens. For the Customers in the United Kingdom A moulded plug complying with your nearest Sony service station. Never use the plug without the fuse cover. Attention The electromagnetic field at the specific frequencies may regulate disposal of rechargeable...
...UNLESS THE BLADES CAN BE FULLY INSERTED TO PREVENT BLADE EXPOSURE. If the plug supplied with or mark) must be sure to this camera. Notice Certain countries may influence the picture and sound of this equipment for using connection cables shorter than 3 meters (9.8 feet). For... consult with BS 1363 is indicated under the lens. For the Customers in the United Kingdom A moulded plug complying with your nearest Sony service station. Never use the plug without the fuse cover. Attention The electromagnetic field at the specific frequencies may regulate disposal of rechargeable...
Operating Instructions
Page 4
...potential risk of data loss, always copy (back up) data to the provision of such materials may be used with the Mavica logo. Unauthorized recording of the copyright laws. If moisture condensation occurs, see page 120 and follow the instructions on the ...malfunctions and inability to a malfunction of the pixels are operational for precautions on your camera This digital still camera uses 8 cm CD-Rs/CDRWs as recording media. Clean the flash surface before using the camera. Precaution on copyright Television programs, films, video tapes, and other equipment on handling ...
...potential risk of data loss, always copy (back up) data to the provision of such materials may be used with the Mavica logo. Unauthorized recording of the copyright laws. If moisture condensation occurs, see page 120 and follow the instructions on the ...malfunctions and inability to a malfunction of the pixels are operational for precautions on your camera This digital still camera uses 8 cm CD-Rs/CDRWs as recording media. Clean the flash surface before using the camera. Precaution on copyright Television programs, films, video tapes, and other equipment on handling ...

Operating Instructions
Page 5
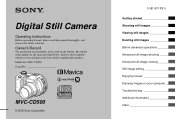
...value indicating the amount of light from a specific part of your eyes. About the Carl Zeiss lens This camera is equipped with a Carl Zeiss lens which is a trademark of Sony Corporation. • Microsoft and Windows are registered trademarks of pictures in this manual are reproduced images, and are...OS are not used in this manual are not actual images shot using this camera. The lens for this camera uses the MTF* measurement system for cameras developed jointly by Carl Zeiss, in Germany, and Sony Corporation, and offers the same quality as examples of the U.S. Do not aim...
...value indicating the amount of light from a specific part of your eyes. About the Carl Zeiss lens This camera is equipped with a Carl Zeiss lens which is a trademark of Sony Corporation. • Microsoft and Windows are registered trademarks of pictures in this manual are reproduced images, and are...OS are not used in this manual are not actual images shot using this camera. The lens for this camera uses the MTF* measurement system for cameras developed jointly by Carl Zeiss, in Germany, and Sony Corporation, and offers the same quality as examples of the U.S. Do not aim...
Operating Instructions
Page 6
... 44 Advanced still image shooting Shooting with Program Shift - TIFF 62 Shooting still images for e-mail - Table of your camera 32 Viewing images on /off your camera .. 41 Changing the menu settings 41 Changing the items in the SET UP screen 41 How to use the control button...the battery pack 11 Using an external power source 14 Using your camera abroad 14 Turning on a TV screen 34 Deleting still images Deleting images 36 Formatting a CD-RW 39 Before advanced operations How to setup and operate your camera 15 How to the subject - Focus preset 50 Adjusting the ...
... 44 Advanced still image shooting Shooting with Program Shift - TIFF 62 Shooting still images for e-mail - Table of your camera 32 Viewing images on /off your camera .. 41 Changing the menu settings 41 Changing the items in the SET UP screen 41 How to use the control button...the battery pack 11 Using an external power source 14 Using your camera abroad 14 Turning on a TV screen 34 Deleting still images Deleting images 36 Formatting a CD-RW 39 Before advanced operations How to setup and operate your camera 15 How to the subject - Focus preset 50 Adjusting the ...

Operating Instructions
Page 7
...connection 91 Installing the PTP Manager 91 Installing "ImageMixer 92 Connecting the camera to print - Introduction 84 Viewing images using the Windows XP AutoPlay Wizard 96 Viewing images on your computer through a CD-ROM drive 88 Image file storage destinations and image file names 89...Picture Effect 65 Confirming whether to scene conditions - Confirm before write 66 Using an external flash 67 Using the Sony HVL-F32X Flash ......67 Using the Sony HVL-F1000 Flash .....68 Using a commercially available external flash 68 Advanced still image viewing Selecting the folder and ...
...connection 91 Installing the PTP Manager 91 Installing "ImageMixer 92 Connecting the camera to print - Introduction 84 Viewing images using the Windows XP AutoPlay Wizard 96 Viewing images on your computer through a CD-ROM drive 88 Image file storage destinations and image file names 89...Picture Effect 65 Confirming whether to scene conditions - Confirm before write 66 Using an external flash 67 Using the Sony HVL-F32X Flash ......67 Using the Sony HVL-F1000 Flash .....68 Using a commercially available external flash 68 Advanced still image viewing Selecting the folder and ...

Operating Instructions
Page 8
...disc status is capable of recording still images and movies onto 8 cm CD-R/CD-RW discs. View on your computer, finalization is complete. Blank disc Format...page 86) About 13 MB disc space is fully available. View through a CD-ROM drive or the USB cable, and view and modify images on a computer...). 8 Flow chart for disc operations Start A new disc : CD-R : CD-RW Initialize (page 19) Preparation for recording is complete. Capture images with ... a CD-ROM drive to view images on the camera (page 32) Record Disc preparation for recording on a computer (page 84) View through a CD-ROM ...
...disc status is capable of recording still images and movies onto 8 cm CD-R/CD-RW discs. View on your computer, finalization is complete. Blank disc Format...page 86) About 13 MB disc space is fully available. View through a CD-ROM drive or the USB cable, and view and modify images on a computer...). 8 Flow chart for disc operations Start A new disc : CD-R : CD-RW Initialize (page 19) Preparation for recording is complete. Capture images with ... a CD-ROM drive to view images on the camera (page 32) Record Disc preparation for recording on a computer (page 84) View through a CD-ROM ...

Operating Instructions
Page 9
... (34) • Use a tripod with a screw length of less than 5.5 mm (7/32 inch). You will be unable to firmly secure the camera to tripods having longer screws, and may damage the camera. • Use ACC jack to connect an external flash or other equipment. • Do not touch the microphone while recording. 9
... (34) • Use a tripod with a screw length of less than 5.5 mm (7/32 inch). You will be unable to firmly secure the camera to tripods having longer screws, and may damage the camera. • Use ACC jack to connect an external flash or other equipment. • Do not touch the microphone while recording. 9

Operating Instructions
Page 11
... DC plug with the v mark facing up . 3 AC Adaptor , Open the DC IN jack cover and connect the AC Adaptor (supplied) to turn off your camera. Insert the battery pack with a dry cotton bud. Slide the cover in the direction of the arrow. • Be sure to the DC IN jack... of your camera when charging the battery pack (page 15). • Your camera operates only with the "InfoLITHIUM" NP-FM50 battery pack (M series) (supplied) (page 121). 2 Battery eject lever , Install the battery pack...
... DC plug with the v mark facing up . 3 AC Adaptor , Open the DC IN jack cover and connect the AC Adaptor (supplied) to turn off your camera. Insert the battery pack with a dry cotton bud. Slide the cover in the direction of the arrow. • Be sure to the DC IN jack... of your camera when charging the battery pack (page 15). • Your camera operates only with the "InfoLITHIUM" NP-FM50 battery pack (M series) (supplied) (page 121). 2 Battery eject lever , Install the battery pack...

Operating Instructions
Page 12
... The battery remaining indicator on the LCD screen shows the remaining shooting or viewing time. 60min 5.0M 101 4 M AF • The black portion of your camera. 12 To remove the battery pack Battery eject lever Open the battery cover. The /CHG lamp (orange) lights up when charging begins, and goes off...
... The battery remaining indicator on the LCD screen shows the remaining shooting or viewing time. 60min 5.0M 101 4 M AF • The black portion of your camera. 12 To remove the battery pack Battery eject lever Open the battery cover. The /CHG lamp (orange) lights up when charging begins, and goes off...

Operating Instructions
Page 13
The camera has been turned on and off once every ten times - [AF Mode] is set to [Monitor] in the SET UP settings Viewing still images2) NP-...
The camera has been turned on and off once every ten times - [AF Mode] is set to [Monitor] in the SET UP settings Viewing still images2) NP-...
Operating Instructions
Page 14
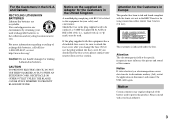
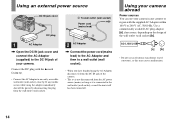
... with the supplied AC Adaptor within 100 V to a wall outlet (wall socket). • When you have finished using the adaptor, immediately shut off . Using your camera in any trouble occurs while using the AC Adaptor, disconnect it is not disconnected from the AC power source (mains) as long as this may...the wall outlet (wall socket), even if the unit itself has been turned off the power by . AC-L15A/L15B • Do not use your camera abroad Power sources You can use an electronic transformer (travel converter), as it from the DC IN jack of the wall outlet (wall socket) [b]. Using...
... with the supplied AC Adaptor within 100 V to a wall outlet (wall socket). • When you have finished using the adaptor, immediately shut off . Using your camera in any trouble occurs while using the AC Adaptor, disconnect it is not disconnected from the AC power source (mains) as long as this may...the wall outlet (wall socket), even if the unit itself has been turned off the power by . AC-L15A/L15B • Do not use your camera abroad Power sources You can use an electronic transformer (travel converter), as it from the DC IN jack of the wall outlet (wall socket) [b]. Using...

Operating Instructions
Page 15
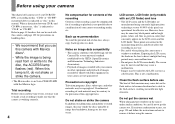
...; When viewing movies • When a connector is set to make the changes. Turning off the power Slide the POWER switch in the direction of the camera, bring up and the power is on the power when the mode dial is plugged into the (USB) jack or the A/V OUT (MONO) jack. Auto... ISO Mode 400 200 100 Auto WB ISO Mode To change the current settings of the arrow again. The POWER lamp goes out, and the camera turns off. • Do not remove the battery pack or the AC Adaptor with the lens portion extended, as this may cause malfunction. • If...
...; When viewing movies • When a connector is set to make the changes. Turning off the power Slide the POWER switch in the direction of the camera, bring up and the power is on the power when the mode dial is plugged into the (USB) jack or the A/V OUT (MONO) jack. Auto... ISO Mode 400 200 100 Auto WB ISO Mode To change the current settings of the arrow again. The POWER lamp goes out, and the camera turns off. • Do not remove the battery pack or the AC Adaptor with the lens portion extended, as this may cause malfunction. • If...
Operating Instructions
Page 18
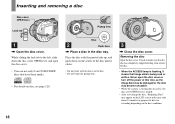
... on the disc. • Do not touch the pickup lens. 3 , Close the disc cover. Never open the disc cover. • You can use only 8 cm CD-R/CD-RW discs that image data is locked. • After you change the disc, "Repairing Data" may appear on the LCD screen and it clicks. •... disc may take about 10 minutes to the left, slide down on the center of the disc until it may become unusable. • While the camera is writing data on the disc condition. 18 While sliding the lock tab to prepare the disc for recording depending on a disc, the disc cover...
... on the disc. • Do not touch the pickup lens. 3 , Close the disc cover. Never open the disc cover. • You can use only 8 cm CD-R/CD-RW discs that image data is locked. • After you change the disc, "Repairing Data" may appear on the LCD screen and it clicks. •... disc may take about 10 minutes to the left, slide down on the center of the disc until it may become unusable. • While the camera is writing data on the disc condition. 18 While sliding the lock tab to prepare the disc for recording depending on a disc, the disc cover...

Operating Instructions
Page 19
... Tool 1) in progress Initialize Initialize complete 2 , Select [OK] with V on the control button, then press z. When you can also perform initialization using your camera to view images through a CD-ROM drive, initialization is set the mode dial to , then turn on the power. Mode dial 1 , Insert a new disc and set to P, S, A, M, SCN...
... Tool 1) in progress Initialize Initialize complete 2 , Select [OK] with V on the control button, then press z. When you can also perform initialization using your camera to view images through a CD-ROM drive, initialization is set the mode dial to , then turn on the power. Mode dial 1 , Insert a new disc and set to P, S, A, M, SCN...
Operating Instructions
Page 21
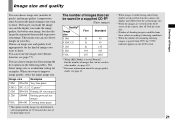
... quality level appropriately for examples. You can resize the images later (Resize function, see page 43. • When images recorded using earlier Sony models are played back on this camera, the display may differ from the actual image size. • When the images are viewed on the LCD screen of the... preserve your image, but also the larger the amount of data needed to match the size of images that can save fewer images in a supplied CD-R2) (Units: images) Quality3) Image size Fine Standard 5.0M 51 95 4.5M(3:2) 51 95 3.1M 81 145 1.2M 194 345 VGA 655 1285 2) When ...
... quality level appropriately for examples. You can resize the images later (Resize function, see page 43. • When images recorded using earlier Sony models are played back on this camera, the display may differ from the actual image size. • When the images are viewed on the LCD screen of the... preserve your image, but also the larger the amount of data needed to match the size of images that can save fewer images in a supplied CD-R2) (Units: images) Quality3) Image size Fine Standard 5.0M 51 95 4.5M(3:2) 51 95 3.1M 81 145 1.2M 194 345 VGA 655 1285 2) When ...

Operating Instructions
Page 22
... beep, the AF adjustment is ready for shooting. (The LCD screen may be frozen for approximately five seconds. • This camera can continue to steadily lit, the camera is not complete. The lens portion moves when you release the shutter button, the recording will be stored in the disc (page... 43). 22 2 , Hold the camera steadily with your fingers. • The minimum focal distance to be recorded appears on the LCD screen for a split second depending on the AF range...
... beep, the AF adjustment is ready for shooting. (The LCD screen may be frozen for approximately five seconds. • This camera can continue to steadily lit, the camera is not complete. The lens portion moves when you release the shutter button, the recording will be stored in the disc (page... 43). 22 2 , Hold the camera steadily with your fingers. • The minimum focal distance to be recorded appears on the LCD screen for a split second depending on the AF range...
Operating Instructions
Page 23
...) goes out, you can select the aperture value (page 47). S (Shutter speed priority) You can shoot the next image. • When operating the camera using menus (pages 41 and 112). M (Manual) You can select from the following modes to shoot according to prevent wearing down . SCN (Scene selection...) You can set the desired shooting functions using menus (pages 41 and 112). Also do not operate the camera for still image shooting When shooting still images with your camera, you can set the desired shooting functions using menus (pages 41 and 112). In addition, you do not...
...) goes out, you can select the aperture value (page 47). S (Shutter speed priority) You can shoot the next image. • When operating the camera using menus (pages 41 and 112). M (Manual) You can select from the following modes to shoot according to prevent wearing down . SCN (Scene selection...) You can set the desired shooting functions using menus (pages 41 and 112). Also do not operate the camera for still image shooting When shooting still images with your camera, you can set the desired shooting functions using menus (pages 41 and 112). In addition, you do not...

Operating Instructions
Page 24
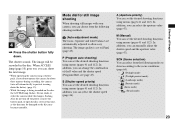
In such cases, release the shutter button, then recompose the shot and focus again. • The subject is distant from the camera and dark. • The contrast between the subject and its background is poor. • The subject is deleted. 24 Checking the last image you try ...
In such cases, release the shutter button, then recompose the shot and focus again. • The subject is distant from the camera and dark. • The contrast between the subject and its background is poor. • The subject is deleted. 24 Checking the last image you try ...

Operating Instructions
Page 27
To cancel the self-timer in the middle of the camera, the focus and the exposure may not be correctly set to P, S, A, M, SCN or . 2 , Center the subject in front of the operation Press V ( ) on the control ...
To cancel the self-timer in the middle of the camera, the focus and the exposure may not be correctly set to P, S, A, M, SCN or . 2 , Center the subject in front of the operation Press V ( ) on the control ...


