Operating Instructions
Page 1
.... Digital Still Camera Operating Instructions Before operating the unit, please read this product. Owner's Record The model and serial numbers are located on your Sony dealer regarding this manual thoroughly, and retain it for future reference. Record the serial number in the space provided below. MVC-CD500 © 2003 Sony Corporation 3-081-837-12(1) Getting started Shooting still images Viewing still images Deleting still images Before advanced operations Advanced still image shooting Advanced still image viewing Still image...
.... Digital Still Camera Operating Instructions Before operating the unit, please read this product. Owner's Record The model and serial numbers are located on your Sony dealer regarding this manual thoroughly, and retain it for future reference. Record the serial number in the space provided below. MVC-CD500 © 2003 Sony Corporation 3-081-837-12(1) Getting started Shooting still images Viewing still images Deleting still images Before advanced operations Advanced still image shooting Advanced still image viewing Still image...
Operating Instructions
Page 3
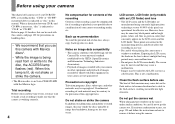
... Directive for using connection cables shorter than 3 meters (9.8 feet). Notice If static electricity or electromagnetism causes data transfer to this equipment has a detachable fuse cover, be used. Notice Certain countries may influence the picture and sound of this product. Attention for your safety and convenience. Attention The electromagnetic field at the specific frequencies may regulate disposal of rechargeable batteries, call toll free...
... Directive for using connection cables shorter than 3 meters (9.8 feet). Notice If static electricity or electromagnetism causes data transfer to this equipment has a detachable fuse cover, be used. Notice Certain countries may influence the picture and sound of this product. Attention for your safety and convenience. Attention The electromagnetic field at the specific frequencies may regulate disposal of rechargeable batteries, call toll free...
Operating Instructions
Page 4
... camera near a window or outdoors. The screen may want to make a trial recording to make sure that constantly appear on the flash surface to become discolored or to stick to a malfunction of images recorded or edited with this camera with your camera or recording media, etc. However, there may be some tiny black points and/or bright points (white, red, blue or green in color) that the camera...
... camera near a window or outdoors. The screen may want to make a trial recording to make sure that constantly appear on the flash surface to become discolored or to stick to a malfunction of images recorded or edited with this camera with your camera or recording media, etc. However, there may be some tiny black points and/or bright points (white, red, blue or green in color) that the camera...
Operating Instructions
Page 6
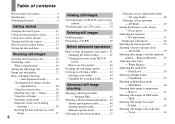
... audio files - Flash Level 58 Shooting multiple frames - White Balance 57 Adjusting the flash level - Macro 26 Using the self-timer 27 Selecting a flash mode 27 Indicators on the screen during shooting 30 Inserting the date and time on a still image 31 6 Viewing still images Viewing images on the LCD screen of contents Before using your camera 4 Introduction 8 Identifying the parts 9 Getting started Charging the battery pack 11 Using an external power source 14 Using your camera abroad 14 Turning on a TV screen 34 Deleting still images Deleting images 36 Formatting a CD-RW...
... audio files - Flash Level 58 Shooting multiple frames - White Balance 57 Adjusting the flash level - Macro 26 Using the self-timer 27 Selecting a flash mode 27 Indicators on the screen during shooting 30 Inserting the date and time on a still image 31 6 Viewing still images Viewing images on the LCD screen of contents Before using your camera 4 Introduction 8 Identifying the parts 9 Getting started Charging the battery pack 11 Using an external power source 14 Using your camera abroad 14 Turning on a TV screen 34 Deleting still images Deleting images 36 Formatting a CD-RW...

Operating Instructions
Page 7
... and messages 107 Self-diagnosis display 109 Additional information Number of a still image.........70 Enlarging an image - Print (DPOF) mark 77 Enjoying movies Shooting movies 80 Viewing movies on your computer - Folder 69 Enlarging a portion of images that can be saved or shooting time 110 Menu items 112 SET UP items 116 Precautions 119 On discs 120 On "InfoLITHIUM" battery pack .........121 Specifications 123 The LCD screen 125 Index Index 129 7 Trimming 71 Playing...
... and messages 107 Self-diagnosis display 109 Additional information Number of a still image.........70 Enlarging an image - Print (DPOF) mark 77 Enjoying movies Shooting movies 80 Viewing movies on your computer - Folder 69 Enlarging a portion of images that can be saved or shooting time 110 Menu items 112 SET UP items 116 Precautions 119 On discs 120 On "InfoLITHIUM" battery pack .........121 Specifications 123 The LCD screen 125 Index Index 129 7 Trimming 71 Playing...
Operating Instructions
Page 16
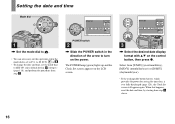
The POWER lamp (green) lights up and the Clock Set screen appears on the control button, then press z. Select from [Y/M/D] (year/month/day), [M/D/Y] (month/day/year) or [D/M/Y] (day/month/year). • If the rechargeable button battery, which provides the power for saving the time data, is set to P, S, A, M, SCN, or . • To change the date and time, set the mode dial to SET UP, select [Clock Set] in the direction of the arrow...
The POWER lamp (green) lights up and the Clock Set screen appears on the control button, then press z. Select from [Y/M/D] (year/month/day), [M/D/Y] (month/day/year) or [D/M/Y] (day/month/year). • If the rechargeable button battery, which provides the power for saving the time data, is set to P, S, A, M, SCN, or . • To change the date and time, set the mode dial to SET UP, select [Clock Set] in the direction of the arrow...

Operating Instructions
Page 22
... , and turn on the power. When the AE/AF lock indicator changes from flashing to steadily lit, the camera is not set properly (except in the center of the folder where the image will be canceled. • When the camera does not beep, the AF adjustment is 50 cm (19 3/4 inches). To shoot even closer subjects, use macro recording mode (page 26). The beep sounds. Basic still image shooting - Do...
... , and turn on the power. When the AE/AF lock indicator changes from flashing to steadily lit, the camera is not set properly (except in the center of the folder where the image will be canceled. • When the camera does not beep, the AF adjustment is 50 cm (19 3/4 inches). To shoot even closer subjects, use macro recording mode (page 26). The beep sounds. Basic still image shooting - Do...
Operating Instructions
Page 29
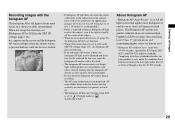
Shooting still images Recording images with the hologram AF The hologram AF is fill light to (Twilight mode) or (Landscape mode). In this function, set to focus more easily on the screen and the hologram AF emits red light when the shutter button is pressed halfway until the focus is locked. 60min ON 5.0M FINE 101 96 M AF 0EV F2.8 30 • If hologram AF light does not reach...
Shooting still images Recording images with the hologram AF The hologram AF is fill light to (Twilight mode) or (Landscape mode). In this function, set to focus more easily on the screen and the hologram AF emits red light when the shutter button is pressed halfway until the focus is locked. 60min ON 5.0M FINE 101 96 M AF 0EV F2.8 30 • If hologram AF light does not reach...

Operating Instructions
Page 31
... : Auto 2 SELECT Camera 1 1 Moving Image : 2 AF Mode : Day&Time 1 Smart Zoom : Date Date/Time : Off 2 Red Eye Reduction : 1 Hologram AF : 2 OK Camera 1 1 Moving Image : 2 AF Mode : MPEG Movie Monitor 1 Smart Zoom : On Date/Time : Date 2 Red Eye Reduction : Off 1 Hologram AF : Auto 2 PAGE SELECT 1 , Set the mode dial to P, S, A, M or SCN. • This setting is maintained even when the power is superimposed onto the image in the order selected in the upper left corner of the LCD screen. Off...
... : Auto 2 SELECT Camera 1 1 Moving Image : 2 AF Mode : Day&Time 1 Smart Zoom : Date Date/Time : Off 2 Red Eye Reduction : 1 Hologram AF : 2 OK Camera 1 1 Moving Image : 2 AF Mode : MPEG Movie Monitor 1 Smart Zoom : On Date/Time : Date 2 Red Eye Reduction : Off 1 Hologram AF : Auto 2 PAGE SELECT 1 , Set the mode dial to P, S, A, M or SCN. • This setting is maintained even when the power is superimposed onto the image in the order selected in the upper left corner of the LCD screen. Off...

Operating Instructions
Page 57
... paper filling the screen under fixed conditions or special lighting conditions, you shoot under the same lighting conditions as photography studios WB (Flash) Adjusts the white balance only to the flash conditions (One push) For adjusting the white balance depending on the light source Mode dial Control button MENU a Set the mode dial to be set . • Do not shake or strike the camera during quick flashing the indicator. • If the indicator keeps flashing even when...
... paper filling the screen under fixed conditions or special lighting conditions, you shoot under the same lighting conditions as photography studios WB (Flash) Adjusts the white balance only to the flash conditions (One push) For adjusting the white balance depending on the light source Mode dial Control button MENU a Set the mode dial to be set . • Do not shake or strike the camera during quick flashing the indicator. • If the indicator keeps flashing even when...

Operating Instructions
Page 80
... SET UP settings (pages 41 and 116). Shutter Mode dial Control button c Select the desired size with sound (MPEG movies) using your camera. "REC" appears on page 27. • Do not touch the microphone during shooting The screen indicators are not superimposed onto movies. • The zoom magnification cannot be changed while shooting movies. For a detailed description of the LCD screen changes as follows: Indicators off t LCD backlight off t All indicators on the recording time for each image size...
... SET UP settings (pages 41 and 116). Shutter Mode dial Control button c Select the desired size with sound (MPEG movies) using your camera. "REC" appears on page 27. • Do not touch the microphone during shooting The screen indicators are not superimposed onto movies. • The zoom magnification cannot be changed while shooting movies. For a detailed description of the LCD screen changes as follows: Indicators off t LCD backlight off t All indicators on the recording time for each image size...

Operating Instructions
Page 100
... focus. Solution p Turn on (page 30). p Cancel the function (page 51). The image is too bright. p Record in the SET UP settings. • The image size is set to [5.0M] or [4.5M(3:2)]. • You are shooting a spotlighted subject in a dark location such as on a stage. • The brightness of the LCD screen is too low. • The LCD backlight is set to [Off] in the macro recording mode. p Adjust the exposure...
... focus. Solution p Turn on (page 30). p Cancel the function (page 51). The image is too bright. p Record in the SET UP settings. • The image size is set to [5.0M] or [4.5M(3:2)]. • You are shooting a spotlighted subject in a dark location such as on a stage. • The brightness of the LCD screen is too low. • The LCD backlight is set to [Off] in the macro recording mode. p Adjust the exposure...

Operating Instructions
Page 102
... and shutter speed flash when you press and hold the shutter button halfway down. p Cancel USB communication (page 94). appear on a computer. Shoot the image using the focus preset (page 50). 102 p Set it to [On] (pages 28 and 116). Unknown beeps are heard • These beeps are recorded incorrectly. viewing a movie. p This is from the hard disk of the subject come out red. The date and time...
... and shutter speed flash when you press and hold the shutter button halfway down. p Cancel USB communication (page 94). appear on a computer. Shoot the image using the focus preset (page 50). 102 p Set it to [On] (pages 28 and 116). Unknown beeps are heard • These beeps are recorded incorrectly. viewing a movie. p This is from the hard disk of the subject come out red. The date and time...

Operating Instructions
Page 104
... (page 14). Make sure that "USB Mode" is not connected directly to your computer. • You are not using the correct copy procedure for Sony" application software, click on your computer are using the USB cable (page 93). p Delete the device which is dirty. p Connect the camera directly to a computer with the USB cable. • The CD-ROM drive does not support the packet- You cannot copy images. p Turn on the screen (page 94...
... (page 14). Make sure that "USB Mode" is not connected directly to your computer. • You are not using the correct copy procedure for Sony" application software, click on your computer are using the USB cable (page 93). p Delete the device which is dirty. p Connect the camera directly to a computer with the USB cable. • The CD-ROM drive does not support the packet- You cannot copy images. p Turn on the screen (page 94...

Operating Instructions
Page 105
image. - Solution p Replace it with a new one. An error message appears when you view a movie on a computer. • You are playing back the file directly from the hard disk. p Click on a disc. p Initialize the disc (page 19). Format the disc when using a CDRW (page 39). p Place the disc correctly in your computer and then play back the file from the disc. p Check the printer settings. Cause • The...
image. - Solution p Replace it with a new one. An error message appears when you view a movie on a computer. • You are playing back the file directly from the hard disk. p Click on a disc. p Initialize the disc (page 19). Format the disc when using a CDRW (page 39). p Place the disc correctly in your computer and then play back the file from the disc. p Check the printer settings. Cause • The...

Operating Instructions
Page 116
... Selects the shooting mode for a movie (pages 80, 59 and 60). Selects whether to SET UP. Factory settings are not inserted in dark conditions (page 29). 116 Also, the date and time appear only during playback, and do not appear during recording. Reduces the red-eye phenomenon when using a flash (page 28). Used when it is difficult to use the smart zoom (page 25). Selects the focus operation mode (page...
... Selects the shooting mode for a movie (pages 80, 59 and 60). Selects whether to SET UP. Factory settings are not inserted in dark conditions (page 29). 116 Also, the date and time appear only during playback, and do not appear during recording. Reduces the red-eye phenomenon when using a flash (page 28). Used when it is difficult to use the smart zoom (page 25). Selects the focus operation mode (page...

Operating Instructions
Page 117
At this time, the zoom or the focus preset function does not work. When [Conversion Lens] is set to [On]: • When the mode dial is set to A or M, you can only select aperture values of F4 or higher. • The Zoom function is not available. • The macro recording function activates automatically (the indicator does not appear). (Disc Tool 1) 1 Item Finalize Format Initialize Unfinalize Setting OK / Cancel OK...
At this time, the zoom or the focus preset function does not work. When [Conversion Lens] is set to [On]: • When the mode dial is set to A or M, you can only select aperture values of F4 or higher. • The Zoom function is not available. • The macro recording function activates automatically (the indicator does not appear). (Disc Tool 1) 1 Item Finalize Format Initialize Unfinalize Setting OK / Cancel OK...

Operating Instructions
Page 118
.../shutter sound. Displays the menu items, warnings and messages in other bright locations, but also uses up the battery charge faster. Changes a folder for recording images (page 44). Turns on the shutter sound. (The shutter sound is heard when you press the control button/shutter button. - Folder OK / Cancel Confirm B. This has no effect on the beep/shutter sound when you press the shutter button.) - Sets the video output signal to PAL mode (e.g., Europe). 118 (Disc Tool 2) 2 Item File Number Setting xSeries Reset...
.../shutter sound. Displays the menu items, warnings and messages in other bright locations, but also uses up the battery charge faster. Changes a folder for recording images (page 44). Turns on the shutter sound. (The shutter sound is heard when you press the control button/shutter button. - Folder OK / Cancel Confirm B. This has no effect on the beep/shutter sound when you press the shutter button.) - Sets the video output signal to PAL mode (e.g., Europe). 118 (Disc Tool 2) 2 Item File Number Setting xSeries Reset...

Operating Instructions
Page 120
... not properly record images on or off. You can still use a commercially available CD cleaner. If moisture condensation occurs Turn off . Note that if you will be sure to remove dust. • If fingerprints, dust, droplets of water, or oil make the recordable side (the reverse of the printed side) of the camera. However, even if this rechargeable button battery before shooting. Moisture...
... not properly record images on or off. You can still use a commercially available CD cleaner. If moisture condensation occurs Turn off . Note that if you will be sure to remove dust. • If fingerprints, dust, droplets of water, or oil make the recordable side (the reverse of the printed side) of the camera. However, even if this rechargeable button battery before shooting. Moisture...

Operating Instructions
Page 131
... Shutter speed priority mode 46 Slide show 71 Smart zoom 25 Still image shooting auto adjustment mode 22 EV adjustment 51 image size 20, 110 metering mode 53 number of images that can be saved or shooting time 21, 110 picture effect 65 Scene Selection 64 shooting close-ups (Macro 26 superimposing the date and time 31 using the flash 27 using the self-timer 27 using the zoom feature 25 White Balance 57 Still image viewing delete 36 index screen 33 playback zoom 70 rotate 72 single image screen...
... Shutter speed priority mode 46 Slide show 71 Smart zoom 25 Still image shooting auto adjustment mode 22 EV adjustment 51 image size 20, 110 metering mode 53 number of images that can be saved or shooting time 21, 110 picture effect 65 Scene Selection 64 shooting close-ups (Macro 26 superimposing the date and time 31 using the flash 27 using the self-timer 27 using the zoom feature 25 White Balance 57 Still image viewing delete 36 index screen 33 playback zoom 70 rotate 72 single image screen...


