
Operating Instructions
Page 1
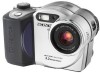
...call upon your computer _______ Troubleshooting Additional information Index Record the serial number in the space provided below. MVC-CD350 © 2003 Sony Corporation 3-081-835-11(1) Getting started Shooting still images Viewing still images Deleting still images Before advanced operations ...the bottom. Owner's Record The model and serial numbers are located on your Sony dealer regarding this manual thoroughly, and retain it for future reference. MVC-CD350 Serial No. Digital Still Camera Operating Instructions Before operating the unit, please read this product. Model No....
...call upon your computer _______ Troubleshooting Additional information Index Record the serial number in the space provided below. MVC-CD350 © 2003 Sony Corporation 3-081-835-11(1) Getting started Shooting still images Viewing still images Deleting still images Before advanced operations ...the bottom. Owner's Record The model and serial numbers are located on your Sony dealer regarding this manual thoroughly, and retain it for future reference. MVC-CD350 Serial No. Digital Still Camera Operating Instructions Before operating the unit, please read this product. Model No....
Operating Instructions
Page 4
...red). Refer to page 18 for discs that can be trailed on your camera This digital still camera uses 8 cm CD-Rs/CDRWs as "CD-R" or "CD-RW." Back up recommendation To avoid the potential risk of images recorded or edited with Mavica discs*. • While the image is indicated as "disc" in a... cold location. Do not shake or strike the camera In addition to malfunctions ...
...red). Refer to page 18 for discs that can be trailed on your camera This digital still camera uses 8 cm CD-Rs/CDRWs as "CD-R" or "CD-RW." Back up recommendation To avoid the potential risk of images recorded or edited with Mavica discs*. • While the image is indicated as "disc" in a... cold location. Do not shake or strike the camera In addition to malfunctions ...

Operating Instructions
Page 5
... Computer, Inc. • Pentium is a trademark of Sony Corporation. • Microsoft and Windows are not used in the United States and other bright light This may cause dirt on the camera locations • Do not use the camera near a location that generates strong radio wave or emits ... marks are registered trademarks of their respective developers or manufacturers. If moisture condensation occurs, see page 108 and follow the instructions on the camera. Or it before use The heat of pictures in this manual are reproduced images, and are , in the rain or under similar ...
... Computer, Inc. • Pentium is a trademark of Sony Corporation. • Microsoft and Windows are not used in the United States and other bright light This may cause dirt on the camera locations • Do not use the camera near a location that generates strong radio wave or emits ... marks are registered trademarks of their respective developers or manufacturers. If moisture condensation occurs, see page 108 and follow the instructions on the camera. Or it before use The heat of pictures in this manual are reproduced images, and are , in the rain or under similar ...

Operating Instructions
Page 6
... 9 Getting started Charging the battery pack 11 Using an external power source 14 Using your camera abroad 14 Turning on a TV screen 33 Deleting still images Deleting images 35 Formatting a CD-RW 38 Before advanced operations How to scene conditions - AF range finder 43 Choosing a ...focus operation - Voice 54 Shooting according to setup and operate your camera .. 40 Changing the menu settings 40 Changing the items...
... 9 Getting started Charging the battery pack 11 Using an external power source 14 Using your camera abroad 14 Turning on a TV screen 33 Deleting still images Deleting images 35 Formatting a CD-RW 38 Before advanced operations How to scene conditions - AF range finder 43 Choosing a ...focus operation - Voice 54 Shooting according to setup and operate your camera .. 40 Changing the menu settings 40 Changing the items...

Operating Instructions
Page 7
...mark 67 Enjoying movies Shooting movies 70 Viewing movies on your computer - Delete 72 Enjoying images on your computer .....87 Creating a Video CD 87 For Mac OS X (v10.0/v10.1/v10.2) users 87 Troubleshooting Troubleshooting 88 Warnings and messages 96 Self-diagnosis display 98 Additional information... the supplied 8cm CD adapter... 77 Viewing images through a CD-ROM drive 78 Image file storage destinations and image file names 79 Copying images into your computer through a USB connection 81 Installing the PTP Manager 81 Installing "ImageMixer 83 Connecting the camera to print -...
...mark 67 Enjoying movies Shooting movies 70 Viewing movies on your computer - Delete 72 Enjoying images on your computer .....87 Creating a Video CD 87 For Mac OS X (v10.0/v10.1/v10.2) users 87 Troubleshooting Troubleshooting 88 Warnings and messages 96 Self-diagnosis display 98 Additional information... the supplied 8cm CD adapter... 77 Viewing images through a CD-ROM drive 78 Image file storage destinations and image file names 79 Copying images into your computer through a USB connection 81 Installing the PTP Manager 81 Installing "ImageMixer 83 Connecting the camera to print -...

Operating Instructions
Page 8
... disc space is fully available. When using application software. View through a CD-ROM drive is capable of recording still images and movies onto 8 cm CD-R/CD-RW discs. Blank disc Format (page 38) The disc space is restored. Introduction This digital still camera is complete. Disc preparation for recording on your computer, finalization is required...
... disc space is fully available. When using application software. View through a CD-ROM drive is capable of recording still images and movies onto 8 cm CD-R/CD-RW discs. Blank disc Format (page 38) The disc space is restored. Introduction This digital still camera is complete. Disc preparation for recording on your computer, finalization is required...

Operating Instructions
Page 9
...). 9 The number of actually recorded pixels is determined according to tripods having longer screws, and may damage the camera. • Do not touch the microphone while recording. • The "3.2 MEGA PIXELS" indicated on the camera shows the number of less than 5.5 mm (7/32 inch). Identifying the parts See the pages in parentheses...
...). 9 The number of actually recorded pixels is determined according to tripods having longer screws, and may damage the camera. • Do not touch the microphone while recording. • The "3.2 MEGA PIXELS" indicated on the camera shows the number of less than 5.5 mm (7/32 inch). Identifying the parts See the pages in parentheses...

Operating Instructions
Page 11
DC IN jack cover DC plug 3 AC Adaptor , Open the DC IN jack cover and connect the AC Adaptor (supplied) to turn off your camera. Make sure the battery pack is firmly inserted all the way, then close the cover. • The battery pack is easily inserted by pushing the ...battery eject lever at the front of your camera when charging the battery pack (page 15). • Your camera operates only with a metallic object, as illustrated. Connect the DC plug with the v mark facing forward. • Do not short...
DC IN jack cover DC plug 3 AC Adaptor , Open the DC IN jack cover and connect the AC Adaptor (supplied) to turn off your camera. Make sure the battery pack is firmly inserted all the way, then close the cover. • The battery pack is easily inserted by pushing the ...battery eject lever at the front of your camera when charging the battery pack (page 15). • Your camera operates only with a metallic object, as illustrated. Connect the DC plug with the v mark facing forward. • Do not short...

Operating Instructions
Page 12
... the arrow, and remove the battery pack. • Be careful not to charge a completely discharged battery pack using the AC Adaptor at a temperature of your camera. 2 To wall outlet Power cord 1 4 AC Adaptor , Connect the power cord to the AC Adaptor and then to a wall outlet. The /CHG lamp (orange) lights...
... the arrow, and remove the battery pack. • Be careful not to charge a completely discharged battery pack using the AC Adaptor at a temperature of your camera. 2 To wall outlet Power cord 1 4 AC Adaptor , Connect the power cord to the AC Adaptor and then to a wall outlet. The /CHG lamp (orange) lights...

Operating Instructions
Page 13
... life (min.) Approx. 1900 Approx. 160 Approx. 2000 Approx. 170 2) Viewing single images in the following conditions: - The numbers of 25°C (77°F). The camera has been turned on and off many times - The battery power is switched alternately between the W and T ends - Shooting still images Under the average conditions1...
... life (min.) Approx. 1900 Approx. 160 Approx. 2000 Approx. 170 2) Viewing single images in the following conditions: - The numbers of 25°C (77°F). The camera has been turned on and off many times - The battery power is switched alternately between the W and T ends - Shooting still images Under the average conditions1...

Operating Instructions
Page 14
... connected to the wall outlet, even if the unit itself has been turned off the power by . AC-L15A/L15B • Do not use your camera. Connect the DC plug with the supplied AC Adaptor within 100 V to 240 V AC, 50/60 Hz. If any country or region with the v mark... to a wall outlet. • When you have finished using the AC Adaptor, disconnect it from the DC IN jack of the wall outlet [b]. Using your camera abroad Power sources You can use an electronic transformer (travel converter), as it is not disconnected from the AC power source as long as this...
... connected to the wall outlet, even if the unit itself has been turned off the power by . AC-L15A/L15B • Do not use your camera. Connect the DC plug with the supplied AC Adaptor within 100 V to 240 V AC, 50/60 Hz. If any country or region with the v mark... to a wall outlet. • When you have finished using the AC Adaptor, disconnect it from the DC IN jack of the wall outlet [b]. Using your camera abroad Power sources You can use an electronic transformer (travel converter), as it is not disconnected from the AC power source as long as this...

Operating Instructions
Page 15
...power Press POWER again. Turning off function only operates when the camera is on. The POWER lamp goes out, and the camera turns off your camera for about three minutes during shooting or viewing or when performing SET UP, the camera turns off automatically to use the control button to make the changes... (page 40), and use the control button 0EV EV 0EV WB ISO 400 200 100 Auto WB ISO To change the current settings of the camera, bring up and the power is operating using a battery pack. For each item, press v/V/b/B to select the desired value, then press the center z or ...
...power Press POWER again. Turning off function only operates when the camera is on. The POWER lamp goes out, and the camera turns off your camera for about three minutes during shooting or viewing or when performing SET UP, the camera turns off automatically to use the control button to make the changes... (page 40), and use the control button 0EV EV 0EV WB ISO 400 200 100 Auto WB ISO To change the current settings of the camera, bring up and the power is operating using a battery pack. For each item, press v/V/b/B to select the desired value, then press the center z or ...

Operating Instructions
Page 18
Never open the disc cover. • You can use only 8 cm CD-R/CD-RW discs that image data is locked. • After you change the disc, "Repairing Data" may appear on the LCD screen and it clicks. • ... cover or turn off the power at this time, as the image data may be damaged or the disc may become unusable. • While the camera is writing data on the disc. • Do not touch the pickup lens. 3 , Close the disc cover. Check to prepare the disc for recording depending...
Never open the disc cover. • You can use only 8 cm CD-R/CD-RW discs that image data is locked. • After you change the disc, "Repairing Data" may appear on the LCD screen and it clicks. • ... cover or turn off the power at this time, as the image data may be damaged or the disc may become unusable. • While the camera is writing data on the disc. • Do not touch the pickup lens. 3 , Close the disc cover. Check to prepare the disc for recording depending...

Operating Instructions
Page 19
... initialization. 19 Images recorded before finalization remain on the LCD screen. When you can also perform initialization using your camera to view images through a CD-ROM drive, initialization is set the mode dial to , then turn on the power. After canceling the initialization, open and close the disc cover, then ...
... initialization. 19 Images recorded before finalization remain on the LCD screen. When you can also perform initialization using your camera to view images through a CD-ROM drive, initialization is set the mode dial to , then turn on the power. After canceling the initialization, open and close the disc cover, then ...

Operating Instructions
Page 21
... make the image quality, the better your image, but also the larger the amount of the print paper used. You can be saved in a supplied CD-R2) (Units: images) Quality3) Image size Fine Standard 3.1M 81 145 2.8M(3:2) 81 145 2.0M 131 234 1.2M 194 345 VGA 655 1285 2) When... [REC Mode] is maximum 3.1 MEGA pixels. • When images recorded using earlier Sony models are viewed on the LCD screen of the camera, they all look the same size. • Number of remaining shooting images is a minimum setting for the kind of images you...
... make the image quality, the better your image, but also the larger the amount of the print paper used. You can be saved in a supplied CD-R2) (Units: images) Quality3) Image size Fine Standard 3.1M 81 145 2.8M(3:2) 81 145 2.0M 131 234 1.2M 194 345 VGA 655 1285 2) When... [REC Mode] is maximum 3.1 MEGA pixels. • When images recorded using earlier Sony models are viewed on the LCD screen of the camera, they all look the same size. • Number of remaining shooting images is a minimum setting for the kind of images you...

Operating Instructions
Page 22
...image shooting - To shoot even closer subjects, use macro recording mode (page 25). You can create new folders and select folders to steadily lit, the camera is ready for shooting. (The LCD screen may be frozen for a split second depending on the subject.) • If you release the shutter button,... Lights up , Press and hold the shutter button halfway down. When the AE/AF lock indicator changes from flashing to be canceled. • When the camera does not beep, the AF adjustment is not complete. Auto adjustment mode Mode dial 60min 3.1M FINE 101 96 M AF F3.8 30 1 , Set the...
...image shooting - To shoot even closer subjects, use macro recording mode (page 25). You can create new folders and select folders to steadily lit, the camera is ready for shooting. (The LCD screen may be frozen for a split second depending on the subject.) • If you release the shutter button,... Lights up , Press and hold the shutter button halfway down. When the AE/AF lock indicator changes from flashing to be canceled. • When the camera does not beep, the AF adjustment is not complete. Auto adjustment mode Mode dial 60min 3.1M FINE 101 96 M AF F3.8 30 1 , Set the...

Operating Instructions
Page 23
... mode) - (Landscape mode) - (Soft snap mode) - (Snow mode) - (Beach mode) - (High-speed shutter mode) Auto Focus When you can select from the camera and dark. • The contrast between the subject and its background is poor. • The subject is being recorded on , the AE/AF lock indicator... menus (pages 40 and 101). The image quality is flashing. SCN (Scene Selection) You can shoot the next image. • When operating the camera using a battery pack, if you can set to [Fine] (page 41). (Program auto shooting) You can choose from the following shooting methods. ...
... mode) - (Landscape mode) - (Soft snap mode) - (Snow mode) - (Beach mode) - (High-speed shutter mode) Auto Focus When you can select from the camera and dark. • The contrast between the subject and its background is poor. • The subject is being recorded on , the AE/AF lock indicator... menus (pages 40 and 101). The image quality is flashing. SCN (Scene Selection) You can shoot the next image. • When operating the camera using a battery pack, if you can set to [Fine] (page 41). (Program auto shooting) You can choose from the following shooting methods. ...

Operating Instructions
Page 27
... operates (approximately 10 seconds). SL (Slow synchro): The flash strobes regardless of the surrounding brightness. To cancel the self-timer in the middle of the camera, the focus and the exposure may block the light from the LCD screen. • If you can clearly shoot the background that is out of...
... operates (approximately 10 seconds). SL (Slow synchro): The flash strobes regardless of the surrounding brightness. To cancel the self-timer in the middle of the camera, the focus and the exposure may block the light from the LCD screen. • If you can clearly shoot the background that is out of...

Operating Instructions
Page 30
... be removed later. • The date and time do not appear on the LCD screen during shooting, instead, " " appears in red during playback only. 2 , Select (Camera) with v on the control button, then press B. The actual date and time appear in the upper left corner of the LCD screen. Inserting the date... and time on a still image Camera Moving Image : 1 AF Mode : MPEG Movie Monitor 2 Smart Zoom : On Date/Time : Off 1 Red Eye Reduction : Off 2 AF Illuminator : Auto SELECT...
... be removed later. • The date and time do not appear on the LCD screen during shooting, instead, " " appears in red during playback only. 2 , Select (Camera) with v on the control button, then press B. The actual date and time appear in the upper left corner of the LCD screen. Inserting the date... and time on a still image Camera Moving Image : 1 AF Mode : MPEG Movie Monitor 2 Smart Zoom : On Date/Time : Off 1 Red Eye Reduction : Off 2 AF Illuminator : Auto SELECT...

Operating Instructions
Page 31
...For details on viewing movies, see page 71. Index (triple-image) screen Three images are also displayed. • For a detailed description of your camera Single (single-image) screen 60min VGA 101 8/9 Index (nine-image) screen 101-0008 2003 7 4 10:30PM BACK/NEXT VOLUME SINGLE DISPLAY MOVE Index... 1/30 Exposure Value: 0.0 ISO: 100 101-0002 2003 7 4 10:30PM SINGLE DISPLAY BACK/NEXT You can view images shot with your camera almost immediately on the LCD screen. You can view one image at a time, displayed over the entire screen. Various image information items are ...
...For details on viewing movies, see page 71. Index (triple-image) screen Three images are also displayed. • For a detailed description of your camera Single (single-image) screen 60min VGA 101 8/9 Index (nine-image) screen 101-0008 2003 7 4 10:30PM BACK/NEXT VOLUME SINGLE DISPLAY MOVE Index... 1/30 Exposure Value: 0.0 ISO: 100 101-0002 2003 7 4 10:30PM SINGLE DISPLAY BACK/NEXT You can view images shot with your camera almost immediately on the LCD screen. You can view one image at a time, displayed over the entire screen. Various image information items are ...


