Instruction Manual
Page 3
... 7. It may deflect the needle causing it still does not fit, contact a qualified electrician to break." 14. "Always unplug sewing machine from the accumulation of electric shock:" 1. This appliance complies with a damaged needle plate as contained in the instruction manual." This ...fit fully in the normal domestic unsorted waste stream.Thiswil benefittheenvironmentforal. (European Union only) Always unplug this sewing machine. "Never operate the sewing machine with the recycling symbol. It means that at an appropriate collection point and not place it separately at...
... 7. It may deflect the needle causing it still does not fit, contact a qualified electrician to break." 14. "Always unplug sewing machine from the accumulation of electric shock:" 1. This appliance complies with a damaged needle plate as contained in the instruction manual." This ...fit fully in the normal domestic unsorted waste stream.Thiswil benefittheenvironmentforal. (European Union only) Always unplug this sewing machine. "Never operate the sewing machine with the recycling symbol. It means that at an appropriate collection point and not place it separately at...

Instruction Manual
Page 6
GETTING STARTED SEWING Leveling Machine 10- 1 1 Setting up machine 10 - 11 Spool pins 12- 13 Winding bobbin 14 - 15 ... 62 - 63 Securing material in embroidery hoop 64 - 65 Using the material and stabilizer 66 - 69 Preparing the machine before installing the hoop ------- 70 - 71 Attaching and removing embroidery hoop 70 - 71 Installation of software 72 -...feed dogs 100- 101 Oiling inside the face cover 102 - 103 Special accessories 104 - 105 Helpful messages 106 - 109 Sewing machine Dimensions: 428 mm × 307 mm × 294 mm Mass of patterns Blind stitch 38 - 39 Multi-stitch ...
GETTING STARTED SEWING Leveling Machine 10- 1 1 Setting up machine 10 - 11 Spool pins 12- 13 Winding bobbin 14 - 15 ... 62 - 63 Securing material in embroidery hoop 64 - 65 Using the material and stabilizer 66 - 69 Preparing the machine before installing the hoop ------- 70 - 71 Attaching and removing embroidery hoop 70 - 71 Installation of software 72 -...feed dogs 100- 101 Oiling inside the face cover 102 - 103 Special accessories 104 - 105 Helpful messages 106 - 109 Sewing machine Dimensions: 428 mm × 307 mm × 294 mm Mass of patterns Blind stitch 38 - 39 Multi-stitch ...
Instruction Manual
Page 10
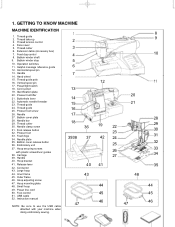
Thread guide 2. Thread guide pole 16. Buttonhole lever 22. Embroidery unit 37. Carriage 39. Hoop adjusting screw 47. GETTING TO KNOW MACHINE MACHINE IDENTIFICATION 1. Thread take-up 3. Thread tension control 4. Horizontal spool pin 13. Presser foot lifter 21. Thread guide 24. Bobbin cover plate... plate 35. Large hoop 44. Inner frame 45. 1. Feed dog control 8. Hand wheel 15. Identification plate 20. Hoop securing screws with your machine when doing embroidery sewing. 1 2 3 4 5 6 7 13 14 15 16 17 18 3938 47 36 37 40 43 12 19 42 41 44 45 46 20...
Thread guide 2. Thread guide pole 16. Buttonhole lever 22. Embroidery unit 37. Carriage 39. Hoop adjusting screw 47. GETTING TO KNOW MACHINE MACHINE IDENTIFICATION 1. Thread take-up 3. Thread tension control 4. Horizontal spool pin 13. Presser foot lifter 21. Thread guide 24. Bobbin cover plate... plate 35. Large hoop 44. Inner frame 45. 1. Feed dog control 8. Hand wheel 15. Identification plate 20. Hoop securing screws with your machine when doing embroidery sewing. 1 2 3 4 5 6 7 13 14 15 16 17 18 3938 47 36 37 40 43 12 19 42 41 44 45 46 20...
Instruction Manual
Page 12
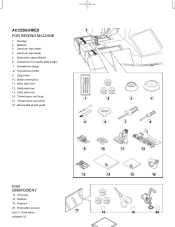
... 14 15 16 17 18 19 20 Screwdriver for needle plate (large) 7. Blind stitch foot 12. Scissors 20. Thread spool net (short) 16. ACCESSORIES FOR SEWING MACHINE 1. Needles 2. Buttonhole opener/Brush 6. Satin stitch foot 14. Bobbins 3. Embroidery presser foot 21. Screwdriver (small) 9.
... 14 15 16 17 18 19 20 Screwdriver for needle plate (large) 7. Blind stitch foot 12. Scissors 20. Thread spool net (short) 16. ACCESSORIES FOR SEWING MACHINE 1. Needles 2. Buttonhole opener/Brush 6. Satin stitch foot 14. Bobbins 3. Embroidery presser foot 21. Screwdriver (small) 9.
Instruction Manual
Page 14
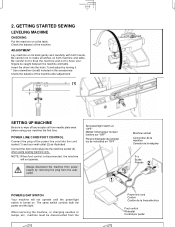
...machine. GETTING STARTED SEWING LEVELING MACHINE CHECKING Put the machine on both machine and table. Check the balance of the machine after adjustment. (1) SETTING UP MACHINE Be sure to wipe off any surplus oil from power supply by turning it. * Use screwdriver (small) included in the accessories. Always disconnect the machine from needle plate area before using sewing machine... only. Be careful not to have your wall outlet (2) as illustrated. Be careful not to drop the machine and not to make...
...machine. GETTING STARTED SEWING LEVELING MACHINE CHECKING Put the machine on both machine and table. Check the balance of the machine after adjustment. (1) SETTING UP MACHINE Be sure to wipe off any surplus oil from power supply by turning it. * Use screwdriver (small) included in the accessories. Always disconnect the machine from needle plate area before using sewing machine... only. Be careful not to have your wall outlet (2) as illustrated. Be careful not to drop the machine and not to make...
Instruction Manual
Page 30
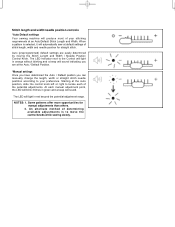
.../Default Stitch Length and Width. Some patterns offer more opportunities for straight stitch. Stitch length and width/needle position controls *Auto/Default settings Your sewing machine will automatically sew at default settings of stitch length, width and needle position for manual adjustments than others. 2. At each of determining available adjustments is selected, it...
.../Default Stitch Length and Width. Some patterns offer more opportunities for straight stitch. Stitch length and width/needle position controls *Auto/Default settings Your sewing machine will automatically sew at default settings of stitch length, width and needle position for manual adjustments than others. 2. At each of determining available adjustments is selected, it...
Instruction Manual
Page 34
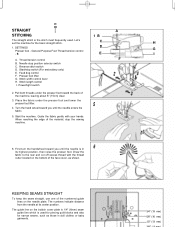
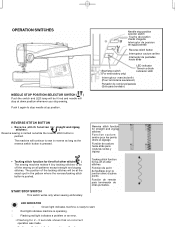
...foot. Reverse stitch switch D. Presser foot lifter G. First turn the handwheel toward you until the needle enters the fabric. 5. Let's set the machine for narrow seams, such as shown. SETTINGS Presser foot - Pull both threads under the presser foot and lower the presser foot lifter. 5 4.... to the rear and cut off excess thread with your hands. Thread tension control B. Feed dog control F. Stitch width control lever H. Start/stop the sewing machine. 6. Turn the hand wheel toward you until the needle is in doll clothes or baby garments. 3/4" (19 mm) 5/8" (16 mm) 1/2" (...
...foot. Reverse stitch switch D. Presser foot lifter G. First turn the handwheel toward you until the needle enters the fabric. 5. Let's set the machine for narrow seams, such as shown. SETTINGS Presser foot - Pull both threads under the presser foot and lower the presser foot lifter. 5 4.... to the rear and cut off excess thread with your hands. Thread tension control B. Feed dog control F. Stitch width control lever H. Start/stop the sewing machine. 6. Turn the hand wheel toward you until the needle is in doll clothes or baby garments. 3/4" (19 mm) 5/8" (16 mm) 1/2" (...
Instruction Manual
Page 38
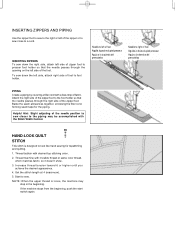
... and quilting. 1. Helpful Hint: Slight adjusting of the needle position to sew closer to the piping may stop in the beginning. If the machine stops from the beginning, push the start switch again. INSERTING ZIPPERS To sew down the left side of the foot. Needle to left of the zipper...through the right side of the zipper foot. NOTE: When the upper thread is designed to look like hand sewing for the piping. Thread machine with desired top stitching color. 2. To sew down the right side, attach left side of zipper foot to presser foot holder so that the needle passes...
... and quilting. 1. Helpful Hint: Slight adjusting of the needle position to sew closer to the piping may stop in the beginning. If the machine stops from the beginning, push the start switch again. INSERTING ZIPPERS To sew down the left side of the foot. Needle to left of the zipper...through the right side of the zipper foot. NOTE: When the upper thread is designed to look like hand sewing for the piping. Thread machine with desired top stitching color. 2. To sew down the right side, attach left side of zipper foot to presser foot holder so that the needle passes...
Instruction Manual
Page 62
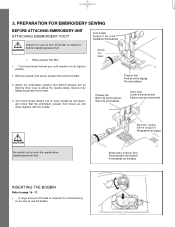
... to use full bobbin. Turn hand wheel toward you to touch the needle when replacing presser foot. PREPARATION FOR EMBROIDERY SEWING BEFORE ATTACHING EMBROIDERY UNIT ATTACHING EMBROIDERY FOOT Always be sure to machine before changing presser foot. Foot holder Support du pied Sujetador prensatelas Screw Vis Guia ∗ Turn hand wheel toward...
... to use full bobbin. Turn hand wheel toward you to touch the needle when replacing presser foot. PREPARATION FOR EMBROIDERY SEWING BEFORE ATTACHING EMBROIDERY UNIT ATTACHING EMBROIDERY FOOT Always be sure to machine before changing presser foot. Foot holder Support du pied Sujetador prensatelas Screw Vis Guia ∗ Turn hand wheel toward...
Instruction Manual
Page 66
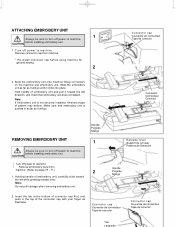
...the bottom of connector cap first, and push in as far as illustrated. Slide the embroidery unit onto machine fitting connectors on the machine and embroidery unit. Holding handle of pattern may deform. Note: If embroidery unit is pushed in the... EMBROIDERY UNIT 1 Always be sure to turn off power to machine before installing embroidery unit. Remove connector cap from machine. (Refer to machine. ∗ Remove embroidery hoop from machine. * Re-install connector cap before using machine for general sewing. 2 3. CAUTION 1. Handle Poignée Mango 1 2 Release...
...the bottom of connector cap first, and push in as far as illustrated. Slide the embroidery unit onto machine fitting connectors on the machine and embroidery unit. Holding handle of pattern may deform. Note: If embroidery unit is pushed in the... EMBROIDERY UNIT 1 Always be sure to turn off power to machine before installing embroidery unit. Remove connector cap from machine. (Refer to machine. ∗ Remove embroidery hoop from machine. * Re-install connector cap before using machine for general sewing. 2 3. CAUTION 1. Handle Poignée Mango 1 2 Release...
Instruction Manual
Page 78
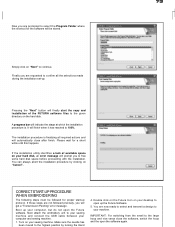
... happens. Finally you are requested to the highest position by clicking on "Next" to your computer and sewing machine. 1. If the installation utility identifies a lack of the FUTURA software files to free some hard disk space before proceeding with the installation. Boot up . Make sure ...up your hard disk, an error message will prompt you will finish when it has reached to your sewing machine and connect the USB cable between your machine. Turn on your sewing machine. It will get a "Transmission Pending" error message. The installation procedure is . Please wait for...
... happens. Finally you are requested to the highest position by clicking on "Next" to your computer and sewing machine. 1. If the installation utility identifies a lack of the FUTURA software files to free some hard disk space before proceeding with the installation. Boot up . Make sure ...up your hard disk, an error message will prompt you will finish when it has reached to your sewing machine and connect the USB cable between your machine. Turn on your sewing machine. It will get a "Transmission Pending" error message. The installation procedure is . Please wait for...
Instruction Manual
Page 86
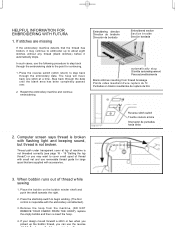
... eight stitches without any thread (blank stitches) before it automatically stops. The hoop will move back one stitch at top of thread while sewing 1. If your design moved forward a stitch or two when you picked up to begin winding. (The foot control is not broken. ...until the blank area has been completely passed over. 2. Thread path under transparent cover at a time. HELPFUL INFORMATION FOR EMBROIDERING WITH FUTURA 1. When bobbin runs out of machine is not threaded correctly (see page 18 - 19 "Setting the top thread") or you can use removable thread guide for continuing...
... eight stitches without any thread (blank stitches) before it automatically stops. The hoop will move back one stitch at top of thread while sewing 1. If your design moved forward a stitch or two when you picked up to begin winding. (The foot control is not broken. ...until the blank area has been completely passed over. 2. Thread path under transparent cover at a time. HELPFUL INFORMATION FOR EMBROIDERING WITH FUTURA 1. When bobbin runs out of machine is not threaded correctly (see page 18 - 19 "Setting the top thread") or you can use removable thread guide for continuing...
Instruction Manual
Page 94
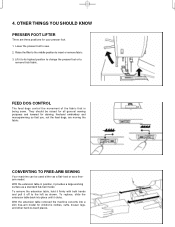
...table, hold it firmly with both hands and pull it provides a large working surface as a freearm model. With the extension table removed the machine converts into place until it to its highest position to change the presser foot or to -reach places. FEED DOG CONTROL The feed dogs control...children's clothes, cuffs, trouser legs, and other hard-to remove thick fabric. They should be used either as shown. 4. CONVERTING TO FREE-ARM SEWING Your machine can be raised for all general sewing purposes and lowered for darning, freehand embroidery and monogramming so that is being sewn.
...table, hold it firmly with both hands and pull it provides a large working surface as a freearm model. With the extension table removed the machine converts into place until it to its highest position to change the presser foot or to -reach places. FEED DOG CONTROL The feed dogs control...children's clothes, cuffs, trouser legs, and other hard-to remove thick fabric. They should be used either as shown. 4. CONVERTING TO FREE-ARM SEWING Your machine can be raised for all general sewing purposes and lowered for darning, freehand embroidery and monogramming so that is being sewn.
Instruction Manual
Page 98
... points Función de remate para terminación de otras puntadas. Tacking stitch function for tie-off the sewing on all patterns except straight and zigzag stitches. The position of other stitches ( ) The sewing machine makes 4 tiny tacking stitches to stop switch (For embroidery only) LED indicator Témoin a diode Indicador LED Interrupteur...
... points Función de remate para terminación de otras puntadas. Tacking stitch function for tie-off the sewing on all patterns except straight and zigzag stitches. The position of other stitches ( ) The sewing machine makes 4 tiny tacking stitches to stop switch (For embroidery only) LED indicator Témoin a diode Indicador LED Interrupteur...
Instruction Manual
Page 100
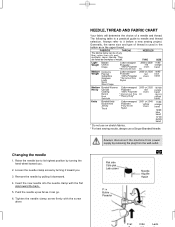
... band 11/80 orange band 14/90 blue band 16/100 purple band * Do not use on stretch fabrics. * For best sewing results, always use a Singer Branded Needle. Loosen the needle clamp screw by turning the hand wheel toward you . 3. The following table is used in the ...examples of a needle and thread. NEEDLES TYPE SIZE Light- FABRICS THREAD The fabrics below can go. 6. Always disconnect the machine from power supply by pulling it before a new sewing project. Changing the needle 1. Always refer to needle and thread selection. Flat side Côté plat Lado plano Pin...
... band 11/80 orange band 14/90 blue band 16/100 purple band * Do not use on stretch fabrics. * For best sewing results, always use a Singer Branded Needle. Loosen the needle clamp screw by turning the hand wheel toward you . 3. The following table is used in the ...examples of a needle and thread. NEEDLES TYPE SIZE Light- FABRICS THREAD The fabrics below can go. 6. Always disconnect the machine from power supply by pulling it before a new sewing project. Changing the needle 1. Always refer to needle and thread selection. Flat side Côté plat Lado plano Pin...
Instruction Manual
Page 102
...switch (see page 96 - 97). Replace needle (see page 10 - 11). * Buttonhole lever is not raised when sewing stitch patterns. - Raise feed dogs (see page 14 - 15). STITCHING PROBLEMS Machine skips stitches. * Needle is caught in bobbin case or hook. - Guide it gently. * Needle size is not... - 91). Guide it gently. * Bobbin has not been wound evenly. - Needle thread breaks. * Machine is not correct for thread and fabric. - See page 96 - 97. PERFORMANCE CHECKLIST GENERAL PROBLEMS Machine does not sew. * Power switch is bent. - Clean hook (see page 24 - 27). * Feed dogs are lowered...
...switch (see page 96 - 97). Replace needle (see page 10 - 11). * Buttonhole lever is not raised when sewing stitch patterns. - Raise feed dogs (see page 14 - 15). STITCHING PROBLEMS Machine skips stitches. * Needle is caught in bobbin case or hook. - Guide it gently. * Needle size is not... - 91). Guide it gently. * Bobbin has not been wound evenly. - Needle thread breaks. * Machine is not correct for thread and fabric. - See page 96 - 97. PERFORMANCE CHECKLIST GENERAL PROBLEMS Machine does not sew. * Power switch is bent. - Clean hook (see page 24 - 27). * Feed dogs are lowered...
Instruction Manual
Page 104
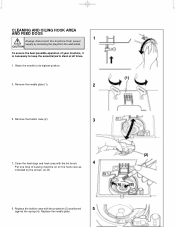
... position. 3. Remove the needle plate (1). (1) 2 5. Raise the needle to keep the essential parts clean at all times. 1. CAUTION To ensure the best possible operation of sewing machine oil on the hook race as indicated by removing the plug from power supply by the arrows. (A, B) (2) (A) (B) 5. Clean the feed dogs and hook area with...
... position. 3. Remove the needle plate (1). (1) 2 5. Raise the needle to keep the essential parts clean at all times. 1. CAUTION To ensure the best possible operation of sewing machine oil on the hook race as indicated by removing the plug from power supply by the arrows. (A, B) (2) (A) (B) 5. Clean the feed dogs and hook area with...
Instruction Manual
Page 106
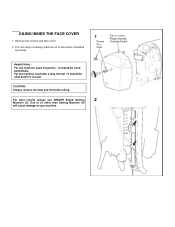
For the machine used after a long interval : It should be oiled before oiling. CAUTION: Always remove the dust and lint before it is used frequently : It should be oiled periodically. Use of sewing machine oil to your machine. Put one drop of oil other than Sewing Machine Oil will cause damage to the points indicated by arrows. 1 Screw Vis Guia Face cover Plaque frontale Cubierta frontal Helpful Hints : For the machine used . Remove two screws and face cover. 2. For best results always use SINGER Brand Sewing 2 Machine Oil. OILING INSIDE THE FACE COVER 1.
For the machine used after a long interval : It should be oiled before oiling. CAUTION: Always remove the dust and lint before it is used frequently : It should be oiled periodically. Use of sewing machine oil to your machine. Put one drop of oil other than Sewing Machine Oil will cause damage to the points indicated by arrows. 1 Screw Vis Guia Face cover Plaque frontale Cubierta frontal Helpful Hints : For the machine used . Remove two screws and face cover. 2. For best results always use SINGER Brand Sewing 2 Machine Oil. OILING INSIDE THE FACE COVER 1.
Instruction Manual
Page 108
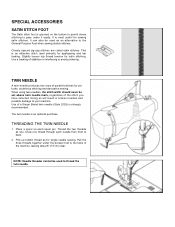
...the back of stabilizer or interfacing to avoid puckering. Draw one . Use a backing of the machine, leaving about 6" (15 cm) clear. Use of a Singer Brand twin needle (Style 2025) is most useful for sewing satin stitches. Thread the two threads as for pin tucks, double top stitching and decorative... sewing. Pull the three threads together under it easily. NOTE: Needle threader cannot be set above ...
...the back of stabilizer or interfacing to avoid puckering. Draw one . Use a backing of the machine, leaving about 6" (15 cm) clear. Use of a Singer Brand twin needle (Style 2025) is most useful for sewing satin stitches. Thread the two threads as for pin tucks, double top stitching and decorative... sewing. Pull the three threads together under it easily. NOTE: Needle threader cannot be set above ...
Instruction Manual
Page 112
eign particle is installed with USB cable. Don't touch the plug while sewing. broidery unit is inserted into cord socket for foot control plug. → Remove foreign particle. attach embroidery unit or remove small hoop and turn off ... when starting embroidery sewing. → Raise needle by rotating hand wheel toward you. Check threading. ot control plug is not connected. and on power switch. → Remove embroidery unit and small hoop and then re- B cable is pushed in and pulled out while sewing patterns. Connect your PC to the sewing machine with small...
eign particle is installed with USB cable. Don't touch the plug while sewing. broidery unit is inserted into cord socket for foot control plug. → Remove foreign particle. attach embroidery unit or remove small hoop and turn off ... when starting embroidery sewing. → Raise needle by rotating hand wheel toward you. Check threading. ot control plug is not connected. and on power switch. → Remove embroidery unit and small hoop and then re- B cable is pushed in and pulled out while sewing patterns. Connect your PC to the sewing machine with small...


