
Instruction Manual
Page 6
... Decorative Stitching 48 - 49 Continuous patterns 50 - 51 Sewing on a button 50 - 51 Buttonhole making 52 - 57 Using buttonhole foot, Procedure, Corded buttonholes 3. GETTING TO KNOW MACHINE Machine identification 6 - 7 Accessories 8-9 2. PRE P AR AT ION FOR E MBROIDERY SEWI NG Before attaching embroidery unit 58 - 61 Attaching embroidery foot, Inserting the bobbin, Setting top thread, Picking up...
... Decorative Stitching 48 - 49 Continuous patterns 50 - 51 Sewing on a button 50 - 51 Buttonhole making 52 - 57 Using buttonhole foot, Procedure, Corded buttonholes 3. GETTING TO KNOW MACHINE Machine identification 6 - 7 Accessories 8-9 2. PRE P AR AT ION FOR E MBROIDERY SEWI NG Before attaching embroidery unit 58 - 61 Attaching embroidery foot, Inserting the bobbin, Setting top thread, Picking up...
Instruction Manual
Page 10
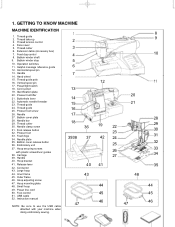
...Inner frame 45. Instruction manual NOTE: Be sure to use the USB cable attached with plastic screwdriver guides 38. GETTING TO KNOW MACHINE MACHINE IDENTIFICATION 1. Needle bar 29. Embroidery unit 37. Horizontal spool pin 13. Cord socket 19. Needle clamp screw 31. Feed dogs 34. Power line cord 50. ...threader 23. Bobbin cover release button 36. Release lever 42. Foot control 51. Thread take-up 3. Hand wheel 15. Hoop securing screws with your machine when doing embroidery sewing. 1 2 3 4 5 6 7 13 14 15 16 17 18 3938 47 36 37 40 43 12 19 42 41 44 45 46 20...
...Inner frame 45. Instruction manual NOTE: Be sure to use the USB cable attached with plastic screwdriver guides 38. GETTING TO KNOW MACHINE MACHINE IDENTIFICATION 1. Needle bar 29. Embroidery unit 37. Horizontal spool pin 13. Cord socket 19. Needle clamp screw 31. Feed dogs 34. Power line cord 50. ...threader 23. Bobbin cover release button 36. Release lever 42. Foot control 51. Thread take-up 3. Hand wheel 15. Hoop securing screws with your machine when doing embroidery sewing. 1 2 3 4 5 6 7 13 14 15 16 17 18 3938 47 36 37 40 43 12 19 42 41 44 45 46 20...
Instruction Manual
Page 12
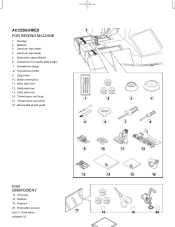
...) 4. Screwdriver (large) 8. Buttonhole foot 13. Thread spool net (long) 15. Bobbins 19. Screwdriver for needle plate (large) 7. Scissors 20. Button sewing foot 11. Screwdriver (small) 9. Needles 2. Spool pin cap (large) 5. Bobbins 3. Embroidery software CD 9 10 11 12 13 14 15 16 17 18 19 20 Zipper foot 10. Blind stitch foot 12...
...) 4. Screwdriver (large) 8. Buttonhole foot 13. Thread spool net (long) 15. Bobbins 19. Screwdriver for needle plate (large) 7. Scissors 20. Button sewing foot 11. Screwdriver (small) 9. Needles 2. Spool pin cap (large) 5. Bobbins 3. Embroidery software CD 9 10 11 12 13 14 15 16 17 18 19 20 Zipper foot 10. Blind stitch foot 12...
Instruction Manual
Page 34
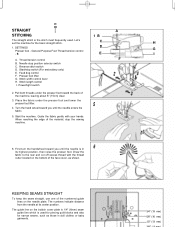
Start/stop the sewing machine. 6. Feed dog control F. Place the fabric under the presser foot toward you until the needle enters the fabric. 5. KEEPING SEAMS STRAIGHT To keep the seam straight, use one of the machine, leaving about 6" (15cm) clear. 3 3. Reverse stitch switch D.... narrow seams, such as shown. Guide the fabric gently with the thread cutter located on the bottom of the material, stop switch (For embroidery only) E. Start the machine. Power/light switch 1B C D E A F 2 H G I . First turn the handwheel toward you until the needle is in doll clothes ...
Start/stop the sewing machine. 6. Feed dog control F. Place the fabric under the presser foot toward you until the needle enters the fabric. 5. KEEPING SEAMS STRAIGHT To keep the seam straight, use one of the machine, leaving about 6" (15cm) clear. 3 3. Reverse stitch switch D.... narrow seams, such as shown. Guide the fabric gently with the thread cutter located on the bottom of the material, stop switch (For embroidery only) E. Start the machine. Power/light switch 1B C D E A F 2 H G I . First turn the handwheel toward you until the needle is in doll clothes ...
Instruction Manual
Page 62
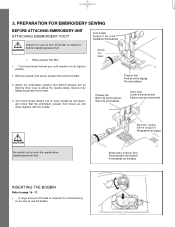
...needle. Needle clamp Serre-aiguille Abrazadera de aguja Embroidery presser foot Pied presseur de broderie Prensatelas de bordado INSERTING THE BOBBIN Refer to machine before changing presser foot. Attach the embroidery presser foot behind presser bar so that the embroidery presser foot moves up and down , and... toward you until needle is in its highest position. 1. Secure it by tightening presser foot screw. 3. 3. PREPARATION FOR EMBROIDERY SEWING BEFORE ATTACHING EMBROIDERY UNIT ATTACHING EMBROIDERY FOOT Always be sure to touch the needle when replacing presser foot.
...needle. Needle clamp Serre-aiguille Abrazadera de aguja Embroidery presser foot Pied presseur de broderie Prensatelas de bordado INSERTING THE BOBBIN Refer to machine before changing presser foot. Attach the embroidery presser foot behind presser bar so that the embroidery presser foot moves up and down , and... toward you until needle is in its highest position. 1. Secure it by tightening presser foot screw. 3. 3. PREPARATION FOR EMBROIDERY SEWING BEFORE ATTACHING EMBROIDERY UNIT ATTACHING EMBROIDERY FOOT Always be sure to touch the needle when replacing presser foot.
Instruction Manual
Page 66
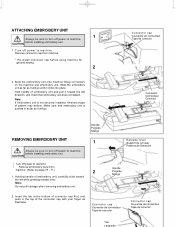
...tab at the bottom of pattern may deform. Turn off power to machine before installing embroidery unit. Hold handle of embroidery unit and pull it toward the left direction, and check that embroidery unit is not securely installed, finished shape of connector cap first, ... go. Remove connector cap from machine. (Refer to pages 70 - 71.) 1. Make sure that embroidery unit does not detach. ATTACHING EMBROIDERY UNIT 1 Always be sure to turn off power to machine. ∗ Remove embroidery hoop from machine. * Re-install connector cap before using machine for general sewing. 2 3.
...tab at the bottom of pattern may deform. Turn off power to machine before installing embroidery unit. Hold handle of embroidery unit and pull it toward the left direction, and check that embroidery unit is not securely installed, finished shape of connector cap first, ... go. Remove connector cap from machine. (Refer to pages 70 - 71.) 1. Make sure that embroidery unit does not detach. ATTACHING EMBROIDERY UNIT 1 Always be sure to turn off power to machine. ∗ Remove embroidery hoop from machine. * Re-install connector cap before using machine for general sewing. 2 3.
Instruction Manual
Page 78
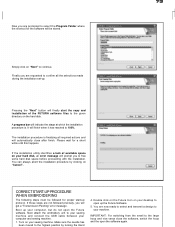
...switching from the small to the highest position by clicking on your computer and sewing machine. 1. Double click on the Futura Icon on "Next" to your sewing machine and connect the USB cable between your sewing machine. The installation procedure is . CORRECT START-UP PROCEDURE WHEN EMBROIDERING The following... up your machine. Please wait for proper start the copy and installation of available space on your hard disk, an error message will be followed for a short while until this happens. Next attach the embroidery unit to continue. Boot up the Futura Software. 5....
...switching from the small to the highest position by clicking on your computer and sewing machine. 1. Double click on the Futura Icon on "Next" to your sewing machine and connect the USB cable between your sewing machine. The installation procedure is . CORRECT START-UP PROCEDURE WHEN EMBROIDERING The following... up your machine. Please wait for proper start the copy and installation of available space on your hard disk, an error message will be followed for a short while until this happens. Next attach the embroidery unit to continue. Boot up the Futura Software. 5....
Instruction Manual
Page 86
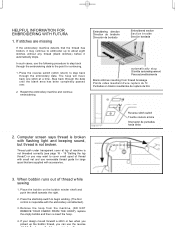
... thread breakage Points vides résultant d'une rupture du fil Puntadas en blanco resultantes de ruptura de hilo 2. Restart the embroidery machine and continue embroidering. Thread path under transparent cover at a time. The hoop will move back one stitch at top of... (blank stitches) before it may continue to embroider up to cover small spool of thread while sewing 1. HELPFUL INFORMATION FOR EMBROIDERING WITH FUTURA 1. If stitches are missing If the embroidery machine detects that are supplied with flashing light and beeping sound, but thread is not threaded correctly (...
... thread breakage Points vides résultant d'une rupture du fil Puntadas en blanco resultantes de ruptura de hilo 2. Restart the embroidery machine and continue embroidering. Thread path under transparent cover at a time. The hoop will move back one stitch at top of... (blank stitches) before it may continue to embroider up to cover small spool of thread while sewing 1. HELPFUL INFORMATION FOR EMBROIDERING WITH FUTURA 1. If stitches are missing If the embroidery machine detects that are supplied with flashing light and beeping sound, but thread is not threaded correctly (...
Instruction Manual
Page 94
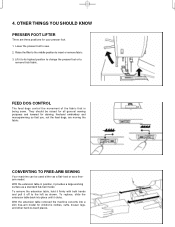
...your presser foot. 1. bed or as shown. To replace, slide the extension table back into a slim free-arm model for darning, freehand embroidery and monogramming so that is being sewn. They should be used either as a standard flat-bed model. Lower the presser foot to insert or..., hold it firmly with both hands and pull it provides a large working surface as a flat- CONVERTING TO FREE-ARM SEWING Your machine can be raised for all general sewing purposes and lowered for children's clothes, cuffs, trouser legs, and other hard-to-reach places. With the extension table removed...
...your presser foot. 1. bed or as shown. To replace, slide the extension table back into a slim free-arm model for darning, freehand embroidery and monogramming so that is being sewn. They should be used either as a standard flat-bed model. Lower the presser foot to insert or..., hold it firmly with both hands and pull it provides a large working surface as a flat- CONVERTING TO FREE-ARM SEWING Your machine can be raised for all general sewing purposes and lowered for children's clothes, cuffs, trouser legs, and other hard-to-reach places. With the extension table removed...
Instruction Manual
Page 98
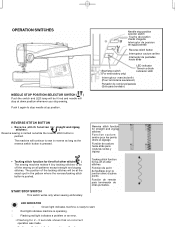
... continue to start. LED INDICATOR Green light indicates machine is ready to sew in the pattern where the reverse/tacking stitch button is pushed. Needle stop position...STOP SWITCH This switch works only when sewing embroidery. Flashing red light indicates a problem or an error. ∗ Flashing for tie-off the sewing on all patterns except straight and zigzag stitches. Red light indicates machine is operating. The position of other ... is pressed. Push it again to tie off of other stitches ( ) The sewing machine makes 4 tiny tacking stitches to stop needle at up position.
... continue to start. LED INDICATOR Green light indicates machine is ready to sew in the pattern where the reverse/tacking stitch button is pushed. Needle stop position...STOP SWITCH This switch works only when sewing embroidery. Flashing red light indicates a problem or an error. ∗ Flashing for tie-off the sewing on all patterns except straight and zigzag stitches. Red light indicates machine is operating. The position of other ... is pressed. Push it again to tie off of other stitches ( ) The sewing machine makes 4 tiny tacking stitches to stop needle at up position.
Instruction Manual
Page 112
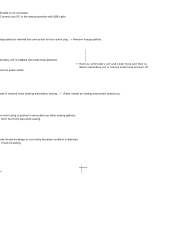
... unit is pushed in and pulled out while sewing patterns. attach embroidery unit or remove small hoop and turn off edle is inserted into cord socket for foot control plug. → Remove foreign particle. Connect your PC to the sewing machine with small hoop attached. and on power switch.... → Remove embroidery unit and small hoop and then re- B cable is detected. edle thread breakage or incorrectly threaded ...
... unit is pushed in and pulled out while sewing patterns. attach embroidery unit or remove small hoop and turn off edle is inserted into cord socket for foot control plug. → Remove foreign particle. Connect your PC to the sewing machine with small hoop attached. and on power switch.... → Remove embroidery unit and small hoop and then re- B cable is detected. edle thread breakage or incorrectly threaded ...


