
Singer Futura XL-400 Support Question
Singer Futura XL-400 Support Question
Find answers below for this question about Singer Futura XL-400.Need a Singer Futura XL-400 manual? We have 1 online manual for this item!
Question posted by Jjcielo on April 29th, 2013
Machine Will Not Turn On
Was Sewing and machine turned off and it will not turn on.
Current Answers
Answer #1: Posted by tintinb on April 29th, 2013 9:55 AM
tintinb

Member since:
October 26th, 2012 Points: 7,056,560

Member since:
October 26th, 2012 Points: 7,056,560
The only thing you can do is to check the power cable if properly plugged into the power outlet. Make sure that the power cable is not loosely connected to let the power flow properly.
If you have more questions, please don't hesitate to ask here at HelpOwl. Experts here are always willing to answer your questions to the best of our knowledge and expertise.
Regards,
Tintin
Related Singer Futura XL-400 Manual Pages
Instruction Manual - Page 2
... Canada only)
This appliance has a polarized plug (one way.
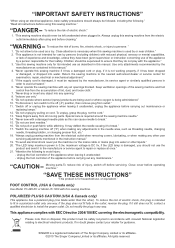
"To disconnect, turn switch to ensure that on cord. "IMPORTANT SAFETY INSTRUCTIONS"
"When using an electrical...appliance is being administered." 10. Return the sewing machine to persons: " 1. "Never operate the sewing machine with the appliance." 3. "Switch the sewing machine off („0") position, then remove plug...
Instruction Manual - Page 5

...48 - 49 Continuous patterns 50 - 51 Sewing on a button 50 - 51 Buttonholes 52 - 57
Using buttonhole foot, Procedure, Corded buttonholes Buttonholing with Futura Multi hoop 88 - 95 Helpful messages when ...face cover 104 - 105 Special accessories 106 - 107 Helpful messages 108 - 109
For European version
Sewing machine Dimensions: 567 mm × 240 mm × 317 mm Mass of the equipment: 10.8...
Instruction Manual - Page 10

...) is called the
General Purpose Foot and will
be
used for most decorative sewing. Embroidery software CD
19
FUTURA embroidery is "system" of your
7
Sewing machine is another
12
very useful foot and should be used for the majority of the machine and the software providing powerful option and capabilities. Thread spool net (long)
18...
Instruction Manual - Page 12
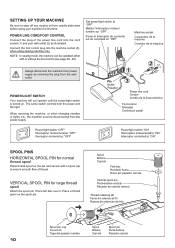
...switch is turned on the spool pin.
Place a thread spool on . Connect the foot control plug into the cord socket (1) and your machine the first time. NOTE: In sewing mode, the machine can be ...OFF"
machine socket Connecteur de la machine Conector de la máquina
2 1
Pin Butée Pasador
3
Power line cord Cordon Cordón de la linea eléctrica
Foot control Rhéostat
XL-550-...
Instruction Manual - Page 18

...With the presser foot raised, pull the thread towards the the back of the machine. Thread the machine with your left hand while firmly gripping the thread with your right hand in the...the thread guide (4). * Pass the thread through thread guides (1 & 2), and then pull it .
16 Turn the hand wheel counter clockwise (toward you should detect only a slight resistance and little or no deflection of ...
Instruction Manual - Page 24

... should be accomplished with the word "S" exposed on the tension control dial on top of the machine. Helpful Hint: A slight adjustment to remove the foot. 2.
Lower the presser foot lifter so that for straight stitch sewing. STRAIGHT STITCHING
The correct appearance of the fabric you will need to adjust the tension control...
Instruction Manual - Page 28

...the LED will blink 3 times in green and a beep will sound.
The LED turns on when twin needle sewing is available for manual adjustments than others.
2. The LED Indicator next to the Control ...according to move the control knobs while sewing slowly. Stitch length and width/needle position controls
*Auto/Default settings Your sewing machine will produce most of your preference. NOTES: 1.
Instruction Manual - Page 30
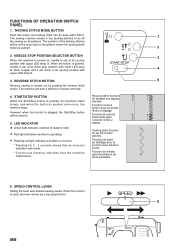
... POSITION SELECTOR BUTTON
3
When the machine is turned on all patterns. REVERSE STITCH BUTTON
5
Reverse sewing is set at its down-stop...that an incorrect operation was made. * Continuous flashing indicates that the machine malfunctions. SPEED CONTROL LEVER
Sliding the lever sets desired sewing speed. The sewing machine makes 4 tiny tacking stitches to tie off of the tacking stitches
...
Instruction Manual - Page 34
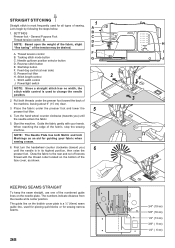
... about 6" (15 cm) clear.
3. Start the machine. First turn the handwheel counter clockwise (toward the back of the numbered guide lines on the bobbin cover plate is used for piecing quilt blocks or for sewing narrow seams.
32
3/4" (19 mm) 5/8" (16 mm) 1/2" (13 mm) 3/8" ( 9 mm) 1/4" ( 6 mm) Reverse stitch button E. Stitch width control J. Pull...
Instruction Manual - Page 56

...Fabric marking Marque du tissu Marca de material
mark Marque Marca
* Sewing will be completed automatically in the center of the bartack threads.
54...then lower the buttonhole foot.
8. While holding the top thread, start the machine. Pull out the bobbin thread
underneath the fabric to the rear.
7.
When sewing is finished, use a buttonhole opener to cut any of the buttonhole. Align...
Instruction Manual - Page 60

...needle. Screw Vis Guia
* Turn the hand wheel counter clockwise (toward you ) until the needle is required for embroidering, so
be sure to turn off power to use full ...de bordado
58 PREPARATION FOR EMBROIDERY SEWING
BEFORE ATTACHING EMBROIDERY UNIT ATTACHING EMBROIDERY FOOT
Foot holder Support du pied Sujetador prensatelas
Always be sure to machine CAUTION before changing presser foot.
...
Instruction Manual - Page 62
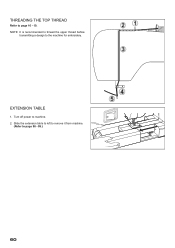
Turn off power to page 98 - 99.)
60 Slide the extension table to left to remove it from machine.
(Refer to machine. 2. THREADING THE TOP THREAD
Refer to the machine for embroidery. EXTENSION TABLE
1. NOTE: It is recommended to thread the upper thread before
transmitting a design to page 16 - 19.
Instruction Manual - Page 64
... is pushed in as far as it will go until it clicks into place. ATTACHING EMBROIDERY UNIT
1
Always be distorted. Turn off the machine. * Remove embroidery hoop from machine.
(Refer to close for general sewing.
3
Handle Poignée Mango
1
Release lever Support de cerceau Palanca de liberación
Handle
2
Poignée Mango
Release lever...
Instruction Manual - Page 72
... onto the embroidery unit from underneath the embroidery foot.
2. PREPARING THE MACHINE BEFORE
INSTALLING THE HOOP
1
1. Palanca de liberación del aro
70... towards you ) until it out from front to back until the needle comes to its highest position.
Turn hand wheel counter clockwise (toward you . ATTACHING AND REMOVING EMBROIDERY HOOP
1
(A)
1. Carriage Chariot Carro
Hoop...
Instruction Manual - Page 76

...you will automatically close the Futura software and then turn on your embroidery unit.
3. Wait for proper start the copy and installation of available space on your machine. A progress bar will ... the embroidery unit to your desktop to open the Futura software. Double click on the Futura Icon on your computer and sewing machine.
1.
It will indicate the stage at which the...
Instruction Manual - Page 78
... button once will reverse one stitch at a time. LED INDICATOR Green light indicates machine is ready to start /stop sewing and the needle stops at a time.
REVERSE STITCH BUTTON To back up through the design.
NOTE: When sewing designs created by checking the box in progress, press the Reverse Stitch button. This...
Instruction Manual - Page 84

... the point for continuing.
1. Computer screen says thread is broken, machine lights are missing
If the embroidery machine detects that the thread is not in the thread tension. In such... fil Puntadas en blanco resultantes de ruptura de hilo
2. HELPFUL INFORMATION FOR EMBROIDERING WITH FUTURA
1.
Reverse stitch button Interrupteur couture arrière interruptor de puntadas hacia atrás...
Instruction Manual - Page 90

... si as possible. Multi-Hoop
Multi-Hooping is a special feature in the Futura software that will allow embroidery data which is larger than a single embroidery hoop to be sent to the machine to stitch out, while making it and sew accordingly.
The Multi-Hoop feature splits the design elements in the upper left...
Instruction Manual - Page 92

... Hooping. The grey area (#1 Hoop) is sent to be set on the horizontal and vertical cross lines on the inner hoop.
There are to the machine for sewing one section at a time. Fig. 3 Fig. 3 Fig. 3
Fig. 4 Fig. 4 Fig. 4
Guide line Ligne Guide Línea guía
Guide line Ligne Guide Línea...
Instruction Manual - Page 102
... thread tension.
(see page 22 - 23). * Stitch length is not threaded correctly. (see page
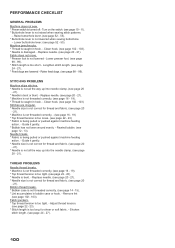
20 - 21). PERFORMANCE CHECKLIST
GENERAL PROBLEMS Machine does not sew. * Power switch is not raised when sewing stitch patterns.
- Turn on the switch. (see page 102 - 103). * Needle is not lowered - Clean hook. (see page 10 - 11). * Buttonhole lever is...
Similar Questions

The Machine Turns On But Doesn't Work, It Just Beeps When Foot Control Is Pres
when trying to operate this machine it doesn't work. It's tuned it on and position to sew, I push th...
when trying to operate this machine it doesn't work. It's tuned it on and position to sew, I push th...
(Posted by Meadedenise53 2 years ago)

I Was Sewing And All Of The Sudden My Machine Turned Off
(Posted by mari0624 3 years ago)

Singer Futura Xl-400
I am in need of a Singer Futura XL-400 Startup disc. Any idea where I can get one
I am in need of a Singer Futura XL-400 Startup disc. Any idea where I can get one
(Posted by fayevb 4 years ago)

How Do I Install The Software For The Singer Futura Machine And Make Files For
xl 400
xl 400
(Posted by gdonlch 10 years ago)

When I Am Embroidering My Machine Shuts Off. Then Turns Back On. Power Cord New.
(Posted by karenmerriam 10 years ago)