
Instruction Manual
Page 6
... and fabric chart 96 - 97 Performance checklist 98 - 99 Cleaning hook area and feed dogs 100- 101 Oiling inside the face cover 102 - 103 Special accessories 104 - 105 Helpful messages 106 - 109 Sewing machine Dimensions: 428 mm × 307 mm × 294 mm Mass of the equipment: 10 kg Embroidery unit...
... and fabric chart 96 - 97 Performance checklist 98 - 99 Cleaning hook area and feed dogs 100- 101 Oiling inside the face cover 102 - 103 Special accessories 104 - 105 Helpful messages 106 - 109 Sewing machine Dimensions: 428 mm × 307 mm × 294 mm Mass of the equipment: 10 kg Embroidery unit...
Instruction Manual
Page 10
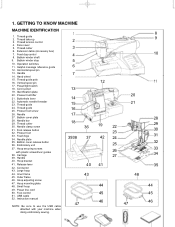
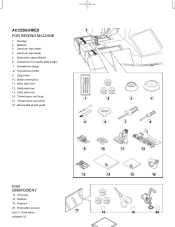
... 28 29 30 31 32 33 34 35 44 45 46 Hoop bracket 41. Large hoop 44. Small hoop 49. USB cable 52. Extension table (Accessory box) 7. Operation switches 11. Horizontal spool pin 13. Vertical spool pin 17. Handle 14. Thread guide pole 16. Automatic needle threader 23. Presser foot screw...
... 28 29 30 31 32 33 34 35 44 45 46 Hoop bracket 41. Large hoop 44. Small hoop 49. USB cable 52. Extension table (Accessory box) 7. Operation switches 11. Horizontal spool pin 13. Vertical spool pin 17. Handle 14. Thread guide pole 16. Automatic needle threader 23. Presser foot screw...
Instruction Manual
Page 12
Screwdriver for needle plate (large) 7. Button sewing foot 11. Scissors 20. Embroidery software CD 9 10 11 12 13 14 15 16 17 18 19 20 ACCESSORIES FOR SEWING MACHINE 1. Screwdriver (small) 9. Buttonhole foot 13. Bobbins 3. Spool pin cap (small) 4. Blind stitch foot 12. Thread spool net (short) 16. Buttonhole opener/Brush 6. ...
Screwdriver for needle plate (large) 7. Button sewing foot 11. Scissors 20. Embroidery software CD 9 10 11 12 13 14 15 16 17 18 19 20 ACCESSORIES FOR SEWING MACHINE 1. Screwdriver (small) 9. Buttonhole foot 13. Bobbins 3. Spool pin cap (small) 4. Blind stitch foot 12. Thread spool net (short) 16. Buttonhole opener/Brush 6. ...
Instruction Manual
Page 14
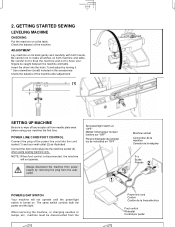
... sur "OFF". Be careful not to make scratches on . Always disconnect the machine from power supply by turning it. * Use screwdriver (small) included in the accessories. POWER LINE CORD/FOOT CONTROL Connect the plug of the power line cord into the machine socket (3), when using your machine the first time. When...
... sur "OFF". Be careful not to make scratches on . Always disconnect the machine from power supply by turning it. * Use screwdriver (small) included in the accessories. POWER LINE CORD/FOOT CONTROL Connect the plug of the power line cord into the machine socket (3), when using your machine the first time. When...
Instruction Manual
Page 86
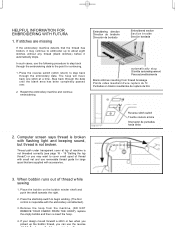
...through the embroidery data. If your design moved forward a stitch or two when you may want to cover small spool of thread with accessories. 3. In such cases, use the reverse Reverse stitch switch Touche couture arrière Interruptor de puntadas hacia atrás Restart the ...has been completely passed over. 2. The hoop will move back one stitch at top of thread while sewing 1. HELPFUL INFORMATION FOR EMBROIDERING WITH FUTURA 1. Thread path under transparent cover at a time. Press the reverse switch (stitch return) to begin winding. (The foot control is ...
...through the embroidery data. If your design moved forward a stitch or two when you may want to cover small spool of thread with accessories. 3. In such cases, use the reverse Reverse stitch switch Touche couture arrière Interruptor de puntadas hacia atrás Restart the ...has been completely passed over. 2. The hoop will move back one stitch at top of thread while sewing 1. HELPFUL INFORMATION FOR EMBROIDERING WITH FUTURA 1. Thread path under transparent cover at a time. Press the reverse switch (stitch return) to begin winding. (The foot control is ...
Instruction Manual
Page 108
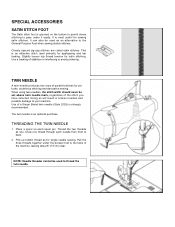
SPECIAL ACCESSORIES SATIN STITCH FOOT The Satin stitch foot is grooved on each needle from front to thread the twin needle. This is most useful for single ... thread through each spool pin. Use a backing of the machine, leaving about 6" (15 cm) clear. Pull the three threads together under it easily. Use of a Singer Brand twin needle (Style 2025) is an optional purchase. Closely spaced zig-zag stitches are called satin stitches. NOTE: Needle threader cannot be used primarily...
SPECIAL ACCESSORIES SATIN STITCH FOOT The Satin stitch foot is grooved on each needle from front to thread the twin needle. This is most useful for single ... thread through each spool pin. Use a backing of the machine, leaving about 6" (15 cm) clear. Pull the three threads together under it easily. Use of a Singer Brand twin needle (Style 2025) is an optional purchase. Closely spaced zig-zag stitches are called satin stitches. NOTE: Needle threader cannot be used primarily...

