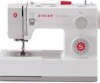
Singer 5523 SCHOLASTIC Support Question
Singer 5523 SCHOLASTIC Support Question
Find answers below for this question about Singer 5523 SCHOLASTIC.Need a Singer 5523 SCHOLASTIC manual? We have 1 online manual for this item!
Question posted by kschruhl on March 20th, 2013
Standard Accessories
Where can I purchase the standard accessories for Singer 5523 as I have lost them and need to purchase.
Current Answers
Related Singer 5523 SCHOLASTIC Manual Pages
Instruction Manual - Page 2
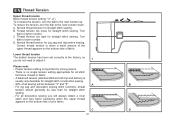
...not operating properly. 18. Do not use the proper needle plate. Always unplug this sewing machine. Return the appliance to break. 7. Do not operate where aerosol spray products are ...be replaced by or near children. 2. Do not allow to break. 9. Always unplug sewing machine from the electrical outlet when removing covers, lubricating, or when making any other user servicing ...
Instruction Manual - Page 6
... Power Source...6 Two Step Presser Foot Lifter/ Adjusting Presser Foot Pressure...8 Accessories...10
Threading the Machine Winding the Bobbin...12 Inserting the Bobbin ...14 Threading the Upper Thread...16 Automatic Needle Threader ...18 Raising the Bobbin Thread ...20 Thread Tension ...22
Sewing How to Choose Your Pattern...24 Three Needle Position Dial ...26...
Instruction Manual - Page 9
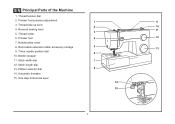
Removable extension table/ accessory storage
5
13
9. Stitch width dial
7
12. Reverse sewing lever
11
3
5. Thread cutter
6. Presser foot
4
12
7. Presser foot pressure adjustment
1
9
3. Needle plate cover
8. Bobbin stopper
11. Stitch length dial
13. EN Principal Parts of the Machine
1. Three needle position dial
6
10. Thread tension dial
2. Thread take...
Instruction Manual - Page 11

Bobbin thread guide
24. EN Principal Parts of the Machine
16. Bobbin winding spindle
16
18. Power and light switch 19
22. Foot speed control 30. Power cord
4
23 24 25 26 27
29 30
...
Instruction Manual - Page 13
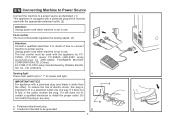
... wider than the other). Unplug power cord when machine is intended to fit in use .
The foot control must be grounded
2
6
A 3 Do not modify the plug in the outlet, reverse the plug. Polarized attachment plug
b. Co., Ltd. (Vietnam)
Sewing light
1
Press main switch (A) to install the proper outlet. If it does not...
Instruction Manual - Page 15
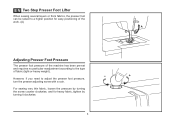
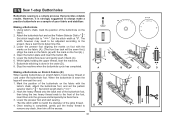
... Step Presser Foot Lifter
When sewing several layers or thick fabrics, the presser foot can be raised to a higher position for heavy fabric, tighten by turning the screw counter clockwise, and for easy positioning of the work. (A)
A
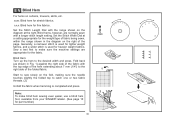
Adjusting Presser Foot Pressure
The presser foot pressure of the machine has been pre-set...
Instruction Manual - Page 17
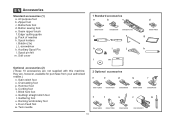
...) j. Soft cover
1 Standard accessories
a
b
c
006918008
e
006905008 006Q6A0150
f
d
006914008
g
h
i
j
k
l
m
Optional accessories (2) (These 10 accessories are , however, available for purchase from your authorized retailer.)
n. they are not supplied with this machine; Overcasting foot p. Gathering foot u. Darning/ embroidery foot v. Zipper foot c. Button sewing foot e. Edge...
Instruction Manual - Page 19

To start sewing, push the bobbin winder spindle to right. (6)
- Snap thread into thread ... spool pin. (1/2)
- Place thread and corresponding spool holder on to left
(sewing position).
4
3
5
6
7
8
9
10
12 Please Note:
When the bobbin winder spindle is in "bobbin winding"
position, the machine will not sew and the handwheel turn. Hold thread end. (7) 1
- Step on spindle....
Instruction Manual - Page 29
... will be less than for zig zag and decorative sewing.
B. Normal thread tension for straight stitch
sewing.
-
A balanced tension (identical stitches both top and bottom) is important for all decorative sewing you do not need to adjust it.
1
Please note:
- A. For zig zag and decorative sewing stitch functions, thread
tension should generally be between "3" and...
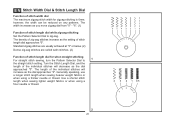
Instruction Manual - Page 31

... blue indicates that the stitch is a stretch stitch pattern, and information on how to sew these stretch patterns is on the machine. a
b
c d e
a. Stitch Length Dial e. The Pattern Selector Dial may be turned in gray. Stitch Width Dial d.
Reverse Sewing Lever b. Stitches in the bottom row of the diagram are indicated on the Pattern...
Instruction Manual - Page 35
...Standard zigzag stitches are usually achieved at "3" or below. (2) Dense zig-zag stitches are called satin stitches. (2)
Function of stitch length dial for zigzag stitching is 6mm; Use a shorter stitch
length when sewing...as you move zigzag dial from "0" - Generally speaking, use
a longer stitch length when sewing heavier weight fabrics or
when using a
finer needle or thread.
4 3 2 1 ...
Instruction Manual - Page 37
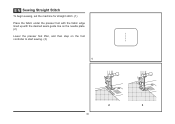
EN Sewing Straight Stitch
To begin sewing, set the machine for straight stitch. (1) Place the fabric under the presser foot with the fabric edge lined up with the desired seam guide line on the needle plate. (2) Lower the presser foot lifter, and then step on the foot controller to start sewing. (3)
1
2
3
30
Instruction Manual - Page 39
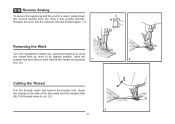
A
Release the lever and the machine will sew forward again. (1)
Removing the Work
Turn the handwheel toward you (counterclockwise) to bring
the thread take up lever ... (2)
Cutting the Thread
Pull the threads under and behind the presser foot. Pull threads down
the reverse sewing lever (A).
EN Reverse Sewing
To secure the beginning and the end of the face plate and into thread cutter...
Instruction Manual - Page 41
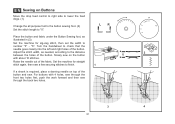
... on the Pattern Selector Dial. Used to add triple reinforcement to " ". M
1 M
2 34
Ric Rac (2) Set the Pattern Selector Dial to stretch and hardwearing seams. The machine sews two stitches forward and one stitch backwards. Then, turn the Pattern Selector Dial to the desired pattern. Adjust the Stitch Width Dial to the indicator...
Instruction Manual - Page 43
... stitch length setting.
Blind Hem:
Turn up the hem to make blind hem sewing even easier, use a blind hem foot, available from your SINGER® retailer. (See page 10 for the fabric. Fold back
(as shown..., and a wider stitch is completed and press.
2 Note: To make sure the machine settings are normally sewn
with
the top edge of the hem extending about 7 mm (1/4") to the
right side...
Instruction Manual - Page 45
...on the
fabric. 2.
Set stitch length dial to determine this. 3. The width however may need to be sewn first.) (Align the mark on the fabric (a) with the
tailor's chalk...the Pattern Selector Dial to the project. Stop the machine when the buttonhole cycle has completed. Once sewing is sewn the
legs will be adjusted according to " ". Sew a test first to " ". When the buttonhole...
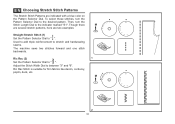
Instruction Manual - Page 49
... length to number "3" - "6". LR
Place the button and fabric under the Button Sewing foot, as needed, according to check that the needle goes cleanly into the left and right holes of the fabric.
Adjust the stitch width, as illustrated in (3). Set the machine for zig-zag stitch, then set the width to "0". EN...
Instruction Manual - Page 51

EN Installing the Removable Extension Table
Hold the removable extension table horizontally, and push it in the direction of the arrow. (1) To remove the extension table, pull it toward the left.
1 The inside of the removable extension table can be utilized as shown. (2)
2
44 To open, flip cover down as an accessory box.
Instruction Manual - Page 55
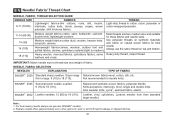
...; needles. 2.
SINGER® 2045 Semi-ball point needle, scarfed. 9 (70) to thread size and weight of fabric.
Not recommended for these fabrics and needle sizes.
Leather, vinyl, upholstery. (Leaves smaller hole than standard large needle.)
Note : 1.
For best sewing results always use the same thread on natural woven fabrics for best
Heavyweight fabrics...
Instruction Manual - Page 64
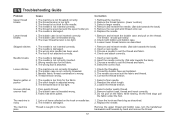
... threaded. 2. Check the threading. 2. Correct the thread tension.
1. The machine is not inserted correctly. 2. Thread is not correctly inserted. 3. Remove bobbin...machine is threaded wrong. 3. Insert a new needle. 3. The needle is noisy
The machine jams
1. The machine is damaged. Check and attach correctly.
1. Select a finer needle. 2. Do not pull on the fabric while sewing...
Similar Questions

I Get E7 Error Message On My Singer Model 7258 Sewing Machine. There Is No Refe
Error message E7 is up on my Singer Stylist model 7258 sewing machine. It is not working at all. I t...
Error message E7 is up on my Singer Stylist model 7258 sewing machine. It is not working at all. I t...
(Posted by ebellamybellamy9 5 years ago)

Sewing Machine Model 5523 Page 53 In Manual Does Not Show Me How To Attach Pres
The page in your instructions I had and was reading it when it deleted
The page in your instructions I had and was reading it when it deleted
(Posted by ramseyrobert 7 years ago)

How Do I Set Up The Machine To Use The Buttonhole Fot For The Singer Scholastic
singer scholastic sewing machine model 5523
singer scholastic sewing machine model 5523
(Posted by sharitaylor91 8 years ago)

Optional Cutter
I am having trouble with the optional cutter on my Singer Scholastic sewing machine. I just purchase...
I am having trouble with the optional cutter on my Singer Scholastic sewing machine. I just purchase...
(Posted by pnjmilstead 9 years ago)

Beeping From Singer Sewing Machine Stylist Ii 5625
My sewing machine will beep and stop sewing after three inches of sewing. I have taken it to be repa...
My sewing machine will beep and stop sewing after three inches of sewing. I have taken it to be repa...
(Posted by arusheria 9 years ago)