
Singer H74 Support Question
Singer H74 Support Question
Find answers below for this question about Singer H74.Need a Singer H74 manual? We have 2 online manuals for this item!
Current Answers
Answer #1: Posted by Troubleshooter101 on March 25th, 2021 11:39 AM
Troubleshooter101

Member since:
September 30th, 2015 Points: 2,927,030

Member since:
September 30th, 2015 Points: 2,927,030
Instructions on How to Remove the Cloth Plate (accessories compartment is inside the cloth plate)for the Singer serger model 14CG754 are on page 27 of the instruction manual.
https://www.amazon.com/ask/questions/Tx2QYUG6EG4PLIE
Thanks
Please respond to my effort to provide you with the best possible solution by using the "Acceptable Solution" and/or the "Helpful" buttons when the answer has proven to be helpful. Please feel free to submit further info for your question, if a solution was not provided. I appreciate the opportunity to serve you!
Troublshooter101
Related Singer H74 Manual Pages
Instruction Manual 2 - Page 1

H74 Instruction Manual
Instruction Manual 2 - Page 3

.... 9.
Never operate the appliance with the appliance. Keep ventilation openings of the sewing machine and foot controller free from outlet. 15. To disconnect, turn off ("O") when making any opening. 12. The sound pressure level under normal operating conditions is required around the sewing machine needle.
6. Children should never be supervised to persons:
1. Never...
Instruction Manual 2 - Page 4
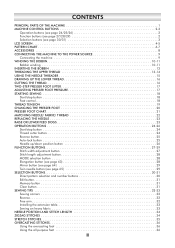
... buttons (see page 30/31 3 LCD SCREEN 4-5 PATTERN CHART 6-7 ACCESSORIES 8 CONNECTING THE MACHINE TO THE POWER SOURCE 9 Connecting the machine 9 WINDING THE BOBBIN 10-11 Bobbin winding 10-11 INSERTING THE BOBBIN...Memory button 31 Clear button 31 SEWING TIPS 32-33 Sewing corners 32 Reverse 32 Free arm 32 Installing the extension table 33 Sewing on heavy fabric 33 NEEDLE POSITION...
Instruction Manual 2 - Page 5
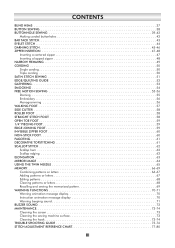
... 52 GATHERING 53 SMOCKING 54 FREE MOTION SEWING 55-56 Darning 55 Embroidery 56 Monogramming 56 WALKING FOOT 57 SIDE CUTTER 58 ROLLER FOOT 58 STRAIGHT STITCH FOOT 58 OPEN TOE FOOT 59 1/4" PIECING FOOT 59 ... 72 MAINTENANCE 73-74 Cleaning the screen 73 Cleaning the sewing machine surface 73 Cleaning the hook 73-74 TROUBLE SHOOTING GUIDE 75-76 STITCH ADJUSTMENT REFERENCE CHART 77-...
Instruction Manual 2 - Page 6
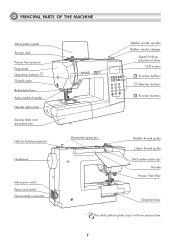
PRINCIPAL PARTS OF THE MACHINE
Stitch pattern plate Tension dial Presser foot pressure Face plate Operation buttons A Thread cutter Buttonhole lever Auto needle threader Needle plate cover
Sewing table and accessory box
Hole for Auxiliary spool pin
Handwheel
Main power switch Power cord socket ... Handle
Presser foot lifter
Drop feed lever * The stitch pattern plate clip is in the accessory box.
1
Instruction Manual 2 - Page 13
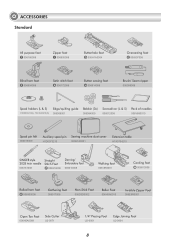
ACCESSORIES Standard
All purpose foot
T 006186008
Zipper foot
I 006905008
Buttonhole foot
D 006H1A0004
Overcasting foot
E 006907008
Blind hem foot
F 006904008
Satin stitch foot
A 006172008
Button sewing...
006084009
006012008
006V880010
Spool pin felt
006015009
Auxiliary spool pin Sewing machine dust cover
H1D0073210
020H7A0001
Extension table
H7A0754210
SINGER style 2025 twin...
Instruction Manual 2 - Page 23
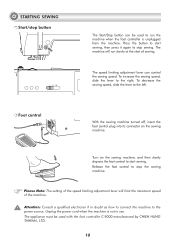
... the lever to the right, To decrease the sewing speed, slide the lever to stop the sewing machine. Foot control
With the sewing machine turned off, insert the foot control plug into its connector on the sewing machine, and then slowly depress the foot control to start sewing.
Turn on the sewing machine. Release the foot control to the left...
Instruction Manual 2 - Page 37
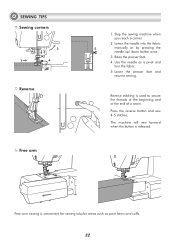
Stop the sewing machine when you reach a corner.
2. The machine will sew forward when the button is used to secure the threads at the beginning and at the end of a seam. Free-arm sewing is convenient for sewing tubular areas such as a pivot and turn the fabric.
5. Press the reverse button and sew 4-5 stitches.
Use the needle as...
Instruction Manual 2 - Page 38
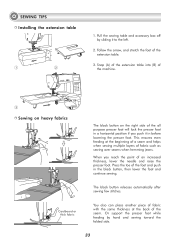
... stitches. Snap (A) of the extension table into (B) of the machine.
3
Sewing on heavy fabrics
The black button on the right side of the all purpose ... and stretch the foot of the foot and push in before lowering the presser foot. Pull the sewing table and accessory box off by hand and sewing toward the folded side.
33 Cardboard or thick fabric
You also can place another piece of fabric ...
Instruction Manual 2 - Page 52
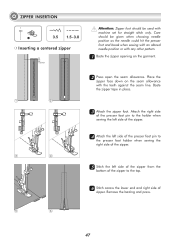
... given when choosing needle position as the needle could hit the presser foot and break when sewing with an altered needle position or with any other pattern.
11 Baste the zipper opening on the seam allowance with machine set for straight stitch only. Attach the right side
of the presser foot pin to...
Instruction Manual 2 - Page 60
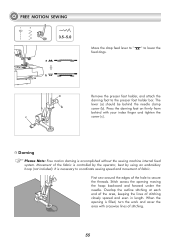
...It is accomplished without the sewing machine internal feed system. Overlap the outline stitching at each end of the area, keeping the lines of the hole to coordinate sewing speed and movement of ...).
Darning
Please Note: Free motion darning is necessary to secure the threads. When the opening moving the hoop backward and forward under the needle. " to lower the
Remove the presser...
Instruction Manual 2 - Page 62
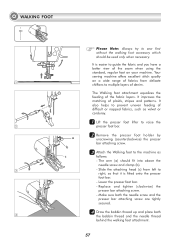
... thread and the needle thread
behind the walking foot attachment.
57 Your
sewing machine offers excellent stitch quality
1
on your machine. Slide the attaching head (c) from delicate
chiffons to raise the
2...33 Attach the Walking foot to
right, so that it is easier to sew first without the walking foot accessory which should fit into above the needle screw and clamp (b).
3
-...
Instruction Manual 2 - Page 64
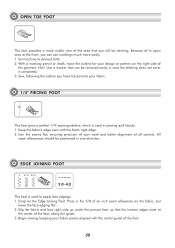
Set machine to apply lace edgings. 1. With a marking pencil or chalk, trace the outline for your fabric pieces aligned with the...foot.
59 Snap on the Edge Joining Foot. Begin sewing, keeping your design or pattern on the fabric, but
leave the lace edging flat. 2. Because of its open area at
the center of all corners. Sew, following the outline you will be positioned in piecing quilt...
Instruction Manual 2 - Page 70
... and start to
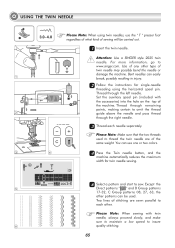
each needle separately. Bent needles can use the " T " presser foot regardless of what kind of
the machine.
Attention: Use a SINGER style 2025 twin
needle.
Please Note: When sewing with
the accessories) into the hole on the top of sewing will be used to thread the twin needle are sewn parallel to...
Instruction Manual 2 - Page 71
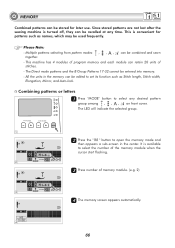
This machine has 4 modules of program memory and each module can be combined and sewn
together. -
It is ...patterns such as Stitch length, Stitch width,
Elongation, Mirror, and Auto-lock.
Since stored patterns are not lost after the sewing machine is available
to open the memory mode and
then appears a sub-screen in the memory can be recalled at any desired pattern
group among , ...
Instruction Manual 2 - Page 74
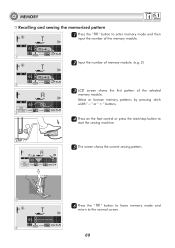
MEMORY
Recalling and sewing the memorized pattern 1 Press the " " button to the normal screen.
6
69
M
1
22 Input the number of memory...or " + " buttons.
3
44 Press on the foot control or press the start/stop button to
start the sewing machine.
4
M
55 The screen shows the current sewing pattern.
5
66 Press the "000" button to leave memory mode and
return to enter memory mode and then
...
Instruction Manual 2 - Page 75
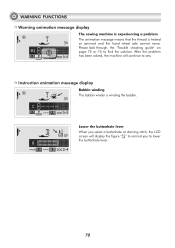
...When you to lower the buttonhole lever.
70 After the problem has been solved, the machine will display the figure " " to remind you select a buttonhole or darning stitch, ...the "Trouble shooting guide" on page 75 or 76 to sew.
WARNING FUNCTIONS Warning animation message display
The sewing machine is experiencing a problem The animation message means that the thread is winding the bobbin...
Instruction Manual 2 - Page 76
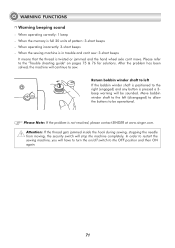
... bobbin winder shaft is positioned to the right (engaged) and any button is full 20 units of pattern: 3-short beeps -
In order to restart the sewing machine, you will continue to be sounded. WARNING FUNCTIONS Warning beeping sound
- Return bobbin winder shaft to left (disengaged) to allow the buttons to...
Instruction Manual 2 - Page 78
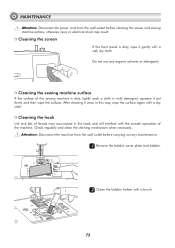
...MAINTENANCE
Attention: Disconnect the power cord from the wall outlet before cleaning the screen and sewing machine surface, otherwise injury or electrical shock may accumulate in this way, wipe the surface ...
22 Clean the bobbin holder with a dry cloth. Cleaning the sewing machine surface
If the surface of the sewing machine is dirty, wipe it gently with the smooth operation of thread may...
Instruction Manual 2 - Page 81
.... To use Start/stop button, disconnect the foot
controller.
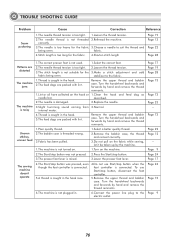
5.A thread is caught in the hook. 5.The feed dogs are distorted
The machine jams
The machine is noisy
Uneven stitches, uneven feed
The sewing machine doesn't operate
1.The correct presser foot is not used.
1.Select the correct foot.
2.The needle thread tension is too tight...
Similar Questions

I Get E7 Error Message On My Singer Model 7258 Sewing Machine. There Is No Refe
Error message E7 is up on my Singer Stylist model 7258 sewing machine. It is not working at all. I t...
Error message E7 is up on my Singer Stylist model 7258 sewing machine. It is not working at all. I t...
(Posted by ebellamybellamy9 5 years ago)


Beeping From Singer Sewing Machine Stylist Ii 5625
My sewing machine will beep and stop sewing after three inches of sewing. I have taken it to be repa...
My sewing machine will beep and stop sewing after three inches of sewing. I have taken it to be repa...
(Posted by arusheria 9 years ago)

Will Singer H74 Sewing Machine Go Into Sewing Machine Table
(Posted by vogelgeos 10 years ago)
