XVZ9000U Operation Manual
Page 6
...or operation of 16:9, it is possible to the projector. 9. Direct Computer Compatibility A multi-scan RGB input accepts signals from VGA (640 dots × 480 lines) and Macintosh (from DVD or DTV. * Digital Light Processing, DLP, Digital Micromirror Device and DMD are available. 6. Low...Film Mode Optimizes the image by converting the interlaced signal to decrease or increase brightness, power consumption and fan noise. 11. For SHARP Assistance (U.S.A. E-6 Important Information Outstanding Features 1. Wide DMD™* (Digital Micromirror Device) Chip The DMD Chip allows for further ...
...or operation of 16:9, it is possible to the projector. 9. Direct Computer Compatibility A multi-scan RGB input accepts signals from VGA (640 dots × 480 lines) and Macintosh (from DVD or DTV. * Digital Light Processing, DLP, Digital Micromirror Device and DMD are available. 6. Low...Film Mode Optimizes the image by converting the interlaced signal to decrease or increase brightness, power consumption and fan noise. 11. For SHARP Assistance (U.S.A. E-6 Important Information Outstanding Features 1. Wide DMD™* (Digital Micromirror Device) Chip The DMD Chip allows for further ...
XVZ9000U Operation Manual
Page 8
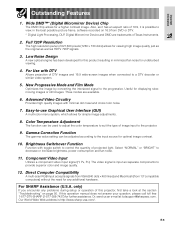
... Time 46 Replacing the Lamp 47 Cleaning the Air Filters 49 Using the Kensington Lock 49 Troubleshooting 50 For SHARP Assistance (U.S.A. only) ..... 50 Appendix Operation Buttons Using the Operation Buttons 23 Selecting the Input Signal Source 23 Adjusting the Picture Aspect Ratio 23 Gamma Correction Function 25 Basic Operation Connecting Pin Assignments...
... Time 46 Replacing the Lamp 47 Cleaning the Air Filters 49 Using the Kensington Lock 49 Troubleshooting 50 For SHARP Assistance (U.S.A. only) ..... 50 Appendix Operation Buttons Using the Operation Buttons 23 Selecting the Input Signal Source 23 Adjusting the Picture Aspect Ratio 23 Gamma Correction Function 25 Basic Operation Connecting Pin Assignments...
XVZ9000U Operation Manual
Page 9
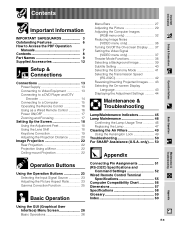
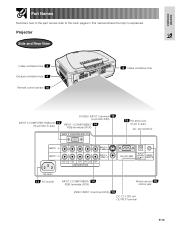
Projector Front and Top View Lens shift dial 18 Zoom knob 17 Focus ring 17 Adjuster 18 16 Remote control sensor 12 Lens cap 45 TEMPERATURE WARNING indicator 45 LAMP REPLACEMENT indicator 45 POWER indicator 4 Intake ventilative hole 18 Adjuster ADJUSTMENT buttons 26 ENTER button 26 UNDO button 26 26 MENU button 23 RESIZE button 23 INPUT button 17 POWER buttons (ON/OFF) Side and Rear View E-9 Important Information Part Names Numbers next to the part names refer to the main pages in this manual where the topic is explained.
Projector Front and Top View Lens shift dial 18 Zoom knob 17 Focus ring 17 Adjuster 18 16 Remote control sensor 12 Lens cap 45 TEMPERATURE WARNING indicator 45 LAMP REPLACEMENT indicator 45 POWER indicator 4 Intake ventilative hole 18 Adjuster ADJUSTMENT buttons 26 ENTER button 26 UNDO button 26 26 MENU button 23 RESIZE button 23 INPUT button 17 POWER buttons (ON/OFF) Side and Rear View E-9 Important Information Part Names Numbers next to the part names refer to the main pages in this manual where the topic is explained.
XVZ9000U Operation Manual
Page 10
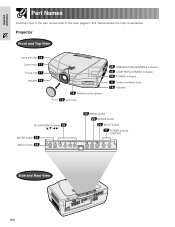
Projector Side and Rear View Intake ventilative hole 4 Exhaust ventilative hole 4 Remote control sensor 16 4 Intake ventilative hole INPUT 5 COMPUTER-RGB port 15 (15-pin Mini D-sub) S-VIDEO INPUT 3 terminal 13 (4-pin Mini DIN) INPUT 1 COMPONENT/ 14 RGB terminals (RCA) 15 RS-232C port (9-pin D-sub) DC 12V OUTPUT 13 AC socket INPUT... 2 COMPONENT/ 14 RGB terminals (RCA) Wired remote 16 control jack VIDEO INPUT 4 terminal (RCA) 13 DC 12 V 200 mA OUTPUT terminal E-10 Important Information Part Names ...
Projector Side and Rear View Intake ventilative hole 4 Exhaust ventilative hole 4 Remote control sensor 16 4 Intake ventilative hole INPUT 5 COMPUTER-RGB port 15 (15-pin Mini D-sub) S-VIDEO INPUT 3 terminal 13 (4-pin Mini DIN) INPUT 1 COMPONENT/ 14 RGB terminals (RCA) 15 RS-232C port (9-pin D-sub) DC 12V OUTPUT 13 AC socket INPUT... 2 COMPONENT/ 14 RGB terminals (RCA) Wired remote 16 control jack VIDEO INPUT 4 terminal (RCA) 13 DC 12 V 200 mA OUTPUT terminal E-10 Important Information Part Names ...

XVZ9000U Operation Manual
Page 11
... Battery cover E-11 Important Information Part Names Remote Control Front View Top View POWER buttons (ON/OFF) 17 ENTER button 26 UNDO button 26 INPUT 1 button 23 INPUT 2 button 23 INPUT 4 button 23 THEATER MODE button 38 GAMMA button 25 AUTO SYNC button 35 26 MENU button 26 ADJUSTMENT buttons 23... INPUT 3 button 23 INPUT 5 button 23 RESIZE button 30 CLR TEMP buttons 19 KEYSTONE button 16 BACKLIGHT button Top View Remote control signal transmitter 16 Wired remote control ...
... Battery cover E-11 Important Information Part Names Remote Control Front View Top View POWER buttons (ON/OFF) 17 ENTER button 26 UNDO button 26 INPUT 1 button 23 INPUT 2 button 23 INPUT 4 button 23 THEATER MODE button 38 GAMMA button 25 AUTO SYNC button 35 26 MENU button 26 ADJUSTMENT buttons 23... INPUT 3 button 23 INPUT 5 button 23 RESIZE button 30 CLR TEMP buttons 19 KEYSTONE button 16 BACKLIGHT button Top View Remote control signal transmitter 16 Wired remote control ...
XVZ9000U Operation Manual
Page 13
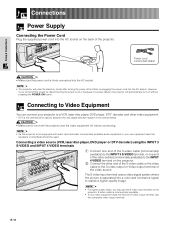
...disconnecting the power cord or because of a power failure, the projector will enter the stand-by mode after turning the power off , before connecting. • As this projector is not equipped with audio input terminals, commercially available audio equipment or your own equipment (such ...player or DTV decoder) using the INPUT 3 S-VIDEO and INPUT 4 VIDEO terminals 1 Connect one end of the S-video cable (commercially available) to the INPUT 3 S-VIDEO terminal, or one end of the video cable (commercially available) to the INPUT 4 VIDEO terminal on the projector. 2 Connect the other video ...
...disconnecting the power cord or because of a power failure, the projector will enter the stand-by mode after turning the power off , before connecting. • As this projector is not equipped with audio input terminals, commercially available audio equipment or your own equipment (such ...player or DTV decoder) using the INPUT 3 S-VIDEO and INPUT 4 VIDEO terminals 1 Connect one end of the S-video cable (commercially available) to the INPUT 3 S-VIDEO terminal, or one end of the video cable (commercially available) to the INPUT 4 VIDEO terminal on the projector. 2 Connect the other video ...
XVZ9000U Operation Manual
Page 14
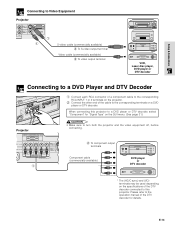
... the operation manual of the DTV decoder for "Signal Type" on the GUI menu. (See page 31.) CAUTION • Make sure to turn both the projector and the video equipment off, before connecting. * 1 2 To component output terminals Component cable (commercially available) * DVD player or DTV decoder * The (HD/C ...sync) and (VD) terminals may be used depending on the specifications of the DTV decoder connected to the corresponding terminals on the projector. 2 Connect the other end of a component cable to the corresponding RCA INPUT 1 or 2 terminals on a DVD player or DTV decoder.
... the operation manual of the DTV decoder for "Signal Type" on the GUI menu. (See page 31.) CAUTION • Make sure to turn both the projector and the video equipment off, before connecting. * 1 2 To component output terminals Component cable (commercially available) * DVD player or DTV decoder * The (HD/C ...sync) and (VD) terminals may be used depending on the specifications of the DTV decoder connected to the corresponding terminals on the projector. 2 Connect the other end of a component cable to the corresponding RCA INPUT 1 or 2 terminals on a DVD player or DTV decoder.
XVZ9000U Operation Manual
Page 15
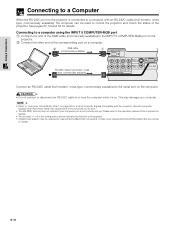
... up. This may not operate if your computer port is on the projector. 2 Connect the other than those listed may be used to work. • The RS-232C function may damage your nearest Authorized SharpVision Service Center or Dealer. See pages 52, 53 and 54 for use... with computer signals other end of the functions not to control the projector and check the status of computer signals compatible with the projector. Connecting to a computer using the INPUT 5 COMPUTER-RGB port ...
... up. This may not operate if your computer port is on the projector. 2 Connect the other than those listed may be used to work. • The RS-232C function may damage your nearest Authorized SharpVision Service Center or Dealer. See pages 52, 53 and 54 for use... with computer signals other end of the functions not to control the projector and check the status of computer signals compatible with the projector. Connecting to a computer using the INPUT 5 COMPUTER-RGB port ...
XVZ9000U Operation Manual
Page 23
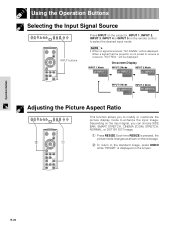
..., NORMAL, or DOT BY DOT image. 1 Press RESIZE. Using the Operation Buttons Selecting the Input Signal Source Press INPUT on the projector, INPUT 1, INPUT 2, INPUT 3, INPUT 4 or INPUT 5 on the input signal, you to modify or customize the picture display mode to enhance the input image. Each time RESIZE is pressed, the picture mode changes as shown on the next...
..., NORMAL, or DOT BY DOT image. 1 Press RESIZE. Using the Operation Buttons Selecting the Input Signal Source Press INPUT on the projector, INPUT 1, INPUT 2, INPUT 3, INPUT 4 or INPUT 5 on the input signal, you to modify or customize the picture display mode to enhance the input image. Each time RESIZE is pressed, the picture mode changes as shown on the next...

XVZ9000U Operation Manual
Page 24
... 480i 480P NTSC PAL SECAM Letter box image With squeeze 720P 1080i For 16:9 aspect ratio EXAMPLE For 4:3 aspect ratio For 16:9 aspect ratio COMPUTER Input Signal VGA For 4:3 aspect ratio (640 ן480) 480i 480P NTSC PAL SECAM 480P 720P 1080i SIDE BAR 960 ן720...
... 480i 480P NTSC PAL SECAM Letter box image With squeeze 720P 1080i For 16:9 aspect ratio EXAMPLE For 4:3 aspect ratio For 16:9 aspect ratio COMPUTER Input Signal VGA For 4:3 aspect ratio (640 ן480) 480i 480P NTSC PAL SECAM 480P 720P 1080i SIDE BAR 960 ן720...
XVZ9000U Operation Manual
Page 26
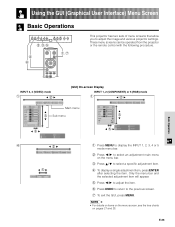
...item, press ENTER after selecting the item. E-26 These menu screens can be operated from the projector or the remote control with the following procedure. Basic Operation INPUT 3, 4 (VIDEO) mode 1 2 (GUI) On-screen Display INPUT 1, 2 (COMPONENT) or 5 (RGB) mode 1 2 Main menu 3 Sub menu 3... 5 4 2 5 1 Press MENU to display the INPUT 1, 2, 3, 4 or 5 mode menu bar. 2 Press / to adjust the image and various projector settings. Using the GUI (Graphical User Interface) Menu Screen Basic Operations 2,3,5 4 6 1,7 This projector has two sets of menu screens that allow you to ...
...item, press ENTER after selecting the item. E-26 These menu screens can be operated from the projector or the remote control with the following procedure. Basic Operation INPUT 3, 4 (VIDEO) mode 1 2 (GUI) On-screen Display INPUT 1, 2 (COMPONENT) or 5 (RGB) mode 1 2 Main menu 3 Sub menu 3... 5 4 2 5 1 Press MENU to display the INPUT 1, 2, 3, 4 or 5 mode menu bar. 2 Press / to adjust the image and various projector settings. Using the GUI (Graphical User Interface) Menu Screen Basic Operations 2,3,5 4 6 1,7 This projector has two sets of menu screens that allow you to ...
XVZ9000U Operation Manual
Page 27
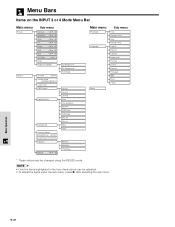
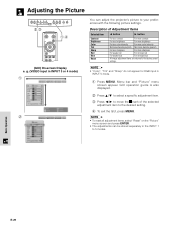
... on the INPUT 3 or 4 Mode Menu Bar Main menu Picture Options Sub menu Contrast מ30 ם30 Brightness מ30 ם30 Color מ30 ם30 Tint מ30 ם30 Sharp מ...
... on the INPUT 3 or 4 Mode Menu Bar Main menu Picture Options Sub menu Contrast מ30 ם30 Brightness מ30 ם30 Color מ30 ם30 Tint מ30 ם30 Sharp מ...
XVZ9000U Operation Manual
Page 28
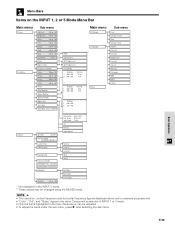
... and horizontal frequency figures displayed above are for example purposes only. • "Color", "Tint", and "Sharp" appear only when Component is selected in INPUT 1 or 2 mode. • Only the items highlighted in the INPUT 5 mode. ** These values may be adjusted. • To adjust the items under the sub menu,... press after selecting the sub menu. Basic Operation E-28 Menu Bars Items on the INPUT 1, 2 or 5 Mode Menu Bar Main menu Picture Fine Sync Options Sub menu Contrast מ30 ם30 Brightness ...
... and horizontal frequency figures displayed above are for example purposes only. • "Color", "Tint", and "Sharp" appear only when Component is selected in INPUT 1 or 2 mode. • Only the items highlighted in the INPUT 5 mode. ** These values may be adjusted. • To adjust the items under the sub menu,... press after selecting the sub menu. Basic Operation E-28 Menu Bars Items on the INPUT 1, 2 or 5 Mode Menu Bar Main menu Picture Fine Sync Options Sub menu Contrast מ30 ם30 Brightness ...
XVZ9000U Operation Manual
Page 29
... brightness For less color intensity For more color intensity Skin tones become purplish Skin tones become greenish For less sharpness For more sharpness For weaker red For stronger red For weaker blue For stronger blue All image adjustment items are returned to ...can adjust the projector's picture to your preferences with the following picture settings. Basic Operation E-29 g. (VIDEO input in INPUT 3 or 4 mode) 1 2 You can be stored separately in the INPUT 1 to the factory preset settings. • "Color", "Tint" and "Sharp" do not appear for RGB input in INPUT 5 mode. ...
... brightness For less color intensity For more color intensity Skin tones become purplish Skin tones become greenish For less sharpness For more sharpness For weaker red For stronger red For weaker blue For stronger blue All image adjustment items are returned to ...can adjust the projector's picture to your preferences with the following picture settings. Basic Operation E-29 g. (VIDEO input in INPUT 3 or 4 mode) 1 2 You can be stored separately in the INPUT 1 to the factory preset settings. • "Color", "Tint" and "Sharp" do not appear for RGB input in INPUT 5 mode. ...

XVZ9000U Operation Manual
Page 30
... 2,3 1,4 (GUI) On-screen Display Adjusting the Color Temperature This function can be used to adjust the color temperature to suit the type of image input to the projector (DVD, video, computer image, TV broadcast, etc.). Menu bar and "Picture" menu screen appear. Basic Operation E-30 images. (Low color temperature) (High color temperature...
... 2,3 1,4 (GUI) On-screen Display Adjusting the Color Temperature This function can be used to adjust the color temperature to suit the type of image input to the projector (DVD, video, computer image, TV broadcast, etc.). Menu bar and "Picture" menu screen appear. Basic Operation E-30 images. (Low color temperature) (High color temperature...

XVZ9000U Operation Manual
Page 31
... display projects a smoother video image. 1 Press MENU. Menu bar and "Picture" menu screen appear. GUI operation guide is useful to select the input signal type COMPONENT or RGB for INPUT 1 or 2. 1 Press MENU. Displays the optimized image of film transformed with PAL 50 Hz. This mode optimizes the image by estimating the...
... display projects a smoother video image. 1 Press MENU. Menu bar and "Picture" menu screen appear. GUI operation guide is useful to select the input signal type COMPONENT or RGB for INPUT 1 or 2. 1 Press MENU. Displays the optimized image of film transformed with PAL 50 Hz. This mode optimizes the image by estimating the...

XVZ9000U Operation Manual
Page 32
Should this occur, adjust "Clock", "Phase", "H-Pos" and "V-Pos" for details. (Select the desired computer input mode with INPUT 1 or 2.) 1 Press MENU. 2 Press / to select "Fine Sync". 3 Press / to select a specific adjustment item. 4 Press / to move the mark of the selected adjustment item to ...) 2,3,4 1,5 (GUI) On-screen Display 2 3 When displaying computer patterns which are returned to the factory preset settings. • Computer image adjustments can be changed using the input signal.
Should this occur, adjust "Clock", "Phase", "H-Pos" and "V-Pos" for details. (Select the desired computer input mode with INPUT 1 or 2.) 1 Press MENU. 2 Press / to select "Fine Sync". 3 Press / to select a specific adjustment item. 4 Press / to move the mark of the selected adjustment item to ...) 2,3,4 1,5 (GUI) On-screen Display 2 3 When displaying computer patterns which are returned to the factory preset settings. • Computer image adjustments can be changed using the input signal.

XVZ9000U Operation Manual
Page 34
...8226; Avoid displaying computer patterns which repeat every other line (horizontal stripes). (Flickering may occur, making the image hard to display the current input signal. 4 To exit the GUI, press MENU. Basic Operation E-34 However, for some signals, the optimal resolution mode in step 4 ...above. 2,3 1,4 (GUI) On-screen Display Checking the Input Signal This function allows you to check the current input signal information. 1 Press MENU. 2 Press / to select "Fine Sync". 3 Press / to select "Signal Info" to...
...8226; Avoid displaying computer patterns which repeat every other line (horizontal stripes). (Flickering may occur, making the image hard to display the current input signal. 4 To exit the GUI, press MENU. Basic Operation E-34 However, for some signals, the optimal resolution mode in step 4 ...above. 2,3 1,4 (GUI) On-screen Display Checking the Input Signal This function allows you to check the current input signal information. 1 Press MENU. 2 Press / to select "Fine Sync". 3 Press / to select "Signal Info" to...

XVZ9000U Operation Manual
Page 35
High Speed • The sync adjustment is automatically made each time the projector is turned on while connected to a computer or the input selection is changed . 1 Press MENU. 2 Press / to select "Fine Sync". 3 Press / to select "Auto Sync", and then press . 4 Press / to select "Normal" or "...may take some time to complete, depending on the remote control, or automatically by setting "Auto Sync" to "Normal" or "High Speed" in the projector's GUI menu. During Auto Sync adjustment, the On-screen Display changes as the "High Speed" setting. • Adjustment using the "Normal" setting takes...
High Speed • The sync adjustment is automatically made each time the projector is turned on while connected to a computer or the input selection is changed . 1 Press MENU. 2 Press / to select "Fine Sync". 3 Press / to select "Auto Sync", and then press . 4 Press / to select "Normal" or "...may take some time to complete, depending on the remote control, or automatically by setting "Auto Sync" to "Normal" or "High Speed" in the projector's GUI menu. During Auto Sync adjustment, the On-screen Display changes as the "High Speed" setting. • Adjustment using the "Normal" setting takes...
XVZ9000U Operation Manual
Page 37
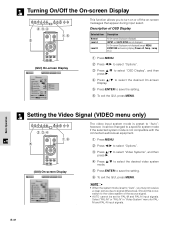
..., press MENU. • When the system mode is preset to "Auto"; Select "PAL-M" or "PAL-N" in "Video System" menu for PAL-M and PAL-N input signals. E-37 Should this occur, switch to the video system of OSD Display Selected item Normal Level A Level B Description All On-screen Display are not...", and then press . 4 Press / to select the desired video system mode. 5 Press ENTER to save the setting. 6 To exit the GUI, press MENU. INPUT and AUTO SYNC are displayed. Basic Operation Setting the Video Signal (VIDEO menu only) 2,3,4 5 1,6 (GUI) On-screen Display The video...
..., press MENU. • When the system mode is preset to "Auto"; Select "PAL-M" or "PAL-N" in "Video System" menu for PAL-M and PAL-N input signals. E-37 Should this occur, switch to the video system of OSD Display Selected item Normal Level A Level B Description All On-screen Display are not...", and then press . 4 Press / to select the desired video system mode. 5 Press ENTER to save the setting. 6 To exit the GUI, press MENU. INPUT and AUTO SYNC are displayed. Basic Operation Setting the Video Signal (VIDEO menu only) 2,3,4 5 1,6 (GUI) On-screen Display The video...


