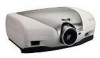
XVZ9000U Operation Manual
Page 1
OPERATION MANUAL ENGLISH IMPORTANT For your assistance in the literature accompanying the product. Model No.: XV-Z9000U Serial No.: There are two important reasons for prompt warranty registration of inspection, modification, or recall that any unauthorized... NO USER-SERVICEABLE PARTS EXCEPT LAMP UNIT. The exclamation point within a triangle is to your new SHARP Projector, using the projector, please read this equip- WARNING: FCC Regulations state that SHARP may be required to the presence of important operating and maintenance (servicing) instructions in reporting the loss...
OPERATION MANUAL ENGLISH IMPORTANT For your assistance in the literature accompanying the product. Model No.: XV-Z9000U Serial No.: There are two important reasons for prompt warranty registration of inspection, modification, or recall that any unauthorized... NO USER-SERVICEABLE PARTS EXCEPT LAMP UNIT. The exclamation point within a triangle is to your new SHARP Projector, using the projector, please read this equip- WARNING: FCC Regulations state that SHARP may be required to the presence of important operating and maintenance (servicing) instructions in reporting the loss...
XVZ9000U Operation Manual
Page 2
... communications. FAILURE TO OBSERVE THIS WILL RESULT IN PREMATURE LAMP FAILURE. This equipment generates, uses, and can be determined by one or more of Conformity SHARP PROJECTOR, MODEL XV-Z9000U This device complies with the operation manual, may not copy, modify, adapt, translate, distribute, reverse engineer, reverse assemble or discompile the contents thereof. ONLY...
... communications. FAILURE TO OBSERVE THIS WILL RESULT IN PREMATURE LAMP FAILURE. This equipment generates, uses, and can be determined by one or more of Conformity SHARP PROJECTOR, MODEL XV-Z9000U This device complies with the operation manual, may not copy, modify, adapt, translate, distribute, reverse engineer, reverse assemble or discompile the contents thereof. ONLY...
XVZ9000U Operation Manual
Page 3
...qualified service personnel. 18. Replacement Parts When replacement parts are not sure of the type of your obsolete outlet. Accessories Do not place this Projector, observe the following conditions: a. This product should be placed in a built-in a wet basement; Do not defeat the safety purpose of...Never push objects of other hazards. 20. Never spill liquid of any kind into the outlet, contact your electrician to replace your Projector, please be sure the service technician has used replacement parts specified by placing the product on the product and in performance, this...
...qualified service personnel. 18. Replacement Parts When replacement parts are not sure of the type of your obsolete outlet. Accessories Do not place this Projector, observe the following conditions: a. This product should be placed in a built-in a wet basement; Do not defeat the safety purpose of...Never push objects of other hazards. 20. Never spill liquid of any kind into the outlet, contact your electrician to replace your Projector, please be sure the service technician has used replacement parts specified by placing the product on the product and in performance, this...
XVZ9000U Operation Manual
Page 4
...than usual. To prevent injury, do not touch these environments will automatically turn on the power by an Authorized SharpVision Service Center or Dealer. • Do not expose the projector to extreme heat or cold. In case of glass particles if the lamp ruptures. UV RADIATION : CAN ...reduce the overall operation life. ALLOW 1 HOUR TO COOL BEFORE REPLACING THE LAMP. TURN OFF LAMP BEFORE SERVICING. NE REMPLACER QUE PAR UNE LAMPE SHARP DE TYPE BQC-XVZ9000/ 1. ETEINDRE LA LAMPE AVANT DE PROCEDER A L'ENTRETIEN. Please note that this manner, use in . Important Information IMPORTANT ...
...than usual. To prevent injury, do not touch these environments will automatically turn on the power by an Authorized SharpVision Service Center or Dealer. • Do not expose the projector to extreme heat or cold. In case of glass particles if the lamp ruptures. UV RADIATION : CAN ...reduce the overall operation life. ALLOW 1 HOUR TO COOL BEFORE REPLACING THE LAMP. TURN OFF LAMP BEFORE SERVICING. NE REMPLACER QUE PAR UNE LAMPE SHARP DE TYPE BQC-XVZ9000/ 1. ETEINDRE LA LAMPE AVANT DE PROCEDER A L'ENTRETIEN. Please note that this manner, use in . Important Information IMPORTANT ...
XVZ9000U Operation Manual
Page 5
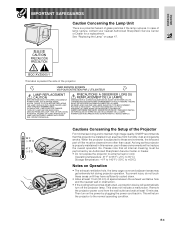
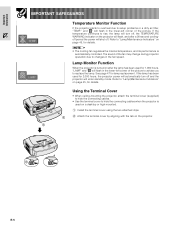
...or high mounted. 1 Install the terminal cover using the two attached clips. 2 Attach the terminal cover by aligning with the tab on the projector will flash, and after the lamp has been used for 1,900 hours, "LAMP" and " " will automatically turn off, the TEMPERATURE WARNING ...is automatically controlled. Refer to "Lamp/Maintenance Indicators" on page 45, for lamp replacement. Important Information IMPORTANT SAFEGUARDS Temperature Monitor Function If the projector starts to overheat due to changes in the fan speed. The sound of the picture to advise you to replace the lamp. and "...
...or high mounted. 1 Install the terminal cover using the two attached clips. 2 Attach the terminal cover by aligning with the tab on the projector will flash, and after the lamp has been used for 1,900 hours, "LAMP" and " " will automatically turn off, the TEMPERATURE WARNING ...is automatically controlled. Refer to "Lamp/Maintenance Indicators" on page 45, for lamp replacement. Important Information IMPORTANT SAFEGUARDS Temperature Monitor Function If the projector starts to overheat due to changes in the fan speed. The sound of the picture to advise you to replace the lamp. and "...
XVZ9000U Operation Manual
Page 6
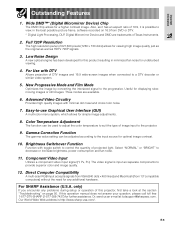
... from VGA (640 dots × 480 lines) and Macintosh (from DVD or DTV. * Digital Light Processing, DLP, Digital Micromirror Device and DMD are available. 6. For SHARP Assistance (U.S.A. only) If you encounter any additional hardware. Important Information Outstanding Features 1. New Progressive Mode and Film Mode... Optimizes the image by converting the interlaced signal to the projector. 9. Useful for any problems during setup or operation of this operation manual does not answer your question, please call toll free 1-877-DTV-SHARP (1-877-388-7427) for viewing high image quality just...
... from VGA (640 dots × 480 lines) and Macintosh (from DVD or DTV. * Digital Light Processing, DLP, Digital Micromirror Device and DMD are available. 6. For SHARP Assistance (U.S.A. only) If you encounter any additional hardware. Important Information Outstanding Features 1. New Progressive Mode and Film Mode... Optimizes the image by converting the interlaced signal to the projector. 9. Useful for any problems during setup or operation of this operation manual does not answer your question, please call toll free 1-877-DTV-SHARP (1-877-388-7427) for viewing high image quality just...
XVZ9000U Operation Manual
Page 9
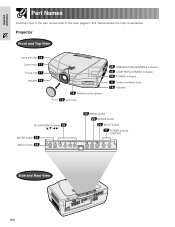
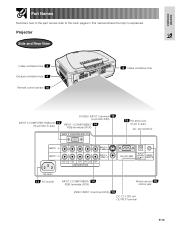
Projector Front and Top View Lens shift dial 18 Zoom knob 17 Focus ring 17 Adjuster 18 16 Remote control sensor 12 Lens cap 45 TEMPERATURE WARNING indicator 45 LAMP REPLACEMENT indicator 45 POWER indicator 4 Intake ventilative hole 18 Adjuster ADJUSTMENT buttons 26 ENTER button 26 UNDO button 26 26 MENU button 23 RESIZE button 23 INPUT button 17 POWER buttons (ON/OFF) Side and Rear View E-9 Important Information Part Names Numbers next to the part names refer to the main pages in this manual where the topic is explained.
Projector Front and Top View Lens shift dial 18 Zoom knob 17 Focus ring 17 Adjuster 18 16 Remote control sensor 12 Lens cap 45 TEMPERATURE WARNING indicator 45 LAMP REPLACEMENT indicator 45 POWER indicator 4 Intake ventilative hole 18 Adjuster ADJUSTMENT buttons 26 ENTER button 26 UNDO button 26 26 MENU button 23 RESIZE button 23 INPUT button 17 POWER buttons (ON/OFF) Side and Rear View E-9 Important Information Part Names Numbers next to the part names refer to the main pages in this manual where the topic is explained.
XVZ9000U Operation Manual
Page 10
Important Information Part Names Numbers next to the part names refer to the main pages in this manual where the topic is explained. Projector Side and Rear View Intake ventilative hole 4 Exhaust ventilative hole 4 Remote control sensor 16 4 Intake ventilative hole INPUT 5 COMPUTER-RGB port 15 (15-pin Mini D-...
Important Information Part Names Numbers next to the part names refer to the main pages in this manual where the topic is explained. Projector Side and Rear View Intake ventilative hole 4 Exhaust ventilative hole 4 Remote control sensor 16 4 Intake ventilative hole INPUT 5 COMPUTER-RGB port 15 (15-pin Mini D-...
XVZ9000U Operation Manual
Page 13
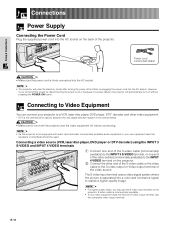
...terminal on the back of the video source. E-13 S-video cable is firmly connected into the AC socket. • The projector will automatically turn both the projector and the video equipment off and then re-plugging the power cord into the AC socket. Connecting a video source (VCR, ...the INPUT 3 S-VIDEO terminal, or one end of the video cable (commercially available) to the S-video output or Video output terminal of the projector. Power cord CACCU5013DE01 CAUTION • Make sure the power cord is commercially available. • If your own equipment (such as speakers or ...
...terminal on the back of the video source. E-13 S-video cable is firmly connected into the AC socket. • The projector will automatically turn both the projector and the video equipment off and then re-plugging the power cord into the AC socket. Connecting a video source (VCR, ...the INPUT 3 S-VIDEO terminal, or one end of the video cable (commercially available) to the S-video output or Video output terminal of the projector. Power cord CACCU5013DE01 CAUTION • Make sure the power cord is commercially available. • If your own equipment (such as speakers or ...
XVZ9000U Operation Manual
Page 14
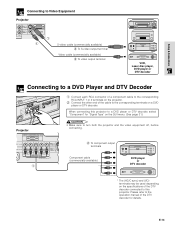
...to the operation manual of the cable to the corresponding terminals on the specifications of the DTV decoder connected to this projector. Setup & Connections Connecting to Video Equipment Projector 1 1 S-video cable (commercially available) 2 To S-video output terminal Video cable (commercially available) 2 To ... of the DTV decoder for "Signal Type" on the GUI menu. (See page 31.) CAUTION • Make sure to turn both the projector and the video equipment off, before connecting. * 1 2 To component output terminals Component cable (commercially available) * DVD player or DTV decoder...
...to the operation manual of the cable to the corresponding terminals on the specifications of the DTV decoder connected to this projector. Setup & Connections Connecting to Video Equipment Projector 1 1 S-video cable (commercially available) 2 To S-video output terminal Video cable (commercially available) 2 To ... of the DTV decoder for "Signal Type" on the GUI menu. (See page 31.) CAUTION • Make sure to turn both the projector and the video equipment off, before connecting. * 1 2 To component output terminals Component cable (commercially available) * DVD player or DTV decoder...
XVZ9000U Operation Manual
Page 15
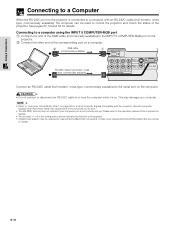
...-232C cable (null modem, cross type, commercially available) to the INPUT 5 COMPUTER-RGB port on the projector. 2 Connect the other than those listed may damage your nearest Authorized SharpVision Service Center or Dealer. Use with the projector. Contact your computer. • Refer to or from the computer while it is not correctly set...
...-232C cable (null modem, cross type, commercially available) to the INPUT 5 COMPUTER-RGB port on the projector. 2 Connect the other than those listed may damage your nearest Authorized SharpVision Service Center or Dealer. Use with the projector. Contact your computer. • Refer to or from the computer while it is not correctly set...
XVZ9000U Operation Manual
Page 16
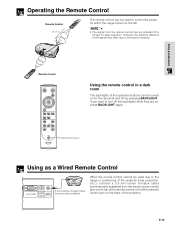
...Remote Control 23Ј (7 m) 30˚ 45˚ 30˚ The remote control can be used due to the range or positioning of the projector (rear projection, etc.), connect a 3.5 mm stereo minijack cable (commercially available) from the remote control can be turned on for easy operation. BACKLIGHT ...button Using as a Wired Remote Control 3.5 mm stereo minijack cable (commercially available) When the remote control cannot be used to control the projector within the range shown on the left. • The signal from the wired remote control jack on the top of the remote control to...
...Remote Control 23Ј (7 m) 30˚ 45˚ 30˚ The remote control can be used due to the range or positioning of the projector (rear projection, etc.), connect a 3.5 mm stereo minijack cable (commercially available) from the remote control can be turned on for easy operation. BACKLIGHT ...button Using as a Wired Remote Control 3.5 mm stereo minijack cable (commercially available) When the remote control cannot be used to control the projector within the range shown on the left. • The signal from the wired remote control jack on the top of the remote control to...
XVZ9000U Operation Manual
Page 17
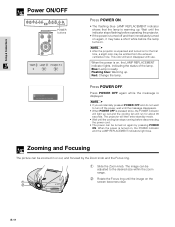
... the power, wait until the message disappears. • When POWER OFF is on the 1 screen becomes clear. 2 E-17 Flashing blue: Warming up . The projector will then enter standby mode. • Wait until the image on , the LAMP REPLACEMENT indicator lights, indicating the status of the lamp. When the power... size within the zoom range. 2 Rotate the Focus ring until the cooling fan stops running before the lamp turns on. • After the projector is warming up . The image can be turned on for about 90 seconds. When the power is ready. This odor will run for the ...
... the power, wait until the message disappears. • When POWER OFF is on the 1 screen becomes clear. 2 E-17 Flashing blue: Warming up . The projector will then enter standby mode. • Wait until the image on , the LAMP REPLACEMENT indicator lights, indicating the status of the lamp. When the power... size within the zoom range. 2 Rotate the Focus ring until the cooling fan stops running before the lamp turns on. • After the projector is warming up . The image can be turned on for about 90 seconds. When the power is ready. This odor will run for the ...

XVZ9000U Operation Manual
Page 18
... is adjusted, the image may become distorted (keystoned), depending on the keystone correction. See page 19 for details on the relative positions of the projector and the screen. Setting Up the Screen Using the Adjustment Feet You can be adjusted within the shift range of the lens by raising the...The picture can be used to adjust the angle of the image by rotating the lens shift dial on the top of the projector using your finger. Projector Projected Image Lens shift dial UP DOWN UP DOWN E-18 Once the adjustment feet have locked in the area between the adjustment feet...
... is adjusted, the image may become distorted (keystoned), depending on the keystone correction. See page 19 for details on the relative positions of the projector and the screen. Setting Up the Screen Using the Adjustment Feet You can be adjusted within the shift range of the lens by raising the...The picture can be used to adjust the angle of the image by rotating the lens shift dial on the top of the projector using your finger. Projector Projected Image Lens shift dial UP DOWN UP DOWN E-18 Once the adjustment feet have locked in the area between the adjustment feet...
XVZ9000U Operation Manual
Page 20
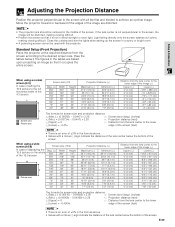
... . • Values with all feet flat and leveled to the screen, the image will be distorted, making viewing difficult. Move the projector forward or backward if the edges of the image are based upon projecting an image so that it occupies the entire screen. Standard Setup...= -0.4904x edge of the screen (feet) • There is not perpendicular to achieve an optimal image. E-20 Adjusting the Projection Distance Position the projector perpendicular to the screen with a minus (-) sign indicate the distance of the lens center below the bottom of the screen. When using a normal screen...
... . • Values with all feet flat and leveled to the screen, the image will be distorted, making viewing difficult. Move the projector forward or backward if the edges of the image are based upon projecting an image so that it occupies the entire screen. Standard Setup...= -0.4904x edge of the screen (feet) • There is not perpendicular to achieve an optimal image. E-20 Adjusting the Projection Distance Position the projector perpendicular to the screen with a minus (-) sign indicate the distance of the lens center below the bottom of the screen. When using a normal screen...
XVZ9000U Operation Manual
Page 21
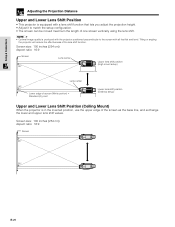
...= Standard (0) point Lower lens shift position (Desktop setup) Upper and Lower Lens Shift Position (Ceiling Mount) When the projector is produced with the projector positioned perpendicular to the screen with all feet flat and level. Setup & Connections Adjusting the Projection Distance Upper and Lower Lens... Shift Position • This projector is equipped with a lens shift function that lets you adjust the projection height. • Adjust it to match the setup configuration....
...= Standard (0) point Lower lens shift position (Desktop setup) Upper and Lower Lens Shift Position (Ceiling Mount) When the projector is produced with the projector positioned perpendicular to the screen with all feet flat and level. Setup & Connections Adjusting the Projection Distance Upper and Lower Lens... Shift Position • This projector is equipped with a lens shift function that lets you adjust the projection height. • Adjust it to match the setup configuration....
XVZ9000U Operation Manual
Page 22
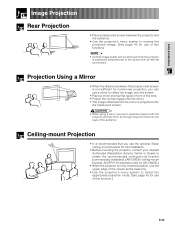
... into the eyes of the audience. Ceiling-mount Projection • It is recommended that you use the optional Sharp ceiling-mount bracket for this installation. • Before mounting the projector, contact your nearest Authorized SharpVision Service Center or Dealer to obtain the recommended ceiling-mount bracket (commercially available). (AN-CM230 ceiling-mount bracket...
... into the eyes of the audience. Ceiling-mount Projection • It is recommended that you use the optional Sharp ceiling-mount bracket for this installation. • Before mounting the projector, contact your nearest Authorized SharpVision Service Center or Dealer to obtain the recommended ceiling-mount bracket (commercially available). (AN-CM230 ceiling-mount bracket...
XVZ9000U Operation Manual
Page 23
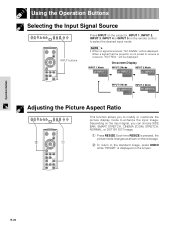
Operation Buttons E-23 When a signal that the projector is not preset to receive is received, "NO SIGNAL" will be displayed. INPUT buttons • When no signal is received, "NOT REG." will be displayed. ... or customize the picture display mode to select the desired input mode. Using the Operation Buttons Selecting the Input Signal Source Press INPUT on the projector, INPUT 1, INPUT 2, INPUT 3, INPUT 4 or INPUT 5 on the screen.
Operation Buttons E-23 When a signal that the projector is not preset to receive is received, "NO SIGNAL" will be displayed. INPUT buttons • When no signal is received, "NOT REG." will be displayed. ... or customize the picture display mode to select the desired input mode. Using the Operation Buttons Selecting the Input Signal Source Press INPUT on the projector, INPUT 1, INPUT 2, INPUT 3, INPUT 4 or INPUT 5 on the screen.
XVZ9000U Operation Manual
Page 26
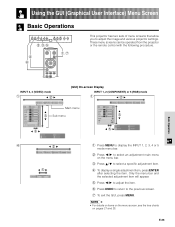
...adjustment item will appear. 5 Press / to adjust the item. 6 Press UNDO to return to adjust the image and various projector settings. These menu screens can be operated from the projector or the remote control with the following procedure. Using the GUI (Graphical User Interface) Menu Screen Basic Operations 2,3,5 4 6 1,7... This projector has two sets of menu screens that allow you to the previous screen. 7 To exit the GUI, press MENU. • ...
...adjustment item will appear. 5 Press / to adjust the item. 6 Press UNDO to return to adjust the image and various projector settings. These menu screens can be operated from the projector or the remote control with the following procedure. Using the GUI (Graphical User Interface) Menu Screen Basic Operations 2,3,5 4 6 1,7... This projector has two sets of menu screens that allow you to the previous screen. 7 To exit the GUI, press MENU. • ...
XVZ9000U Operation Manual
Page 29
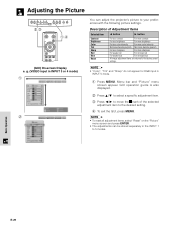
...specific adjustment item. 3 Press / to move the mark of Adjustment Items Selected item Contrast Brightness Color Tint Sharp Red Blue Reset button button For less contrast For more contrast For less brightness For more brightness For less ...color intensity For more color intensity Skin tones become purplish Skin tones become greenish For less sharpness For more sharpness For weaker red For stronger red For weaker blue For stronger blue All image adjustment items..."Picture" menu screen and press ENTER. • The adjustments can adjust the projector's picture to 5 modes.
...specific adjustment item. 3 Press / to move the mark of Adjustment Items Selected item Contrast Brightness Color Tint Sharp Red Blue Reset button button For less contrast For more contrast For less brightness For more brightness For less ...color intensity For more color intensity Skin tones become purplish Skin tones become greenish For less sharpness For more sharpness For weaker red For stronger red For weaker blue For stronger blue All image adjustment items..."Picture" menu screen and press ENTER. • The adjustments can adjust the projector's picture to 5 modes.


