XVZ9000U Operation Manual
Page 2
... LAMP FAILURE. HOT SURFACE INSIDE. HANDLE WITH CARE. NE REMPLACER QUE PAR UNE LAMPE SHARP DE TYPE BQC-XVZ9000/ 1. ETEINDRE LA LAMPE AVANT DE PROCEDER A L'ENTRETIEN. ONLY Declaration of Conformity SHARP PROJECTOR, MODEL XV-Z9000U This device complies with Part 15 of the FCC Rules. MEDIUM PRESSURE LAMP : RISK OF... the equipment and the receiver. • Connect the equipment into an outlet on the remote control. During normal operation, when turning the power off always use the OFF button on the projector or on a circuit different from that to Part 15 of the FCC rules. DURING ...
... LAMP FAILURE. HOT SURFACE INSIDE. HANDLE WITH CARE. NE REMPLACER QUE PAR UNE LAMPE SHARP DE TYPE BQC-XVZ9000/ 1. ETEINDRE LA LAMPE AVANT DE PROCEDER A L'ENTRETIEN. ONLY Declaration of Conformity SHARP PROJECTOR, MODEL XV-Z9000U This device complies with Part 15 of the FCC Rules. MEDIUM PRESSURE LAMP : RISK OF... the equipment and the receiver. • Connect the equipment into an outlet on the remote control. During normal operation, when turning the power off always use the OFF button on the projector or on a circuit different from that to Part 15 of the FCC rules. DURING ...

XVZ9000U Operation Manual
Page 8
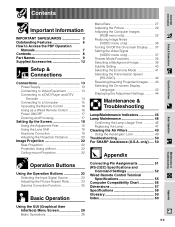
...the Lamp Usage Time 46 Replacing the Lamp 47 Cleaning the Air Filters 49 Using the Kensington Lock 49 Troubleshooting 50 For SHARP Assistance (U.S.A. only) ..... 50 Appendix Operation Buttons Using the Operation Buttons 23 Selecting the Input Signal Source 23 Adjusting the ...Aspect Ratio 23 Gamma Correction Function 25 Basic Operation Connecting Pin Assignments 51 (RS-232C) Specifications and Command Settings 52 Wired Remote Control Terminal Specifications 55 Computer Compatibility Chart 56 Dimensions 57 Specifications 58 Glossary 59 Index 60 Using the GUI (Graphical User ...
...the Lamp Usage Time 46 Replacing the Lamp 47 Cleaning the Air Filters 49 Using the Kensington Lock 49 Troubleshooting 50 For SHARP Assistance (U.S.A. only) ..... 50 Appendix Operation Buttons Using the Operation Buttons 23 Selecting the Input Signal Source 23 Adjusting the ...Aspect Ratio 23 Gamma Correction Function 25 Basic Operation Connecting Pin Assignments 51 (RS-232C) Specifications and Command Settings 52 Wired Remote Control Terminal Specifications 55 Computer Compatibility Chart 56 Dimensions 57 Specifications 58 Glossary 59 Index 60 Using the GUI (Graphical User ...
XVZ9000U Operation Manual
Page 9
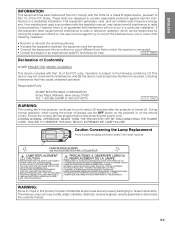
Important Information Part Names Numbers next to the part names refer to the main pages in this manual where the topic is explained. Projector Front and Top View Lens shift dial 18 Zoom knob 17 Focus ring 17 Adjuster 18 16 Remote control sensor 12 Lens cap 45 TEMPERATURE WARNING indicator 45 LAMP REPLACEMENT indicator 45 POWER indicator 4 Intake ventilative hole 18 Adjuster ADJUSTMENT buttons 26 ENTER button 26 UNDO button 26 26 MENU button 23 RESIZE button 23 INPUT button 17 POWER buttons (ON/OFF) Side and Rear View E-9
Important Information Part Names Numbers next to the part names refer to the main pages in this manual where the topic is explained. Projector Front and Top View Lens shift dial 18 Zoom knob 17 Focus ring 17 Adjuster 18 16 Remote control sensor 12 Lens cap 45 TEMPERATURE WARNING indicator 45 LAMP REPLACEMENT indicator 45 POWER indicator 4 Intake ventilative hole 18 Adjuster ADJUSTMENT buttons 26 ENTER button 26 UNDO button 26 26 MENU button 23 RESIZE button 23 INPUT button 17 POWER buttons (ON/OFF) Side and Rear View E-9
XVZ9000U Operation Manual
Page 10
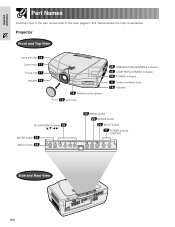
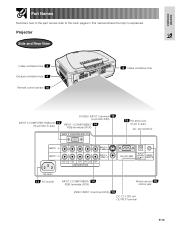
... Names Numbers next to the part names refer to the main pages in this manual where the topic is explained. Projector Side and Rear View Intake ventilative hole 4 Exhaust ventilative hole 4 Remote control sensor 16 4 Intake ventilative hole INPUT 5 COMPUTER-RGB port 15 (15-pin Mini D-sub) S-VIDEO INPUT 3 terminal 13 (4-pin...) INPUT 1 COMPONENT/ 14 RGB terminals (RCA) 15 RS-232C port (9-pin D-sub) DC 12V OUTPUT 13 AC socket INPUT 2 COMPONENT/ 14 RGB terminals (RCA) Wired remote 16 control jack VIDEO INPUT 4 terminal (RCA) 13 DC 12 V 200 mA OUTPUT terminal E-10
... Names Numbers next to the part names refer to the main pages in this manual where the topic is explained. Projector Side and Rear View Intake ventilative hole 4 Exhaust ventilative hole 4 Remote control sensor 16 4 Intake ventilative hole INPUT 5 COMPUTER-RGB port 15 (15-pin Mini D-sub) S-VIDEO INPUT 3 terminal 13 (4-pin...) INPUT 1 COMPONENT/ 14 RGB terminals (RCA) 15 RS-232C port (9-pin D-sub) DC 12V OUTPUT 13 AC socket INPUT 2 COMPONENT/ 14 RGB terminals (RCA) Wired remote 16 control jack VIDEO INPUT 4 terminal (RCA) 13 DC 12 V 200 mA OUTPUT terminal E-10

XVZ9000U Operation Manual
Page 11
Battery cover Battery compartment Battery cover E-11 in place. Important Information Part Names Remote Control Front View Top View POWER buttons (ON/OFF) 17 ENTER button 26 UNDO button 26 INPUT 1 button 23 INPUT 2 button 23 INPUT 4 button 23 ... buttons 23 INPUT 3 button 23 INPUT 5 button 23 RESIZE button 30 CLR TEMP buttons 19 KEYSTONE button 16 BACKLIGHT button Top View Remote control signal transmitter 16 Wired remote control jack Inserting the batteries 1 Pull down the tab on the battery cover and remove the cover towards the direction of the arrow...
Battery cover Battery compartment Battery cover E-11 in place. Important Information Part Names Remote Control Front View Top View POWER buttons (ON/OFF) 17 ENTER button 26 UNDO button 26 INPUT 1 button 23 INPUT 2 button 23 INPUT 4 button 23 ... buttons 23 INPUT 3 button 23 INPUT 5 button 23 RESIZE button 30 CLR TEMP buttons 19 KEYSTONE button 16 BACKLIGHT button Top View Remote control signal transmitter 16 Wired remote control jack Inserting the batteries 1 Pull down the tab on the battery cover and remove the cover towards the direction of the arrow...
XVZ9000U Operation Manual
Page 16
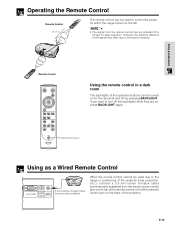
...1032; (7 m) 30˚ 45˚ 30˚ The remote control can be used due to the range or positioning of the projector (rear projection, etc.), connect a 3.5 mm stereo minijack cable (commercially available) from the remote control can be reflected off the backlights while they are on, ...off a screen for five seconds and off by pressing BACKLIGHT. BACKLIGHT button Using as a Wired Remote Control 3.5 mm stereo minijack cable (commercially available) When the remote control cannot be used to control the projector within the range shown on the left. • The signal from the wired...
...1032; (7 m) 30˚ 45˚ 30˚ The remote control can be used due to the range or positioning of the projector (rear projection, etc.), connect a 3.5 mm stereo minijack cable (commercially available) from the remote control can be reflected off the backlights while they are on, ...off a screen for five seconds and off by pressing BACKLIGHT. BACKLIGHT button Using as a Wired Remote Control 3.5 mm stereo minijack cable (commercially available) When the remote control cannot be used to control the projector within the range shown on the left. • The signal from the wired...

XVZ9000U Operation Manual
Page 19
E-19 To reset the Keystone setting, press UNDO. • Straight lines and the edges of the displayed image may appear jagged, when adjusting the Keystone setting. Press KEYSTONE to return to make adjustments. 4 a. b. Setup & Connections Keystone Correction This function can be used to adjust the Keystone settings. 3 4b 2 1,4a 1 Press KEYSTONE on the remote control. 2 Press ENTER to display the test pattern. 3 Press / / / to the normal screen.
E-19 To reset the Keystone setting, press UNDO. • Straight lines and the edges of the displayed image may appear jagged, when adjusting the Keystone setting. Press KEYSTONE to return to make adjustments. 4 a. b. Setup & Connections Keystone Correction This function can be used to adjust the Keystone settings. 3 4b 2 1,4a 1 Press KEYSTONE on the remote control. 2 Press ENTER to display the test pattern. 3 Press / / / to the normal screen.
XVZ9000U Operation Manual
Page 23
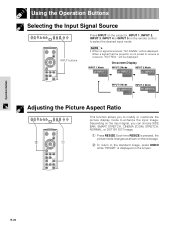
... • When no signal is received, "NO SIGNAL" will be displayed. Using the Operation Buttons Selecting the Input Signal Source Press INPUT on the projector, INPUT 1, INPUT 2, INPUT 3, INPUT 4 or INPUT 5 on the remote control to the standard image, press UNDO while "RESIZE" is displayed on the screen. When a signal that the...
... • When no signal is received, "NO SIGNAL" will be displayed. Using the Operation Buttons Selecting the Input Signal Source Press INPUT on the projector, INPUT 1, INPUT 2, INPUT 3, INPUT 4 or INPUT 5 on the remote control to the standard image, press UNDO while "RESIZE" is displayed on the screen. When a signal that the...
XVZ9000U Operation Manual
Page 26
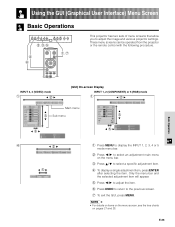
These menu screens can be operated from the projector or the remote control with the following procedure. E-26 Using the GUI (Graphical User Interface) Menu Screen Basic Operations 2,3,5 4 6 1,7 This projector has two sets of menu screens that allow you to the previous screen. 7 To... the menu bar and the selected adjustment item will appear. 5 Press / to adjust the item. 6 Press UNDO to return to adjust the image and various projector settings. Basic Operation INPUT 3, 4 (VIDEO) mode 1 2 (GUI) On-screen Display INPUT 1, 2 (COMPONENT) or 5 (RGB) mode 1 2 Main menu 3 Sub menu ...
These menu screens can be operated from the projector or the remote control with the following procedure. E-26 Using the GUI (Graphical User Interface) Menu Screen Basic Operations 2,3,5 4 6 1,7 This projector has two sets of menu screens that allow you to the previous screen. 7 To... the menu bar and the selected adjustment item will appear. 5 Press / to adjust the item. 6 Press UNDO to return to adjust the image and various projector settings. Basic Operation INPUT 3, 4 (VIDEO) mode 1 2 (GUI) On-screen Display INPUT 1, 2 (COMPONENT) or 5 (RGB) mode 1 2 Main menu 3 Sub menu ...

XVZ9000U Operation Manual
Page 30
... function can be used to adjust the color temperature to suit the type of image input to the projector (DVD, video, computer image, TV broadcast, etc.). Adjusting the Color Temperature with the Remote Control 1 Press CLR TEMP (-/+) on the table below. •" " disappears after four-seconds of... the button operations are shown on the remote control. Adjusting the Color Temperature using the CLR TEMP buttons on the remote control, as well as the GUI menu screen. GUI operation guide is displayed. 2 Press CLR TEMP (-/+) ...
... function can be used to adjust the color temperature to suit the type of image input to the projector (DVD, video, computer image, TV broadcast, etc.). Adjusting the Color Temperature with the Remote Control 1 Press CLR TEMP (-/+) on the table below. •" " disappears after four-seconds of... the button operations are shown on the remote control. Adjusting the Color Temperature using the CLR TEMP buttons on the remote control, as well as the GUI menu screen. GUI operation guide is displayed. 2 Press CLR TEMP (-/+) ...

XVZ9000U Operation Manual
Page 32
.... 2 Press / to select "Fine Sync". 3 Press / to select a specific adjustment item. 4 Press / to move the mark of the selected adjustment item to tracking on the remote control. Description of Adjustment Items Selected item Clock Phase H-Pos V-Pos Reset Description Adjusts vertical noise. All computer image adjustment items are very detailed (tiling...
.... 2 Press / to select "Fine Sync". 3 Press / to select a specific adjustment item. 4 Press / to move the mark of the selected adjustment item to tracking on the remote control. Description of Adjustment Items Selected item Clock Phase H-Pos V-Pos Reset Description Adjusts vertical noise. All computer image adjustment items are very detailed (tiling...

XVZ9000U Operation Manual
Page 35
...a computer or the input selection is changed. • The Auto Sync adjustment setting previously made each time the projector is not automatically performed. • Press AUTO SYNC to the projector. During Auto Sync adjustment, the On-screen Display changes as the "High Speed" setting. • Adjustment using... • Used to automatically adjust a computer image. • Auto Sync adjustment can be made manually by pressing the AUTO SYNC button on the remote control, or automatically by setting "Auto Sync" to select "Normal" or "High Speed". 5 To exit the GUI, press MENU. • ...
...a computer or the input selection is changed. • The Auto Sync adjustment setting previously made each time the projector is not automatically performed. • Press AUTO SYNC to the projector. During Auto Sync adjustment, the On-screen Display changes as the "High Speed" setting. • Adjustment using... • Used to automatically adjust a computer image. • Auto Sync adjustment can be made manually by pressing the AUTO SYNC button on the remote control, or automatically by setting "Auto Sync" to select "Normal" or "High Speed". 5 To exit the GUI, press MENU. • ...

XVZ9000U Operation Manual
Page 38
... temperature rises enough to activate the cooling function. " " disappears after four-seconds of projected light. Operating the Theater Mode Function with the Remote Control 1 Press THEATER MODE on the remote control, as well as a toggle switch for controlling the quantity of no-operation. 2,3,4 1,5 • "Theater Mode" is factory preset to "BRIGHT" . •... displayed. Theater Mode Functions 1 On-screen Display Function as the GUI menu screen. This function can be operated using the THEATER MODE button on the remote control.
... temperature rises enough to activate the cooling function. " " disappears after four-seconds of projected light. Operating the Theater Mode Function with the Remote Control 1 Press THEATER MODE on the remote control, as well as a toggle switch for controlling the quantity of no-operation. 2,3,4 1,5 • "Theater Mode" is factory preset to "BRIGHT" . •... displayed. Theater Mode Functions 1 On-screen Display Function as the GUI menu screen. This function can be operated using the THEATER MODE button on the remote control.

XVZ9000U Operation Manual
Page 50
...; Noise may appear when used with certain computers. only) If you encounter any problems during setup or operation of the projector. (See pages 13-15.) • Remote control batteries have run down. (See page 11.) • "Contrast" and "Brightness" adjustments are set to minimum position...short to the "Troubleshooting" section on INPUT 1, 2 RGB. • Change the input signal type. (See page 31.) For SHARP Assistance (U.S.A. If this projector, first refer to allow for further assistance. This will not affect operation or performance. Or, send us an e-mail at lcdsupport@...
...; Noise may appear when used with certain computers. only) If you encounter any problems during setup or operation of the projector. (See pages 13-15.) • Remote control batteries have run down. (See page 11.) • "Contrast" and "Brightness" adjustments are set to minimum position...short to the "Troubleshooting" section on INPUT 1, 2 RGB. • Change the input signal type. (See page 31.) For SHARP Assistance (U.S.A. If this projector, first refer to allow for further assistance. This will not affect operation or performance. Or, send us an e-mail at lcdsupport@...

XVZ9000U Operation Manual
Page 55
Sharp remote control signal format Transmission format: 15-bit format D D D D D D D D D D D D D 67.5 ms 67.5 ms Wave form of wired remote control... 1 1 10 0 1 1 0 ƒ 1 0 1 1 01 0 1 1 10 0 1 1 0 ß 1 0 1 1 00 0 0 0 10 1 0 1 0 © 1 0 1 1 01 1 1 1 00 1 0 1 0 ENTER 1 0 1 1 01 1 1 0 10 1 0 1 0 UNDO 1 0 1 1 01 0 0 1 10 1 0 1 0 THEATER MODE 1 0 1 1 0 1 0 0 1 1 0 0 0 1 0 Wired remote control function code LSB C1 System Code C5 C6 1 0 1 1 0 * * Data Code * * * * MSB C13 C14 C15 * * 1 0 CONTROL ITEM RESIZE GAMMA CLR TEMP + CLR TEMP - Wired...
Sharp remote control signal format Transmission format: 15-bit format D D D D D D D D D D D D D 67.5 ms 67.5 ms Wave form of wired remote control... 1 1 10 0 1 1 0 ƒ 1 0 1 1 01 0 1 1 10 0 1 1 0 ß 1 0 1 1 00 0 0 0 10 1 0 1 0 © 1 0 1 1 01 1 1 1 00 1 0 1 0 ENTER 1 0 1 1 01 1 1 0 10 1 0 1 0 UNDO 1 0 1 1 01 0 0 1 10 1 0 1 0 THEATER MODE 1 0 1 1 0 1 0 0 1 1 0 0 0 1 0 Wired remote control function code LSB C1 System Code C5 C6 1 0 1 1 0 * * Data Code * * * * MSB C13 C14 C15 * * 1 0 CONTROL ITEM RESIZE GAMMA CLR TEMP + CLR TEMP - Wired...
XVZ9000U Operation Manual
Page 58
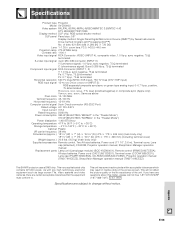
... module) (BQC-XVZ9000/1), Remote control (RRMCG1657CESA), AA size batteries, Power cord (CACCU5013DE01), Terminal cover (CCOVA1985CE01), Lens cap (PCAPH1056CESA), CD-ROM (UDSKA0047CEN1), Projector operation manual (TINS-7416CEZZ), SharpVision Manager operation manual (TINS-7418CEZZ) This SHARP projector uses a DMD chip. ... call toll free 1-877-DTV-SHARP (1-877-388-7427). ONLY Specifications are certain acceptable tolerances that the equipment must conform to change without notice. Appendix E-58 Specifications Product type Projector Model XV-Z9000U Video system PAL/PAL 60/PAL...
... module) (BQC-XVZ9000/1), Remote control (RRMCG1657CESA), AA size batteries, Power cord (CACCU5013DE01), Terminal cover (CCOVA1985CE01), Lens cap (PCAPH1056CESA), CD-ROM (UDSKA0047CEN1), Projector operation manual (TINS-7416CEZZ), SharpVision Manager operation manual (TINS-7418CEZZ) This SHARP projector uses a DMD chip. ... call toll free 1-877-DTV-SHARP (1-877-388-7427). ONLY Specifications are certain acceptable tolerances that the equipment must conform to change without notice. Appendix E-58 Specifications Product type Projector Model XV-Z9000U Video system PAL/PAL 60/PAL...

XVZ9000U Operation Manual
Page 60
... On-screen display Language 43 P Phase 32 POWER buttons 17 Power cord 13 POWER indicator 45 Progressive Mode 31 R Rear projection 22 Remote control 11 Remote control sensor 16 Remote control signal transmitter 11 RESIZE button 23 RS-232C Off Function 41 RS-232C port 51 S Save Setting 33 Select Setting 33 SIDE... 51 T TEMPERATURE WARNING indicator 45 THEATER MODE button 38 Transmission Speed (RS-232C 42 U UNDO button 26 V VIDEO INPUT terminal 13 Video System 37 W Wired remote control input jack 16 Z Zoom knob 17 No. 3D DNR (3D Digital Noise Reduction 36 Appendix E-60
... On-screen display Language 43 P Phase 32 POWER buttons 17 Power cord 13 POWER indicator 45 Progressive Mode 31 R Rear projection 22 Remote control 11 Remote control sensor 16 Remote control signal transmitter 11 RESIZE button 23 RS-232C Off Function 41 RS-232C port 51 S Save Setting 33 Select Setting 33 SIDE... 51 T TEMPERATURE WARNING indicator 45 THEATER MODE button 38 Transmission Speed (RS-232C 42 U UNDO button 26 V VIDEO INPUT terminal 13 Video System 37 W Wired remote control input jack 16 Z Zoom knob 17 No. 3D DNR (3D Digital Noise Reduction 36 Appendix E-60

XVZ9000U Operation Manual
Page 2
... THE SCREW, DISCONNECT POWER CORD. REPLACE WITH SAME SHARP LAMP UNIT TYPE BQC-XVZ9000/ 1 ONLY. NE REMPLACER QUE PAR UNE LAMPE SHARP DE TYPE BQC-XVZ9000/ 1. E-2 ONLY Declaration of Conformity SHARP PROJECTOR, MODEL XV-Z9000U This device complies with the operation manual, may cause...SHARP ELECTRONICS CORPORATION Sharp Plaza, Mahwah, New Jersey 07430 TEL: 1-800-BE-SHARP (1-800-237-4277) U.S.A. DEBRANCHER LE CORDON D'ALIMENTATION AVANT DE RETIRER LES VIS. Caution Concerning the Lamp Replacement There is turned off always use the OFF button on the projector or on the remote...
... THE SCREW, DISCONNECT POWER CORD. REPLACE WITH SAME SHARP LAMP UNIT TYPE BQC-XVZ9000/ 1 ONLY. NE REMPLACER QUE PAR UNE LAMPE SHARP DE TYPE BQC-XVZ9000/ 1. E-2 ONLY Declaration of Conformity SHARP PROJECTOR, MODEL XV-Z9000U This device complies with the operation manual, may cause...SHARP ELECTRONICS CORPORATION Sharp Plaza, Mahwah, New Jersey 07430 TEL: 1-800-BE-SHARP (1-800-237-4277) U.S.A. DEBRANCHER LE CORDON D'ALIMENTATION AVANT DE RETIRER LES VIS. Caution Concerning the Lamp Replacement There is turned off always use the OFF button on the projector or on the remote...
XVZ9000U Operation Manual
Page 8
... Gamma Correction Function 25 Basic Operation Connecting Pin Assignments 51 (RS-232C) Specifications and Command Settings 52 Wired Remote Control Terminal Specifications 55 Computer Compatibility Chart 56 Dimensions 57 Specifications 58 Glossary 59 Index 60 Using the GUI...13 Connecting to a DVD Player and DTV Decoder 14 Connecting to a Computer 15 Operating the Remote Control 16 Using as a Wired Remote Control 16 Power ON/OFF 17 Zooming and Focusing 17 Setting Up the Screen 18 Using ... Air Filters 49 Using the Kensington Lock 49 Troubleshooting 50 For SHARP Assistance (U.S.A.
... Gamma Correction Function 25 Basic Operation Connecting Pin Assignments 51 (RS-232C) Specifications and Command Settings 52 Wired Remote Control Terminal Specifications 55 Computer Compatibility Chart 56 Dimensions 57 Specifications 58 Glossary 59 Index 60 Using the GUI...13 Connecting to a DVD Player and DTV Decoder 14 Connecting to a Computer 15 Operating the Remote Control 16 Using as a Wired Remote Control 16 Power ON/OFF 17 Zooming and Focusing 17 Setting Up the Screen 18 Using ... Air Filters 49 Using the Kensington Lock 49 Troubleshooting 50 For SHARP Assistance (U.S.A.

XVZ9000U Operation Manual
Page 9
Projector Front and Top View Lens shift dial 18 Zoom knob 17 Focus ring 17 Adjuster 18 16 Remote control sensor 12 Lens cap 45 TEMPERATURE WARNING indicator 45 LAMP REPLACEMENT indicator 45 POWER indicator 4 Intake ventilative hole 18 Adjuster ADJUSTMENT buttons 26 ENTER button 26 UNDO button 26 26 MENU button 23 RESIZE button 23 INPUT button 17 POWER buttons (ON/OFF) Side and Rear View E-9 Important Information Part Names Numbers next to the part names refer to the main pages in this manual where the topic is explained.
Projector Front and Top View Lens shift dial 18 Zoom knob 17 Focus ring 17 Adjuster 18 16 Remote control sensor 12 Lens cap 45 TEMPERATURE WARNING indicator 45 LAMP REPLACEMENT indicator 45 POWER indicator 4 Intake ventilative hole 18 Adjuster ADJUSTMENT buttons 26 ENTER button 26 UNDO button 26 26 MENU button 23 RESIZE button 23 INPUT button 17 POWER buttons (ON/OFF) Side and Rear View E-9 Important Information Part Names Numbers next to the part names refer to the main pages in this manual where the topic is explained.


