XR-55S | XR-55X Operation Manual
Page 8
... 13 Inserting the Batteries 15 Usable Range 15 Easy Start Easy Start 16 Setup and Projection 16 Setup Setting Up the Projector 18 Setting Up the Projector 18 Standard Setup (Front Projection 18 Screen Size and Projection Distance ...... 19 Projection (PRJ) Mode 20 Ceiling-Mount Setup...Resize Mode 30 Useful Features Operating with the Remote Control......32 Displaying and Setting the Break Timer 32 Displaying the Pointer 32 Using the Spot Function 32 Switching the Eco+Quiet Mode 32 Auto Sync (Auto Sync Adjustment) ......... 33 Freezing a Moving Image 33 Selecting the Picture...
... 13 Inserting the Batteries 15 Usable Range 15 Easy Start Easy Start 16 Setup and Projection 16 Setup Setting Up the Projector 18 Setting Up the Projector 18 Standard Setup (Front Projection 18 Screen Size and Projection Distance ...... 19 Projection (PRJ) Mode 20 Ceiling-Mount Setup...Resize Mode 30 Useful Features Operating with the Remote Control......32 Displaying and Setting the Break Timer 32 Displaying the Pointer 32 Using the Spot Function 32 Switching the Eco+Quiet Mode 32 Auto Sync (Auto Sync Adjustment) ......... 33 Freezing a Moving Image 33 Selecting the Picture...
XR-55S | XR-55X Operation Manual
Page 18
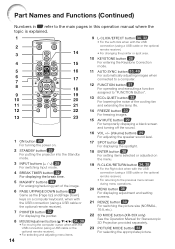
... 21 12 22 13 23 1 ON button 25 For turning the power on. 2 STANDBY button 25 For putting the projector into the Standby mode. 3 INPUT buttons ( / ) 29 For switching Input mode. 4 BREAK TIMER button 32 For... connection (using a USB cable or the optional remote receiver). • For changing the pointer or spot area. 10 KEYSTONE button 28 For entering the Keystone Correction mode. 11 AUTO SYNC button 33, 49... switching the picture size (NORMAL, 16:9, etc.). 22 3D MODE button (XR-55X only) See the Operation Manual for Stereoscopic 3D Projection provided separately. 23 PICTURE MODE button ...
... 21 12 22 13 23 1 ON button 25 For turning the power on. 2 STANDBY button 25 For putting the projector into the Standby mode. 3 INPUT buttons ( / ) 29 For switching Input mode. 4 BREAK TIMER button 32 For... connection (using a USB cable or the optional remote receiver). • For changing the pointer or spot area. 10 KEYSTONE button 28 For entering the Keystone Correction mode. 11 AUTO SYNC button 33, 49... switching the picture size (NORMAL, 16:9, etc.). 22 3D MODE button (XR-55X only) See the Operation Manual for Stereoscopic 3D Projection provided separately. 23 PICTURE MODE button ...
XR-55S | XR-55X Operation Manual
Page 36
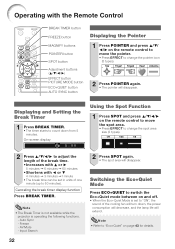
...- Note • The Break Timer is not available while the projector is set in units of one minute (up to 60 minutes). Auto Sync - Input Search 32 2 Press SPOT again. • The spot area will disappear. Canceling the break timer display function Press BREAK ...5 minutes ➞ 6 minutes ➞ 60 minutes • Shortens with the Remote Control BREAK TIMER button FREEZE button MAGNIFY buttons POINTER button SPOT button Adjustment buttons (P/R/O/Q) EFFECT button PICTURE MODE button ECO+QUIET button AUTO SYNC button Displaying the Pointer 1 Press POINTER and press P/R/ O/Q on...
...- Note • The Break Timer is not available while the projector is set in units of one minute (up to 60 minutes). Auto Sync - Input Search 32 2 Press SPOT again. • The spot area will disappear. Canceling the break timer display function Press BREAK ...5 minutes ➞ 6 minutes ➞ 60 minutes • Shortens with the Remote Control BREAK TIMER button FREEZE button MAGNIFY buttons POINTER button SPOT button Adjustment buttons (P/R/O/Q) EFFECT button PICTURE MODE button ECO+QUIET button AUTO SYNC button Displaying the Pointer 1 Press POINTER and press P/R/ O/Q on...


